
Results 1 to 15 of 15
Thread: How to install gauges - Write up
-
09-05-2009, 03:32 PM #1Veteran


- Join Date
- Nov 2005
- Location
- Florida
- Posts
- 10,467
Black- 1999 TA WS.6
How To : Install gauges in a Fbody - Write up
Well, I just finished my guage install's and the re-wire of my existing guages, electric cutout, and wideband o2 sensor. Im making this thread to hopefully help someone that is looking for some part numbers, and a little guideance if they have not done alot of wiring. This is JUST MY WAY, there are many ways of wiring, I chose this one because I thought it would look clean... and more importantly be very stable and safe. Lets start this off.
*All pictures are thumbnails, click to enlarge*
Thing you will want to have before hand, IF you do things like I did
1. Basic hand tools
2. A GOOD wire stripper/crimper. Buy a good one (Matco, snap on)
3. A roll of electrical tape. AND LIQUID electrical tape. The actual tape is good for keeping wire loom together. Thats it IMO
4. Paint for your new 3 gauges pod/pillar. You can leave it black also, up to you. ( Will get you the part number I used, its not exact, but its close)
5. 3M tape. (If your going to do what I did with the cubby hole)
6. AN to NPT (National Pipe Thread) fittings for fuel rail. I will post part numbers for you, as I bought many wrong ones
7. Oil filter samwich/adapter for Oil pressure/Oil temp.
8. Power Plate, Universal. (This will add 6 additional fuse locations)
9. 32mm Water Temp attachment. (this allows another location for water temp sender)
10. Soldering gun, solder, and tip cleaning tray
11. 10 ft of wire loom
12. Lots of zip ties in different lengths
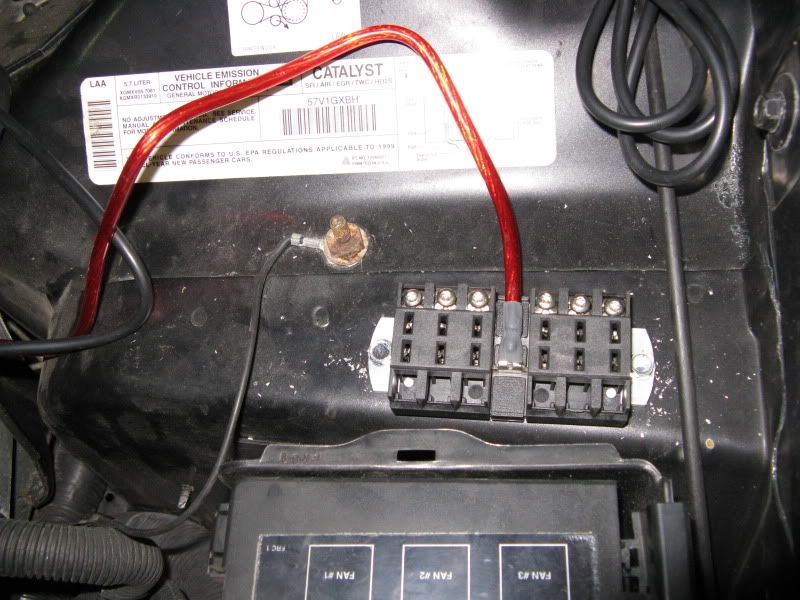
Thats good for now. Lets start off with my thoughts on tapping into existing Pink (power) wires. IMO, thats the wrong way of doing it, that circuit was designed to handle the current it has from the factory. My solution was to buy this http://www.electricalconnection.com/...on/pp-univ.JPG (part number 02202). This comes with a 30 amp in line fuse, a relay, and 6 slots for normal ATC blade type fuses. Relays are a nice thing to have Use a small amount of current to control a larger amount. This also insures that your guages will not kill your battery when key off/engine off. Here is where I mounted it,
 .
.
It really easy to wire up, I used the post by the fuse box under the hood. Heres where I mounted my Relay, and power plate (fuse panel)

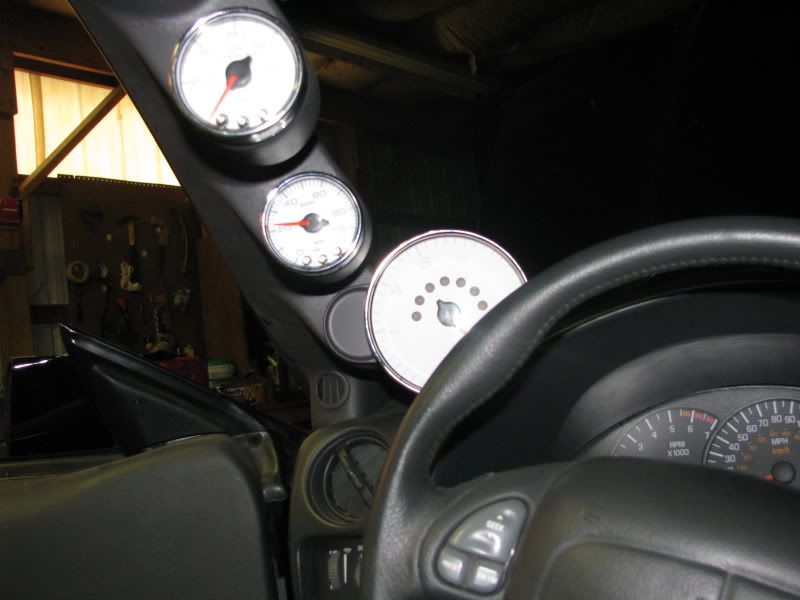
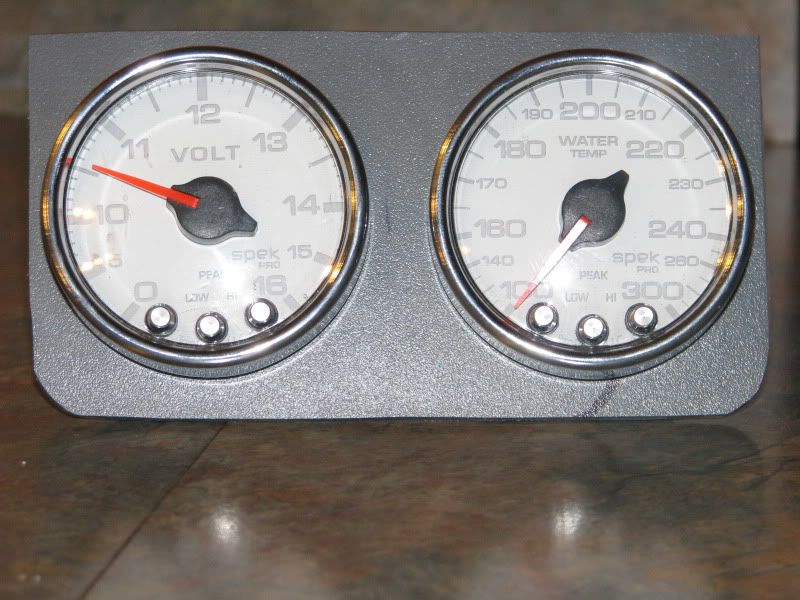
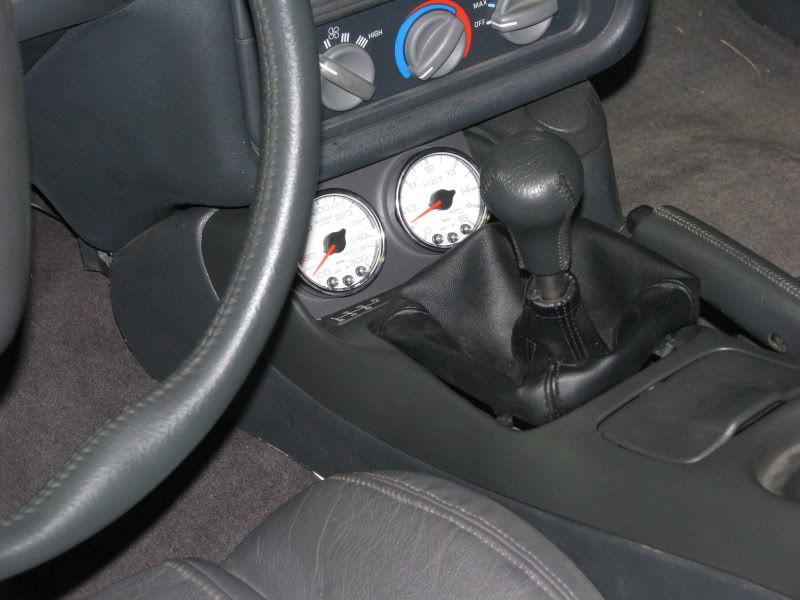
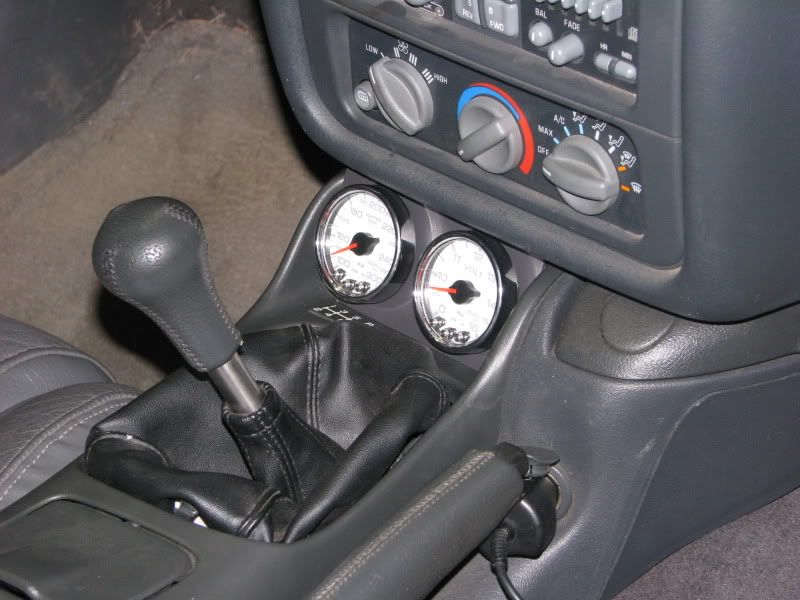
Voltmeter - easy to wire up. You need power, ground, dimmer switch, and power into the guage for reading. I hooked it right to the battery. I had and still have limited places to install my guages. So, I made a plastic panel to mount where the cubby hole is by the cigerette lighter. You can buy these, or make your own. I really like how it looks, and I made it for free... just alittle time invested.
 .
.
I might be making a few more of these, if people want them. Installed -

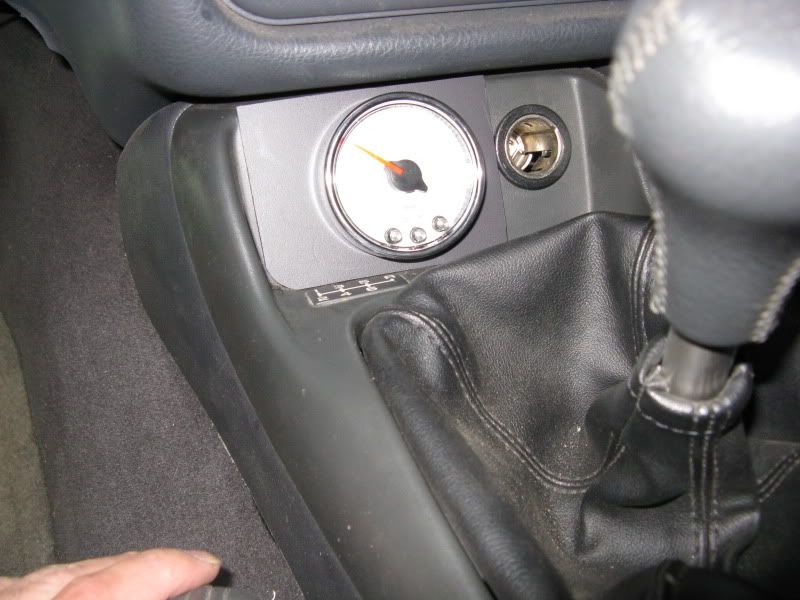
I attached this plastic plate I made with 1/4" wide 3M tape. Worked very nice, its not going anywhere.

Fuel pressure - Very nice gauge to have. You need to adapt from -4 AN fitting to a 1/8 female NPT for the sender. This is how I did mine. Part numbers are, EAR-916104ERL (-4AN to 1/8" Male NPT) and EAR-991001ERL (female 1/8" NPT to female 1/8" NPT)(Bought from Summit). Heres my setup.
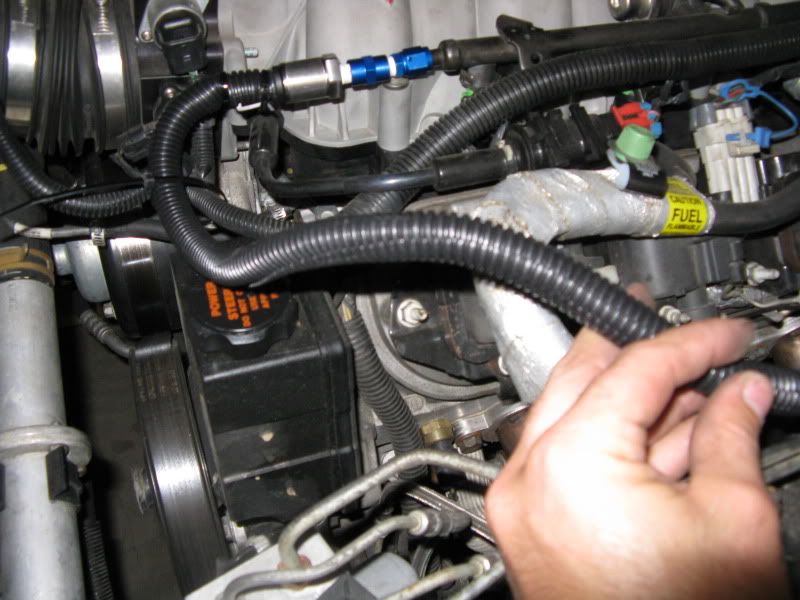 . You need to put thread tape, or even better... Liquid Pipe Tape on all the NPT fittings to prevent fuel leaks. NPT threads have an ever increasing torque by design. Get them good and tight.

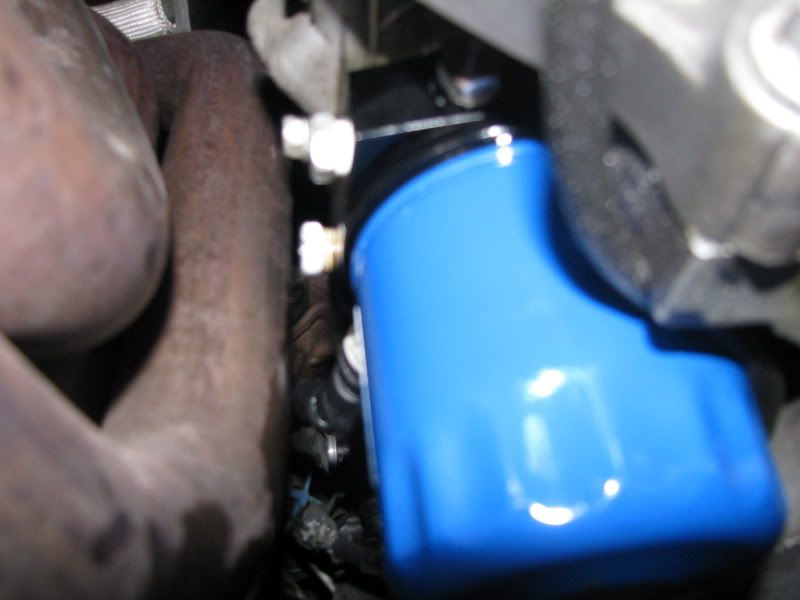
Oil Pressure - There are some different ways to go about getting a sender hooked up. I want to keep all my factory guages operating. You can pull the intake and use the existing OPSU location, but you'll loose you factory guage. I bought a Oil Filter "Samwich" adapter. Just take your old filter off, screw this on and install a new oil filter. It has four (4) 1/8" NPT female ports. If you ever wanted to add a Oil Temperature Guage later, this would make it a breeze.
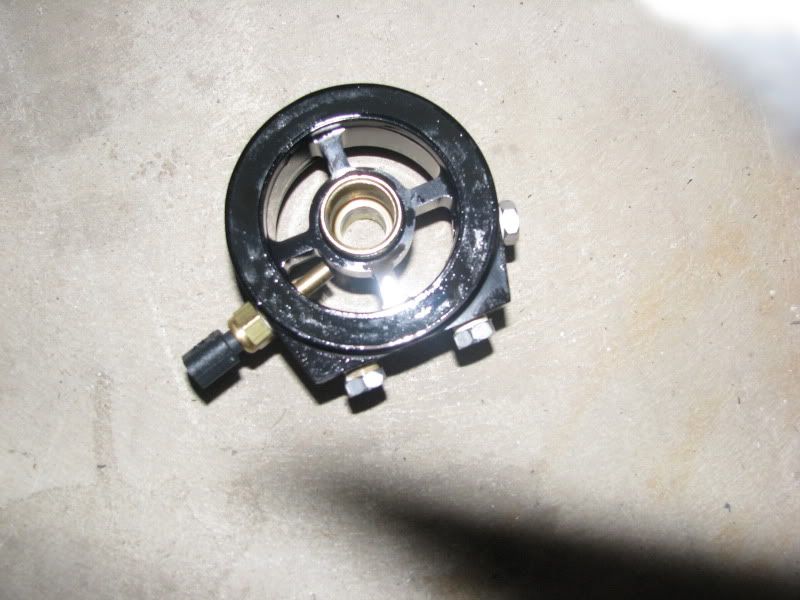
I bought mine from this company, Oil Filter Sandwich Adapters ( Part Number for Fbody's is GS-AF4) You can run your sender wiring down past your steering shaft, and right to your oil filter location. There is existing wiring to zip tie to, its a must with aftermarket headers or you will burn up your sender wiring. Here is the sandwich adapter installed with a nice new PF46 filter.
You have to be carefull where you run your wiring, I can post pictures of where I ran mine, but Im sure you can figure it out.
Water Temp - You have a few choices here. The factory Water Temp gauge sender is on the drivers side head, up front towards the radiator. There is the same port on the passenger side head, by the #8 spark plug. Very hard to get to. You can also put it in the drain directly in the block. That is located on the drivers side, in the back by the firewall. I wanted to keep the factory gauge, didnt want to dig around by the #8 spark plug, and didnt want to take a coolant bath to drain the block. I bought this, Water Temperature Sender Attachments ( Part number for Fbody is GS- AW32. I can not vouch for that number 100% as I did not install mine due to not having a guage location at the moment
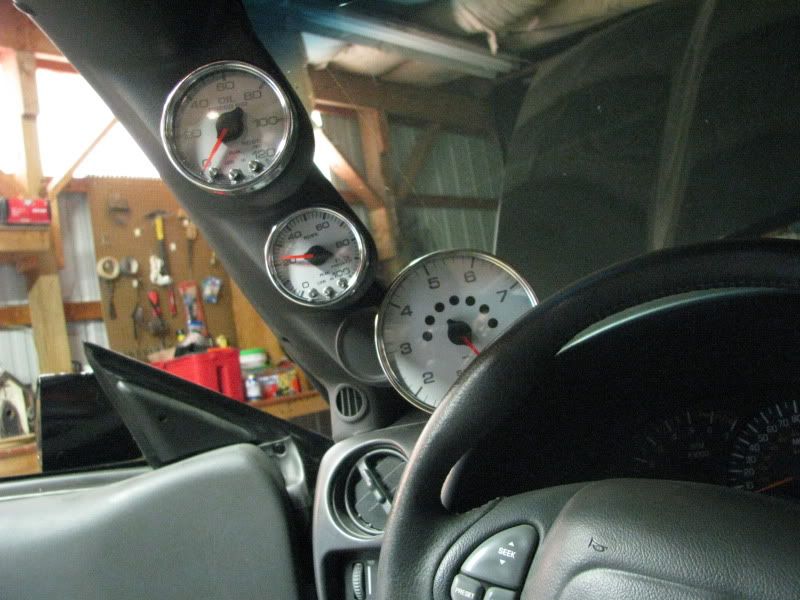
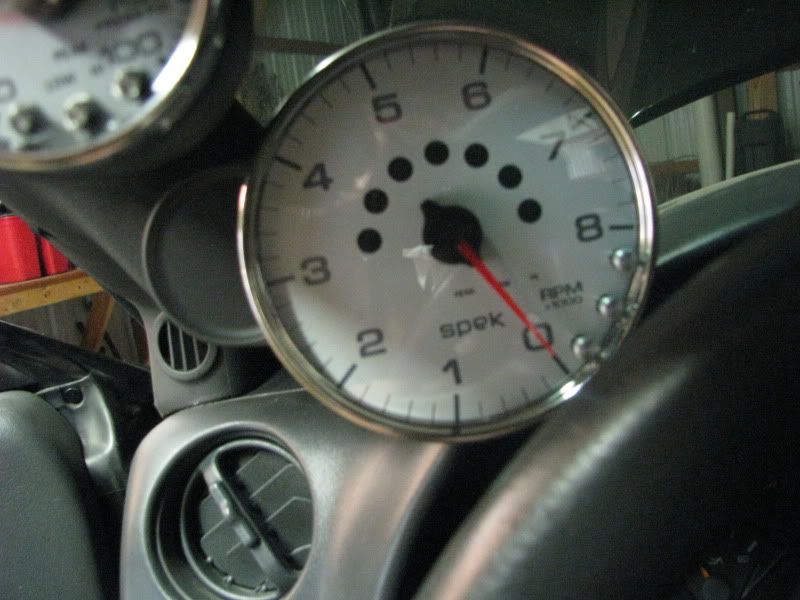
5" Tach - I bought this strictly for the track. Its pretty easy to install. Most will have a green wire that needs to be T'd into the Tach signal wire coming out of the PCM. Its the RED connector, Pin number 10 and its a white wire. Solder is your friend here. Scotch Locks might work for awhile, but by design they are not reliable IMO. I just used a razor, and stripped about 1/2" length. Then wrap your green signal wire around it, and solder it good. Liquid Electrical tape is your friend here. Great stuff.
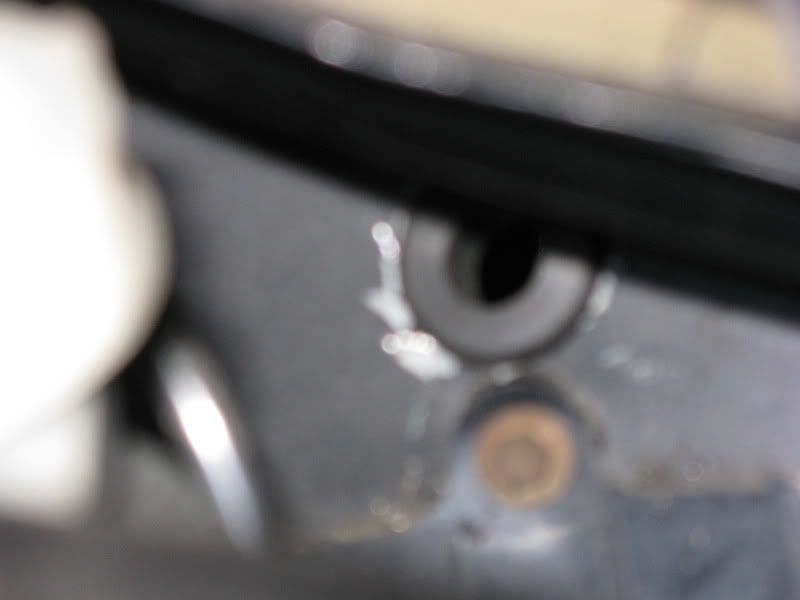
Now, I cut a hole in my firewall to run all my wires through. Where I went its pretty thick. I couldnt find a rubber grommet thats was wide enough and that I felt comfortable with its not falling out. I had some wide, big hose laying around. I ended up sticking that in there and running all my wires through it. It works great, better then any grommet would have. Probably about 4-5" worth. Here is a picture when I still had a grommet in there, its up in the corner of the firewall.
 .
.
As for running the wiring up to the 3 gauge A pillar Pod, I ran al my wires up through this location.

You can see that hose poking out at the bottom, I left it poking out for pictures. Its tight back there, and I wanted something around that wiring going straight up. Having shorts in your wiring later on is not fun.
Grounding all these guages is easy. Sure you could find a bolt and hook them all up. When I did my WB 02 sensor a while ago, I wanted to make a collection of grounds... In car. This is what I came up with. Its really nice to have a designated place for grounds. The 10 guage GREEN wire attached is going straight to the negative battery post for a known good ground.
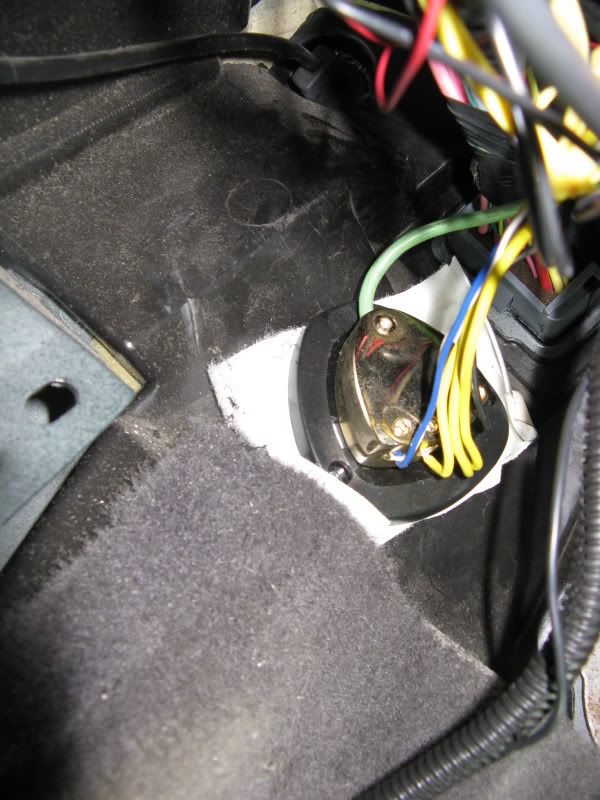

I have everything in my car that I added, grounded right there. I attached that with double sided Velcro. Seems to be doing the job. I dont have a part number for this as I found it at a
You want all these new guages, electric cutout, and anything you add to be FUSED for saftey. Thats where the power block comes in handy. Fused, wit ha relay.
Here are the guages I installed.
ProParts - Gauge Controllers, Mounting Pods
ProParts - Gauge Controllers, Mounting Pods
ProParts - Gauge Controllers, Mounting Pods
ProParts - Gauge Controllers, Mounting Pods
ProParts - Gauge Controllers, Mounting Pods
Heres some pictures of the install all done(pretty much).


I think over all, the install went good and looks pretty clean. Again, this is just my way of wiring. There might be a better way of doing things. Hope this helps somebody. I know I searched for days for some of these part numbers, ordered wrong fitting's etc. Good luck.
Last edited by Cutlass; 10-24-2011 at 06:13 PM. Reason: Cleaned up pic spacing to make it easier to read
-
09-07-2009, 02:21 PM #2COTM July '09
- Join Date
- Jun 2008
- Location
- Annapolis, MD
- Posts
- 1,111
BLK/BLK w/CGM Stripes- 2010 Camaro 2SS/M6
good work and nice writeup!
-
09-07-2009, 04:23 PM #3Veteran


- Join Date
- Aug 2005
- Location
- ohio
- Posts
- 22,554
98 Formula- 06 duramax
I put this in the tech stickies....good job.
-
09-08-2009, 12:24 AM #4Veteran
- Join Date
- Nov 2005
- Location
- Florida
- Posts
- 10,467
Black- 1999 TA WS.6
Alright, after pondering with a buddy on how to squeeze that water temp guage in I think I found my spot. I would like some opinions on it. I made that pastic plate for the voltmeter as seen above. What I want to do it remove/relocate the cigerette lighter and place the water temp guage there. Having two guages right there would look very nice in my opinion. The only thing that is stoping me from attempting to make that plate is cutting up my dash. Anyone think its a bad idea to do that? It would just be the plastic around the cigerette lighter. I would make another one but with two 2 1/16 guage hole in it and attach similarly. Thoughts?
370 CI - Twin 6766 Turbo - Jakes stage 5 4L80E - MWC 9" - Holley Dominator
Build in progress...
-
09-09-2009, 12:16 PM #5Bone it like you own it

- Join Date
- Sep 2005
- Location
- TEXAS... U mad?
- Posts
- 6,158
Black / Stryker Blue- 2K WS.6/ 2K9 G8GT


I did it in my 99 Z28.... Looked great. (had trans temp (was stalled) and Oil temp)
If you are weary of the cutting, buy another console top first.
-
09-09-2009, 06:24 PM #6Veteran
- Join Date
- Nov 2005
- Location
- Florida
- Posts
- 10,467
Black- 1999 TA WS.6
Thats what im figuring. Ill just keep my eyes open for a console-6 speed. If I ever wanted to change. Cars is never going to be sold, It will be done, but probably this winter honestly. Originally Posted by FORD RECOVERY EXPERT

-
09-09-2009, 08:02 PM #7Bone it like you own it
- Join Date
- Sep 2005
- Location
- TEXAS... U mad?
- Posts
- 6,158
Black / Stryker Blue- 2K WS.6/ 2K9 G8GT
 Consider mine open for you as well.
-
09-10-2009, 09:22 PM #8cutting and welding

- Join Date
- Mar 2008
- Location
- mercersburg pa
- Posts
- 6,443
hugger orange- 2004
if you go to the auto parts store you can pick up a 12v outlet with a nice little boot cover and reloate it down by the seat beside your shifter (that gives you power for the laptop and pgone charger) Originally Posted by Hi-Po
any one know what type/size threads the water temp hole is on the head? I'm going to use it since its easy to get to on the goat.
for oil pressure I used the hole behind the intake with a double male, into a 90°, then a T so the stock oil (switch) is still hooked up
-
09-10-2009, 09:33 PM #9Veteran
- Join Date
- Nov 2005
- Location
- Florida
- Posts
- 10,467
Black- 1999 TA WS.6
On a goat, I dont know off hand. Im willing to bet its a metric thread. I searched for days for part numbers on these adaptors. I dont get why people dont post what PN adaptors thes use to install these things. I must have looked at 30 threads with useless babble. Might try searching Mark, but I doubt youll find any actual part numbers. You could always buy what I did, Im still going to use it. Be easier then the alternative for me I think. Originally Posted by mark21742
-
09-10-2009, 10:08 PM #10cutting and welding
- Join Date
- Mar 2008
- Location
- mercersburg pa
- Posts
- 6,443
hugger orange- 2004
lol for the oil port itself I couldn't tell you, I had a box of fittings and just happened to find one that fit perfect. one end fit the port and the other end (3/8 FPT) fit the T.
-
09-27-2009, 12:06 PM #11Veteran
- Join Date
- Nov 2005
- Location
- Florida
- Posts
- 10,467
Black- 1999 TA WS.6
I ended up making this about a week ago. I think it turned out really nice. It took me two times to perfect it, but I like it.
This is before painting.

-
01-27-2010, 01:23 PM #12515 HP TrickFlow Package

- Join Date
- Feb 2008
- Location
- Palm Beach, FL
- Age
- 46
- Posts
- 1,702
440 RWHP / 410 TQ- 2000 SLP CAMARO SS
Damn nice job Hi-Po! Lookin real good!
2000 SLP Camaro SS M6 * 515 HP TrickFlow Package * FAST 92 MM Intake * Nick Williams 92 MM TB * Volant CAI * Granatelli MAF * Full Custom True Dual Exhaust with X-Pipe * Tuned by Breathless Performance
-
11-07-2010, 10:51 AM #13Veteran

- Join Date
- Jun 2008
- Location
- van down by the river
- Posts
- 1,935
i may have missed it....Ron where did you get the pillar pod??
and what paint did you use?
-
11-07-2010, 11:17 AM #14Veteran
- Join Date
- Nov 2005
- Location
- Florida
- Posts
- 10,467
Black- 1999 TA WS.6
I bought my pillar off the same guy who had all these Spec guages. It was a guy on Tech.
There used to be a company that made the entire pillar with the pods in them for a seamless fit. I can not find the company anymore, i've searched high and low.
The paint was a duplicolor brand. Im a long ways from home and my car, and dont remember off hand. Take your pillar to a good paint store, and match it up. Sorry I couldnt help more.
-
11-07-2010, 12:05 PM #15Veteran
- Join Date
- Jun 2008
- Location
- van down by the river
- Posts
- 1,935
no problem Ron...ill with the autometer and match up the color Originally Posted by Hi-Po

 Reply With Quote
Thread Information
Users Browsing this Thread
There are currently 1 users browsing this thread. (0 members and 1 guests)
Similar Threads
-
Permanent Wideband Install Write Up, Lots of Pictures
By Jloosh in forum Computer & TuningReplies: 7Last Post: 03-18-2014, 10:58 AM -
Motor Mount install Write up
By Justin93 in forum External EngineReplies: 3Last Post: 01-24-2009, 08:08 PM -
write up on pacesetters install?
By GottaHaveLS1 in forum External EngineReplies: 1Last Post: 07-15-2007, 07:42 PM -
Clutch install write up
By JonB in forum Manual TransmissionReplies: 3Last Post: 06-28-2007, 12:39 PM -
need a write-up on TC install
By Wheeler99WS6 in forum Automatic TransmissionReplies: 10Last Post: 02-18-2007, 04:00 AM

Bookmarks