

Results 21 to 40 of 114
Thread: K-member swap and upgrades
-
02-20-2012, 05:15 PM #21Veteran


- Join Date
- Feb 2009
- Location
- Mansfield, PA
- Posts
- 22,146
Black & Blue- '02 WS.6 / '07 Suburban
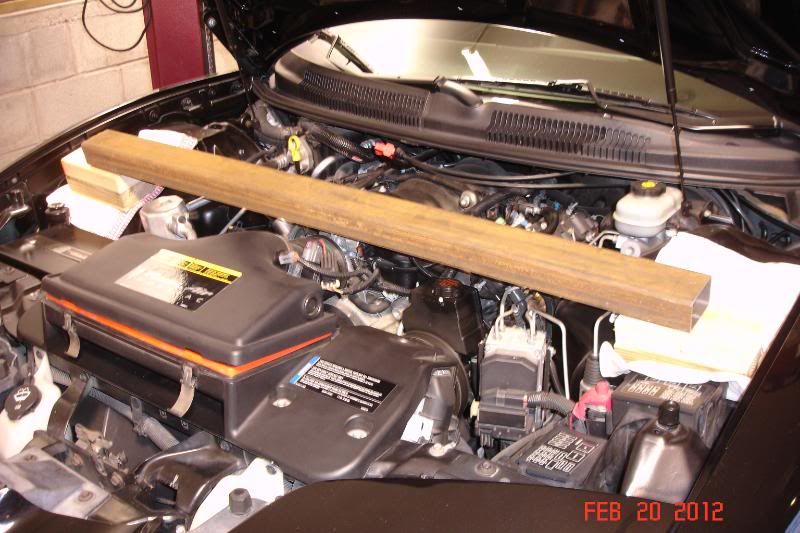
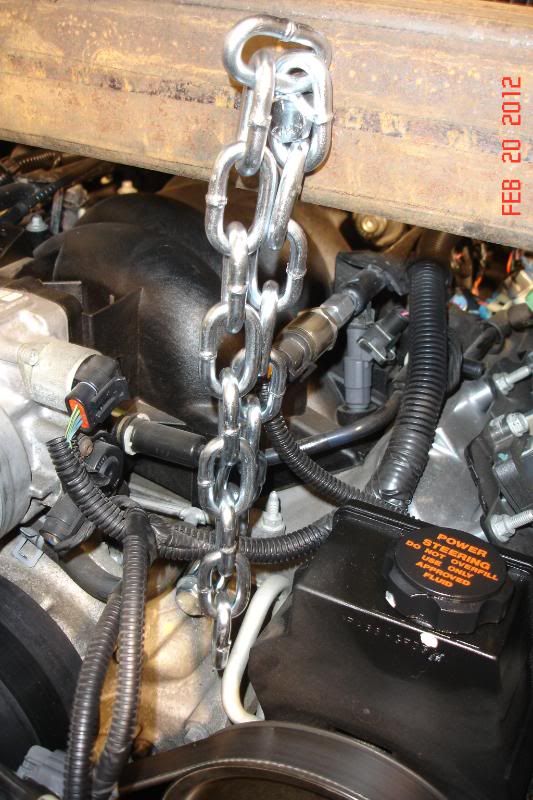
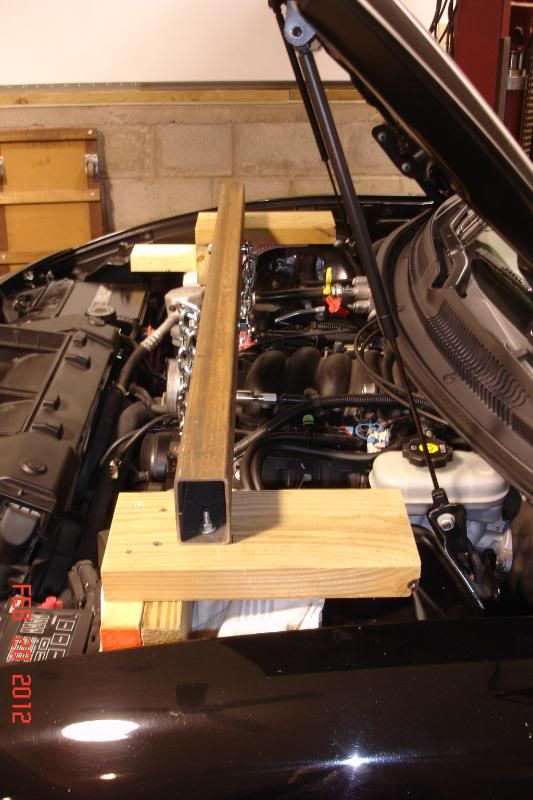
I left work early and went shopping -- spent $32.00 on a piece of 2" x 3" rectangular steel, a couple of bolts and 4' of chain. I started by setting the steel across the engine bay on a few blocks just to eye things up. After trying a few different combinations and sighting across the front of the heads, I decided to build a stepped support on each wheel house using some scrap wood.
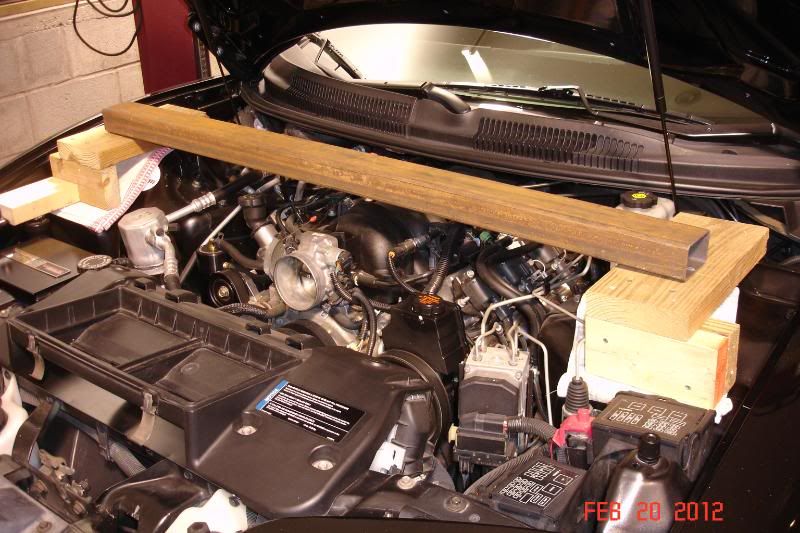
Once I had things lined up where I liked them, I added a small spacer block on the passenger side as the front of the wheel house is narrower and I did not want to risk having the block kick out. This block is wedged between behind the hood bumper bracket and locks the support block in place. With the steel laid across the blocks, I marked it for the holes setting them a bit wider than the bolt holes in the heads. I ended up using the inside lower hole on the driver side head and the outside lower hole on the passenger side head.

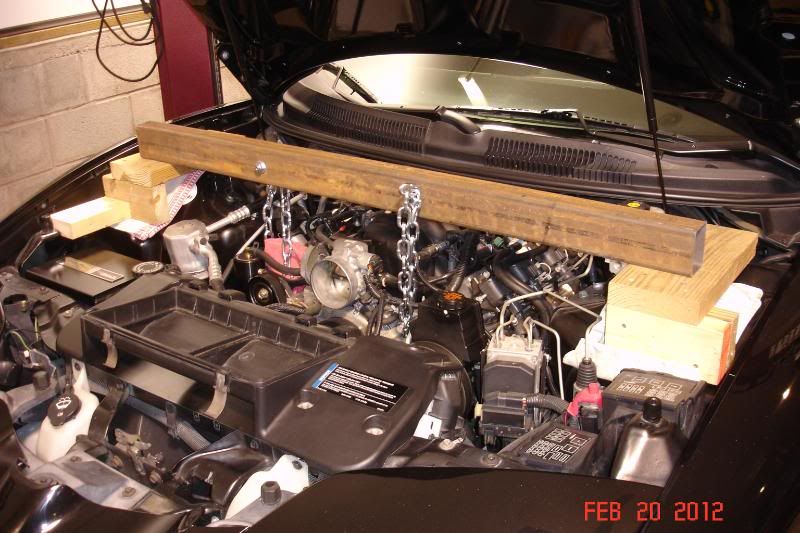
The stagger on the heads worked out about perfect for mounting the chains, with the driver side on the front of the steel cross piece and the passenger side on the back. This should prevent the steel from trying to flip once the weight of the engine is hanging from the chains. Again, the only reason I have to suspend the engine is that I am swapping out the oil pan gasket once the K-member has been removed.
Thoughts?
-
02-20-2012, 05:41 PM #22Electrical Engineer


- Join Date
- Jul 2009
- Location
- North of the Motorcity
- Posts
- 2,612
Custom Swirly Black- 2001 WS6 M6

Nice!
-
02-20-2012, 06:35 PM #23None Shall Pass

- Join Date
- Jan 2010
- Location
- East of Cleveland, Ohio
- Posts
- 3,827
Black- 99 WS.6 - Modified
That should work perfectly, Jeff. I'd probably do the same.
-
02-20-2012, 07:34 PM #24Electrical Engineer
- Join Date
- Jul 2009
- Location
- North of the Motorcity
- Posts
- 2,612
Custom Swirly Black- 2001 WS6 M6
That would be a good time for tower strut brace!!!!!!!
-
02-21-2012, 03:39 AM #25Veteran
- Join Date
- Feb 2009
- Location
- Mansfield, PA
- Posts
- 22,146
Black & Blue- '02 WS.6 / '07 Suburban
 Originally Posted by Knight

I wanted a second opinion from you guys before I put it to the test. Thanks!
-
02-21-2012, 07:14 PM #26Giant Dicks Car Club

- Join Date
- Nov 2006
- Location
- Millerton, PA
- Posts
- 5,191
2005 Ram- 1978 Firebird
Subscribed.
-
02-22-2012, 12:16 AM #27ʢ ൧ ൨ ൩ ൪ ൫ ൬ ൭ ൮Ր Ց Ւ Փ

- Join Date
- Feb 2009
- Location
- Pittsburgh
- Posts
- 9,963
White- 2008 Hummer H3
I enjoy seeing your ideas Jeff, wanna come work on one of mine (changing up to a 6-spd) ? lol
Very nice work, looks like it's coming along very smooth.
-
02-22-2012, 03:45 AM #28Veteran
- Join Date
- Feb 2009
- Location
- Mansfield, PA
- Posts
- 22,146
Black & Blue- '02 WS.6 / '07 Suburban
I never seem to make it to your part of PA. I would like to check out your projects some time though and will let you know if I am heading in your direction.
-
02-22-2012, 08:43 AM #29Spaz is My Mentor


- Join Date
- Feb 2009
- Location
- Florida Man Status Acheivement
- Posts
- 11,785
Navy Blue Metallic- 98 T/A, 00 FBVert, 78T/A
Jeff my only concern so far is in how you have it set up (the blocks of wood) My primary concern is that they will kick out because of the slopping angle of the wheel well.
Are you keeping the tranny cross member in place? Or leaving the bolts in place but maybe loosing them a little for wiggle room?
If so I can see that would help in not letting not move forward.
I know this is one of those huge PITA things to do like you're doing, could you do it like so in addition to what you have in the pics.
Place a support jack like a transmission jack (if you have one) on the crank pulley and one just next to the bell housing near the block.
-
02-22-2012, 11:58 AM #30Member

- Join Date
- Oct 2005
- Location
- Arkansas
- Posts
- 1,235
2000 Camaro SS- '02 Z28 parting-out
Jeff, I like that you took the extra effort and bolted the bar to the boards and screwed the boards together. If there any benifit to bolting the chain to the bar instead of wraping the chain around it and putting a bolt through the chain? Either way I would put a washer on the bolt holding the chain.
-
02-22-2012, 12:56 PM #31ʢ ൧ ൨ ൩ ൪ ൫ ൬ ൭ ൮Ր Ց Ւ Փ
- Join Date
- Feb 2009
- Location
- Pittsburgh
- Posts
- 9,963
White- 2008 Hummer H3
That would be great! Originally Posted by pajeff02
We're making some changes to the business for the new year.
I'm getting out of fab work (other than for myself) and sold most of the machine equipment associated with it, I'm still retaining my Co. name though.
Taking some time off for the spring this year and I'm moving the company back towards my trade fulltime in Plumbing and home improvements.
This frees up the shops for my personal projects and now I actually have room for what I want to do.
Plus the work schedule is more like a 9-5er rather than 10-12-14+ hour days.
Dad retired after the first of the year so out goes the small engine repair too.
I/we broke our backs for the last three years to get into a spot where I/we don't need so much work anymore.
Let's us focus more on what's important, family and cars..
Suggestion: If you are particularly irritated by another member's posting habits and are constantly fighting the urge to flame them, you can click on that person's profile, and select "Add to ignore list." This will make that person's posts invisible to you.
-
02-22-2012, 02:57 PM #32Veteran
- Join Date
- Feb 2009
- Location
- Mansfield, PA
- Posts
- 22,146
Black & Blue- '02 WS.6 / '07 Suburban
Originally Posted by SMWS6TA
The passenger side support is wedged behind the hood bumper bracket -- it can't kick out. Driver side has a larger flat area and as half the weight will be on the top of the wheel house, I don't think it will move. The trans x-member will remain in place and will keep the engine and trans from moving. I will have an undercar stand in place at the front of the transmission for the sake of safety. I will be using the trans jack to lower the K-member once everything is unbolted.
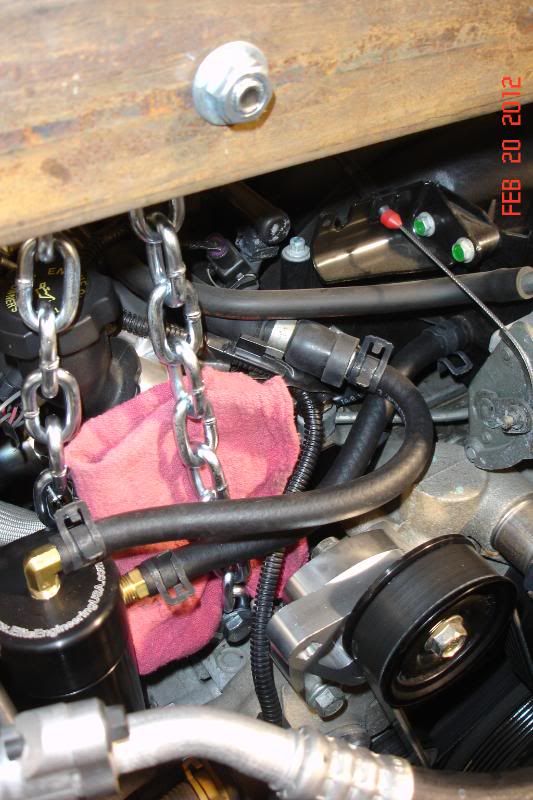
blackcar -- the chain is bolted through the steel and what you see is simply the excess hanging down. I chose not to wrap it and have it attached at the front and the back of the steel so that there is no possibility of it trying to roll over.
-
02-22-2012, 03:01 PM #33Giant Dicks Car Club
- Join Date
- Nov 2006
- Location
- Millerton, PA
- Posts
- 5,191
2005 Ram- 1978 Firebird
I think he was worried more about the head of the bolt not having a washer between it and the chain.
-
02-22-2012, 04:59 PM #34Veteran
- Join Date
- Feb 2009
- Location
- Mansfield, PA
- Posts
- 22,146
Black & Blue- '02 WS.6 / '07 Suburban
I looked at that when I put it all together -- no chance the chain can pop off the bolt, so all is good there.
-
02-23-2012, 05:31 PM #35Veteran
- Join Date
- Feb 2009
- Location
- Mansfield, PA
- Posts
- 22,146
Black & Blue- '02 WS.6 / '07 Suburban
Parts are starting to roll in now -- upper balljoints, poly tie rod boots, wheel studs, and one set of Hawk brake pads so far. I am currently sidetracked fixing the wiring on my father's enclosed trailer right now.
-
02-27-2012, 06:28 PM #36Veteran
- Join Date
- Feb 2009
- Location
- Mansfield, PA
- Posts
- 22,146
Black & Blue- '02 WS.6 / '07 Suburban
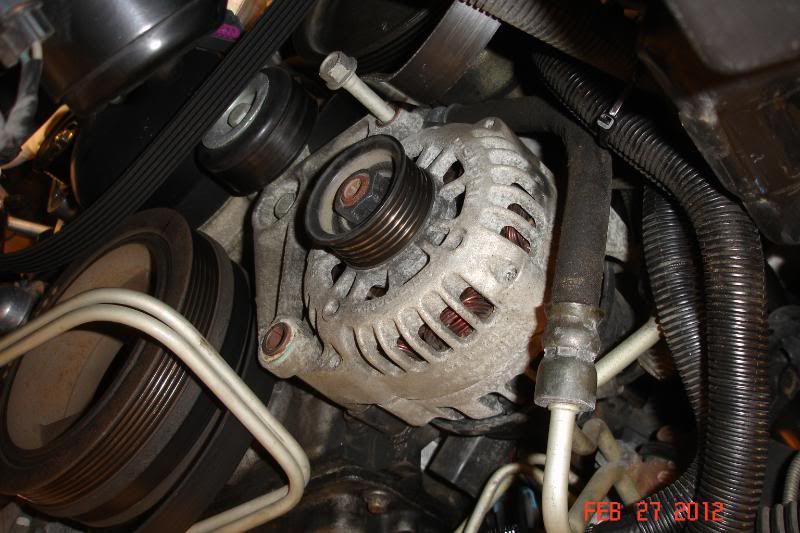
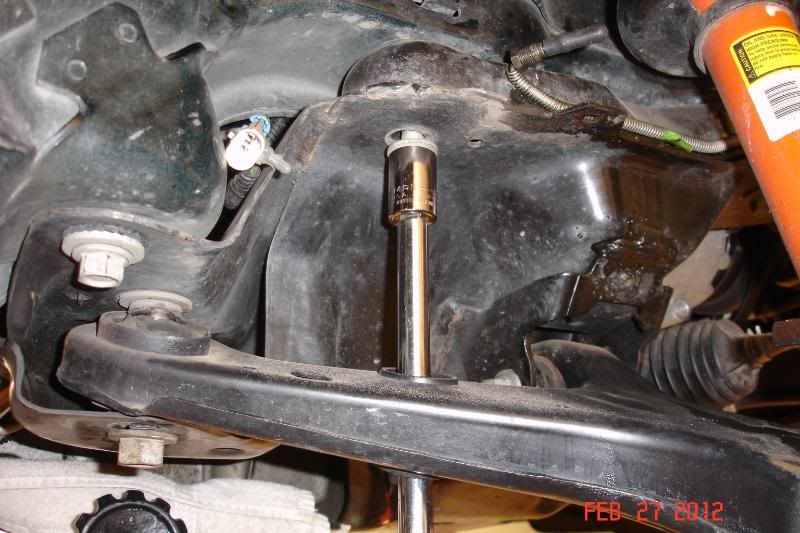
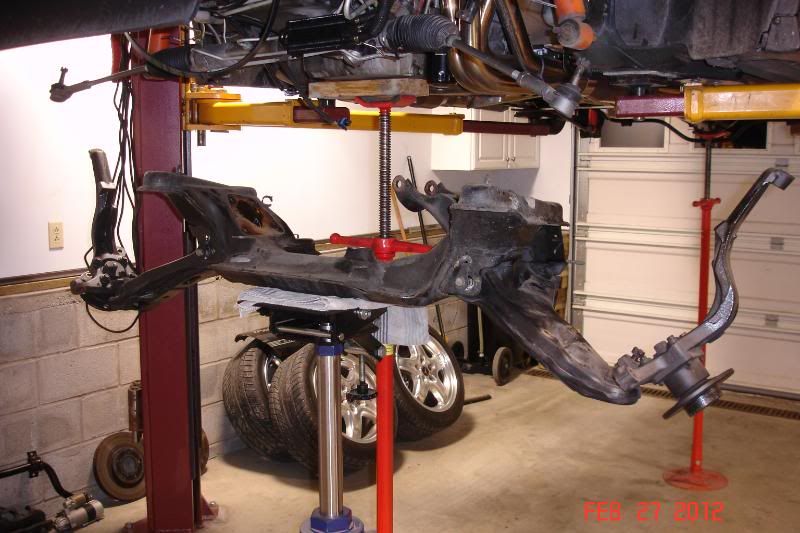
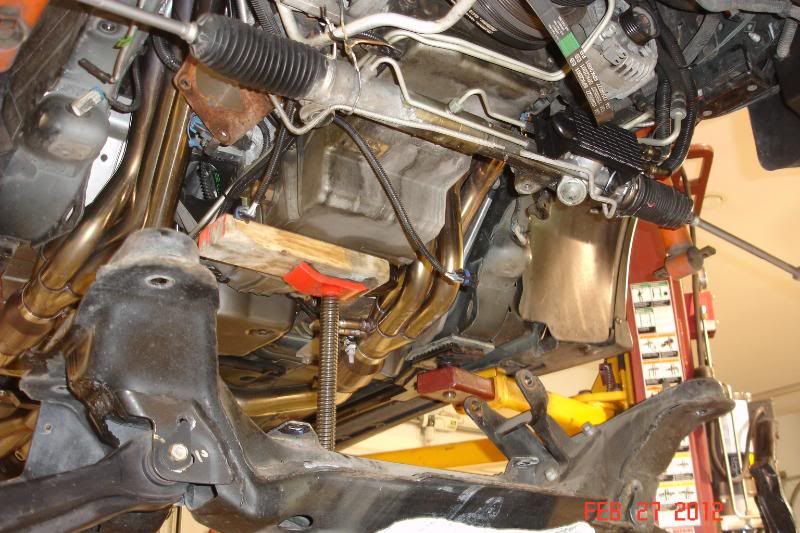
The rotors showed up today along with the remaining set of pads. They were all packed in the same box and it was heavy. I didn't even take the time to open up the individual boxes once I unpacked it. Instead, it was time to get back to work on removing the K-member. I started by unbolting the steering rack from the K-member. There are two (2) bolts that drop down through brackets on the K-member with nuts at the bottom. The passenger side comes right out, however, the driver side bolt hits the oil pan rail and you have to lower the K-member a bit to get it out. I positioned my transmission jack under the oil pan and carefully matched its angle. Lifting the engine slightly allowed me to push the engine mounting bolts forward, whereupon they promptly contacted the alternator on the left side and A/C compressor bracket on the right. Looking things over, I elected to relieve the main belt tensioner and then unbolted the alternator. With it free, I pulled the alternator forward and removed the mounting bolt. This was done with the alternator wiring intact and once the engine mounting bolt was removed I loosely re-installed the alternator mounting bolts. On the passenger side, I began to remove the A/C compressor, but after looking it over again I changed my mind and instead unbolted the engine mounting pedestal from the K-member. With the engine mounts now disconnected, I allowed the engine to hang from the steel beam and moved my jack under the K-member. I then loosened all six (6) of the K-member mounting bolts and then dropped it down just a bit to check for anything that might be hung up. There is a hole in the lower control arm that allows you direct access to the middle bolt on each side.
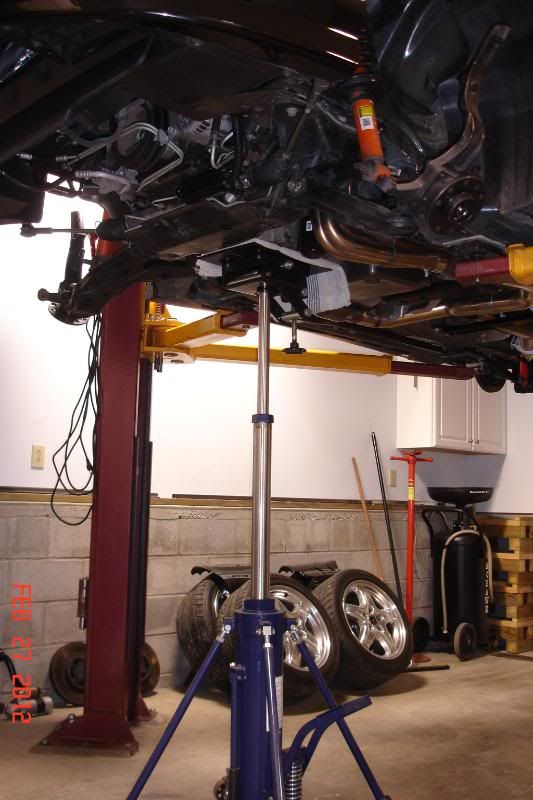
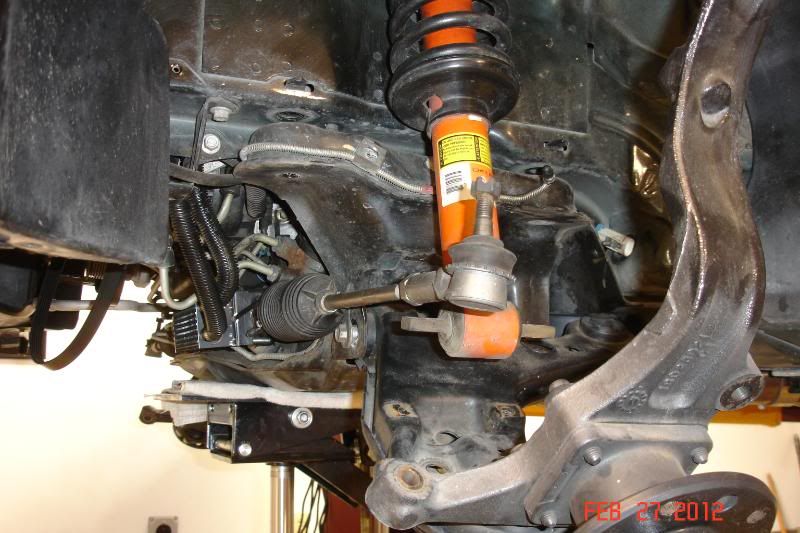
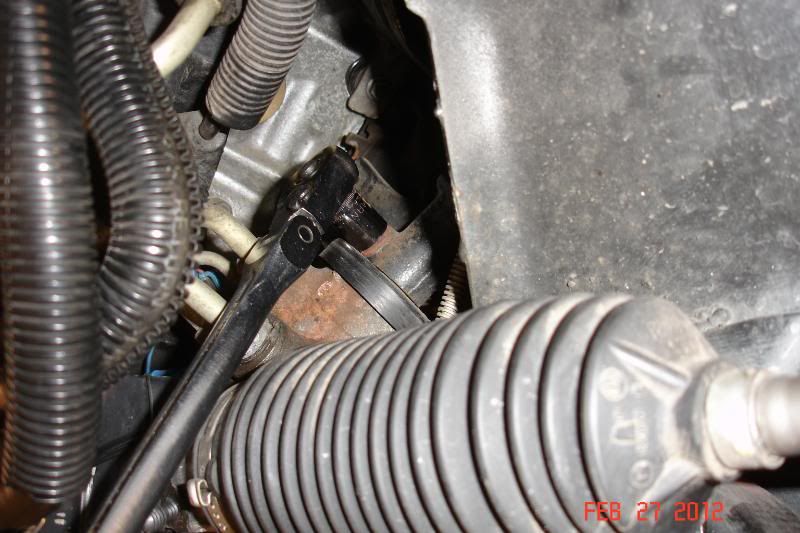
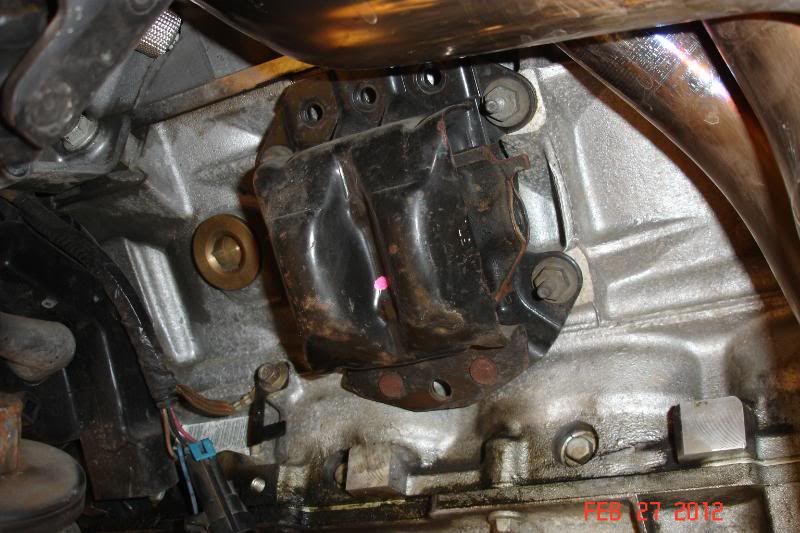
With the K-member loose, I began working on the steering rack and removed it from the bracket on the passenger side. I quickly found that I would need to disconnect the rack from the steering shaft and after removing the 11mm bolt, gently pried the shaft up off the rack. This allowed the K-member to drop a bit more on the driver side and I was then able to remove the second mounting bolt. I used a set of old coathanger wires to suspend the rack from the A/C compressor bracket on the right and sway bar bracket on the left. Again, checking to make sure everything was clearing, I slowly lowered the K-member out from under the car. With all kinds of working space now opened up, both engine mounts were unbolted and removed. The passenger side mount is attached with 13mm bolts, while the driver side uses 13mm studs. There is a small heat shield that is secured to the top two (2) studs. In the pic, the heat shield has already been taken off and you can clearly see the large 17mm brass plug that is removed when flushing coolant. To finish out the night, I dropped the oil pan drain plug and punctured the filter as my next step will be to swap out the oil pan gasket.

-
02-28-2012, 09:14 AM #37Spaz is My Mentor
- Join Date
- Feb 2009
- Location
- Florida Man Status Acheivement
- Posts
- 11,785
Navy Blue Metallic- 98 T/A, 00 FBVert, 78T/A
Jeff, Are the engine mounts to poly?
-
02-28-2012, 10:16 AM #38Member
- Join Date
- Oct 2005
- Location
- Arkansas
- Posts
- 1,235
2000 Camaro SS- '02 Z28 parting-out
This looks likes one of those 3D illusions pictures. I know the wood is bolted to the bar and hanging in the air. But it looks like they are on the floor with the bar setting on them (a few inches tall) and the trash can (a few feet tall). Originally Posted by pajeff02
-
02-28-2012, 11:39 AM #39Junior Member

- Join Date
- Jan 2010
- Location
- Lake In The Hills IL
- Posts
- 78
black- 2000 Z28
Very nice!! I cant wait til I do my k member. I have had mine out 3 times for various things, next time it wont be going back in lol.. I just used ratchet straps from the strut tower brace to the headers LOL
-
02-28-2012, 12:28 PM #40Veteran
- Join Date
- Feb 2009
- Location
- Mansfield, PA
- Posts
- 22,146
Black & Blue- '02 WS.6 / '07 Suburban
Engine mounts are being swapped out for Prothane pieces. The beam never moved when I dropped the weight of the engine onto the chains. I did run a strap around the beam and tied it off to the bracket at the back of each tower.
blackcar: I see what you mean, that pic does look a little odd.

 Reply With Quote
Thread Information
Users Browsing this Thread
There are currently 1 users browsing this thread. (0 members and 1 guests)
Similar Threads
-
NEED HELP!! LS1 swap, HP upgrades
By spoonman4 in forum General HelpReplies: 13Last Post: 10-25-2013, 06:58 PM -
what upgrades should i do?
By Talon_II in forum Firebird / WS6Replies: 11Last Post: 03-04-2011, 11:26 AM -
Wanted: LS1 Swap K-Member 3rd Gen
By HP52TA in forum Parts Wanted / TradeReplies: 0Last Post: 11-10-2010, 06:44 PM -
Need help with some upgrades for an a4
By 02_WS6 in forum Automatic TransmissionReplies: 12Last Post: 04-17-2007, 07:49 PM

Bookmarks