

Results 1 to 20 of 40
Thread: DIY cooling sytem flush
-
06-27-2011, 05:38 PM #1Senior Member


- Join Date
- Dec 2007
- Location
- Orlando, FL
- Posts
- 3,352
Mean Black- 1998 Trans Am
DIY cooling sytem flush
Here is a DIY LS1 engine coolant flush. You need to do a complete flush when your coolant is old or when you want to switch to the green stuff. Draining the radiator and putting green stuff in is the incorrect way and it will cause problems in the future. You can't mix green stuff with Dexcool.
You will need the following:
a. 2 gallons of Dexcool (GM approved) or green stuff "Glycol" (if you want to change to green coolant)
b. 5/16" hex socket 6 inches long
c. 17mm hex socket
d. Socket extensions and ratchet
e. Thermostat
f. Water (tap or distelled)
Make sure that you do this on a cold engine. Don't let the coolant drain down the road. Use a container to collect as much as you can and recycle it properly.
Start by using putting the car on jack stands (safety 1st). Make sure you have enough room to work around the starter area. Take of the radiator cap (again with a cold engine).
Locate the radiator drain plug is at the bottom on the passenger side.

Put a container underneath and unscrew the plug. If its too hard to move with you fingers you can use some pliers to get a better hold of it and break it loose.
Let it drain.

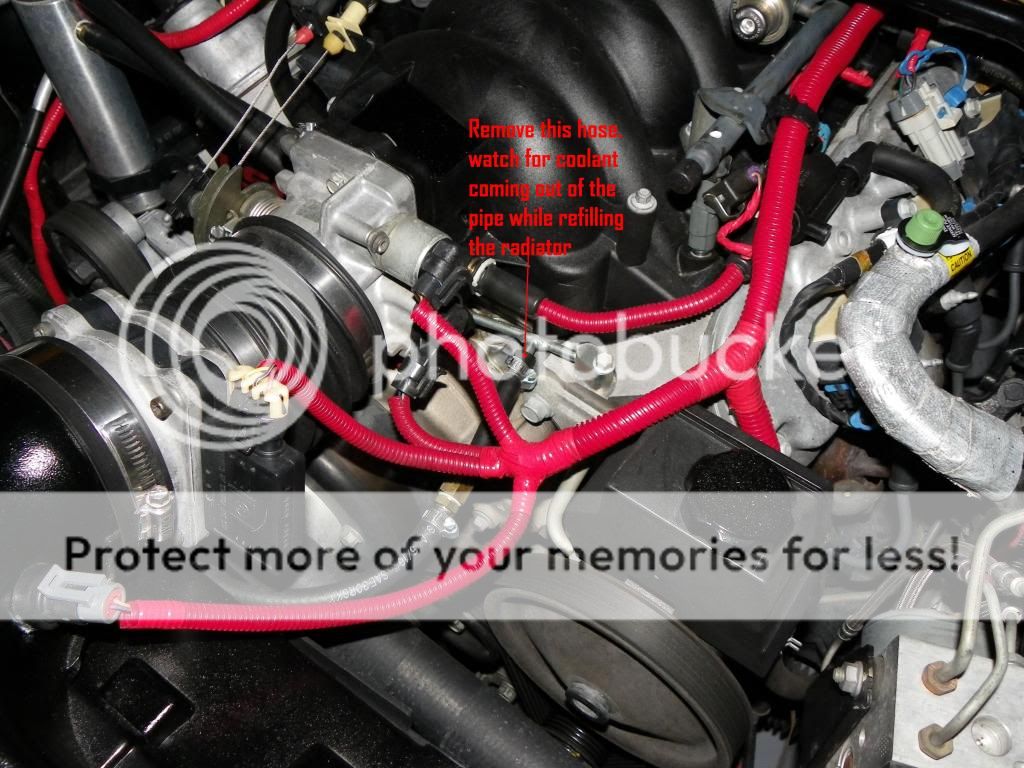
Next locate the thermostat housing.

Put a container underneath this area. Remove the radiator hose. Some coolant will drain out.
Next remove the two 10mm bolts from the thermostat housing.

Remove the thermostat housing. Once removed alot of the coolant will come out. Now you need to remove the actual thermostat from the housing. Put the bottom of the thermostat against the floor and use a pair of channel locks or a wrench. If you press down on the housing you will notice that it has a spring. When you press down use the pliers or wrench to turn the metal piece that holds the thermostat and spring in place.
If you look at this pic, if you press down you will be able to move the metal piece and it will clear the green circle area.

This will release the spring. If the thermostat doesn't fall out then pull it out.
This is what it looks like: (generic photo)

Now you have an empty thermostat housing. Put the housing back on the engine and tight the bolts slightly (even by hand as long as the oring seals some). Reconnect the lower radiator hose to the thermostat housing. You dont need to put the clamp back.
Disconnect your battery for the next procedure. Remove the 13mm bolt that holds the battery in place.

Remove the battery. There is another 13mm bolt on top of the battery base which is part of the coolant reservoir. Remove this bolt as well.

Remove the hose clamp that holds the small hose from the reservoir to the radiator neck and remove the hose from the neck.

Pull the whole reservoir by pulling slowly from the reservoir neck and remove.
This is what the reservoir looks like:

Drain the reservoir of old coolant. Using a hose and soap (if necessary) flush the reservoir until clean water comes out. Reinstall the reservoir and it's bolt. Reconnect the reservoir hose to the radiator neck and it's hose clamp. Reinstall battery and its holding bracket. Don't reconnect the battery cables yet. Don't fill the reservoir yet.
This a pic of the two hex sockets you will need to remove the engine block plugs.

Get underneath the area where the alternator is located. If you look behind it you can see a big brass engine block plug. (pic is kinda blurry sorry)

This one shows more clearly what im refering to. Look at the green square. NOTE: the alternator is removed in this pic.

Using the 17mm hex socket, extensions and ratchet insert the socket in the plug. I couldn't move the plug with a 3/8" ratchet. I used my 1/2" ratchet and it came right out.

This is how long I did my extension:

Some coolant is going to drain out. Make sure your face is out of the way. Ask me how I know. Once the coolant is all out put the plug back in the block and hand tight.Last edited by JayTA98; 06-28-2011 at 05:39 AM.
-
06-27-2011, 05:39 PM #2Senior Member
- Join Date
- Dec 2007
- Location
- Orlando, FL
- Posts
- 3,352
Mean Black- 1998 Trans Am
Next go to the passenger side of the engine oil pan. Locate the starter and look closely in the gap between the engine block and the starter. You will see a small hex drain plug.

Using the 5/16" long extension socket, additional extension and ratchet to remove this plug.


Again be ready for more coolant to come out. I found it was easy if i slowly unscrew the plug and waited there for the coolant to drain out while holding the drain plug on the hex socket. Is kinda of hard to remove and put the plug back due to the small clearance. I mean its possible but is better to do it at the end when you have to put teflon on it. Once the coolant is drained put the plug back and hand tight.
Make sure the radiator drain is close. Reconnect your battery. Turn your A/C temp knob to heat(all the way). This allow the heater core to be flushed as well. Fill the radiator with water all the way to the neck.
Start the engine. Don't put the radiator cap back on and keep the radiator water level to the neck. If you see small leaks of water is okay remember we hand tight stuff.
After a few minutes has passed (i wont do more more than 5 mins) turn the engine off. Drain the radiator again and remove the block drains again. Let all the water out and put the drains back. Be careful the water may be warm or hot.
You are repeating this process until the water is coming out clear from the engine block drains and the radiator. Once this happens apply some liquid teflon to the drain plugs. The starter one might be alittle tricky to put back. I found it was easier to hold on top of the starter from the front of the car and then put the hex extension in it and then slowly move it to the right position.
I used this product:

Tighten the block drains. Don't use alot of force as you might strip the aluminum treads in the block and this will mean trouble. I will recommend using a 3/8" ratchet, NOT a 1/2". Remove the lower radiator hose from the thermostat housing again. Remove the thermostat bolts and remove the housing from the engine.
You have 2 options.
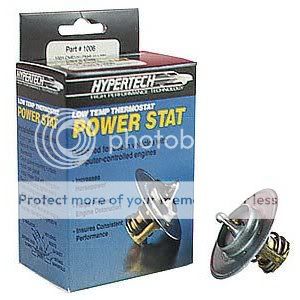
1. you can reuse the current housing and install a new thermostat as long as the housing's Oring is in good condition. You can buy a thermostat like this one: (this example is a 160 degree thermostat, the stock OEM is 195 degrees)
2. You can purchase a new thermostat housing together. This will be easier but more expensive.

If you decide to get a new thermostat only put it back in the housing, put the metal clip back and press the bottom against the floor until you have clearance to twist the metal piece back in place again. Once the thermostat housing is ready reinstall it back on the engine and tighten down the bolts. Reinstall the radiator hose and put the hose clamp back in place.
This is an optional step but i used it and i never had a big air buble issue in my engine. Remove the small hose that goes to the coolant crossover pipe.
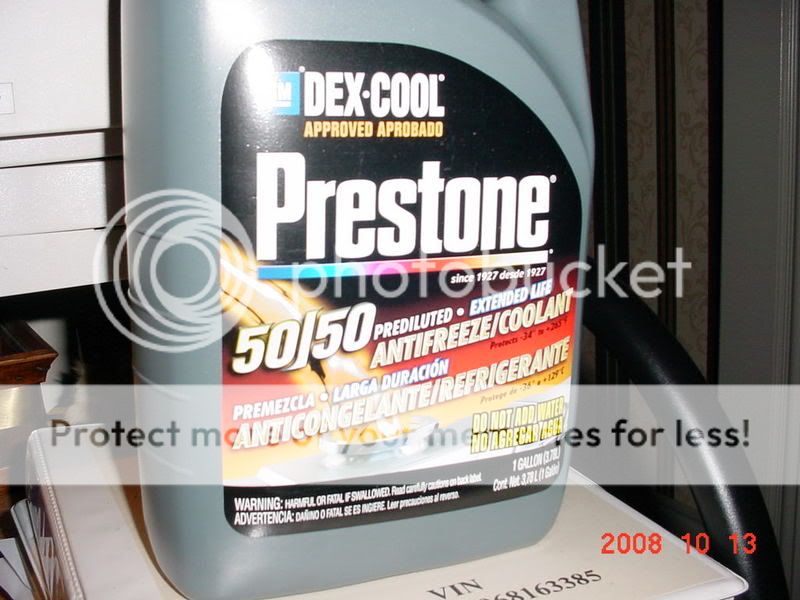
Now get you 50/50 mix of the coolant of choice. Make sure if that the dexcool is GM approved. If you bought the prediluted type you DON'T NEED TO MIX IT WITH WATER. Here is a container of dexcool prediluted
If you bought undiluted coolant then follow the steps below. Here is the one i used:

I used a pitcher and filled half of it with coolant and the other half with water. I used distilled water but is not necessary. Slowly start to fill the radiator back up. You might need about 2 1/2 gallons of 50/50 mix. Keep an eye on the small coolant crossover pipe. When you see coolant coming out of it stop, reconnect the hose and clamp. This step helps to eliminate the majority of the air by the crossover pipe. The pipe is the highest point of the engine cooling system.
Recheck the coolant level on the radiator. Don't put the radiator cap back on yet. Go ahead and start your engine. Again leave the A/C controls on heat. Check for leaks underneath the car. If you don't see any let the car run at idle. Keep an eye on the radiator level. Add 50/50 mix as necessary. After 20-30 mins (depending on the temperature) you will see the radiator coolant level drop. This means the thermostat has opened. Refill the radiator to proper level and put the radator cap back on.
At this time you can refill the coolant reservoir. Check for leaks again. If no leaks are present lower your car. Take you car for a ride and watch the temperature gauge. If it stays in the normal level you are done. Check the radiator level everyday in the morning for the next 5 days and add 50/50 mix as necessary. It might take a few cycles for any residual air to escape the system.
There you have it. I hope this write up help you guys out there looking to do your own flush.
I have to give credit to Pajeff02. I learned this procedure from him the 1st time I did mine.Last edited by JayTA98; 06-28-2011 at 03:07 AM.
-
06-27-2011, 05:41 PM #3Senior Member
- Join Date
- Dec 2007
- Location
- Orlando, FL
- Posts
- 3,352
Mean Black- 1998 Trans Am
Please let me know if I miss something. Thanks.
-
06-27-2011, 05:58 PM #4Member

- Join Date
- Jun 2009
- Location
- Mass
- Posts
- 616
silver/black- 00 trans am,SLP,Ws6
Vote For STICKY
-
06-27-2011, 06:01 PM #5Senior Member
- Join Date
- Dec 2007
- Location
- Orlando, FL
- Posts
- 3,352
Mean Black- 1998 Trans Am
Thanks. Originally Posted by 2000dreambird

-
06-27-2011, 06:33 PM #6Junior Member
- Join Date
- Jan 2011
- Location
- Pittsburgh, PA
- Age
- 36
- Posts
- 38
NBM / EGM- 02 WS6 6m / 97 Tahoe 2dr
100% agreed Originally Posted by 2000dreambird
-
06-27-2011, 06:49 PM #7Senior Member
- Join Date
- Dec 2007
- Location
- Orlando, FL
- Posts
- 3,352
Mean Black- 1998 Trans Am
Updated a few more pics. thanks guys.
-
06-28-2011, 06:02 PM #8Senior Member

- Join Date
- Jun 2009
- Location
- Ohio
- Posts
- 1,017
Sunset Orange Metallic- 2002 Z28 Hardtop
Nice writeup.
-
06-28-2011, 11:31 PM #9z guy

- Join Date
- Apr 2011
- Location
- ca
- Posts
- 183
silver- 1998 camaro z28

Man thanx that is an awesome write up great ill see if i can get it done
keep ya posted
Originally Posted by JayTA98
-
06-29-2011, 05:41 AM #10Senior Member
- Join Date
- Dec 2007
- Location
- Orlando, FL
- Posts
- 3,352
Mean Black- 1998 Trans Am
Thanks guys.
-
06-29-2011, 06:01 AM #11Electrical Engineer

- Join Date
- Jul 2009
- Location
- North of the Motorcity
- Posts
- 2,612
Custom Swirly Black- 2001 WS6 M6

Nice Jay! Those block plugs are a pain to find!
-
06-29-2011, 10:37 AM #12z guy
- Join Date
- Apr 2011
- Location
- ca
- Posts
- 183
silver- 1998 camaro z28

Well 2 hours later, 1st i removed t stat from housing put it back replaced radiator hose filled w/ clear water w/ heater on full ran 12 miutes idled gauge never reached 210 little befor 210.
Drained from rad and t stat housing 3 tomes water is clear no trace.
I,m concerned the heater never got really warm not like warm full fan all way up i hope its just from no t stat installed.
I left car on jack stands i have an 8 mm hex same size as 5/16.
I need to buy a 17 mm hex 1/2 inch drive.
I may just put t stat back add 50/50 dex or green and be done w/ it.
I can t see thered be any more mixture in the block as i ran and i know the waterpump really flows and water was clear as a bell by the 3rd drain no trace.
One thing gauge never even reached 210 idling 13 minutes , is it cause no stat and water clean maybe?
i thought running w/o t stat would increase temp cause water would not stay in rad that long.
i dunno but i just hope i get heat outta heater when i reinstall the t stat.
alright gracias muchacho
Originally Posted by denegrader
-
06-29-2011, 10:57 AM #13Experienced Old Fart

- Join Date
- Mar 2011
- Location
- Tampa, FL
- Posts
- 154
Red- '02 35th SS LE SLP#1084
Definite Sticky material!!!
I feel better just having read this.
Jon
-
06-29-2011, 11:15 AM #14Senior Member
- Join Date
- Dec 2007
- Location
- Orlando, FL
- Posts
- 3,352
Mean Black- 1998 Trans Am
I will what you done is better than before. When did this the 1st time I couldn't get the plugs out. they were tight as hell. I flush the radiator and water pump until water came out clean. Pajeff02 kept telling me that there is still residual at the bottom of the block that if I could I should remove the plugs. Time for the 1/2" ratchet. Plugs came out along with some residual or red dexcool. Originally Posted by denegrader
As far as the car not overheating with no stat and just water is because is at idle. If you drive the car around it will overheat eventually.
I'm not telling you to drain the plug as you did a pretty decent flush from what you described. Did you get rid of all the all stuff? I will say probably. I will put it back together run it.
-
06-29-2011, 11:15 AM #15Senior Member
- Join Date
- Dec 2007
- Location
- Orlando, FL
- Posts
- 3,352
Mean Black- 1998 Trans Am
it is sticky already

-
06-29-2011, 12:15 PM #16z guy
- Join Date
- Apr 2011
- Location
- ca
- Posts
- 183
silver- 1998 camaro z28

Well
Are these plugs meant to drain coolant routinely?
How much water coolant dexcool drained out from each side?
I cannot detect a trace of dexcool or green!
Are these plugs meant to routinly drain coolant?
Are the threads on these plugs fine or coarse?
Will my heater work after i install thermostat?
Heater worked befor i drained dexcool and added 1 gallon green!
I,m thinkin fill w/ water drive around, see if i overheat?
Drive around w water a week w/o t stat flush again ?
What you think?
I may have a mixture sitting down in block, i wonder how much quanity and if w all the flushing it aint just water?????
Originally Posted by JayTA98
-
06-29-2011, 12:19 PM #17Senior Member
- Join Date
- Dec 2007
- Location
- Orlando, FL
- Posts
- 3,352
Mean Black- 1998 Trans Am
my main suggestion about the plugs was because of how nasty your coolant was and because you mixed dexcool with glycol coolant(green stuff). Originally Posted by denegrader
The plugs are not meant for regular flushing. It just a way to remove all the old stuff out. you sound very confident that you did a good flush. go ahead put everything back, run it and keep an eye on the temp. Your heater should work fine unless is clogged (which it doesn't sound like it is) or if you have a leak (but it will still work).
-
06-29-2011, 12:34 PM #18z guy
- Join Date
- Apr 2011
- Location
- ca
- Posts
- 183
silver- 1998 camaro z28
Well alrighty then 5 0 curse words later hemmin and a hawwing looks like we may have acomplished just maybe a littl e sumpthin
well great great stick and a thread to you and paejeff
Ill keep ya posted
Originally Posted by JayTA98
-
07-02-2011, 09:19 AM #19Member

- Join Date
- Oct 2005
- Location
- Land of the FOID
- Posts
- 330
SOM- 2002 WS6 M6 - 461hp 406tq
You got this ALL wrong. The way I did it was to just to a H/C swap, that way I know everything is drained out. It's slightly more expensive BTW.
My car came with Dexcool already in it. Bought it brand new....that normal?
-
07-02-2011, 10:01 AM #20Senior Member
- Join Date
- Jan 2010
- Location
- texas
- Posts
- 1,623
silver- 2000 formula
i used 1 of those flush kits with all those plastic tees and the adapter to splice into the hose..........only i did not splice into the hose........i got some extra hose about 2 ft long.....and attached 1 end to the WP and the other end to the stock hose......eliminating the need to cut the stock hose.....attach the water hose to the Tee and flush away......saved me from having to remove the plugs......good write up


 Reply With Quote
Thread Information
Users Browsing this Thread
There are currently 1 users browsing this thread. (0 members and 1 guests)
Similar Threads
-
Cooling system flush question
By JayTA98 in forum General HelpReplies: 49Last Post: 07-23-2011, 11:32 AM -
Installing a sub on a Monsoon sytem
By bigrig73 in forum Stereo and ElectronicsReplies: 1Last Post: 04-05-2010, 08:57 AM -
Squire Turbo Sytem
By ram98ta in forum Forced InductionReplies: 12Last Post: 09-13-2008, 09:35 AM -
NOS LS1 Plate Sytem
By BAHGTO in forum Parts For Sale / TradeReplies: 2Last Post: 06-14-2007, 07:42 PM -
Hit 150 shot on my new nx sytem 2nite! (long)
By BlwnCamaro in forum NitrousReplies: 15Last Post: 03-05-2007, 09:05 AM

Bookmarks