
Results 101 to 120 of 146
Thread: 1987 Buick Regal Turbo
-
06-29-2013, 04:05 PM #101Veteran


- Join Date
- Feb 2009
- Location
- Mansfield, PA
- Posts
- 22,146
Black & Blue- '02 WS.6 / '07 Suburban
Nice looking ride. Probably just a bit faster than ours by the look of things.
-
06-29-2013, 05:22 PM #102Member

- Join Date
- Jul 2012
- Location
- COLORADO, USA
- Posts
- 105
1967 Chevy Chevelle- 2008 Hummer H3 Alpha
I have always loved these cars, great job on the build.
There are some things you just can't test in a white lab coat.
-
06-29-2013, 06:35 PM #103Veteran
- Join Date
- Feb 2009
- Location
- Mansfield, PA
- Posts
- 22,146
Black & Blue- '02 WS.6 / '07 Suburban
Thanks. Just putting things back in order and fixing a few issues. The car ran great down and back from GM Carlisle and actually received quite a few looks and comments last weekend.
-
06-30-2013, 05:08 AM #1042004 HEAD/CAM CTS-V

- Join Date
- Oct 2006
- Location
- doylestown, Pa
- Posts
- 6,817
SILVER- 2004 CTS-V
Jeff why do you think you had to mod the test pipe? Was our flange on the Y-pipe welded on crooked?
-
06-30-2013, 05:12 AM #105Giant Dicks Car Club

- Join Date
- Nov 2006
- Location
- Millerton, PA
- Posts
- 5,191
2005 Ram- 1978 Firebird

I believe that was the test pipe that came on the car, Brandon, not the pypes piece. Jeff will correct me if I'm wrong, but I think that's the case...
-
06-30-2013, 05:33 AM #106Veteran
- Join Date
- Feb 2009
- Location
- Mansfield, PA
- Posts
- 22,146
Black & Blue- '02 WS.6 / '07 Suburban
Flange on the test pipe was 90° , however it simply forced the system downward as the bolts drew the two flanges together. The pic shows that fairly well. I think there is an angle on the catback flange, but I did not measure it. The slash cut on the driver side tailpipe is definitely off.
-
06-30-2013, 06:31 PM #107Veteran
- Join Date
- Feb 2009
- Location
- Mansfield, PA
- Posts
- 22,146
Black & Blue- '02 WS.6 / '07 Suburban
Put the Regal up in the air tonight and gave everything a once over. Drove it around 325 miles total last weekend and everything looks good. At the show, I took a look at a couple of Grand Nationals to see how the air inlet was secured to the radiator support and also the rubber flap that seals the bottom of the radiator. I see now that the flap is supposed to fold up in front of the radiator and is secured to a plastic panel with 5 push pins. Don't know why I didn't realize that before when I was trying to figure out why the flap wasn't secured to anything. The air inlet is also mounted with a push pin, so I removed the bolt and nut that I had originally used.
I also installed the new rear replacement speakers I bought from Kirban Performance at the show. Each speaker is secured by a metal bracket that clips to the underside of the package tray area. Very easy to replace them after crawling into the trunk. Both original speakers were whipped -- the foam surround was all but gone on them. Radio should sound a whole lot better now.
-
06-30-2013, 06:36 PM #1082004 HEAD/CAM CTS-V
- Join Date
- Oct 2006
- Location
- doylestown, Pa
- Posts
- 6,817
SILVER- 2004 CTS-V
I would like to see more pics of the test pipe and the mid-pipe. Also the tailpipe. Email me pics and if its defective I'll replace it.
 Originally Posted by pajeff02

-
07-01-2013, 03:13 AM #109Veteran
- Join Date
- Feb 2009
- Location
- Mansfield, PA
- Posts
- 22,146
Black & Blue- '02 WS.6 / '07 Suburban
Will do. I have meetings tonight and tomorrow night, so it may be later this week. Thanks!
-
07-01-2013, 07:19 PM #110Junior Member
- Join Date
- Sep 2006
- Location
- Chitown
- Age
- 49
- Posts
- 2
Black- 1987 Buick Grand National
Hey Love the limited...nice car...good sleeper look...
Don't forget to pick up a scanmaster....it allows you to keep an eye on what the engine is doing...its a small box no bigger than the palm of your hand...its vital along with your gauges....
I just bought my 3rd GN...a few weeks ago...in no time you'll be addicted...if you aren't already....
Good luck and congrats on your build...
-
07-02-2013, 04:42 PM #111Veteran
- Join Date
- Feb 2009
- Location
- Mansfield, PA
- Posts
- 22,146
Black & Blue- '02 WS.6 / '07 Suburban
Thanks for the compliments. I have a Snap-On scantool that will interface with the OBD-I, just have to take the time to learn how to use it.
-
07-21-2013, 05:41 PM #112Veteran
- Join Date
- Feb 2009
- Location
- Mansfield, PA
- Posts
- 22,146
Black & Blue- '02 WS.6 / '07 Suburban
Swapped out the plugs and ignition wires this evening and installed a new injector harness I purchased from Casper's Electronics. The old harness had mouse damage and the wires had been twisted and taped as a temporary repair.
Bad news is that I still have a low speed, light throttle, surge going on. I am going to check a few things this week to see if I can track down a cause. Other than that, the car runs like a scared sheep at the Carlisle Motel 6 pool...
-
07-25-2013, 03:01 PM #113None Shall Pass


- Join Date
- Jan 2010
- Location
- East of Cleveland, Ohio
- Posts
- 3,827
Black- 99 WS.6 - Modified
I don't remember any sheep......
-
07-26-2013, 03:07 AM #114Veteran
- Join Date
- Feb 2009
- Location
- Mansfield, PA
- Posts
- 22,146
Black & Blue- '02 WS.6 / '07 Suburban
Zach may have kept them all to himself.
I still have to get around to diagnosing what is going on with it.
-
07-27-2013, 08:05 AM #115Veteran
- Join Date
- Feb 2009
- Location
- Mansfield, PA
- Posts
- 22,146
Black & Blue- '02 WS.6 / '07 Suburban
Started out by fixing the trim ring around the steering wheel this morning. At the GM show, Mr. Kirban reached in through the window and felt that it was loose. He explained that they all have a bad habit of coming loose over time and that the screws can actually back out enough to interfere with steering. In order to tighten the loose screws, the steering wheel has to be removed. Around the perimeter of the horn button there appear to be six (6) recessed allen head bolts. In reality, only the bolts at the 3:00 and 9:00 positions are actual bolts. The others are molded plastic replicas and if you attempt to remove those all you do is bugger them up.
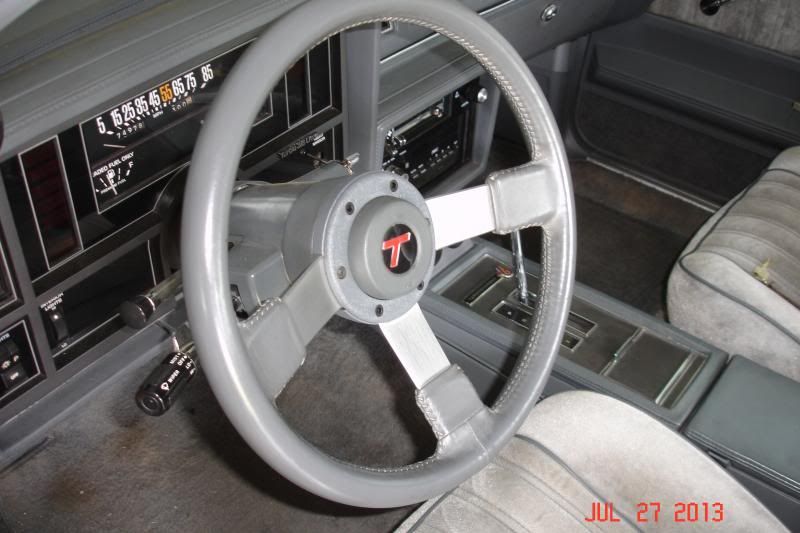
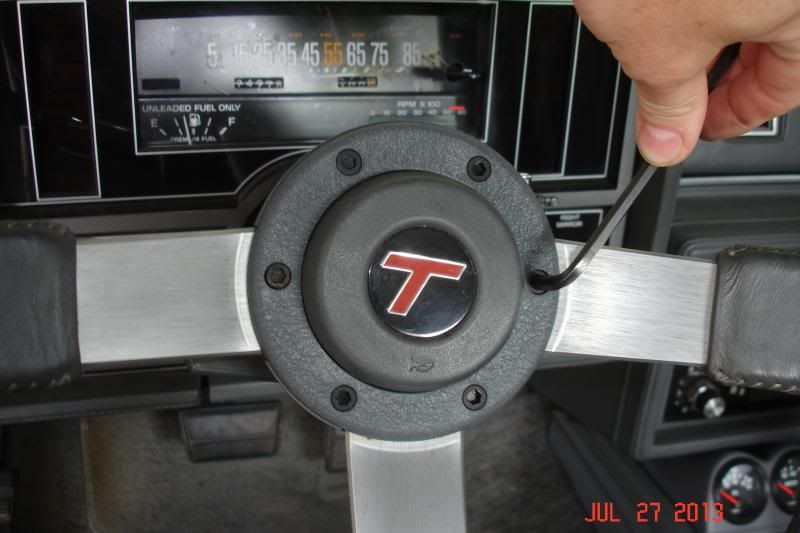
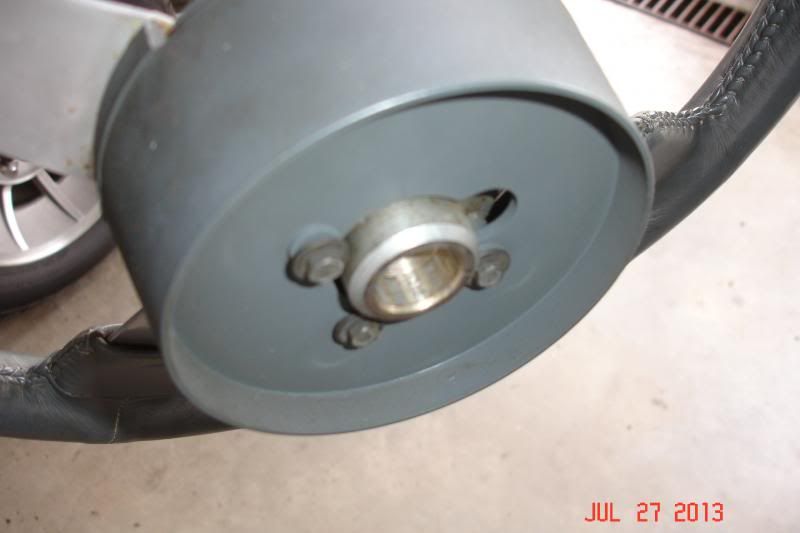
To finish removing the horn button, the connector has to be pushed in and twisted counterclockwise to release it from the column. There is a snap ring at the end of the shaft that prevents the steering wheel nut from backing off to the point that it completely comes off. The clip is easily removed with a pair of circlip pliers and then, holding the steering wheel firmly, the nut can be removed. A steering wheel puller was used to pop the wheel off the splines on the shaft. It doesn't take a whole lot of pressure to pop it in most cases and the wheel is again held firmly to take some of the rotational pressure off the lock plate as you tighten the puller.
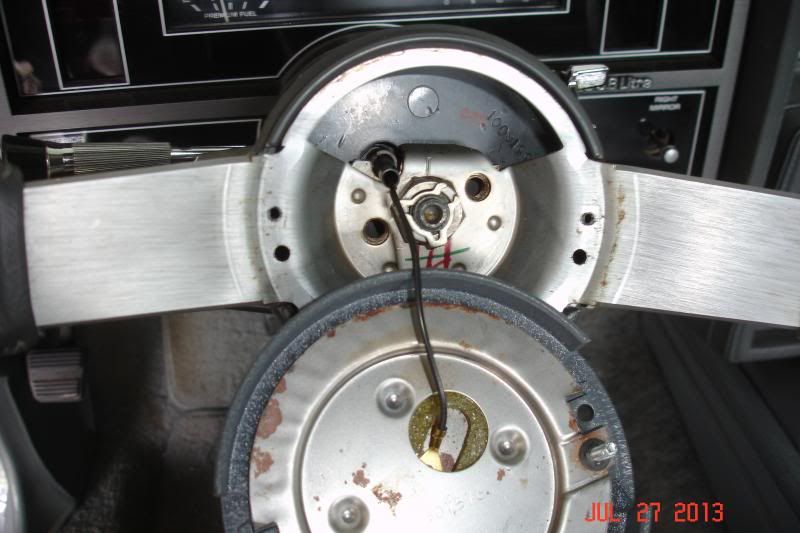
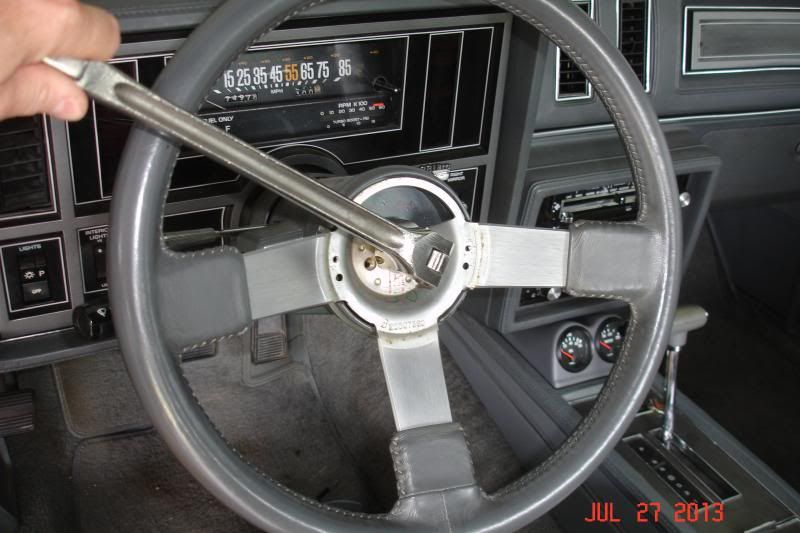
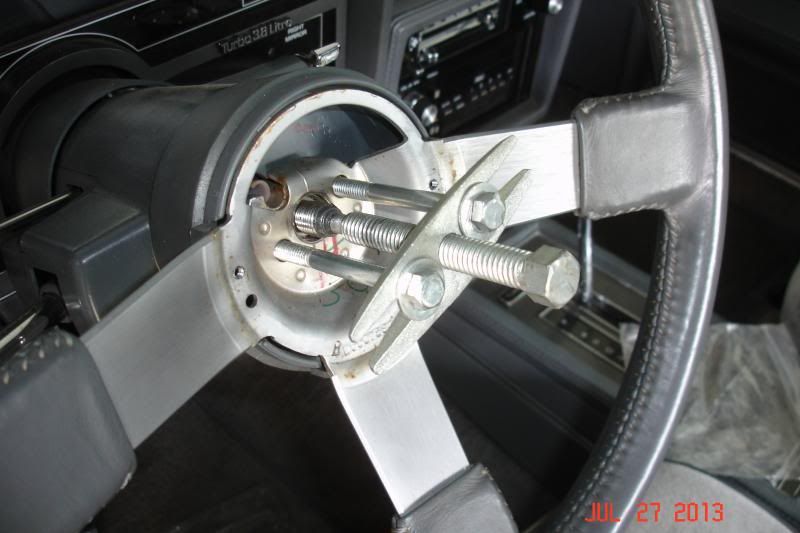
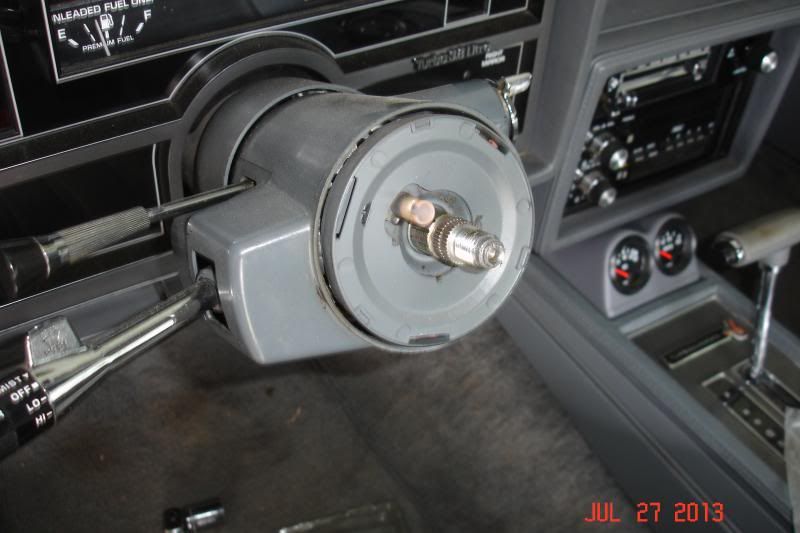
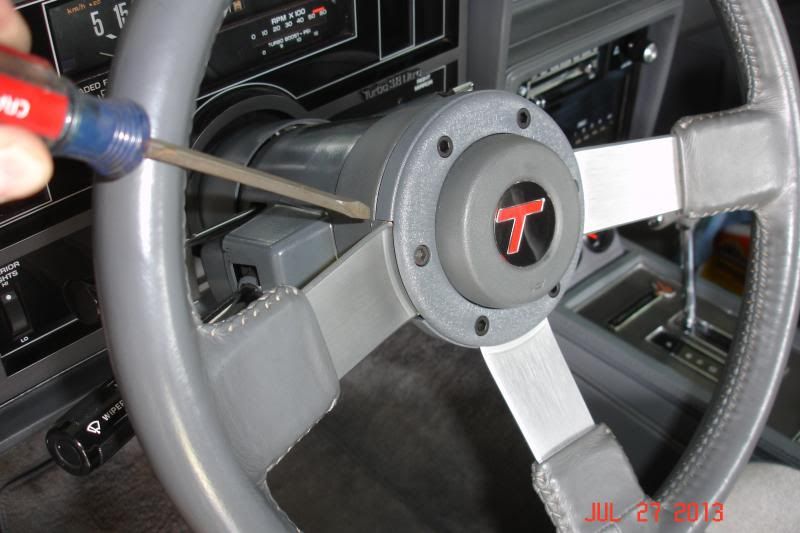
On the back side of the steering wheel are three (3) small machine bolts. These are the culprits that back out and can cause issues more serious than just a loose piece of trim. The screws were all removed and then re-installed with a dab of Loc-Tite, before putting the steering wheel and horn button back onto the column. Of course, it wouldn't be much fun if you only had to remove the steering wheel once. Upon re-assembly, I found that the trim piece on the column had just enough slop in the holes that if rotated just a bit it would interfere with the horn button and prevent it from being installed. Back off it all came and I re-clocked it before tightening it all back down again. The screwdriver in the last pic is pointing to the area of interference (after the issue was corrected). Problem fixed.

-
07-27-2013, 08:19 AM #116Veteran
- Join Date
- Feb 2009
- Location
- Mansfield, PA
- Posts
- 22,146
Black & Blue- '02 WS.6 / '07 Suburban
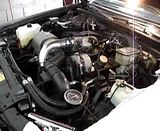
I also started some diagnostic work on the engine with respect to the slight low speed surge we have been experiencing. I have 38 psi of fuel pressure at idle and it jumps up over 40 psi when I rev the engine. The vacuum reading started out around 15 psi and then fell just a bit to 13 psi as the engine warmed up and idled down. Both the fuel pressure and vacuum readings were steady -- no jumping around at idle.
I tried the timing light, however, this was done without marking the balancer and I couldn't see anything. The spark is steady and there does not appear to be any miss or change while idling. I could hear the engine idle hunting just a bit after it warmed up and the vacuum gauge obviously followed the slight change in rpm. I did not put my tach gauge on it yet, so I cannot quantify the rpm change. It isn't a whole lot though and if I held the throttle open slightly things do seem steady.
I know internet posted vids are not the best diagnostic tools, but here it is anyway. The slight "clunk" about three-fourths of the way through the vid is the vacuum gauge sliding off the AC lines and hitting the inner fender. Thoughts?
-
07-27-2013, 10:18 AM #117Senior Member

- Join Date
- May 2010
- Location
- Wilkes-Barre, PA
- Posts
- 1,547
Black/Black- 98 WS6/04 Sierra Dmax
How's the MAF reading?
-
07-27-2013, 10:51 AM #118Veteran
- Join Date
- Feb 2009
- Location
- Mansfield, PA
- Posts
- 22,146
Black & Blue- '02 WS.6 / '07 Suburban
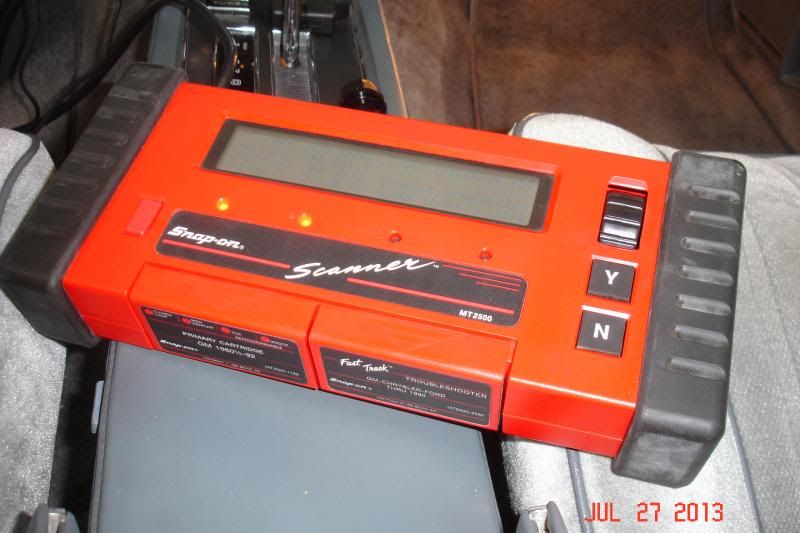
I just hooked up the Snap-On Scanner I borrowed from Ronn. No codes, O2 readings seem to be in range running from rich to lean, TPS is just a smidge too low, IAC counts -- well, not sure what they are supposed to be so have to do some reading, and no clue on the MAF, will have to look at that parameter again.
-
07-27-2013, 10:58 AM #119Veteran
- Join Date
- Feb 2009
- Location
- Mansfield, PA
- Posts
- 22,146
Black & Blue- '02 WS.6 / '07 Suburban
Looks like my IAC counts are running high. I am seeing a reading of around 50 on the scanner and the recommended range is 20-25. I am also idling at approximately 1,000 rpm, with just a few dips down to 950 or so. Time to start tune and tune!
-
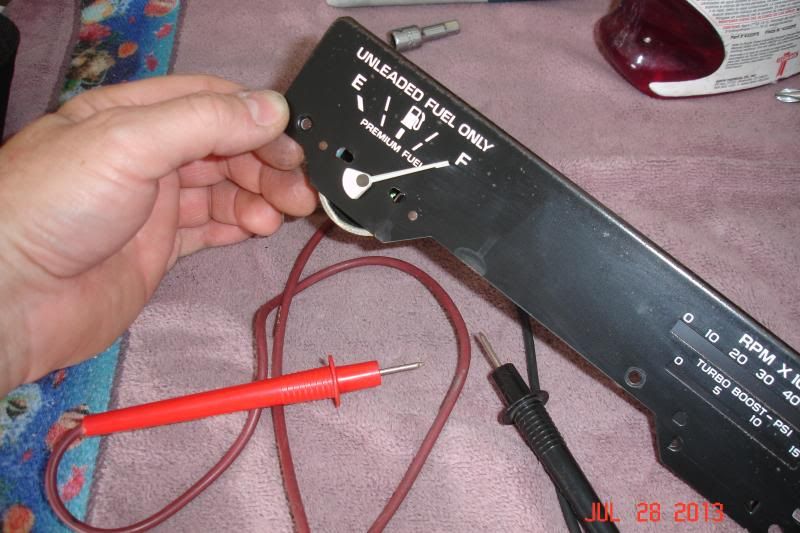
07-28-2013, 06:48 PM #120Veteran
- Join Date
- Feb 2009
- Location
- Mansfield, PA
- Posts
- 22,146
Black & Blue- '02 WS.6 / '07 Suburban
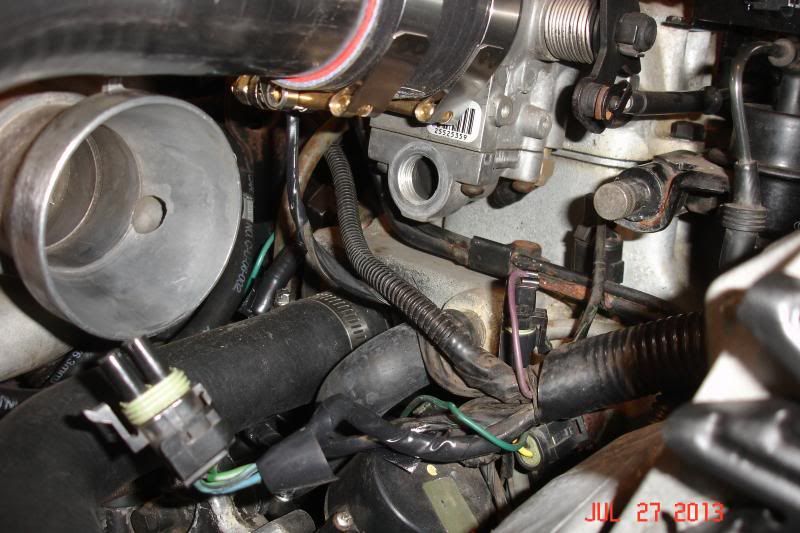
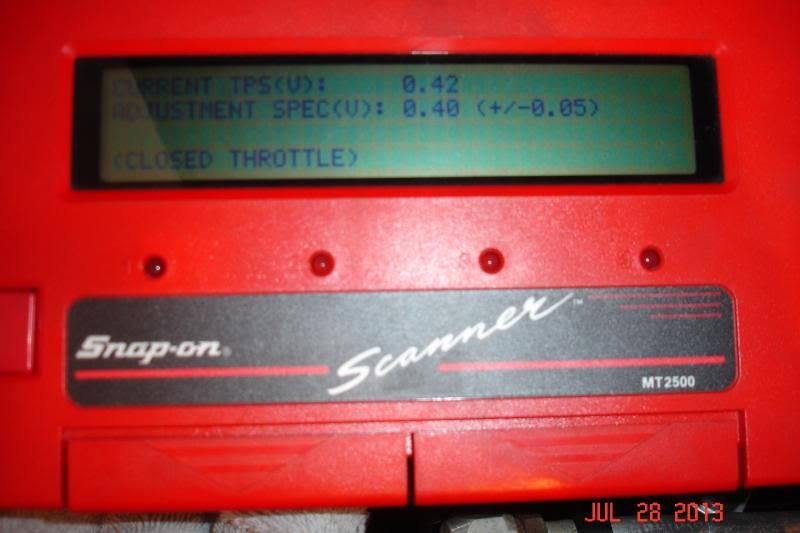
Last night, I pulled the IAC and cleaned both it and the cavity beneath the throttle body that it mounts into. The only thing I had to remove to access it was the air inlet between the MAF and the turbo, so not too tough to get at. This morning, I warmed the engine up and began the process of calibrating both the IAC and TPS using the Snap-On Scanner. I adjusted the TPS to 0.42 volts with the engine off and the throttle fully closed. The IAC is sort of interesting as you actually adjust what appears to be an idle screw on the throttle linkage. By tightening the screw and opening the throttle blade, the IAC counts (which run from 0 to 255, I believe) decrease. By threading the screw out and closing the throttle blade, the IAC counts increase. As I was seeing north of 50 on the scanner, I had to turn the screw in to open the throttle blade and also readjust the TPS to keep it in spec. The end result was that my idle dropped down to around 925 rpm and it is not surging. We had rain this morning and again this evening, so I didn't have a chance to road test it yet.
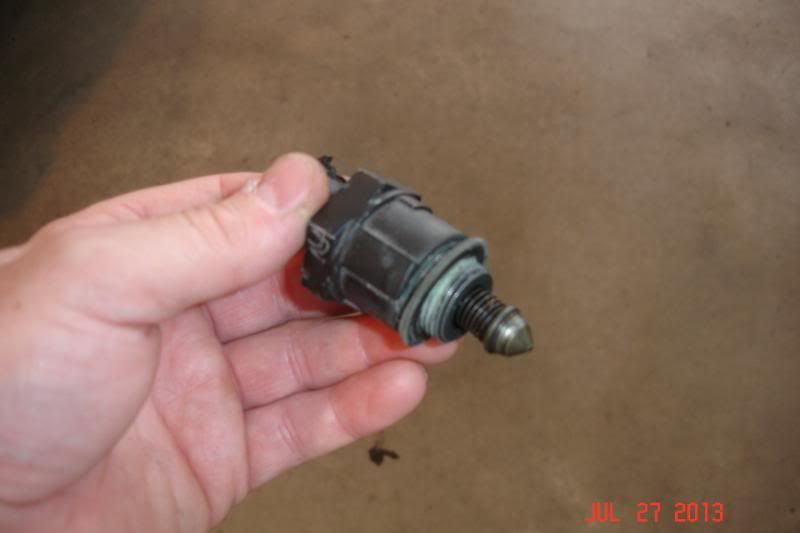
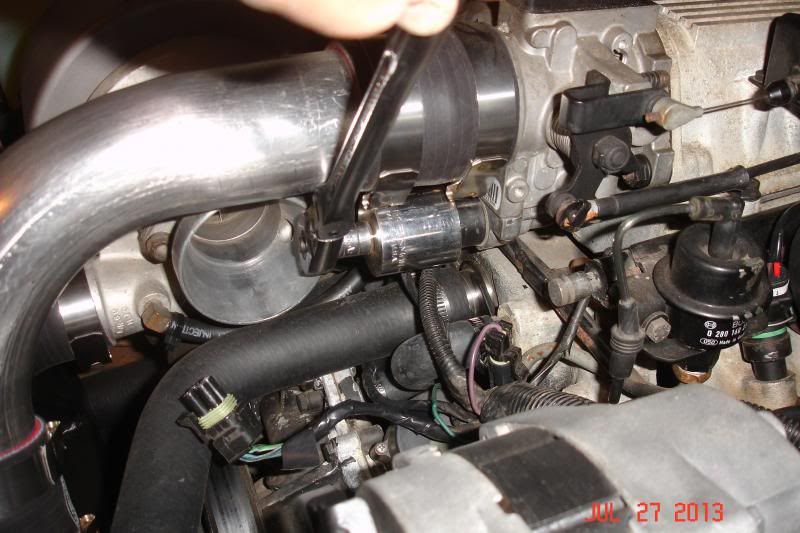
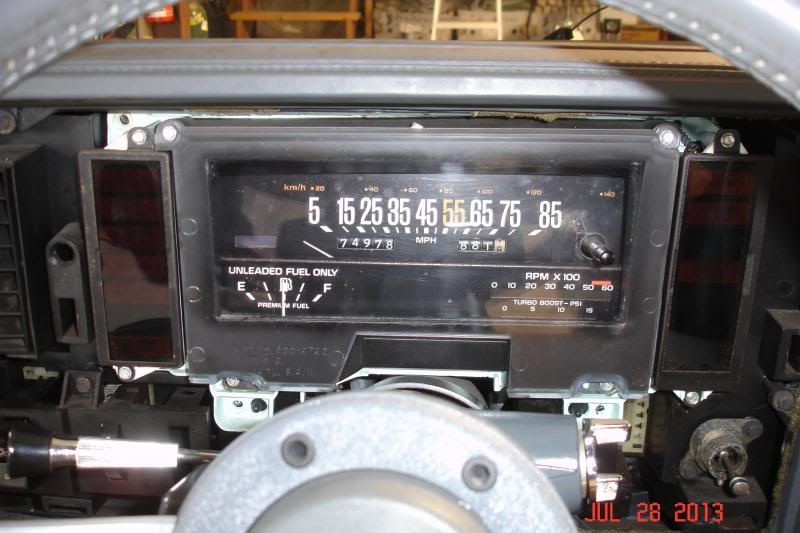
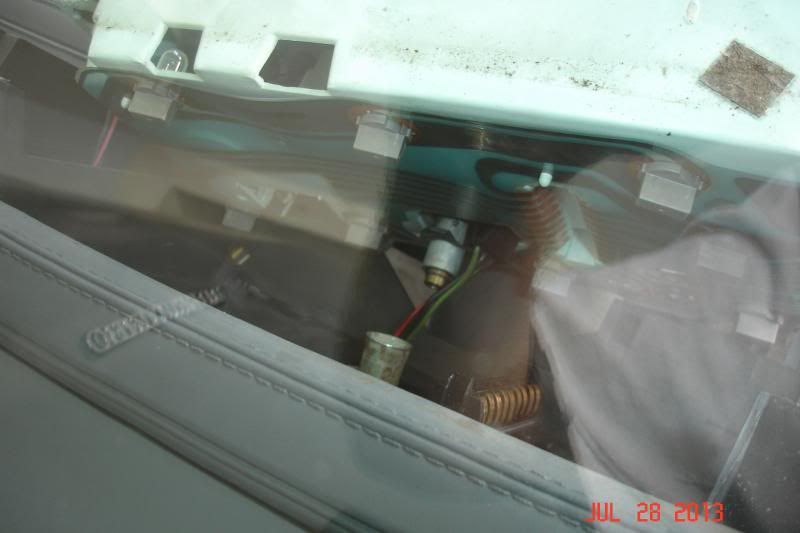
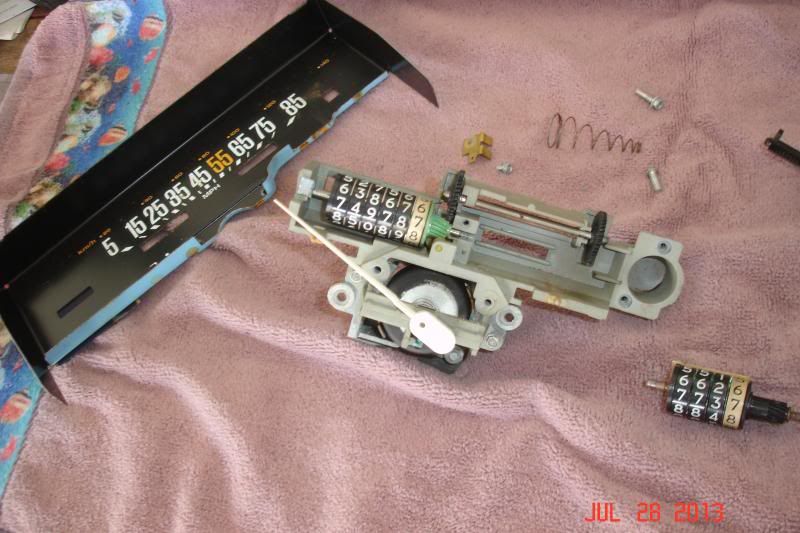
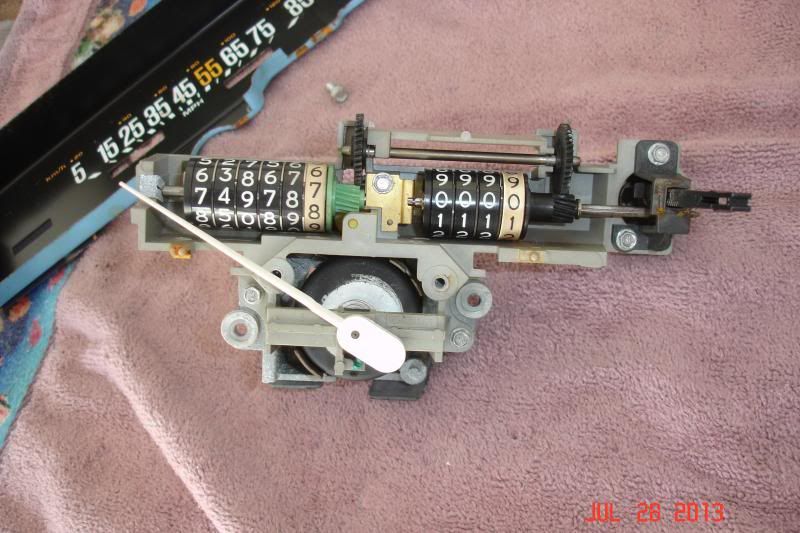
Once that process was completed, I turned my attention to the instrument cluster. I had three problems to remedy -- the tripometer will not reset, the speedometer is twitchy, and the fuel gauge is all over the place. Pulling the cluster turned out to be a bit of a headache. The trim panel pops off easily and I applied tape over top of the column to protect the plastic before proceeding. The cluster seats onto a connector that makes contact with all the printed circuits which, in theory, should make it real easy to remove it. Wrong... there is a connector next to the speedometer cable that is secured by a bolt that goes into the back of the cluster. I believe it is the Vehicle Speed Sensor (VSS), but am not 100% on that. You can see it in the pic taken through the windshield after I removed the trim surround as well. The steering column also has to be unbolted and dropped down for the cluster to pull out of the dash. The speedometer cable then has a clip that you press and it slides right off the back of the cluster.
In addition to the bolt, I found that the digital tach and boost gauge assembly is hardwired on the right side of the cluster. I have no idea where the other end goes and could not find a connector within easy reach. I searched on-line and found reference to "pulling it through the cluster and allowing it to hang off to the side". For whatever reason, I had almost no slack and it took quite a while to work it out enough to access the bolts necessary to remove the speedometer and odometer assembly.
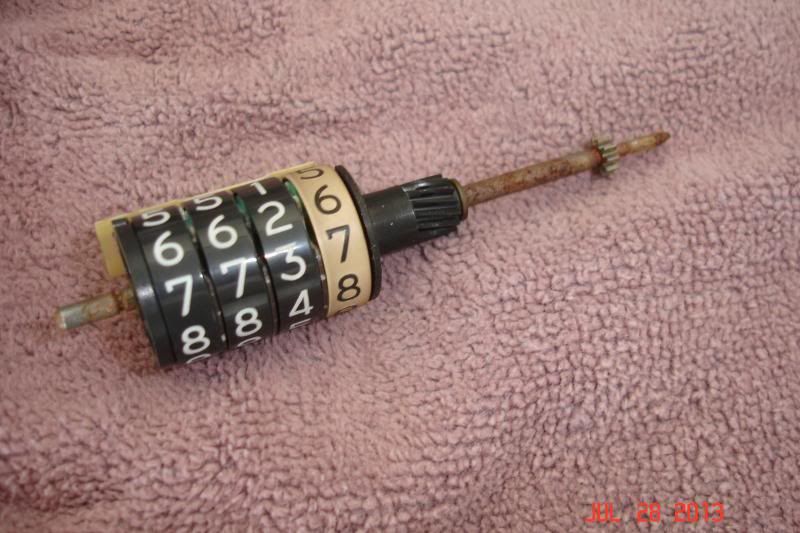
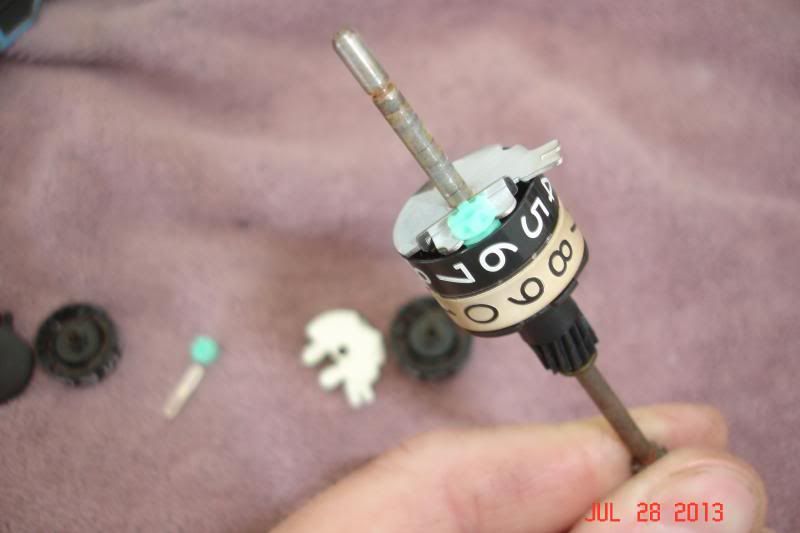
Once I finally manged to get it on the work bench, I followed a set of instructions I found on-line to fix the tripometer reset. The process involves removal of a pressed on retainer and then relocating the position of the opposite retainer by .030". This allows the tiny spring tangs to ride on a different part of the shaft as over time they wear grooves into it. Each wheel has a small gear and the whole mechanism is rather intriguing in how it works. In additon to moving the retainer, the springs are also removed and bent to retension them before putting everything back together.
With the cluster out, I removed the speedometer cable from the housing and lubed it on my work bench with a "cable lubricant" I purchased years ago in a small blue tube. In Dennis Kirban's book, he indicates that lubricating the cable will usually remedy a jumpy speedometer. However, you have to be careful to keep the top several inches dry as the lubricant can work its way up and get flung around the instrument cluster.

Last thing I did was test the fuel gauge. It has been reading all over the place no matter what the actual amount of fuel in the tank. Like most GM fuel level senders, it reads off a 0-90 ohm resistance on a sensor wire attached to the sender in the tank that varies its resistance by a float. There are three prongs on the back of the gauge, one for 12 volts, one for ground, and one for the sender signal. By applying power and ground the gauge should slowly rise and read "Full". When the sender wire is then hooked to ground, the gauge should slowly fall and read "Empty". My gauge passed both these test, so I simply cleaned the prongs and contacts in the dash they mount to before reinstalling it. It doesn't appear to be a connection issue in the cluster, so I suspect the probelm is out back somewhere.

 Reply With Quote


Thread Information
Users Browsing this Thread
There are currently 1 users browsing this thread. (0 members and 1 guests)
Similar Threads
-
1987 Turbo Regal
By Redegal in forum Vehicles For Sale / TradeReplies: 23Last Post: 03-11-2010, 08:34 PM -
1998 Buick Regal GS Turbo
By casper the ghost in forum Vehicles For Sale / TradeReplies: 8Last Post: 03-03-2009, 03:17 PM

Bookmarks