

Results 1 to 16 of 16
-
01-28-2011, 10:19 AM #1dbl clutch'n like i shld


- Join Date
- Aug 2010
- Location
- Oklahoma City, Oklahoma
- Posts
- 1,807
sebring silver- Y2K SS CAMARO
BG headlight restoration kit with pics
I did the BG headlight restoration on my car last weekend and i thought i would share the results and guide you through the steps with a little more detail then the instructions give you.
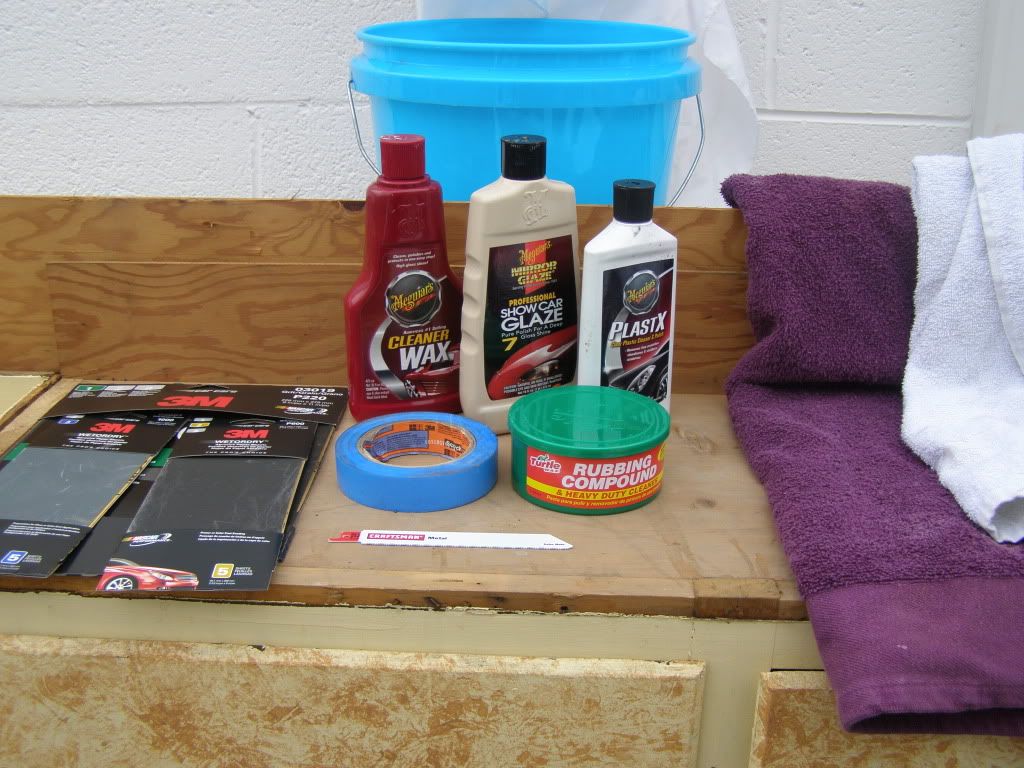
The kit Part number is CA875 and runs around $55.00
First the supplies that are included:
two small sheets of 400 grit sand paper
one sheet of 1000 grit
one sheet of 2000 grit
foam brush
cleaning towel
two latex gloves
#1 prep solution
#2 cleaning solution
#3 sealant
these supplies are pretty good to get the job done but i reccommend getting these few things to go along with the included items.
three microfiber towels for each solution (they work better for cleaning the lens)
a five pack of each grit sand paper (the pieces included are small and hard to work with)
here is a pic of what the kit looks like:

Step 1:
apply a healthy amount of #1 prep and start out with the 400 grit sand paper make sure to go over the entire lens throughly. Dont be afraid to be a little rough to get the dis coloration and cloudiness out of the lens. Once finished throughly wipe with a microfiber towel (note: the lens will be VERY hazy after this but should be clear if there is still a yellow tint you still have more sanding to do)
Step 2:
Apply a good amount of #2 Cleaner to a NEW microfiber towel and wipe the lens throughly and press somewhat hard inorder to get all of the old plastic shavings out. Once clean let air dry for about 10 minutes.
Step 3:
re-apply more of #1 prep solution and use 1000 grit sand paper in the same fashion as step number 1 with a little lighter sanding. once finished repeat step number two with a NEW microfiber towel. the lens should still cloudy but a little more clear then the 400 grit sanding.
Step 4:
Once again re-apply the rest of prep #1 solution and use the 2000 grit sand paper. Now this is where being anal and particular comes in handy. (this is the step that took the longest for me). go over the lens completely as to remove all scratches. Once satisfyed use the last microfiber towel to clean while using the #2 cleaner. Allow to air dry for about 30 minutes or so. (or cheat and wipe it off with one of the clean towels that are provided in the kit)
Step 5:
Once the lenses are COMPLETELY dry apply a large amount of bottle #3 sealerto the foam brush. move from the top on the light to the bottom in even and smooth streaks as to prevent bubbles or streaks. (REMEMBER you can put too much on and end up having a run the the product). keep smoothing the product out to get rid of any lines or imperfestions that may still exist. Allow to dry for a few hours. (the kit says only 30 minutes or so but mine took on the upwards of 2 hours to fully dry).
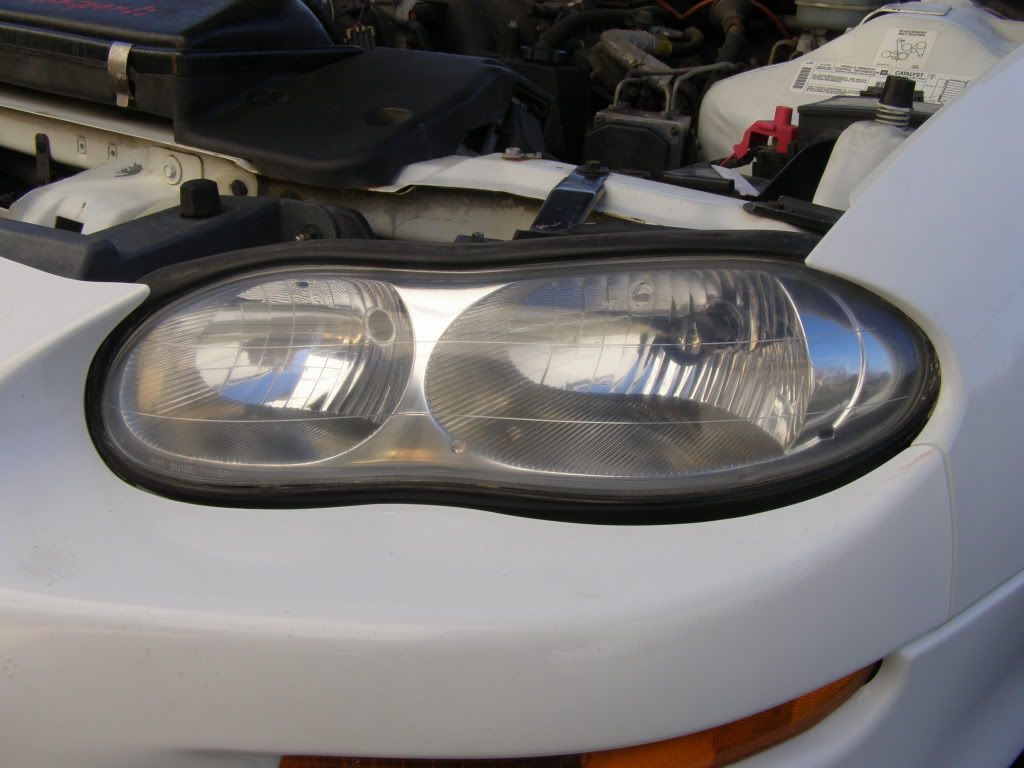
After this you will have new looking headlights. Enjoy!!!
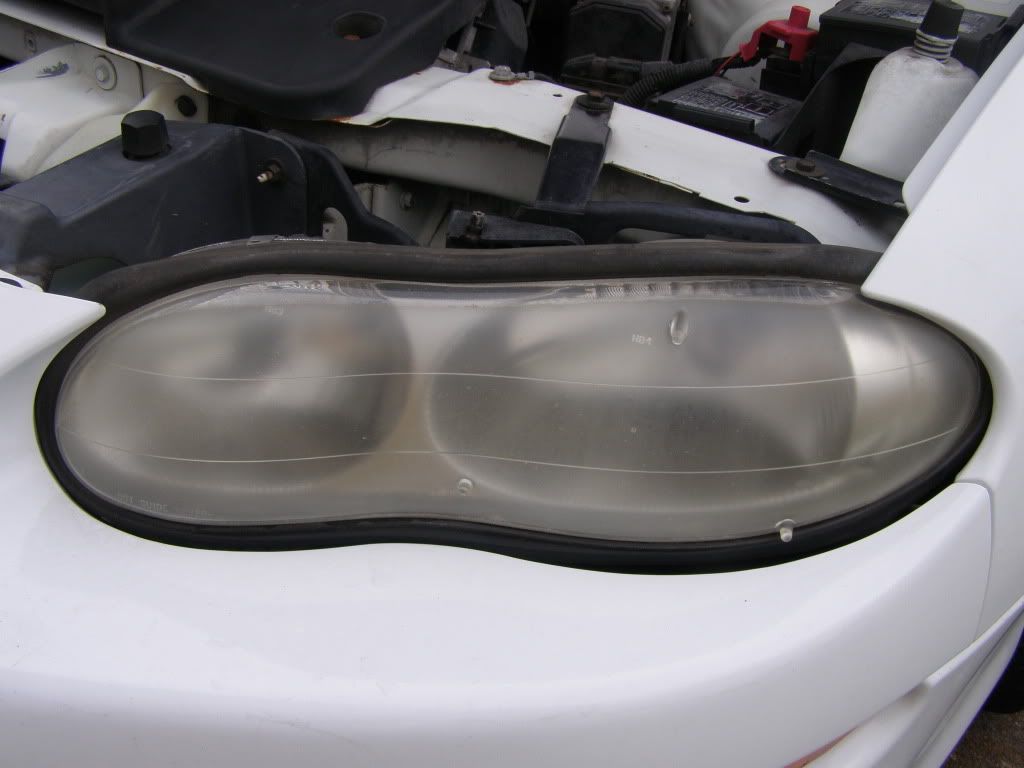
before this is what the looked like:
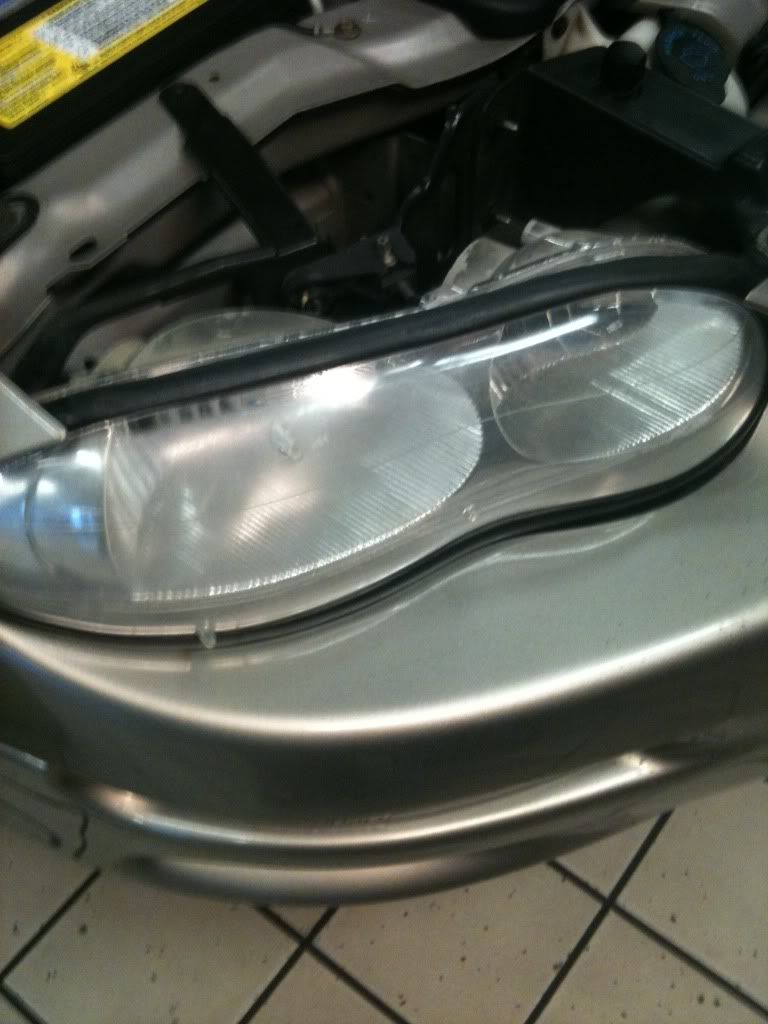
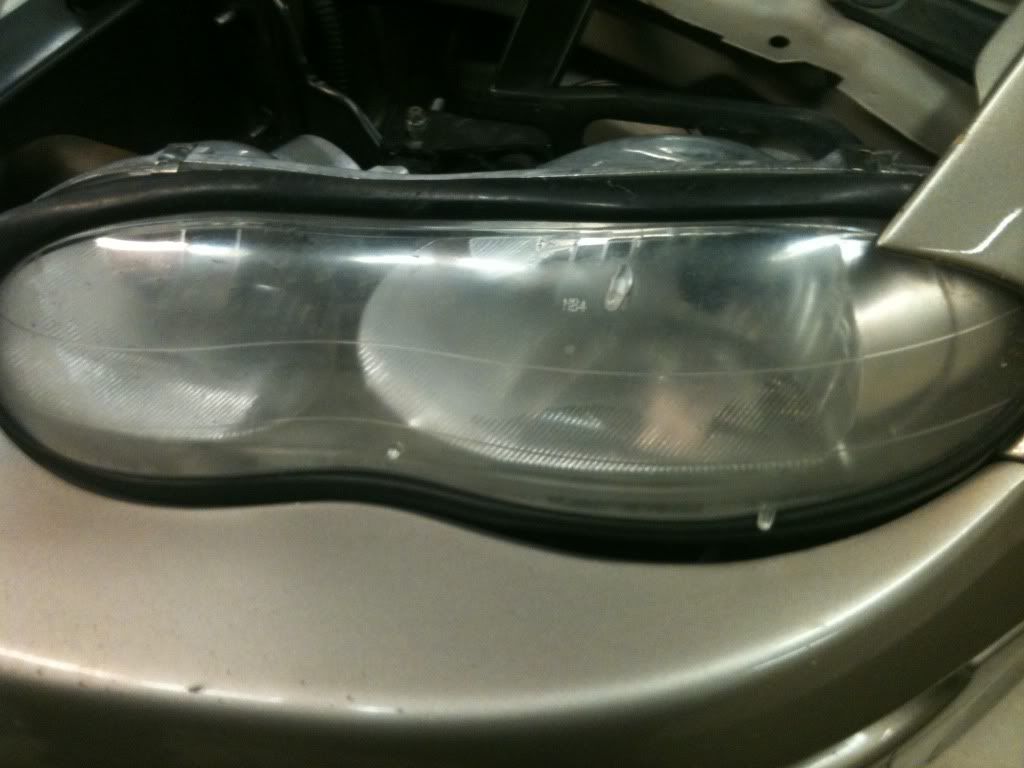
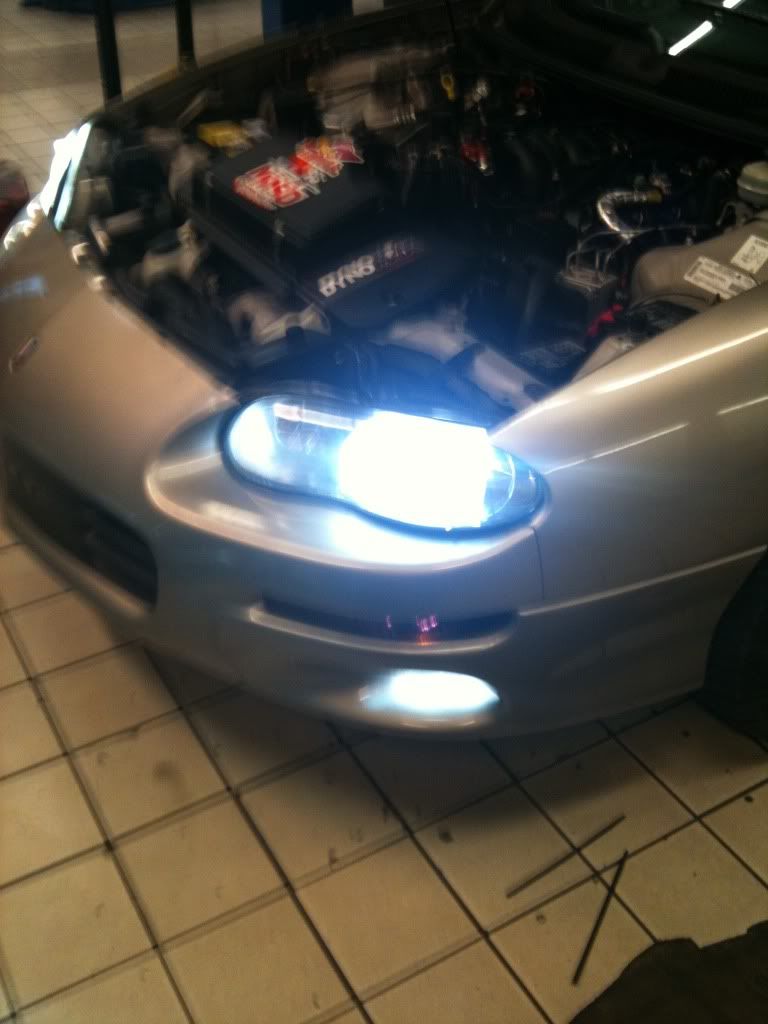
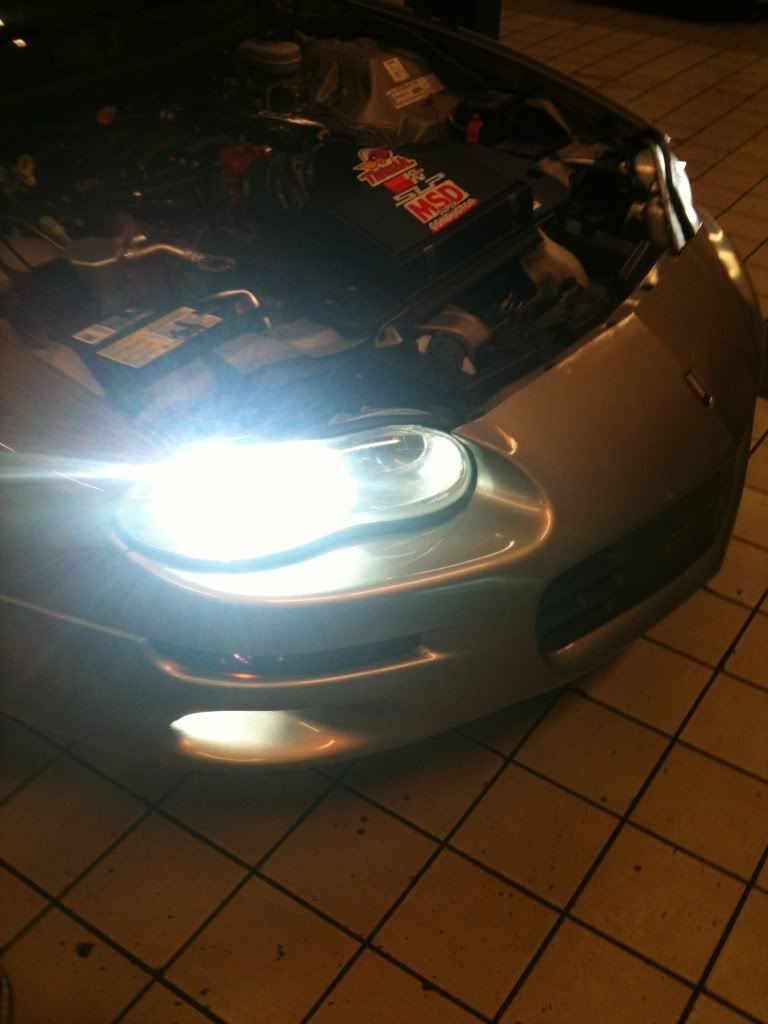
and this is what they look like now:
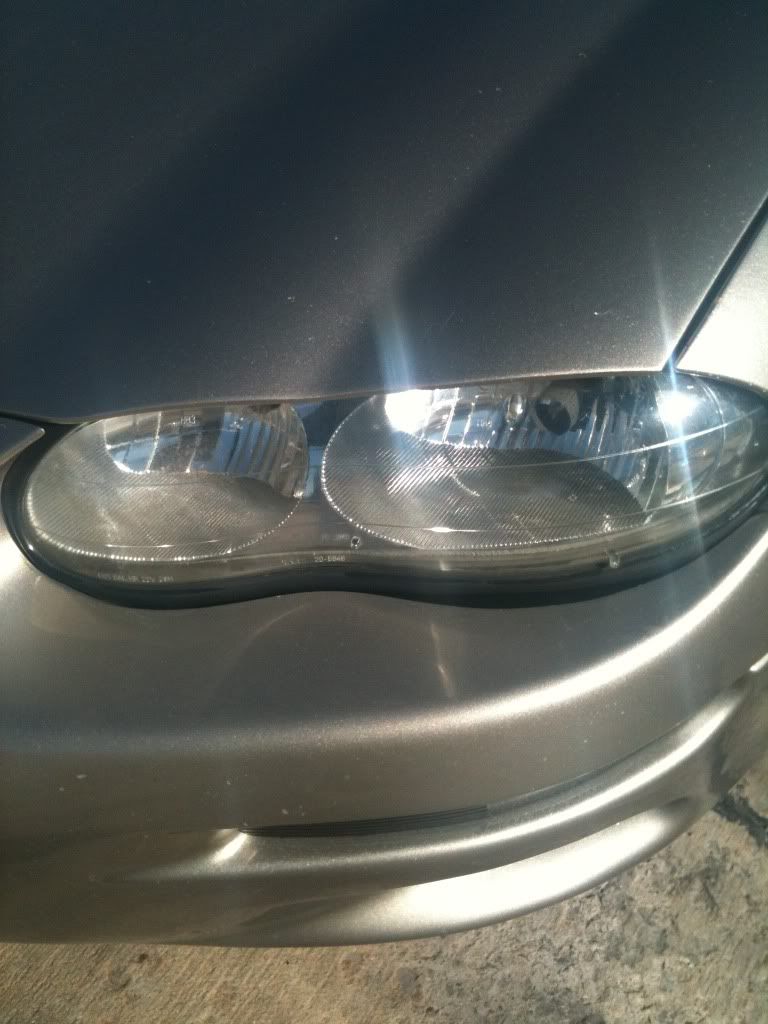
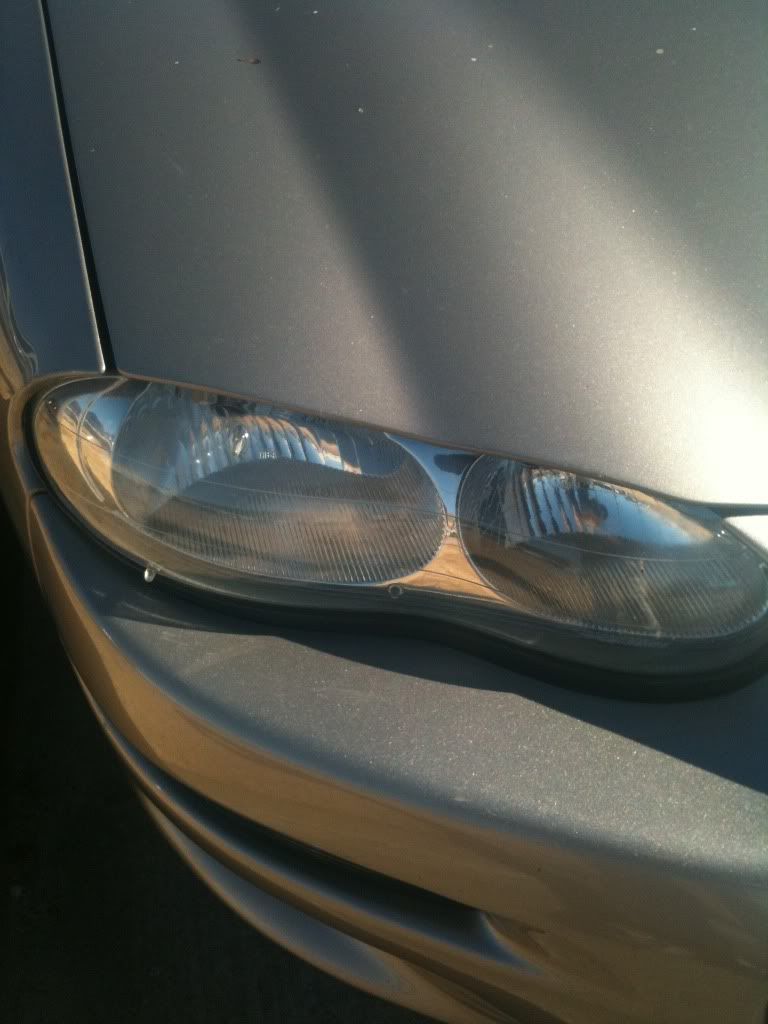
and a few with the HID's
Last edited by WICKEDLS1; 01-28-2011 at 10:30 AM.
-
01-28-2011, 10:40 AM #2Mike

- Join Date
- Sep 2006
- Location
- Lawndale, CA
- Posts
- 639
Artic White- 2002 Camaro SS

That came out good.
2002 Artic White SS 35th Wheels|Full Hotchkis Suspension|Koni SA|Magnaflow CME|SLP lid|www.fquick.com/The_Guz
-
01-28-2011, 12:24 PM #3dbl clutch'n like i shld
- Join Date
- Aug 2010
- Location
- Oklahoma City, Oklahoma
- Posts
- 1,807
sebring silver- Y2K SS CAMARO
yeah it was a night and day difference. even at night i can tell a huge difference in how far the headlights shine Originally Posted by The Guz

-
01-28-2011, 09:13 PM #4Slow'er'Ass

- Join Date
- Aug 2005
- Location
- Thornton, CO
- Posts
- 23,773
Red Tint Jewelcoat- 2008 Trailblazer SS
Congrats on the improvement.
Although it could have been done for a bit less coin.
I did a hell of a job on the Grand Am's headlight lenses for the cost of 1500 and 2000 grit sandpaper. Of course, I already had the portercable to clean them up after that....
-
01-29-2011, 06:07 AM #5dbl clutch'n like i shld
- Join Date
- Aug 2010
- Location
- Oklahoma City, Oklahoma
- Posts
- 1,807
sebring silver- Y2K SS CAMARO
Yeah i did that on my DD (honda) but i wanted to try this out and see if it was really as good as they say Originally Posted by Mr. Luos
-
01-30-2011, 04:06 PM #6Electrical Engineer


- Join Date
- Jul 2009
- Location
- North of the Motorcity
- Posts
- 2,612
Custom Swirly Black- 2001 WS6 M6
 That's what I did to my old Jeep headlights as well. Originally Posted by Mr. Luos
The only pain in the ass is it required regular polishing (once every other month or so) so the hazing didnt come back.
-
01-30-2011, 10:10 PM #7Senior Member

- Join Date
- Jul 2005
- Location
- Colorado
- Posts
- 3,268
Avus Silver- 2007 Audi RS4
Nice write up. Thanks for posting...
Out of that kit, I think the 400 grit sandpaper is an overkill.
-
01-31-2011, 04:59 AM #8dbl clutch'n like i shld
- Join Date
- Aug 2010
- Location
- Oklahoma City, Oklahoma
- Posts
- 1,807
sebring silver- Y2K SS CAMARO
yeah you could get away with 600 or 800 but if the lights are really bad the 400 works great Originally Posted by Z06-Goose
-
02-06-2011, 07:57 PM #9Senior Member

- Join Date
- Nov 2009
- Location
- NOVA
- Posts
- 1,266
2002 C5 - M6 - Blue- 2000 Z28 - A4 - Pewter
Depends on how bad your lesnses are, to decide if 400 is overkill. Mine were absolutely horrible. I went, 400, 600, 800, rubbing compound, cleaner wax, polishing wax on both of my Zs. Got pictures of the white Z before and after... used 3m paper, turtle wax compound, and meguiars for my waxes... here's mine. I did a write up not long ago on mine as well. I think it cost me around $30 total for everything.
Before...
After...
-
02-24-2011, 03:59 AM #10Lifes A Garden, Dig It!!!

- Join Date
- Jun 2009
- Location
- Northern Ohio
- Posts
- 169
Pewter- 2002 Trans Am Convertible
ive only ever had a few cars that were soooo bad i had to use sandpaper on it. and i didnt have to use worse than 1000 grit.
Below is my 2000 Grand Am GT that i had to use sandpaper on. It was so thick it was crazy. Ive done well over 100 headlight restorations. Meguiars 105 on a yellow pad does more that you think. If you buy an aggressive enough polish, like 105, it will save lots of sanding.
I used 1000 and 2000 wet, and M105 on the Grand Am GT.


This late 90's Toyota Tacoma has 300,000 miles on it and the headlights have never been touched. This is the shop truck at the motorcycle shop i work at. All i used was M105 and a yellow pad. NOTHING else.


you can see how the 105 works here!


98 Mustang with 120K. These were really bad too. Used 1000 &2000 wet and M105.


13 year old Silverado with 200K lamps... 1000 & 2000 wet and 105.


Its crazy how many people will pay 30 bucks for me to spend 20 minutes on there headlights! its cheaper than 100 + bucks for new headlights housings.Last edited by 02convertibleT/A; 02-24-2011 at 04:16 AM.
-
02-24-2011, 07:22 AM #11dbl clutch'n like i shld
- Join Date
- Aug 2010
- Location
- Oklahoma City, Oklahoma
- Posts
- 1,807
sebring silver- Y2K SS CAMARO
yeah the only bad thing about just polishing like mastercraft said is that you have to keep doing it. one thing that is good about the BG kit is that it has i sealer in it to keep them looking good Originally Posted by 02convertibleT/A
-
02-24-2011, 09:39 AM #12Lifes A Garden, Dig It!!!
- Join Date
- Jun 2009
- Location
- Northern Ohio
- Posts
- 169
Pewter- 2002 Trans Am Convertible
i use a Sealant after every headlight resto job, its meant for Headlight lenses. ill check what it is at home. I believe its a Wolfgang product. Originally Posted by WICKEDLS1
Last edited by 02convertibleT/A; 02-24-2011 at 09:51 AM.
-
02-24-2011, 09:50 AM #13Senior Member

- Join Date
- Mar 2007
- Location
- Henryetta/Tulsa Oklahoma
- Age
- 39
- Posts
- 3,675
2016 Camaro SS - Summit- 2001 Trans Am WS6 - NBM
Looks good Wicked.
 I did mine with 400, 800, 1200 and 2000 grit, and Meguiers PlastX. I made the mistake, though, of not using a sealant...and it shows. It'll be time for round 2 soon, shouldn't have to use below 1000 grit this time, and just make sure I seal it up.
-
02-24-2011, 10:07 AM #14Member

- Join Date
- Jul 2009
- Location
- chicago
- Posts
- 502
light pewter metallic- 1999 z28
subscribed
-
02-24-2011, 10:33 AM #15dbl clutch'n like i shld
- Join Date
- Aug 2010
- Location
- Oklahoma City, Oklahoma
- Posts
- 1,807
sebring silver- Y2K SS CAMARO
ive still got like three bottles of sealant and the rest of the products sitting at the house. ill help you out with it if you'd like Originally Posted by Y2KArcticSS
-
02-24-2011, 10:34 AM #16dbl clutch'n like i shld
- Join Date
- Aug 2010
- Location
- Oklahoma City, Oklahoma
- Posts
- 1,807
sebring silver- Y2K SS CAMARO
yeah the bg stuff is kind of a pain in the ass IMO just because you have to watch it and make sure it doesnt run all over the place Originally Posted by 02convertibleT/A

 Reply With Quote


Thread Information
Users Browsing this Thread
There are currently 1 users browsing this thread. (0 members and 1 guests)
Similar Threads
-
Headlight Restoration... THE RIGHT WAY!!!!! Pics!
By rappin_ernie in forum Camaro / SSReplies: 55Last Post: 10-10-2011, 04:38 PM -
Headlight Restoration... THE RIGHT WAY!!!!! Pics!
By rappin_ernie in forum Appearance SectionReplies: 14Last Post: 06-20-2010, 07:48 PM -
Headlight restoration (pics)
By GoFast908Z in forum Showcar and DetailingReplies: 6Last Post: 04-05-2010, 06:00 PM -
Headlight Restoration
By LS1Jason in forum Showcar and DetailingReplies: 12Last Post: 04-14-2009, 03:53 PM -
Headlight Restoration Kit
By LETHALxLS1 in forum Showcar and DetailingReplies: 19Last Post: 08-17-2007, 09:15 PM

Bookmarks