

Results 1 to 17 of 17
Thread: Painting my intake
-
12-28-2010, 07:43 PM #1Member


- Join Date
- Dec 2009
- Location
- Dacula, Georgia, United States
- Posts
- 555
White- 2001 RS Camaro
Painting my intake
So can someone explain how to remove the intake and valve covers so I can paint them? I've never got in the engine so keep it simple lol. Pics are much appreciated! Also what all part am I going to need besides the upper intake gaskets and valve cover gaskets?
Last edited by transamgirl89; 12-28-2010 at 09:53 PM.
-
12-29-2010, 05:28 AM #2ʢ ൧ ൨ ൩ ൪ ൫ ൬ ൭ ൮Ր Ց Ւ Փ

- Join Date
- Feb 2009
- Location
- Pittsburgh
- Posts
- 9,963
White- 2008 Hummer H3
1st off you will need tools. Not just a simple socket set either..
1. disconnect the battery.. Drain coolant system..
2. disconnect ALL upper and lower manifold electrical connections.
3. remove the coils and their mounting bracket.
4. remove ALT.
5. remove surpintine belt, and remove coolant diverter (the part the belt tensioner is mounted to).
6. remove the black bracket that comes from the rear of the engine and on up to the back of the ALT.
7. Purge the fuel rails.
8. disconnect the fuel lines.
9. remove rad hose from thermostat housing and EGR chimney pipe.
10. disconnect the breather line from the fuel vapor purge solenoid.
11. remove the fuel rail and injectors.
12. remove the intake bellows or dryer if you're still stock.
a. remove map vac line that runs to the fire wall and tranny..
b. remove brake booster vac line..
13. remove upper intake after checking all connectons are seperated.
14. remove the gasket so you can get to the LM bolts that are (2) hidden under the gasket.
15. remove the LM.
USE THESE FOR REFERANCE ONLY. DO NOT ASSEMBLE THE TWO AS YOU SEE HERE.
IF YOU DO YOU WILL NOT BE ABLE TO ACSESS THE (2) HIDDEN LM BOLTS LATER ON..


Coolant diverter..

coils and bracket.

clean ignition module pins.

clean and disassemble everything seen here..

paint and reassemble but DO NOT mount the UI to the LM as you won't be able to get to the hidden LM bolts if you do..


16. Purchase a top end gasket kit from your local auto parts.
a. ALSO, purchase a tube of high temp RTV (copper) gasket seal..
17. Pay close attention to how things come apart and take your time..
18. You will likely break the black plastic coolant elbow that goes from the coolant diverter to the lower intake.
a. The "help" section @ your auto parts will have exact replacements.
19. Tap an clear all the threaded holes in both the UI and LM.. CAREFULLY!
20. Once everything is removed. Take a LINT FREE cloth and soak up all the coolant that will get into the valley..
21. Make sure NONE of the old gasket is left behind on all mating surfaces.
22. begin reassembly and then PM me..Last edited by Smittro; 12-29-2010 at 08:01 PM. Reason: Details added
-
12-30-2010, 12:44 AM #3Member
- Join Date
- Dec 2009
- Location
- Dacula, Georgia, United States
- Posts
- 555
White- 2001 RS Camaro
Thanks smitty!! Will do! I'm gonna start tearing into her today. I decided to scrap the crappy plastic LM gaskets and payed a pretty penny for new aluminum gaskets.
-
12-30-2010, 04:04 AM #4ʢ ൧ ൨ ൩ ൪ ൫ ൬ ൭ ൮Ր Ց Ւ Փ
- Join Date
- Feb 2009
- Location
- Pittsburgh
- Posts
- 9,963
White- 2008 Hummer H3
 No prob.. You will need more gaskets than just the updated LM to head gaskets.. You will also need the large gasket shown in the pic on top of the LM. You will also need to replace the O-rings in the same pic.. Aswell as the middle plastic valley leading edge gaskets..
 Originally Posted by transamgirl89

Also be prepaired to bleed.. It has been suggested that you clip the "points" off of the push pins under the cowl so not to rip up your arms.. If not you WILL be bleeding from scratches clear up to your elbows..
Last edited by Smittro; 12-30-2010 at 04:23 AM.
Suggestion: If you are particularly irritated by another member's posting habits and are constantly fighting the urge to flame them, you can click on that person's profile, and select "Add to ignore list." This will make that person's posts invisible to you.
-
12-30-2010, 04:10 AM #5ʢ ൧ ൨ ൩ ൪ ൫ ൬ ൭ ൮Ր Ց Ւ Փ
- Join Date
- Feb 2009
- Location
- Pittsburgh
- Posts
- 9,963
White- 2008 Hummer H3
Some more pics to help..


-
12-30-2010, 04:26 AM #6ʢ ൧ ൨ ൩ ൪ ൫ ൬ ൭ ൮Ր Ց Ւ Փ
- Join Date
- Feb 2009
- Location
- Pittsburgh
- Posts
- 9,963
White- 2008 Hummer H3
This WILL be an under taking..
It's not an overly easy job but it's also not overly hard..
Just take your time, pay attention to details..
You CAN do this yourself.. Trust me..
-
12-30-2010, 11:27 AM #7Member
- Join Date
- Dec 2009
- Location
- Dacula, Georgia, United States
- Posts
- 555
White- 2001 RS Camaro
Oh I already look like I got in a fight with a bear and lost. I finally got a bottle of peroxide and have it next to me cause I know I'm gonna get another cut. Hands are fine but good lord my arms! Curse GM for mounting these engines so far back! Originally Posted by Smittro

-
12-30-2010, 11:35 AM #8Member
- Join Date
- Dec 2009
- Location
- Dacula, Georgia, United States
- Posts
- 555
White- 2001 RS Camaro
Do you have to take all these pieces off to get to the LM? I know the altenator and belt tensioner come off but do the valve covers and coil packs come off to?
-
12-30-2010, 01:30 PM #9ʢ ൧ ൨ ൩ ൪ ൫ ൬ ൭ ൮Ր Ց Ւ Փ
- Join Date
- Feb 2009
- Location
- Pittsburgh
- Posts
- 9,963
White- 2008 Hummer H3
Coil packs yes.. Valve covers no... Originally Posted by transamgirl89
-
12-30-2010, 01:31 PM #10ʢ ൧ ൨ ൩ ൪ ൫ ൬ ൭ ൮Ր Ց Ւ Փ
- Join Date
- Feb 2009
- Location
- Pittsburgh
- Posts
- 9,963
White- 2008 Hummer H3
Originally Posted by transamgirl89
 Nearly our entire engine is under the our cowl..
-
12-30-2010, 01:33 PM #11ʢ ൧ ൨ ൩ ൪ ൫ ൬ ൭ ൮Ր Ց Ւ Փ
- Join Date
- Feb 2009
- Location
- Pittsburgh
- Posts
- 9,963
White- 2008 Hummer H3
The reason the coil's have to come off is you'll be needing that space to reach the rear UI bolts and it will give you the room you need on that side to work back there..
Also both the alt. and coil brackets obstruct the LM..Last edited by Smittro; 12-30-2010 at 01:36 PM.
-
01-05-2011, 04:05 PM #12Member
- Join Date
- Dec 2009
- Location
- Dacula, Georgia, United States
- Posts
- 555
White- 2001 RS Camaro
Finally finished it!!!!
[IMG]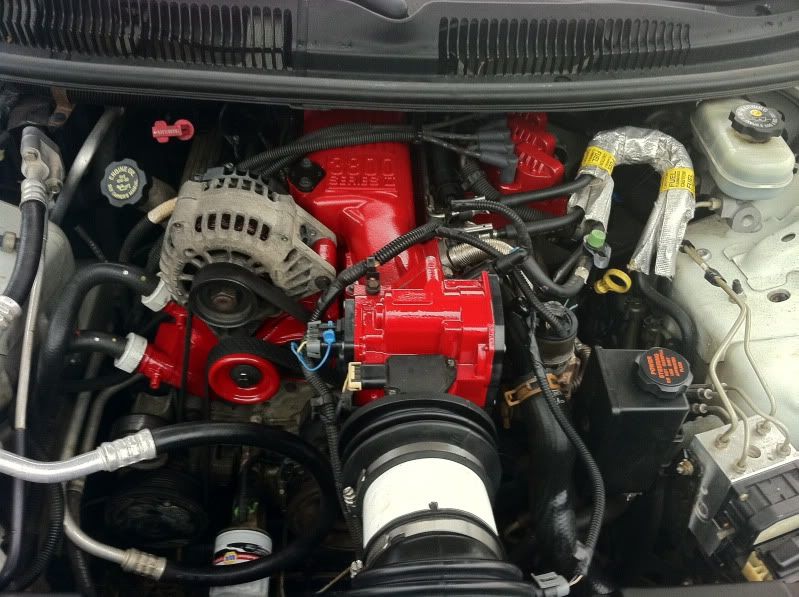 [/IMG]
[IMG]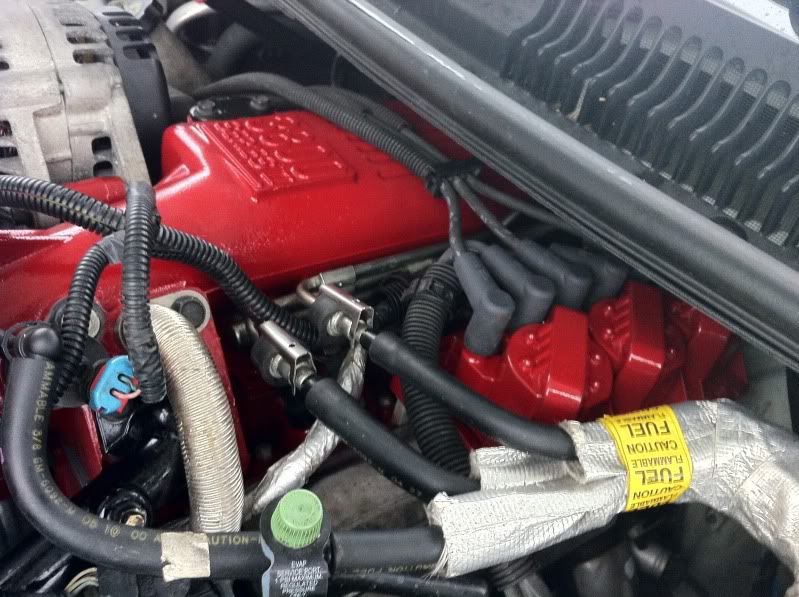 [/IMG]
-
01-05-2011, 06:38 PM #13ʢ ൧ ൨ ൩ ൪ ൫ ൬ ൭ ൮Ր Ց Ւ Փ
- Join Date
- Feb 2009
- Location
- Pittsburgh
- Posts
- 9,963
White- 2008 Hummer H3
 Lookin' good.. Now was'nt that fun! Originally Posted by transamgirl89


-
01-05-2011, 06:50 PM #14ArtistFormerlyKnownAsMac

- Join Date
- Apr 2006
- Location
- Indianapolis, IN
- Posts
- 4,886
All Black- 83, 87, 02 All WS6 T/As
Looks great... Im just confused that the screenname says TransAmGirl... but drives a v6 camaro... <scratches head>
-Geno
1983 Black WS6 "WindCharger"
1987 Black WS6 "WS87"
2002 Black WS6 "Silver Streak"
Sold the other four f-bodies
-
01-05-2011, 08:38 PM #15expensive tires

- Join Date
- Mar 2006
- Location
- phoenix
- Posts
- 1,951
white- 04 2500 4x4 crew cab
nice work.
-
01-06-2011, 04:53 PM #16Member
- Join Date
- Dec 2009
- Location
- Dacula, Georgia, United States
- Posts
- 555
White- 2001 RS Camaro
Because when I first joined the site I had a TA but I totaled it and once you make a screen name you can't change it. Originally Posted by Silver Streak
-
01-06-2011, 04:54 PM #17ArtistFormerlyKnownAsMac
- Join Date
- Apr 2006
- Location
- Indianapolis, IN
- Posts
- 4,886
All Black- 83, 87, 02 All WS6 T/As
Sure you can... I used to be KITTvsKARR... just pm'd the mods and they did it. Originally Posted by transamgirl89

 Reply With Quote

Thread Information
Users Browsing this Thread
There are currently 1 users browsing this thread. (0 members and 1 guests)
Similar Threads
-
Painting Ls6 Intake
By 98ramairguy in forum Appearance SectionReplies: 5Last Post: 06-21-2013, 11:48 AM -
Help: need help with painting LS1 intake
By fbodyNATION in forum Appearance SectionReplies: 6Last Post: 12-23-2010, 04:32 AM -
Painting a LS6 Intake
By SMWS6TA in forum Appearance SectionReplies: 2Last Post: 09-07-2010, 10:07 AM -
Question: painting intake
By LS1_ws6 in forum Appearance SectionReplies: 23Last Post: 04-01-2010, 04:13 AM -
Painting Intake?
By 00blacktransam112 in forum Appearance SectionReplies: 9Last Post: 01-13-2010, 04:36 PM

Bookmarks