

Results 41 to 60 of 97
Thread: Step By Step - HID Light Upgrade
-
07-20-2011, 09:14 AM #41Junior Member

- Join Date
- Oct 2007
- Location
- Florence, AL
- Posts
- 17
I've got a few left from the ones I ordered, if you'd be interested.. If this post violates any of the rules here, please feel free to delete it. Originally Posted by JayTA98

-
07-20-2011, 09:24 AM #42Impounded
- Join Date
- Apr 2010
- Location
- IN
- Posts
- 2,148
pics when finished
-
07-20-2011, 11:33 AM #43Junior Member
- Join Date
- Oct 2007
- Location
- Florence, AL
- Posts
- 17
Sure.. Hoping my replacement bulbs will be here tomorrow. Originally Posted by BashamWS6
-
07-23-2011, 11:20 AM #44Junior Member
- Join Date
- Oct 2007
- Location
- Florence, AL
- Posts
- 17
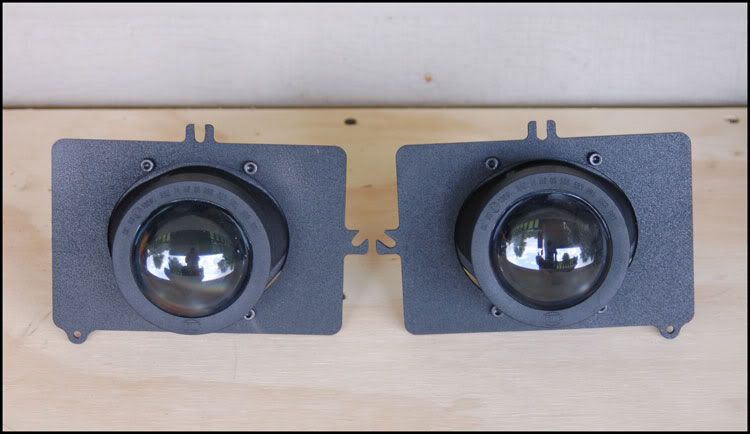
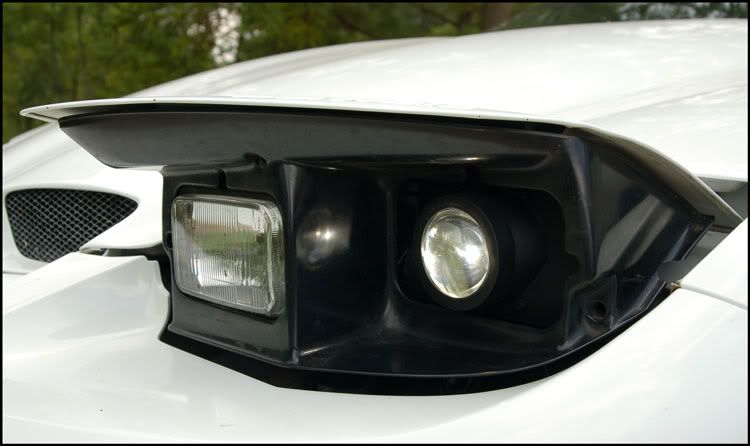
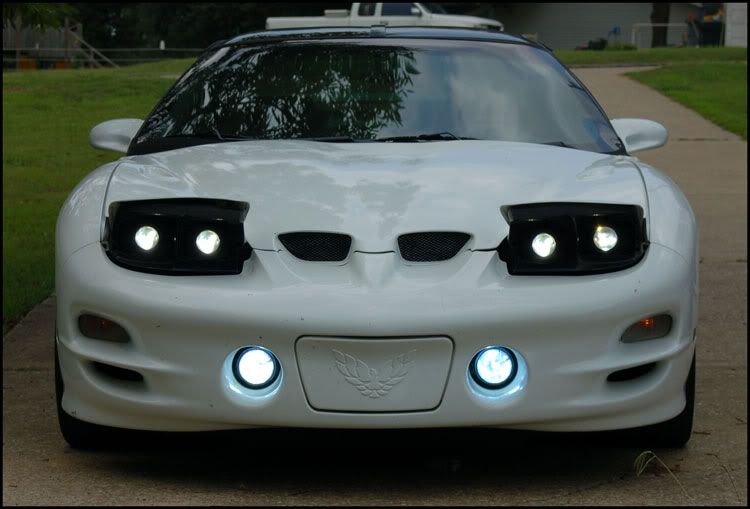
Well, my replacement parts came in yesterday, but I didn't have any time to finish the install, but found some time this morning between playing plumber and chef.. LOL.. I haven't been able to aim them yet, since it isn't dark enough and I'll have to drive somewhere to do it since my driveway is at an angle.
Here are a few pics..
Brackets with the housings installed..
Installed and on..
-
07-23-2011, 11:29 AM #45Senior Member


- Join Date
- Dec 2007
- Location
- Orlando, FL
- Posts
- 3,352
Mean Black- 1998 Trans Am
looks nice tram! Originally Posted by Tram
1998 TA 130k A4, LS6 intake, TunedByFrost, Airlid, AIR and EGR delete, Borla exhaust, front Eibach lowering springs, LS6 valley cover, UMI TQ arm, UMI LCA's, UMI panhard bar, Poly engine mounts, BMR relocation brackets, Blistein HD shocks and struts, Oil catch can, Autotrix window fix.
Now I have an 2001 F150 5.4L
-
07-23-2011, 12:28 PM #46Junior Member
- Join Date
- Oct 2007
- Location
- Florence, AL
- Posts
- 17
Thanks..
I think it'll look really good when I get the high's in there..
-
07-23-2011, 04:40 PM #47Senior Member
- Join Date
- Dec 2007
- Location
- Orlando, FL
- Posts
- 3,352
Mean Black- 1998 Trans Am
oh man sick!!! damm now i want it lol Originally Posted by Tram
-
07-23-2011, 09:05 PM #48Junior Member
- Join Date
- Oct 2007
- Location
- Florence, AL
- Posts
- 17
LOL.. Yeh, I think it'd look sweet.. I'm just starting to run out of room for ballasts, so I dunno what I'll do..
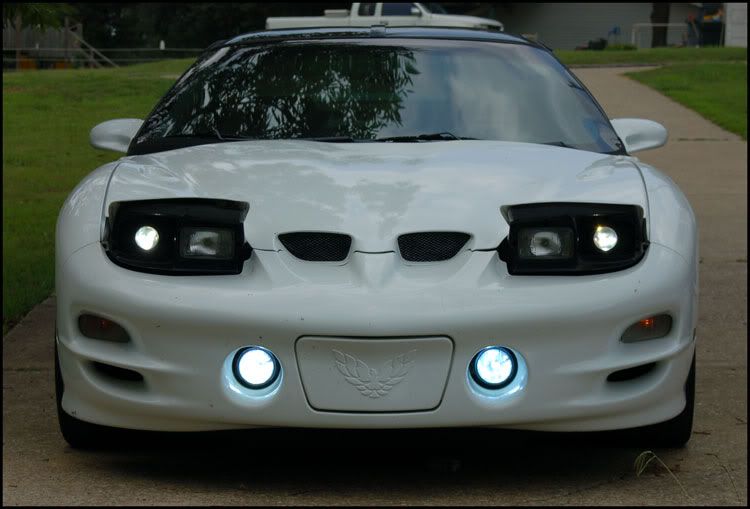
I was able to take some shots of the cutoff..
This one is before I did too much adjusting.. I had to run down to a local gas station to get some level ground to adjust the lights. I was "mid-adjust" when some local rednecks came out and started acting like there was going to be an issue, so I left..
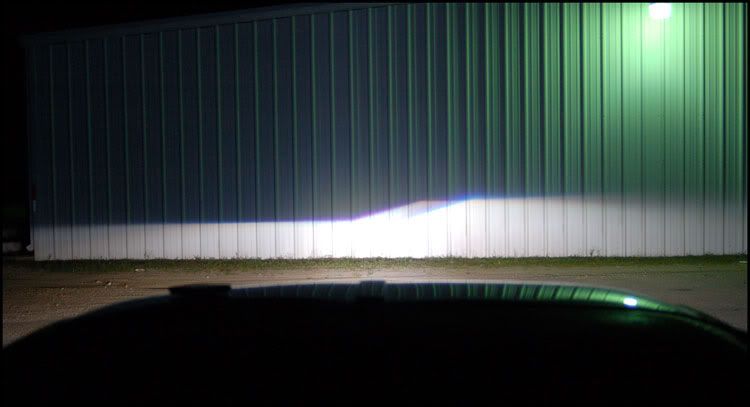
I went down to another location that I thought might not end up in someone getting shot and took these..
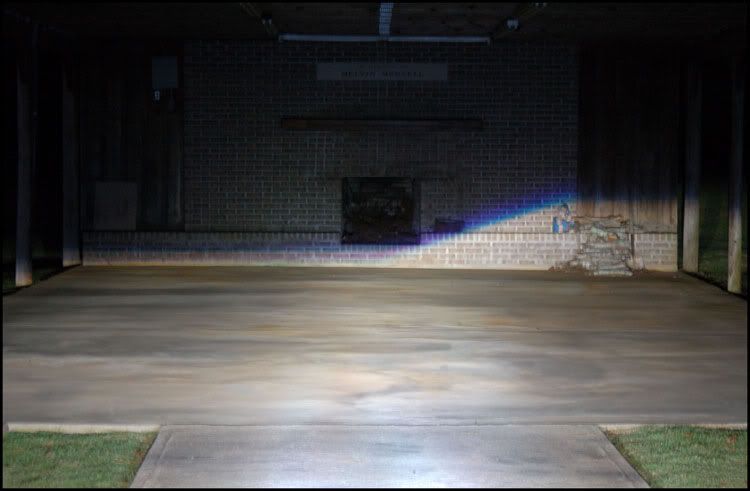
I basically adjusted it until I stopped getting flashed by trucks. Cars never seemed to mind, but taller trucks sure had an issue with it at first. I guess I need to see if there is an official way to adjust the beam for optimal effectiveness..
-
07-24-2011, 08:54 AM #49Senior Member
- Join Date
- Dec 2007
- Location
- Orlando, FL
- Posts
- 3,352
Mean Black- 1998 Trans Am
man thats bright! looks like the right side is still up some. Originally Posted by Tram
-
07-24-2011, 10:13 AM #50Impounded
- Join Date
- Apr 2010
- Location
- IN
- Posts
- 2,148
ohhh....wooow........ Originally Posted by Tram

-
07-24-2011, 06:49 PM #51Junior Member
- Join Date
- Oct 2007
- Location
- Florence, AL
- Posts
- 17
That's the cut off, you're basically supposed to make the "up" side shine into your lane and the level spot goes into the other lane, so it doesn't blind oncoming traffic.. Originally Posted by JayTA98
Fap! Fap! Fap! Originally Posted by BashamWS6
-
11-11-2011, 08:08 AM #52Junior Member
- Join Date
- Oct 2007
- Location
- Florence, AL
- Posts
- 17
I got a PM asking what these looked like at night, so I thought I'd post the video here as well..
Projector Retrofit
-
11-12-2011, 05:23 AM #53Junior Member

- Join Date
- Jun 2007
- Location
- New York City, NY
- Posts
- 60
Red- 2002 Firehawk #0689
Tram,
That is a really nice, modern looking mod. You should offer it up as a kit! Well done, mate!
-
11-12-2011, 12:36 PM #54Junior Member
- Join Date
- Oct 2007
- Location
- Florence, AL
- Posts
- 17
I've got a few extra plates I can sell if anyone is interested. Originally Posted by dagersh
-
12-26-2011, 01:46 PM #55Junior Member
- Join Date
- Jun 2007
- Location
- New York City, NY
- Posts
- 60
Red- 2002 Firehawk #0689
 Problem with Install!!!!!
Wow - I have a major problem! The Fogs are melting my housings - both sides.
These are the 880 HID kits. On my Passenger side the whole bulb housing is melting the rear relector and housing so that the bulb is pointing towards the driver side. On the Driver side, the lens is melting the center, I cannot see what is happening to the housing.
Here are some pics:
Passenger Side:
Driver's Side:
Shoot, I thought I had done a really tight install. Anyone have a clue as what is going on?
HELP!!!!!
GershLast edited by dagersh; 12-26-2011 at 01:48 PM. Reason: Bigger Pics
-
12-26-2011, 02:44 PM #5611 years of bangin gears

- Join Date
- Jan 2009
- Location
- North Jersey
- Posts
- 11,496
Phantom Black Metallic- 2004 GTO M6

What is the heat range of the fogs you are running?
-
12-26-2011, 02:52 PM #5711 years of bangin gears
- Join Date
- Jan 2009
- Location
- North Jersey
- Posts
- 11,496
Phantom Black Metallic- 2004 GTO M6
I can only assume the ignitor for the right pic is possibly too close to the lens causing the fogged look. Left pic looks like possibly vibration related.
Possibly a switch to a cooler heat range set and glass-housed projectors would suffice?Last edited by cammed goat; 12-26-2011 at 02:55 PM.
-
12-27-2011, 04:36 AM #58Senior Member
- Join Date
- Dec 2007
- Location
- Orlando, FL
- Posts
- 3,352
Mean Black- 1998 Trans Am
Nice Tram. They are bright! Originally Posted by Tram
-
12-27-2011, 04:39 AM #59Senior Member
- Join Date
- Dec 2007
- Location
- Orlando, FL
- Posts
- 3,352
Mean Black- 1998 Trans Am
Same question as Cammed, Are you running 55w bulbs? those might be creating too much heat. I'm running 35w on mine for 6 months and no issues. Originally Posted by dagersh
-
12-27-2011, 11:58 AM #60Junior Member
- Join Date
- Jun 2007
- Location
- New York City, NY
- Posts
- 60
Red- 2002 Firehawk #0689
Oh, that might make some good sense.
Good point. I thought I had ordered 35W, but maybe I did not realize they were 55w.
Shoot. Anyone know where to get replacement or even better glass/metal housings?
Thanks!!!!
Gersh

 Reply With Quote
Thread Information
Users Browsing this Thread
There are currently 1 users browsing this thread. (0 members and 1 guests)
Similar Threads
-
Step By Step: Tight Locking Trans Dipstick
By Ed Blown Vert in forum General HelpReplies: 0Last Post: 10-10-2014, 02:10 AM -
Step By Step - Chrysler 440 Six Pack Electric Choke
By Ed Blown Vert in forum General HelpReplies: 1Last Post: 06-24-2014, 05:11 AM -
Step By Step - Starting A Vintage Top Fuel Dragster
By Ed Blown Vert in forum General HelpReplies: 0Last Post: 11-06-2013, 05:10 AM -
Brake System Maintenance - Flushed Out - CHP Step By Step
By Ed Blown Vert in forum Camaro / SSReplies: 0Last Post: 01-29-2011, 02:30 AM -
Chevy 630 HP Small-Block Engine - Rockin'- Step By Step - CHP
By Ed Blown Vert in forum Camaro / SSReplies: 1Last Post: 10-19-2007, 04:04 AM

Bookmarks