

Results 21 to 36 of 36
Thread: Firehawk Fun!
-
11-11-2010, 10:53 AM #21Spaz is My Mentor


- Join Date
- Feb 2009
- Location
- Florida Man Status Acheivement
- Posts
- 11,810
Navy Blue Metallic- 98 T/A, 00 FBVert, 78T/A
maybe a couple of more detail pics like you mention in the post. Other then that I'm curious as far as total cost. Originally Posted by dagersh

-
11-11-2010, 03:59 PM #22Senior Member
- Join Date
- Aug 2009
- Location
- NC
- Posts
- 1,501
midnight blue- 2000 trans am
Very Very nice, I need to finish up college haha so I can start being able to get me some nice toys! Originally Posted by dagersh
I appreciate the list of all the parts, it helped out alot cause I would have had no idea where to start!!
-
11-12-2010, 09:17 AM #23Junior Member
- Join Date
- Jun 2007
- Location
- New York City, NY
- Posts
- 60
Red- 2002 Firehawk #0689
SMWS6TA,
Answer up top. I will put together a how-to on the Fogs and repost to the Admin's to see if they want to to sticky it.
Gersh
-
11-12-2010, 02:18 PM #24Senior Member

- Join Date
- Nov 2006
- Location
- Indianapolis
- Age
- 63
- Posts
- 5,188
Black- 2000 WS6 6spd Hooker LT
I second the sticky write up.
Very nice, detailed, well written.
And, nice garage!
-
11-13-2010, 06:13 AM #25Junior Member
- Join Date
- Jun 2007
- Location
- New York City, NY
- Posts
- 60
Red- 2002 Firehawk #0689
Thanks guys! I will document the fog light install which I completed last night. Its probably much easier on a Camaro or Formula due to the location of the lights, and I am kind of cursing Pontiac for the lack of access to the fogs. I did get done, and it looks great! I will post with lots of pics and then put all the lighting into one big write up and present it to the Admin's.
Gersh
-
11-15-2010, 03:37 PM #26Member
- Join Date
- Jun 2007
- Location
- 39466 USA
- Age
- 65
- Posts
- 904
Bright Red- 99 Firehawk #157 Roadster
I almost found it easier to drop the bumper cover to swap out fogs, I said almost...LOL
Regards,
Todd
#cajunhotrodder on instagram
-
11-15-2010, 03:47 PM #27Junior Member
- Join Date
- Jun 2007
- Location
- New York City, NY
- Posts
- 60
Red- 2002 Firehawk #0689
HID Fog Light Install
So, on to the HID Fog Light Upgrade.
Here is what you will be ordering from DDM Tuning:
DDM HID Kit, 35W, 880, 8000K (Kit / Package)
Bulb Type: 880
Wattage: 35 Watt
Bulb Color: 8000K – or whatever color you desire.
For Trans Am owners, this install is a bit trickier than the Low Beams. It took me longer to figure out how to access them than it took to do the actual conversion. Hopefully this write-up will save you that problem.
If you want to do this on your Formula or Camaro, your access point is easier to get to (I think – I have never worked on either one, so I am possibly talking out of my Butt!) Your access points should be here, on the corners of front clip. The view is looking up at the bottom of the car:


When I loosened up all the 10mm bolts underneath these sections, I found access to the Amber Front Markers and quarter panel Side Markers. I would think for Formulas and Camaros you would get to your fogs here as well. For us T/A owners, getting everything loose here will be very helpful. All the plastic here is very malleable, and you will not damage anything by bending things in order to get access.
So, if you are working on a T/A, we need to get some more access which is blocked by the plastic of the front bumper in between the sections pictured above. See the Pic below:

You can see the GM plastic rivets which hold the plastic in place. You can see the centers have already been popped out. Pop up these centers carefully; I used a trim removal tool that had a “V”. Much like the claw end of a hammer. Do not use pliers, the plastic will tear. Once the centers are popped, the rivets slide out easily. Here is what they look like.

When you are done, put these rivets back in with the centers extended, and then push them in to lock everything in place. It’s very easy – you will understand when everything is laid out in front of you.
Once the rivets are out, You will be able to bend the plastic cover back to reveal the rear of the fog lights, where the bulb can be removed. You will also see the light’s housing bracket, and the 2 10mm bolts that hold them in place.

Remove the two bolts in order to maneuver the housings so that the stock bulbs can be removed.

Tilt the Fog housing like so:

You will see this connector attached at the bulb:

Remember this connector; you will be attaching the DDM loom into it.
And here is the actual bulb housing which will be replaced by the HID:

So, on to the DDM Tuning Kit.
On the low beam conversion, the black and blue wire combination on the kit’s loom was not necessary, if you used the LMC housings. On the fogs, though, you will need them.
Here is a pic of the loom:

Attached to the Ballast:

Now, twist the HID bulb into the light housing to install. Make sure to use the seal included with the bulb. Here are the stock bulb and HID together. You can see that the stock bulb has a white rubber seal and the new HID has a clear rubber seal.

Here is the bulb installed:

Run the bulb wires towards the outside of the car and re-secure the Fog Light housing to the car:

-
11-15-2010, 03:55 PM #28Junior Member
- Join Date
- Jun 2007
- Location
- New York City, NY
- Posts
- 60
Red- 2002 Firehawk #0689
The exposed pins at the free end of the blue and black wires are the Power and Ground wires that will be attached to the connector that was removed from the stock bulb.

Space is a bit tight in there. However, if you want you could cut off the factory connector and solder or butt connect the wires together. However, this area is pretty well protected, so I just secured the wires with electrical tape. If there is a problem later on, I can still go back and connect everything permanently.

I then mounted the ballasts on the outside of the fog light housing brackets with double sided tape, and zip tied the wires for neatness sake.


Button everything back up together, and take a look at your new improved lighting!


All said and done, this takes less than an hour to actually install and makes a world of difference. Driving the car at night is a whole new affair!
Next up is keeping the Fogs on with your brights! Also very easy to do!
-
11-15-2010, 04:32 PM #29Junior Member
- Join Date
- Jun 2007
- Location
- New York City, NY
- Posts
- 60
Red- 2002 Firehawk #0689
Fog Lights with Brights
Now I want to have my Fog Lights stay on with the brights – HID’s do not like to be switched too often.
The procedure is very simple and can be done in about ½ hour or so.
First we need to get into the upper rightmost fuse box in the engine compartment.

You can see the relay we want. It is the rightmost gray relay numbered “8567” located under the large black one numbered “7234”. Before we do anything, the fuse block must be lifted in order to expose the wires beneath.
The screwdriver in the picture is releasing the locking tab that holds the fuse block in place. Once the tab is released, the fuse block may be slid up and to the left.


Here you can see the wires now exposed ( the whole block is lifted out to the left). We want to deal with the light green wire (between the brown and orange in the picture).
Another view:

Here is the wire loom coming out of the fuse block. We are going to cut the Light Green wire as far down the loom as we feel comfortable doing.

Here is the wire cut:

The cut wire must now be sealed off so that it cannot make ground. Make sure you are not doing this to the wire coming off the relay!!!! We will deal with the relay side momentarily. Here is how I sealed off my wire.

Now back to the relay side. I tried to leave as much length as possible to attach to this body ground just above the fuse block. I cut mine too short, so I will have to lengthen the light green wire with some spare wire of the same gauge.
The body ground and the eyelet I am going to use:

The wire extension with Butt connector:

Attached, and then you can see the red heat shrink wrap that I will put over the connection:

Eyelet attached:

The ground (needs some cleaning):

Attached (post ground cleaned up!):

All buttoned up. Yes, I am anal, and besides… yellow makes it go faster!!!!
Yes, I got the wrench out!

Voila!

-
11-15-2010, 05:54 PM #3038 of 139

- Join Date
- Jul 2005
- Location
- Kearney, NE
- Posts
- 931
Black- 2001 Pontiac
No kiddin', ..., So making the fog lights stay on with the high beams is as easy as cutting that light green wire & grounding the section from the relay?!?
Hell, I can handle that, ...
Continue, ..., we're likin' the good write-ups & photos to explain everything, ...,
-
11-15-2010, 08:30 PM #31Chief of his tribe!

- Join Date
- Mar 2008
- Location
- NYC
- Posts
- 1,460
Navy Blue Metallic- 2000 T/A Firehawk M6
I am LOVING your car. i wish mine was as clean
 keep up the excellent work and great writeups!
-
11-16-2010, 08:53 AM #32Junior Member
- Join Date
- Jun 2007
- Location
- New York City, NY
- Posts
- 60
Red- 2002 Firehawk #0689
Thanks guys.
I think Headlight motor gear upgrades are next on the list, along with Sequential Tail Lights.
-
11-16-2010, 09:38 AM #33Spaz is My Mentor
- Join Date
- Feb 2009
- Location
- Florida Man Status Acheivement
- Posts
- 11,810
Navy Blue Metallic- 98 T/A, 00 FBVert, 78T/A
I'm defiantly going to be doing this after Christmas.
-
11-16-2010, 12:05 PM #34Spaz is My Mentor
- Join Date
- Feb 2009
- Location
- Florida Man Status Acheivement
- Posts
- 11,810
Navy Blue Metallic- 98 T/A, 00 FBVert, 78T/A
Dagersh,
I forgot to say in my response to also post it in the General area. You will have better chance at getting it seen.
-
11-16-2010, 05:33 PM #35Junior Member
- Join Date
- Jun 2007
- Location
- New York City, NY
- Posts
- 60
Red- 2002 Firehawk #0689
Will do. Thx!
-
11-29-2010, 11:44 AM #36Junior Member
- Join Date
- Jun 2007
- Location
- New York City, NY
- Posts
- 60
Red- 2002 Firehawk #0689
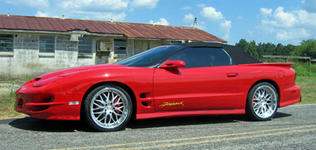
New Shoes!
18" C6 ZO6 Replicas from OE Wheels. Yummy!


Next up, Brembo CTS-V 4 Piston Caliper and '06 ZO6 Rotors!

 Reply With Quote
Thread Information
Users Browsing this Thread
There are currently 1 users browsing this thread. (0 members and 1 guests)
Similar Threads
-
Spoiler, 1993-02 Firehawk "Iroc-Style" (Trans Am only) Iroc style Firehawk spoiler??
By Devylyst in forum Appearance SectionReplies: 18Last Post: 01-25-2014, 03:54 PM -
Wanted: Boot cover, Firehawk slp floor mats, Firehawk slp car cover
By 1fastcamarosss11 in forum Parts Wanted / TradeReplies: 3Last Post: 02-21-2013, 04:37 PM -
WTB: 98-02 WS6 or Firehawk M6
By the_tom in forum Vehicles For Sale / TradeReplies: 12Last Post: 04-16-2010, 12:16 PM -
firehawk a4 vs firehawk m6? suggestions on buying
By jermoe in forum Firebird / WS6Replies: 4Last Post: 04-24-2007, 02:45 PM -
Ebony Firehawk Floormats & Firehawk Car Cover/Bag
By John02Hawk in forum Parts For Sale / TradeReplies: 6Last Post: 05-21-2006, 11:32 AM

Bookmarks