

Results 21 to 40 of 83
Thread: 1970 Chevrolet Camaro
-
09-03-2015, 09:02 AM #21Spaz is My Mentor


- Join Date
- Feb 2009
- Location
- Florida Man Status Acheivement
- Posts
- 11,785
Navy Blue Metallic- 98 T/A, 00 FBVert, 78T/A
I always love Jeff's threads. Very detailed. Must be way he's a lawyer

-
09-03-2015, 11:50 AM #22Veteran

- Join Date
- Feb 2009
- Location
- Mansfield, PA
- Posts
- 22,146
Black & Blue- '02 WS.6 / '07 Suburban
 Originally Posted by 35th-ANV-SS

Thanks, Jon. I was able to buy four new #168 bulbs today so we'll see if any others are out, or if they have the #194's installed.
-
09-07-2015, 06:02 AM #23Veteran
- Join Date
- Feb 2009
- Location
- Mansfield, PA
- Posts
- 22,146
Black & Blue- '02 WS.6 / '07 Suburban
Going to address a few minor issues, or at least attempt to. The dome light lamp is setting in the glove box. Apparently, the light stays lit all the time. The parking brake foot pedal is rubber banded to keep it in the released position. And the accessory gauge lights are wired on all the time with the ignition.
Also, going to work up a shopping list for Fall Carlisle which runs from September 30th to October 4th. We'll probably just go Friday this year as I am only going to shop for the Camaro. Try to get down there early and park outside Gate 3. After we do some shopping, chances are good that we'll end up at Redd's by mid-afternoon for some eats.
-
09-07-2015, 12:51 PM #24Member

- Join Date
- May 2015
- Location
- Blossburg, PA
- Age
- 34
- Posts
- 472
Silver Metallic- 2000 Trans Am WS6
Finally a car thread of your's that I can be early in
 . Nice work so far, I like RS/split bumpers as much as the next guy but I do enjoy the simplicity and natural body of this Camaro vs being done up to what it wasn't meant to be from the factory.
A minor video clip of the Camaro, followed by Ronn's Dart, from the Chilson Wilcox event.
2000 Trans Am WS.6 M6
SLP lid & bellow w/ K&N, GMMG catback w/ Corsa Clones, UMI SFC, UMI Adj. Panhard, UMI Adj. TQ arm w/ relocation kit, QTP Longtube headers ORY, LS6 intake, EGR/A.I.R delete.
Eibach prokit, Bilstein HDs, Nitto NT555s, skip shift elim, whiteface overlays, 20% tint, matte black decal/overlays
YouTube.com/DarrenWS6
-
09-07-2015, 05:31 PM #25Veteran
- Join Date
- Feb 2009
- Location
- Mansfield, PA
- Posts
- 22,146
Black & Blue- '02 WS.6 / '07 Suburban
Had success on all three projects today. I started with the dome light issue and began by installing the bulb and confirming that the light stayed on with the doors closed. I then checked the dimmer switch to ensure that it was not activating the dome light. I knew from the schematics that the door switches create a path to ground when the doors are opened and that is what activates the light.
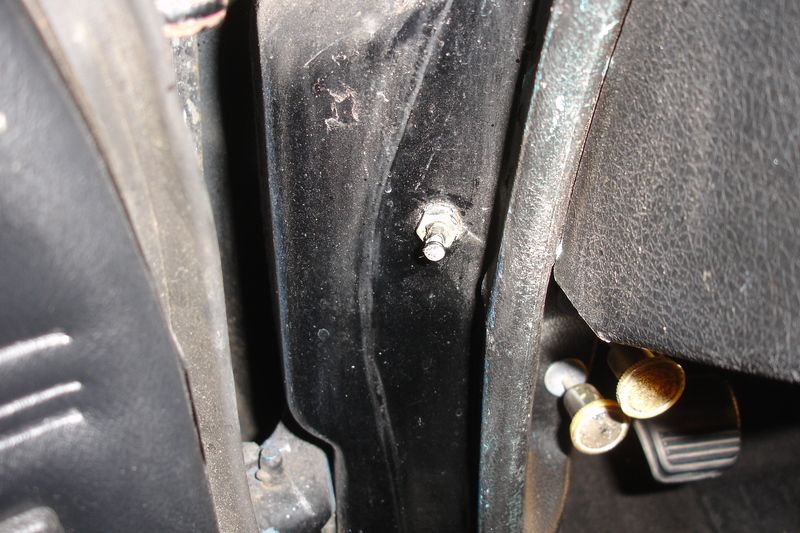
I shut the passenger door and then pressed the driver door switch with my finger which caused the light to go out. With a deep well 7/16" socket on an extension and my 1/4" drive ratchet I backed the driver door switch out a ways and confirmed that it has at least a quarter inch or more of thread. I then snugged the switch and backed it out around 2 turns. Closing the door the dome light immediately went out. I backed it out another half turn or so and to be safe also backed the passenger side switch out just a touch. I then checked each door several times to ensure that the light stayed out with the doors shut. The real test was driving on our bumpy back roads this afternoon and making sure the dome light never even flickered. I think all is good for now, but I did add a dome light lens and housing to the shopping list.
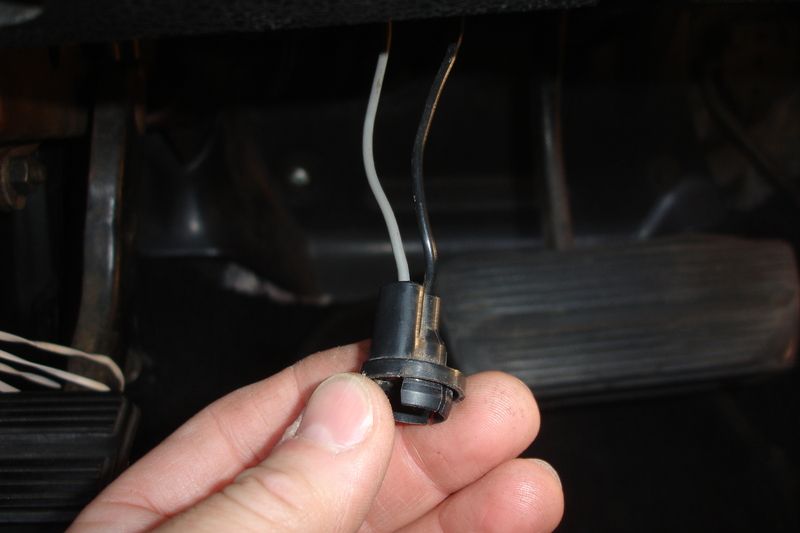
Next up were the lights on the aftermarket gauges. The lights on these were wired into the "ACC" slot on the fuse panel and are on all the time. Looking under the dash, it appeared that the easiest tap into the dash lights would be the light for the heater control panel. I confirmed that the gray wire was hot but found that the bulb was burned out. I had not noticed this before as the steering wheel completely blocks the panel which is located on the left side of the column. Fortunately, I had one #1445 bulb left in my stash to replace it. I spliced into the gray wire and confirmed that the lights on the gauges now come on with the light switch and are controlled by the dimmer.
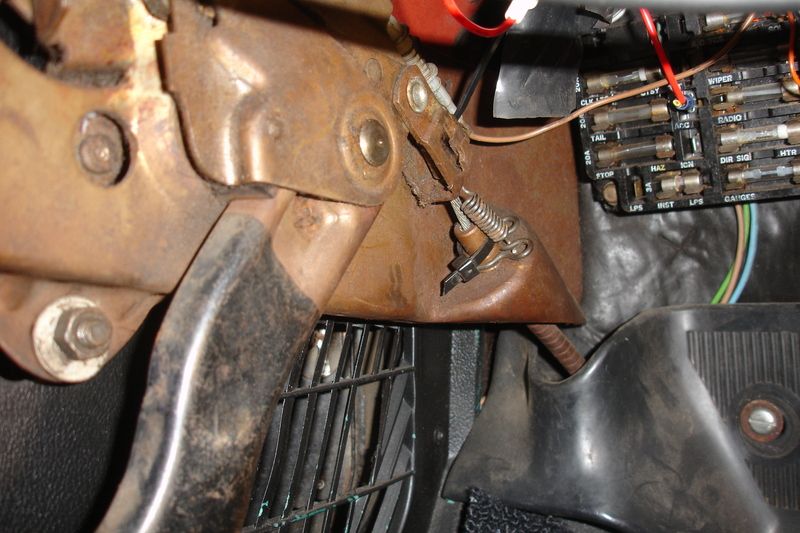
Finally, the rubber bands on the parking brake had to go. Being an automatic, we just do not use the parking brake so the easiest fix appeared to be placing a small spring on the back of the brake lever which pulled that side down and the pedal up. I was able to find a spring that placed enough tension on the pedal to hold it up and that attached to the ear on the cable retainer clip, so no drilling or fabrication was required. I will complete a more proper repair sometime later.
-
09-08-2015, 03:04 AM #26Veteran
- Join Date
- Feb 2009
- Location
- Mansfield, PA
- Posts
- 22,146
Black & Blue- '02 WS.6 / '07 Suburban
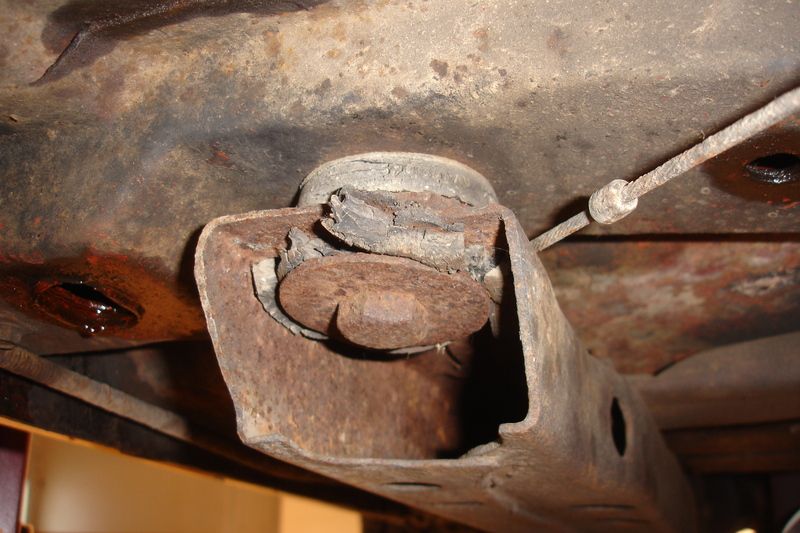
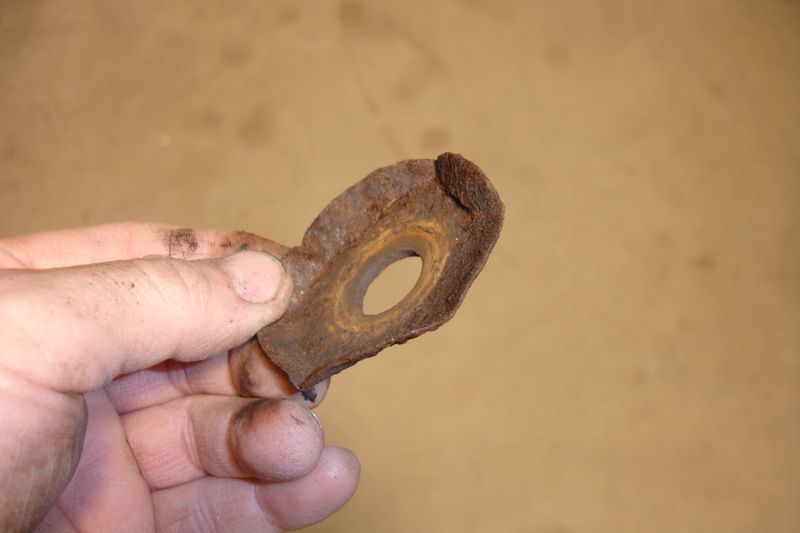
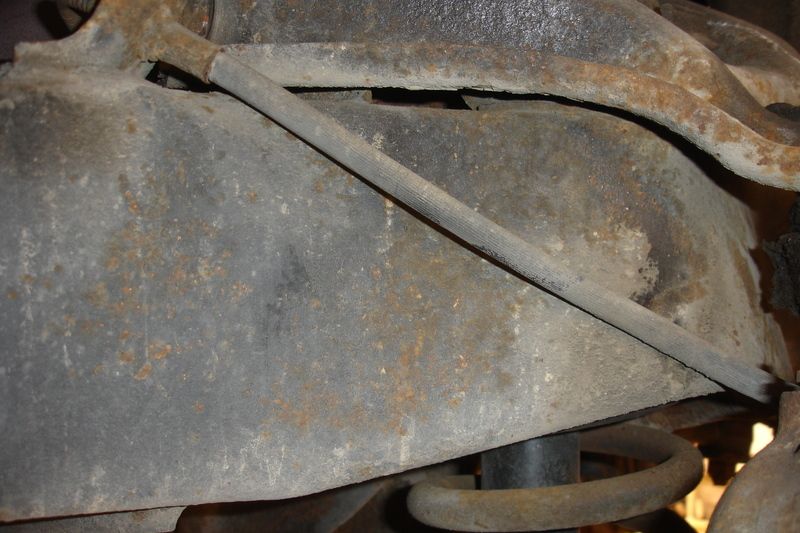
Next up is going to have to be the bushings on the subframe. A new set came with the car and it does not look like too tough of a project. I have already started hosing things down with PB Blaster in hope that the caged nuts do not let loose when I attempt to remove the bolts. I will probably utilize my set of blocks to get the car around a foot in the air, and then use the lift to pick up a bit on the body. With jackstands under the back of the subframe I should get enough separation to remove and insert the upper bushings. The stock bushing are decimated to say the least.
-
09-08-2015, 03:23 AM #27Member
- Join Date
- Feb 2015
- Location
- Harrisburg, PA
- Posts
- 188
Silver- 1995 Firehawk
I will be there Friday as well.Also, going to work up a shopping list for Fall Carlisle which runs from September 30th to October 4th. We'll probably just go Friday this year as I am only going to shop for the Camaro
I did mine on my 76 TA and it's not a difficult job at all.A new set came with the car and it does not look like too tough of a project.
-
09-13-2015, 06:13 PM #28Veteran
- Join Date
- Feb 2009
- Location
- Mansfield, PA
- Posts
- 22,146
Black & Blue- '02 WS.6 / '07 Suburban
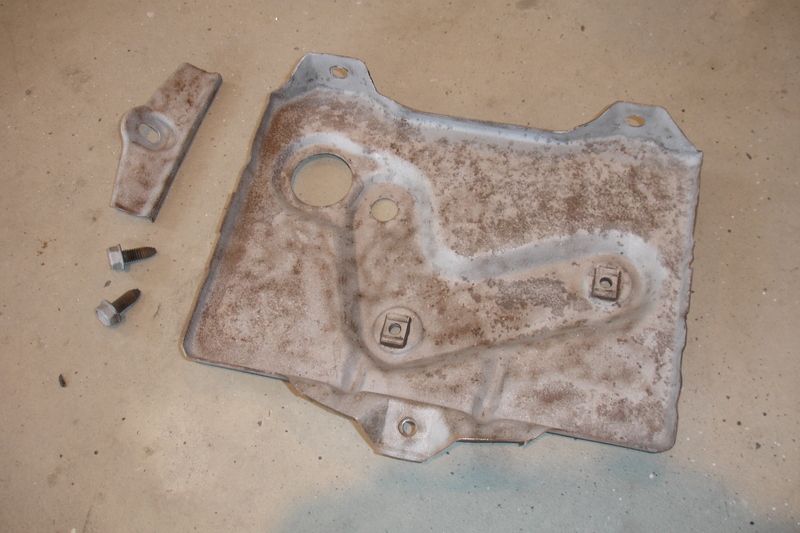
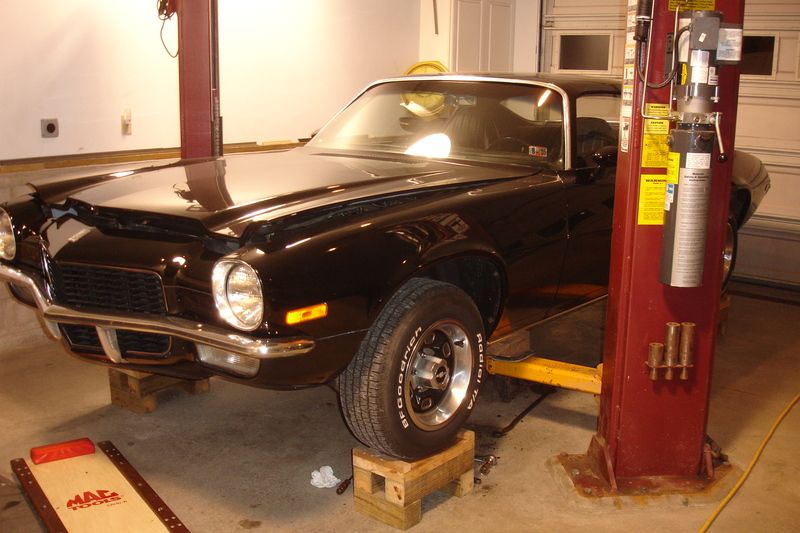
So I have the car up on blocks in the lift bay ready to tackle the subframe bushings and I get distracted with a few other things. You have to remove the battery tray in order to access the right side bushing on the radiator support. Although it is solid, the battery tray is in need of a little rehabilitation.
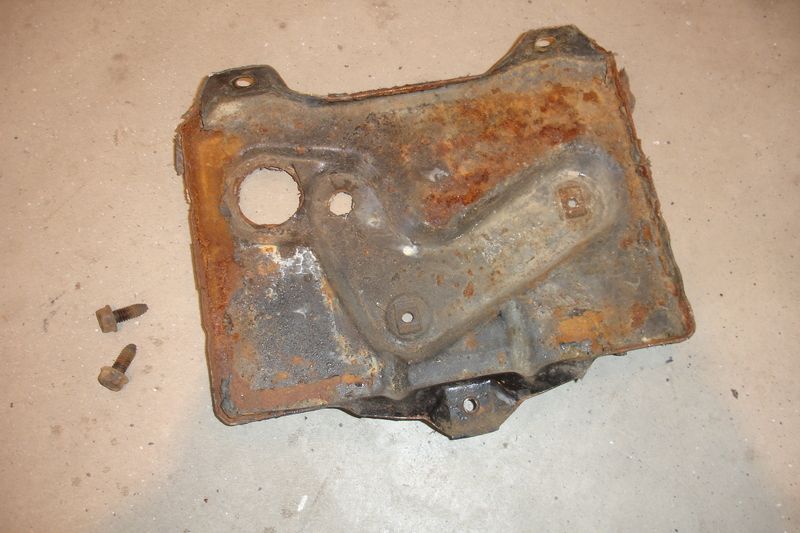
Through a friend, I sourced an 18" fan to replace the flex fan. I picked up a new fan clutch at the parts store and between two other fans, one of which came with the car, have everything I need to swap it over and reinstall the fan shroud. Looking at things, I would like to put the stock style alternator bracket back on the car and one of the bolts happens to be directly behind the water pump pulley.
That means now is also the time to take care of that so I dig out the brackets and after eyeing everything up start dropping things through the blast cabinet.
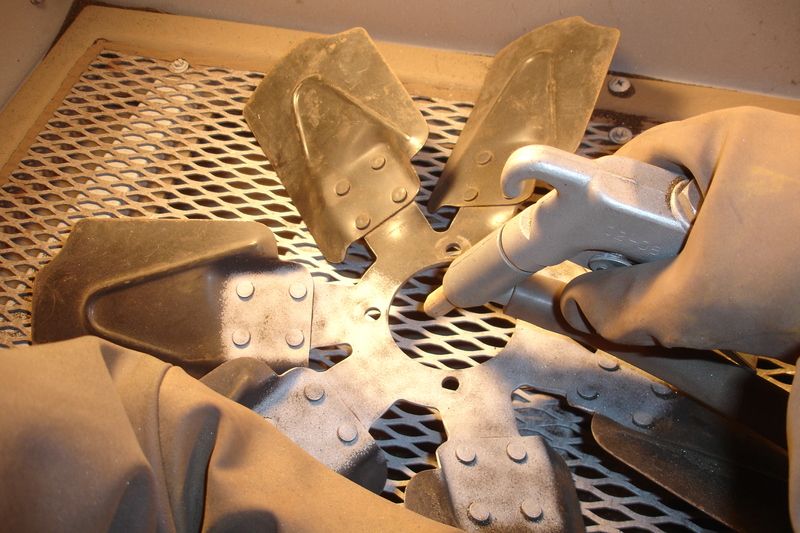
I do not find the studs for the water pump, but the fan I received from my friend has a seized up clutch on it with fine thread studs that will work perfectly for mounting the new clutch to the water pump. I used the "double nut" method to remove the studs and then cleaned them up good with some brake cleaner. I will install them in the water pump with some blue Loc-Tite before mounting the fan.

-
09-14-2015, 03:57 PM #29Member
- Join Date
- May 2015
- Location
- Blossburg, PA
- Age
- 34
- Posts
- 472
Silver Metallic- 2000 Trans Am WS6
Progress looks good as always Jeff!
-
09-14-2015, 06:30 PM #30Veteran
- Join Date
- Feb 2009
- Location
- Mansfield, PA
- Posts
- 22,146
Black & Blue- '02 WS.6 / '07 Suburban
Thanks! I had to mow grass this evening before getting back to work in the garage. I started by removing the alternator in preparation for reinstalling the factory brackets. I had to order a few odds and ends from NPD so that everything will come together and hopefully the parts will arrive by Wednesday.
I again soaked all the bolts for the subframe bushings with PB Blaster and using a two foot piece of pipe on my breaker bar I was able to successfully break free all four (4) of the bolts that attach the subframe to the body. The front bushings at the radiator support are much easier as there are no caged nuts to worry about, so I just gunned those loose with my impact.
Working one side at a time, I was able to remove and install the driver side bushings on the body. I am not getting any movement at the radiator support and it appears that there is a bracket that may have to be removed in order to separate the support from the subframe enough to remove the old bushing and slide a new one home. I dropped the rear bolts into the blast cabinet to clean them up and everything is getting a healthy coat of anti-seize. I will pick this back up tomorrow evening and hope to have the bushing swap completed. I'll get some pics up after it is done.
-
09-17-2015, 03:36 AM #31Veteran
- Join Date
- Feb 2009
- Location
- Mansfield, PA
- Posts
- 22,146
Black & Blue- '02 WS.6 / '07 Suburban
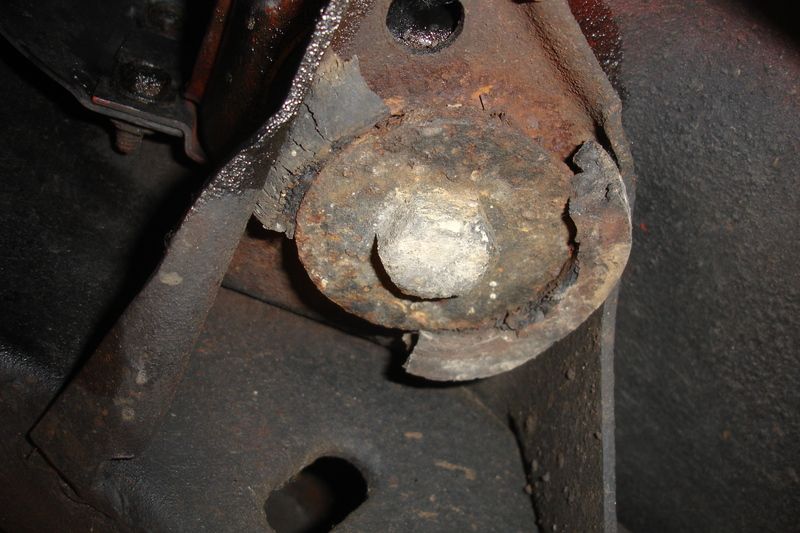
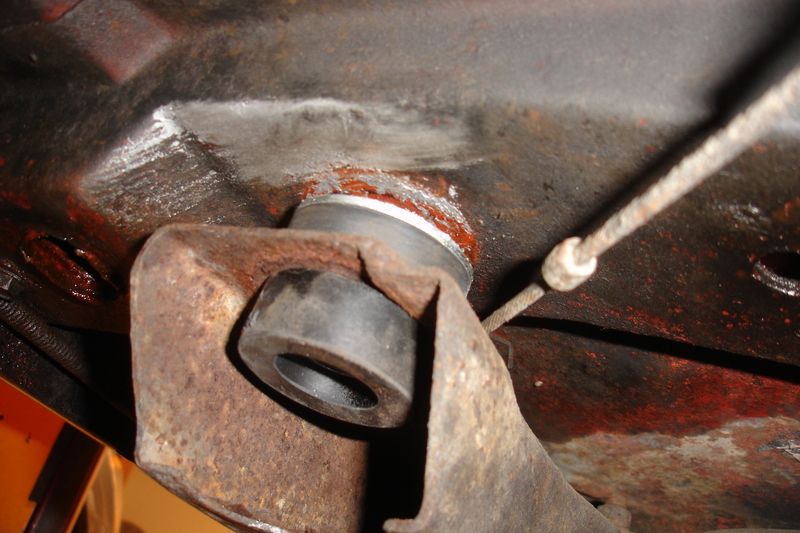
Subframe bushings are in - it wasn't too bad a process and they definitely needed replacement:


Photobucket was being grumpy, so I'll get some more pics up of the swap in my next post.
-
09-17-2015, 06:06 PM #32Veteran
- Join Date
- Feb 2009
- Location
- Mansfield, PA
- Posts
- 22,146
Black & Blue- '02 WS.6 / '07 Suburban
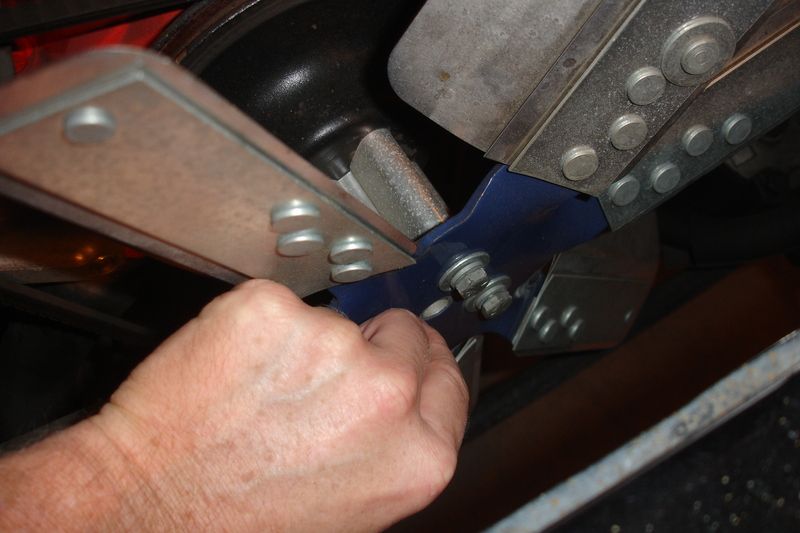
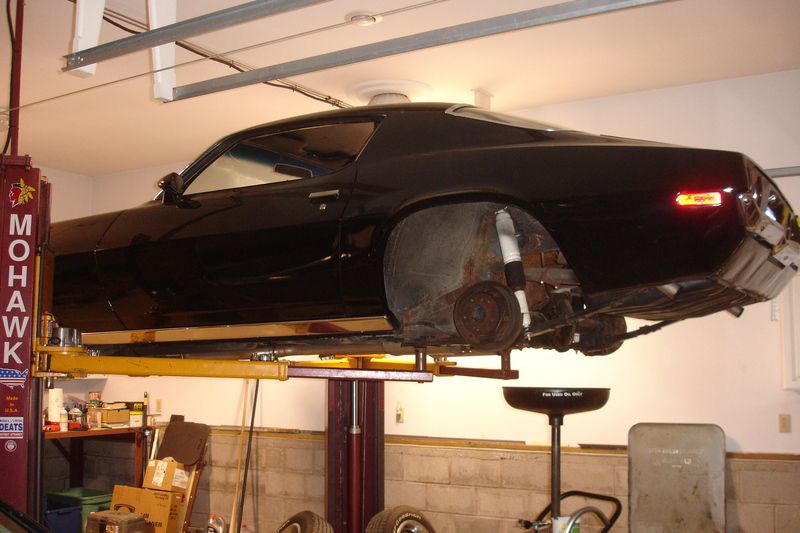
There are six (6) bushings that needed changed out, four (4) on the body and two (2) on the radiator support. Working one side at a time, I lifted the car up onto blocks and placed a jackstand under the subframe between the two (2) body mounts on the driver side. I then repositioned the front arm on my lift under the pinchweld on the body and placed a large block of wood on top of the lift arm.
I broke free the subframe mounts on the body with a breaker bar and piece of pipe -- they were all very tight and popped loudly. Up front under the radiator support I simply used a long extension on my air impact and a 3/4" wrench on the bolt. The bolts on the body all turned out easily once broke free and raising the lift a bit created enough separation to pry out the old bushings.

I cleaned and inspected both the underbody and the subframe and found everything to be in great shape. I did apply anti-seize to the bushings for additional corrosion resistance. A complete restoration is a ways down the road so I just wanted to ensure that things do not deteriorate to the point that replacement becomes necessary. Using a pry bar to create a little more separation, I slid the upper portion of the bushings in place and then pushed the lower bushing into position.
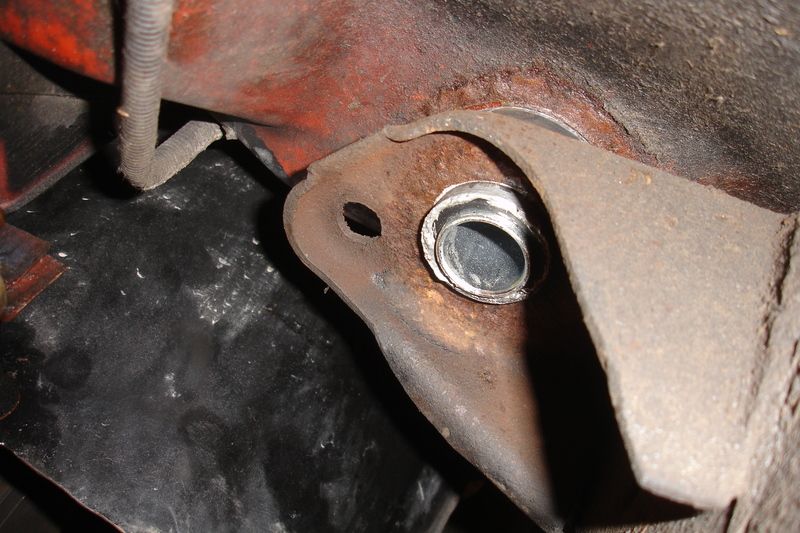
I dropped the bolts and washers through the blast cabinet and then painted them before giving them a coat of anti-seize and loosely installing them on the body. I then moved up front and after removing a bracket that mounts between the subframe and radiator support replaced the front bushing.

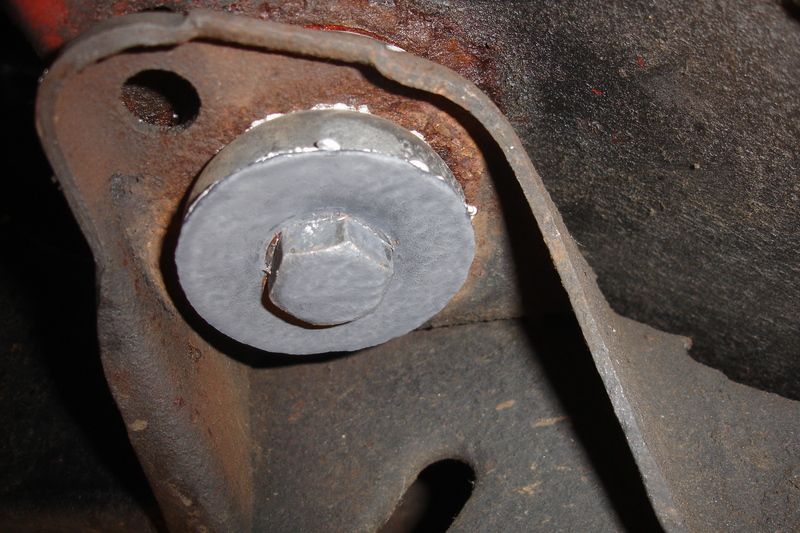
Before snugging everything down, I checked to ensure that the alignment holes in the #2 position remained undisturbed and then torqued the body bushings to 85 lb.ft. and the radiator support bushing to 35 lb.ft. Once the driver side was completed I then moved to the passenger side and repeated the entire process. The only carnage during the swap was the washer on the passenger side #2 mount -- it was too far gone to save, so I installed a matching size washer in its place.
I still have to reinstall the battery tray and battery which were removed to access the radiator support bushing on the passenger side. I will then install the alternator and temporarily mount the fan shroud and install the new fan and clutch. I do need to source an AC/HD cooling fan shroud as our car has the wider radiator and top mounting plate. The shroud that came with the car appears to be for non-AC, non-HD cooling and it is not wide enough to mate up with the bolt holes on the top plate.
-
09-21-2015, 11:00 AM #33Yeah baby! Yeah!

- Join Date
- May 2009
- Location
- okc
- Posts
- 2,567
Silver 2002 WS.6- Red 1989 Formula
Ahhh I sure missed your threads Jeff! This Camaro is looking good
2002 Trans Am WS.6 M6
Last bolt-on LS1 in the world
-
09-21-2015, 06:13 PM #34Veteran
- Join Date
- Feb 2009
- Location
- Mansfield, PA
- Posts
- 22,146
Black & Blue- '02 WS.6 / '07 Suburban
Thanks! Good to see you back on the Board too!
-
09-21-2015, 09:56 PM #35Member

- Join Date
- Jul 2012
- Location
- NorCal
- Posts
- 987
Sunset Orange Metallic- 2002 Camaro SS M6

[B]Nice Camaro Jeff....Looking forward to reading more on this thread!!
Last edited by SuperSSguy; 09-21-2015 at 10:00 PM.
-
09-22-2015, 06:05 PM #36Veteran
- Join Date
- Feb 2009
- Location
- Mansfield, PA
- Posts
- 22,146
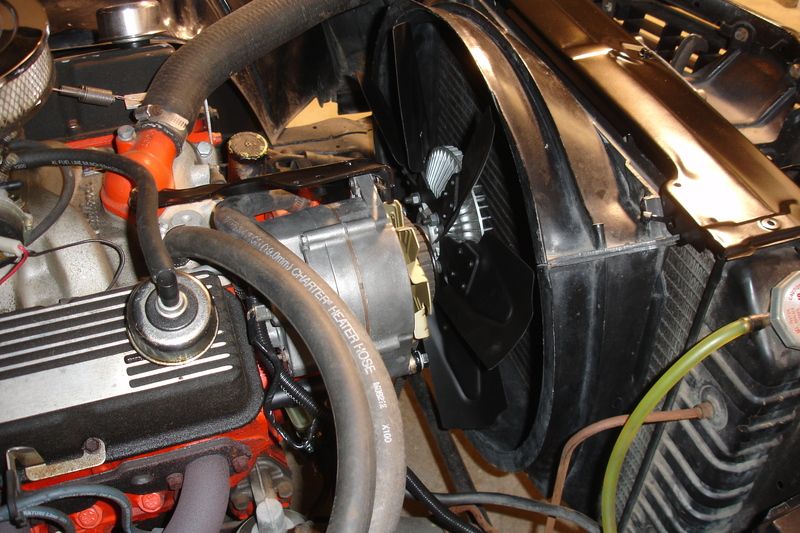
Black & Blue- '02 WS.6 / '07 Suburban
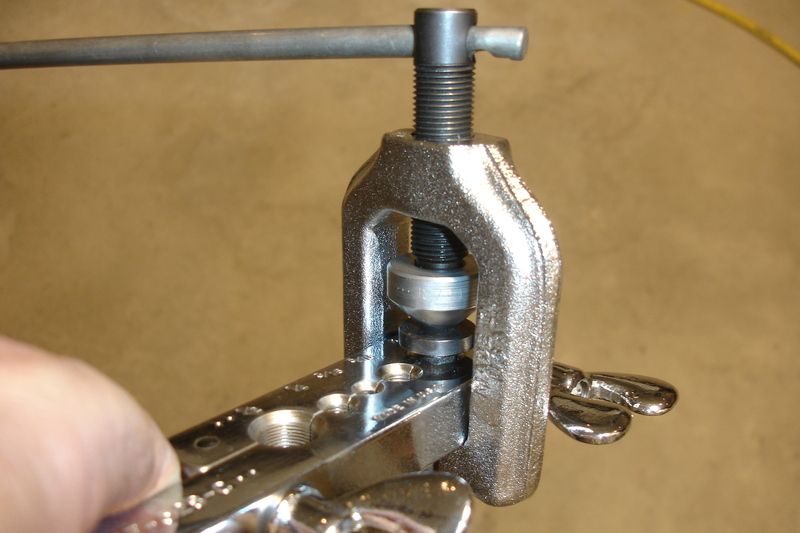
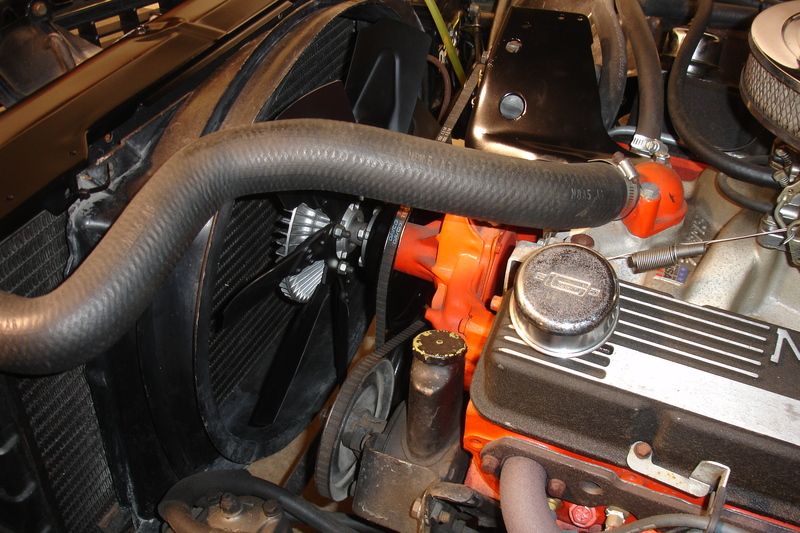
Thank you. Last night I was able to button up the alternator mounts and install the fan and shroud. The shroud is not correct as it does not span the entire radiator, however, it will work for now until we can source the right one. While I had the alternator out, I replaced the remaining rubber fuel lines on the car and changed the filter. The engine is topped with an Edelbrock Performer carburetor so the stock fuel line from the pump to the carb has been replaced with sections of tubing, hose and an aftermarket filter with a replaceable element. I found that the metal sections of the fuel line had not been flared and not wanting to risk a leak I removed both metal sections and gave each end a bubble flare:

I will eventually reinstall a Q-jet on the car. I have a couple of spare carbs and will just need to go through one to freshen it up. Once the Q-jet is back on, since it has an integral fuel filter, I will be able to reinstall a metal fuel line from the pump to the carb.
I still have to insert a bit more shim on the top alternator bracket where it bolts to the water pump and source a correct spacer for the lower mount. Other than that, the belt alignment is pretty good and I will be able to reinstall a factory style ground wire from the battery to the top mounting bracket. I did find that the heater hose is too short to loop over top of the mounting bracket and that I do not have the hose clamp that clips to it. For now, I just ran it underneath and padded the sharp edge of the bracket. All in good time...
-
10-01-2015, 02:06 PM #37Veteran
- Join Date
- Feb 2009
- Location
- Mansfield, PA
- Posts
- 22,146
Black & Blue- '02 WS.6 / '07 Suburban
The Fall Carlisle trip worked out well... for the Camaro. We picked up horns, a trunk liner, interior door handle bezels, an emblem for the nose, the brackets for the heater hoses, an alternator spacer, an air cleaner assembly, plastic trim for the seat hinges, bumper bolts, and a dome light housing and lens. Struck out on a fan shroud, seat bolts, battery cables and a decent battery disconnect (all the ones we looked at were junk). We only covered around 1/4 of the show though, so had we stayed longer we may have found the remaining items.
-
03-29-2016, 03:24 AM #38Veteran
- Join Date
- Feb 2009
- Location
- Mansfield, PA
- Posts
- 22,146
Black & Blue- '02 WS.6 / '07 Suburban
The Camaro has been awoken from its winter slumber and is now back in the lift bay. So far, I have replaced the dome light base and lens, installed new door handle bezels and seat hinge covers, and eyed up the air cleaner swap. Switching back to a stock style dual snorkel air cleaner is going to be a project. The stock distributor was replaced with an HEI unit that is quite a bit larger, it has an Edelbrock carb in place of the stock Q-jet, the M/T valve covers are taller than stock and the oil filler cap and PCV are in the way of the snorkels.
I am also replacing the rubber brake lines and will re-pack the front wheel bearings. Last night I was able to remove the rear line without too much trouble. I did have to get the fire wrench out to warm up the connection to the hard line on the body. While I have it apart, I am going to also replace the hard lines on the rear axle. They are replacements that are longer than stock so they have a few extra bends to take up the extra length. As long as I can get the bleeders to break free the car should have brakes again by this weekend.
-
03-31-2016, 03:38 AM #39Veteran
- Join Date
- Feb 2009
- Location
- Mansfield, PA
- Posts
- 22,146
Black & Blue- '02 WS.6 / '07 Suburban
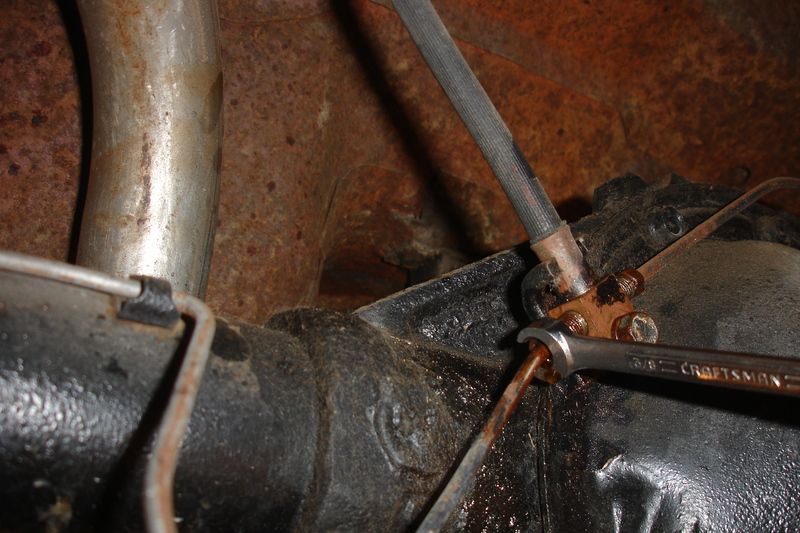
I still need to attack the underbody and rear wheel wells. Not sure if I will get to it this time around, or whether it will have to wait. With the weather improving, Dawn really wants to drive the Camaro. Anyway, after getting the car in the air and the wheels removed, I started removal of the rear brake lines. The hard lines on the axle unbolted easily, but as noted in the prior post, I had to get the torch out to coax the union between the rubber line and hard line on the underbody free. I also could not use a line wrench on this connection due to the line being armor plated.
The rubber lines at both front caliper and the rear axle are rather old and are in definite need of replacement.
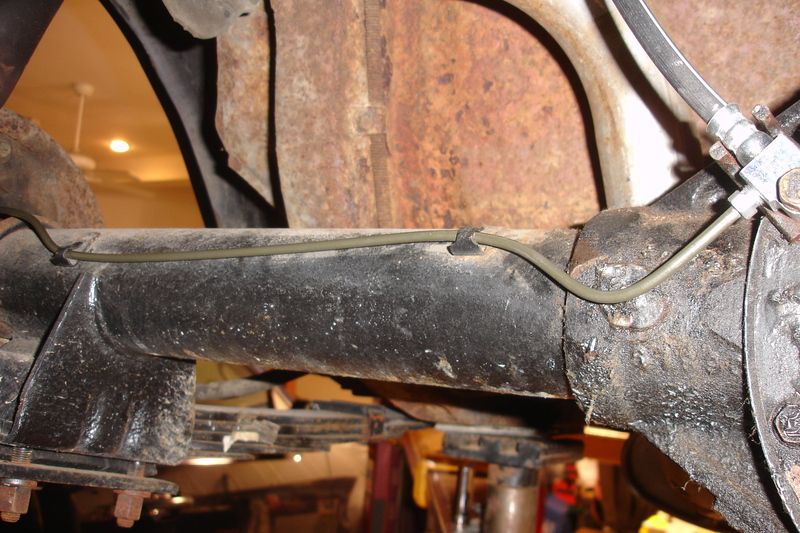
Last night, I managed to bend a replacement line for the driver side and using my flare kit cut it to length and flared the end so as not to have any extra line to deal with. I utilized the picture of the rear axle in the assembly manual to approximate the bends of the original lines.
Last edited by pajeff02; 03-31-2016 at 03:41 AM.
-
04-02-2016, 08:06 AM #40Giant Dicks Car Club

- Join Date
- Nov 2006
- Location
- Millerton, PA
- Posts
- 5,191
2005 Ram- 1978 Firebird

Just a note, if you ever decide to get crazy with this car, a lot of folks will upgrade to 1/2" u bolts both inboard and outboard of the leaf spring. It's a simple upgrade to keep the rear in check. It requires opening up the holes in the leaf spring pad, and a slight re routing of the brake line. On occasion the brake line clip has to be removed as well. The stock spring isolation pad has a steel pin impregnated into the rubber, and polyurethane upgrades do not work. They have the steel locator, but are too slippery and the axle will move in relation to the spring. One company out there makes a steel pad and locator, and reports of additional nvh are fairly uncommon.

 Reply With Quote


Thread Information
Users Browsing this Thread
There are currently 2 users browsing this thread. (0 members and 2 guests)
Similar Threads
-
1969 &1970 Chevrolet Camaro - One For Show, Two For Go!
By Ed Blown Vert in forum Camaro / SSReplies: 0Last Post: 01-29-2013, 02:20 PM -
Ring Brothers 1970 Chevrolet Camaro "Diversion"
By Ed Blown Vert in forum Classic MuscleReplies: 0Last Post: 11-04-2011, 04:40 AM -
1970 Chevrolet Camaro - Performance Minded
By Ed Blown Vert in forum Camaro / SSReplies: 0Last Post: 10-05-2011, 04:20 PM -
1970 Chevrolet Camaro and More - Local Heroes Redux
By Ed Blown Vert in forum Camaro / SSReplies: 0Last Post: 09-29-2010, 03:50 AM -
For Trade: For Sale 1970 Chevrolet Camaro Split Bumper
By fuzzyhall in forum Vehicles For Sale / TradeReplies: 2Last Post: 11-15-2008, 03:21 PM

Bookmarks