

Results 1 to 20 of 83
Thread: 1970 Chevrolet Camaro
-
08-29-2015, 05:22 AM #1Veteran


- Join Date
- Feb 2009
- Location
- Mansfield, PA
- Posts
- 22,146
Black & Blue- '02 WS.6 / '07 Suburban
1970 Chevrolet Camaro
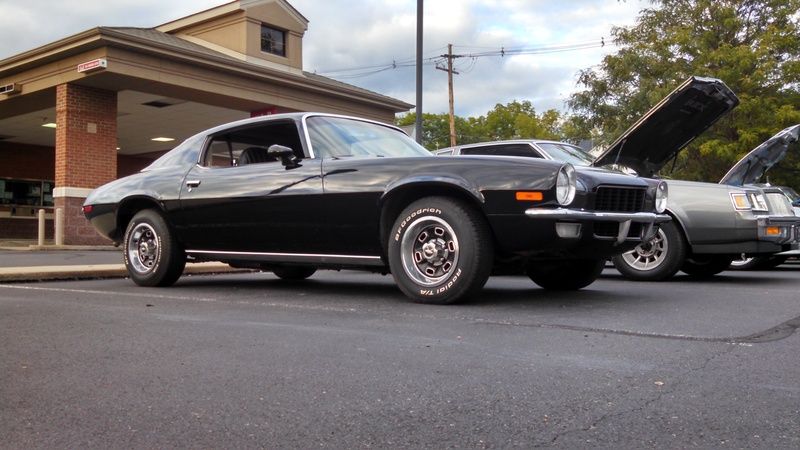
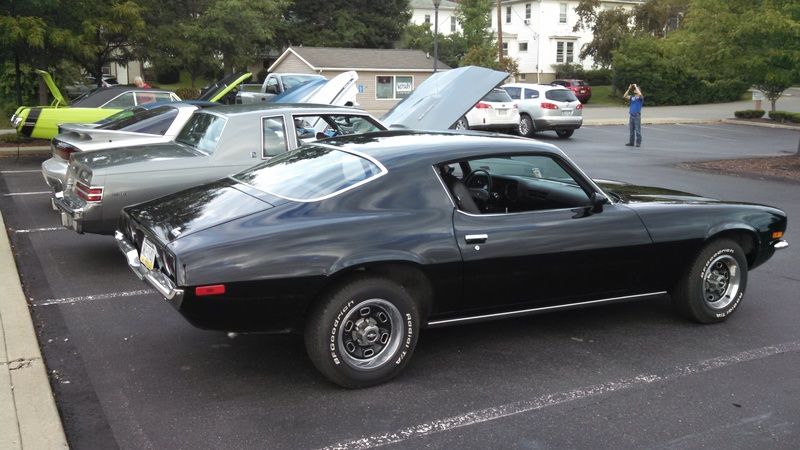
A belated introduction of our newest addition to the garage - Dawn's 1970 Camaro that we picked up a few weeks ago. Through a co-worker, she learned that his sister's husband wanted to sell the car. He sent us a couple of pictures and a professional appraisal that had been recently completed. We scheduled a time on a Saturday to drive up to the Rochester, NY, area to look at the car. In hindsight, I should have simply trailered up with a cashier's check in hand as upon seeing the car parked in front of their house I knew that Dawn was going to want to add it to the collection.

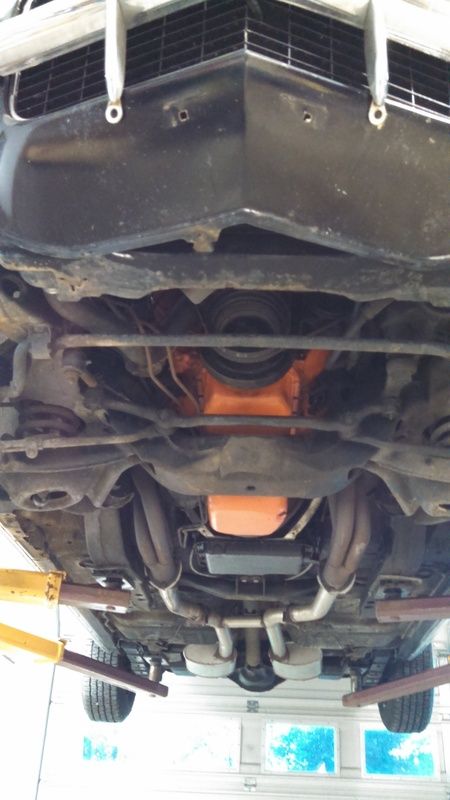
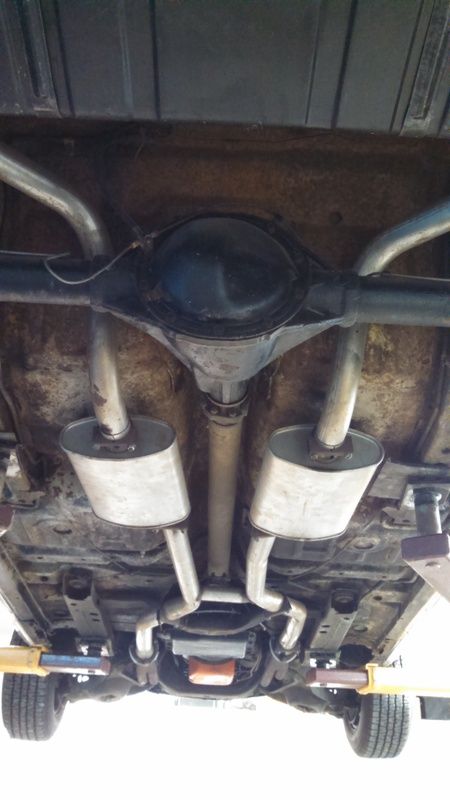
We drove the car twice that afternoon and looked everything over real well. As best I can tell, the car was originally a base model Camaro equipped with a 307 cubic inch engine, probably a 2 bbl carburetor, and a two-speed Powerglide putting it to the ground through a 2.83 equipped open rear. The car was essentially complete and solid with a nice interior. It had originally been blue and the repaint was most likely completed by a prior owner. There is a bit of rust in the lower rear right quarter and the panel beneath the rear bumper. The 307 is long gone and in its place is a semi-built 350 sporting an Edelbrock intake and carburetor, RHS Pro Torker heads, a decent cam, Hooker 1-5/8" long tube headers, and dual exhaust with an H-pipe and what sound like turbo style mufflers. Both the engine and transmission had been rebuilt during his period of ownership and he had receipts for everything.
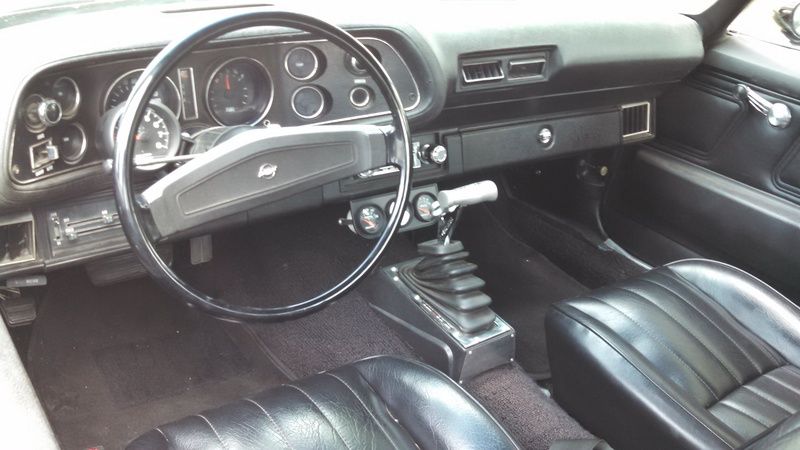
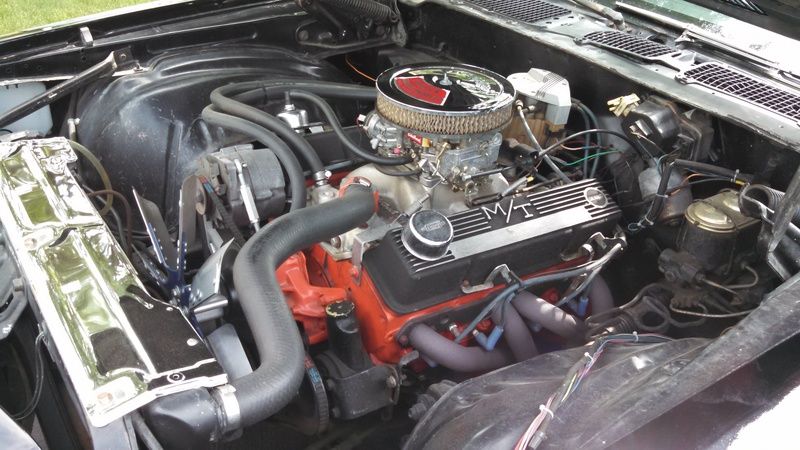
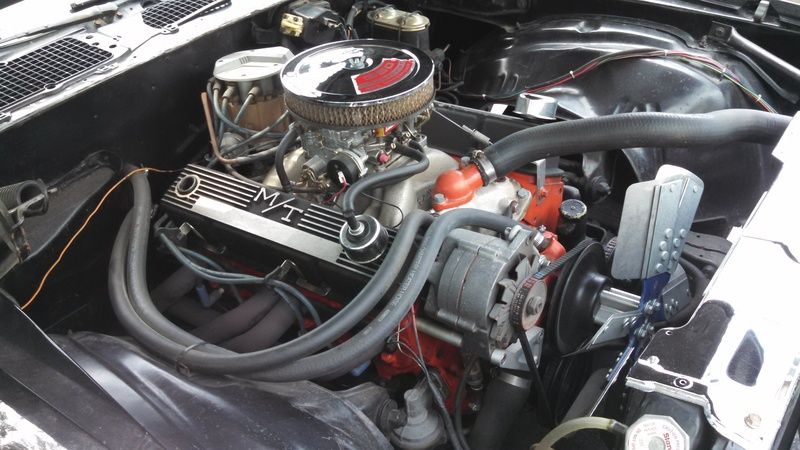
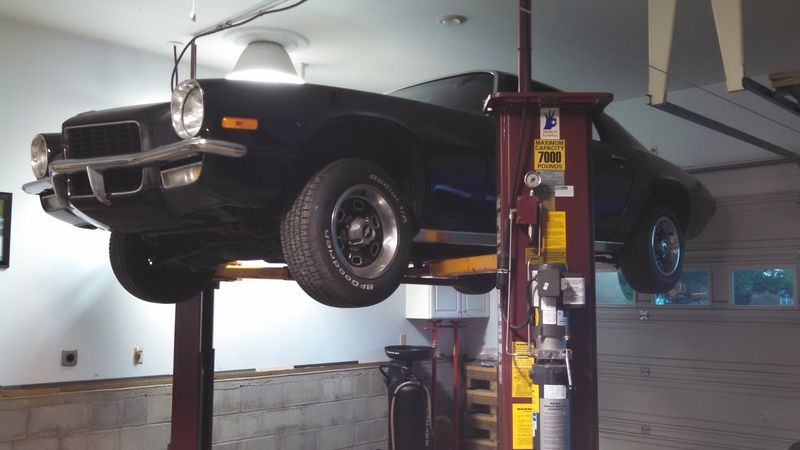
Some modifications do appear on the car, it has later model seats, a Hurst Vmatic2 ratchet style shifter (you get one bang of the gears), it has a Z-28 grille, later model 14" wheels, an aftermarket Custom Autosound stereo and speakers, the shroud was removed and it has a flex style fan, it was converted over to Accel HEI ignition, a tach was mounted to the steering column, and there are gauges under the dash. It has the AC vents in the center of the dash, but no other indication of being an AC equipped car. An additional leaf is in place on the rear springs and it is equipped with air shocks. Fortunately, the owner had the original fan shroud, the fan that was on the car when he purchased it, and a good supply of additional parts and literature. There was no jack or lug wrench, however, it did come with a full size spare tire. The car is clean and although it does have some surface rust underneath, it is nothing that cannot be dealt with and other than the panels mentioned above I do not envision any further replacements as being necessary.
We struck a deal that day and made arrangements to go up a few weeks later with the trailer to pick up the car. Upon arriving home, we unloaded her and ran her into the garage to give everything a once over. Our local Notary was away on vacation, so we ended up tripping to another town to register the car and obtain a plate. I have already added the car to our Hagerty policy so it was insured for the trip home, just in case. Everything looked good, so we hopped in to go for our first ride. We made it about 3 miles before the engine sputtered and died... running out of gas on a back road. Fortunately, my daughter and her boyfriend came to the rescue with a gas can and we were back on the road within about 45 minutes. It was then that we learned that when the fuel gauge reads "1/2" that the tank is empty. I called the prior owner later that weekend and he confirmed that this was in fact the case. It certainly made for a memorable first drive and we'll laugh about this one for years.
Since acquiring the car, I have further inspected everything and made a few tweaks. The first thing that had to go were the stock seat belts which were mismatched and not much fun to use. In '70, although the car came with a shoulder belt, it was simply another lap style belt mounted to the roof with no retractor. Instead, there are two buckles bolted to the center hump, one for the lap belt and one for the shoulder belt. Through NPD, and from reading on the NastyZ28 website, I found replacement belts from Morris Concepts that include a retractor, install in the stock mounting locations and work like a modern seatbelt. They were pricey, especially with the "GM logo" on the buckles, but were well worth it imo. I also picked up a new washer bottle as the original was missing from the car. I found out why soon after receiving it - the front left fender had been replaced and there is a section missing at the front corner where the bottle mounts. I will fab up a replacement panel that will attach behind the bottle and be essentially invisible.
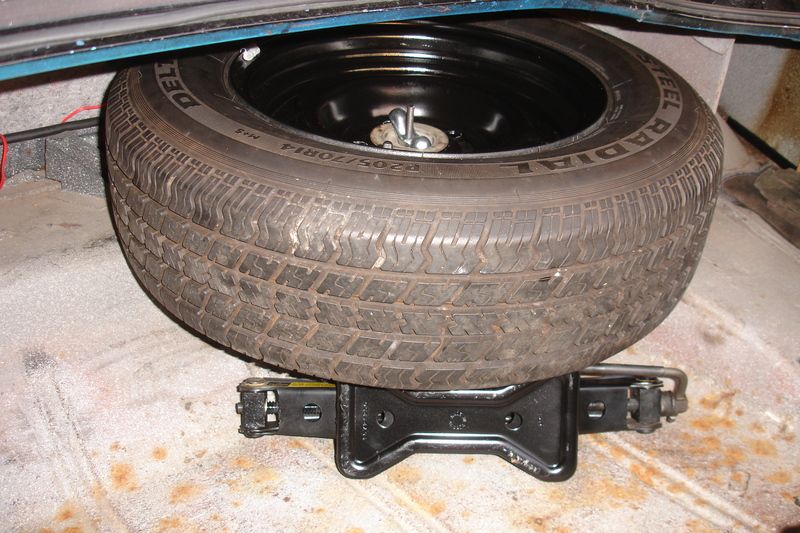
The car will be a driving restoration and we will just do a bit here and there. I will be reinstalling the fan shroud after I source an 18" fan (the other fan that came with the car is about 1" too big), the tach will be removed, and I will be swapping over to a dual snorkel air cleaner in place of the chrome one. I may also revert back to a Q-jet as that is what I am most familiar with and have all the parts and tools to work on. I will need to drop the fuel tank as I am measuring 200 ohms of resistance on the sender wire when the tank is full. I tried re-grounding it but that did not alter the reading so something is amiss. I did source a scissors style jack (stock it came with a bumper jack) and a lug wrench from a Ford F-150 that fits the 13/16" acorn lug nuts (stock would have been 3/4"). Unfortunately, the rear speaker precludes mounting the spare in the correct location so I will have to remedy that at some point.
Now for some more pics from the cruise in on Thursday:


Last edited by pajeff02; 09-03-2015 at 11:40 AM.
-
08-30-2015, 02:19 PM #2Member

- Join Date
- Mar 2011
- Location
- Waynesboro, Pa
- Posts
- 256
Mystic Teal Metallic:320c- 1998 Camaro Z/28
very nice jeff, planning split bumper and duck tail spoiler by chance?
98 Z/28 Ttop M6 320C SLP lid--PMT LCA/PRB--UMI SFCs--LTs/ORY--SkipShiftElim--Pro5.0w/UMIshortstick--4.10s--D/Sfrontrotors--Whistler--BilletGrille--SSspoiler
-
08-30-2015, 02:29 PM #3Veteran
- Join Date
- Feb 2009
- Location
- Mansfield, PA
- Posts
- 22,146
Black & Blue- '02 WS.6 / '07 Suburban
Thanks! Actually, we will leave the existing bumper in place and have no plans to add a spoiler.
-
08-30-2015, 05:25 PM #4Veteran
- Join Date
- Feb 2009
- Location
- Mansfield, PA
- Posts
- 22,146
Black & Blue- '02 WS.6 / '07 Suburban
Here is the seatbelt setup from Morris Concepts that I installed around two weeks ago:
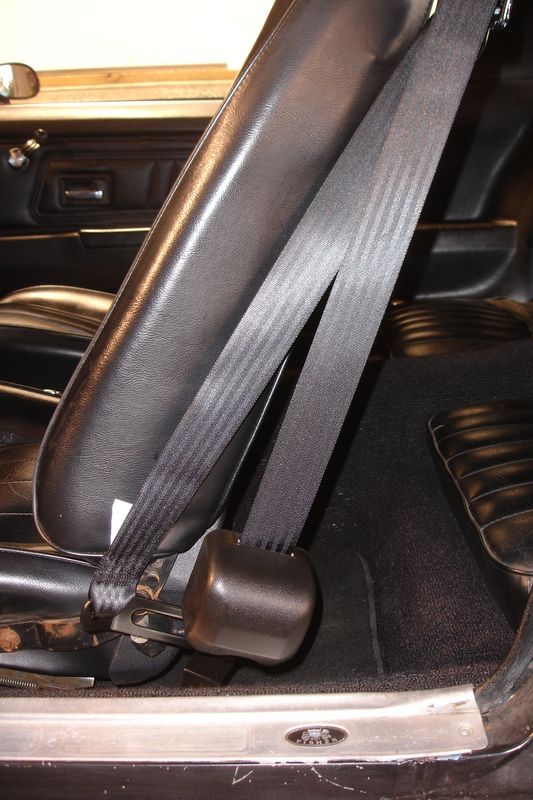
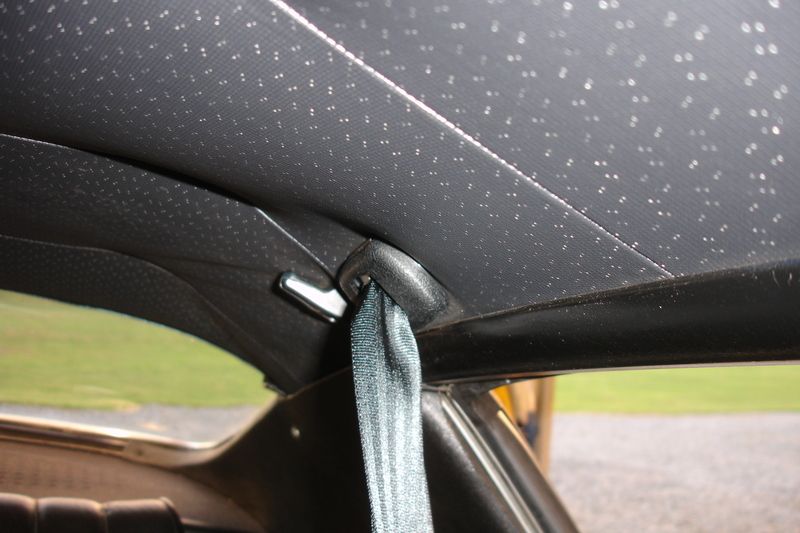
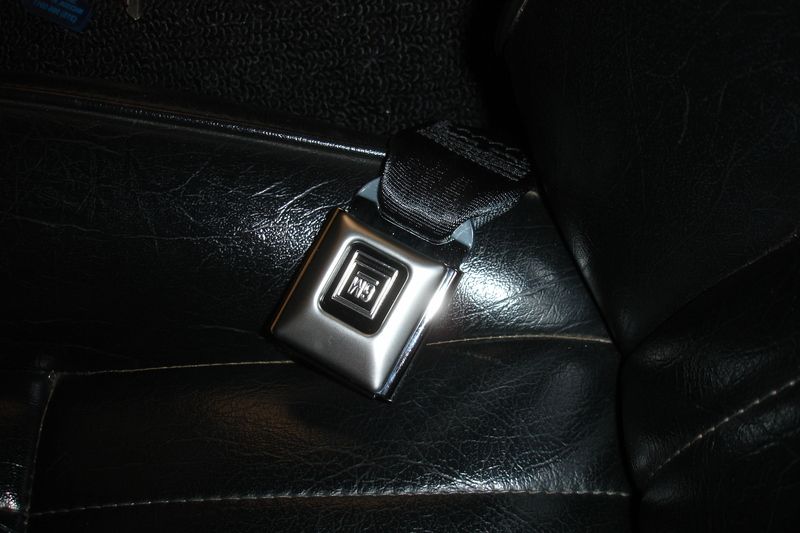
It works great and is a huge improvement over the stock seatbelts. The inner buckle came with a plastic sheath, but the contour just did not fit the center hump at all no matter which way I tried it. In the end, I simply removed the sheath and we lay the belts over the hump when we unbuckle for easy access next time we get in the car.
-
08-30-2015, 05:33 PM #5Veteran
- Join Date
- Feb 2009
- Location
- Mansfield, PA
- Posts
- 22,146
Black & Blue- '02 WS.6 / '07 Suburban
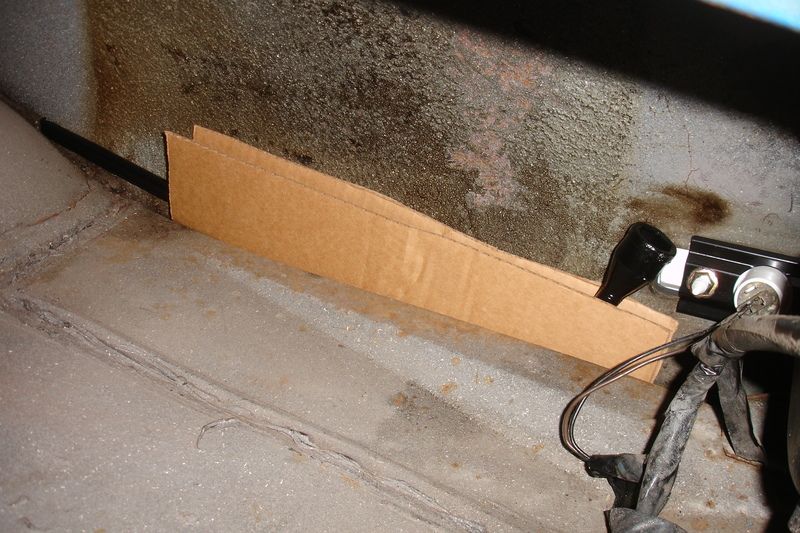
The spare tire setup is a bit interesting. At first, I was convinced that it was supposed to have the space saver spare that comes with an aerosol style inflator. Turns out that the rear speaker on the passenger side prevents a full size spare from mounting at the proper angle. To compensate, I put around a 30 degree bend in the threaded rod and installed the scissors jack that I sourced from the local boneyard under the tire to keep it from hitting the speaker. The jack handle, sourced from an older Ford F-150 in order to fit the 13/16" lugnuts, is folded in a piece of cardboard and dropped into the well of the right side quarter panel.
-
08-30-2015, 05:43 PM #6Veteran
- Join Date
- Feb 2009
- Location
- Mansfield, PA
- Posts
- 22,146
Black & Blue- '02 WS.6 / '07 Suburban
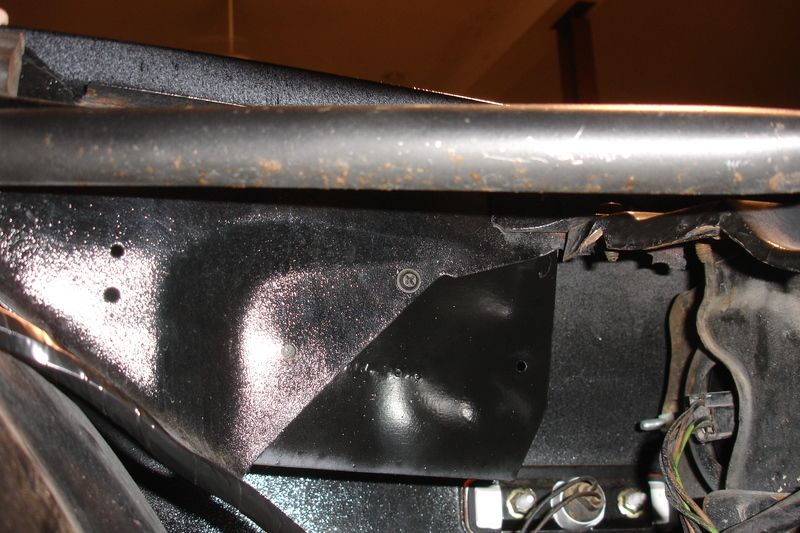
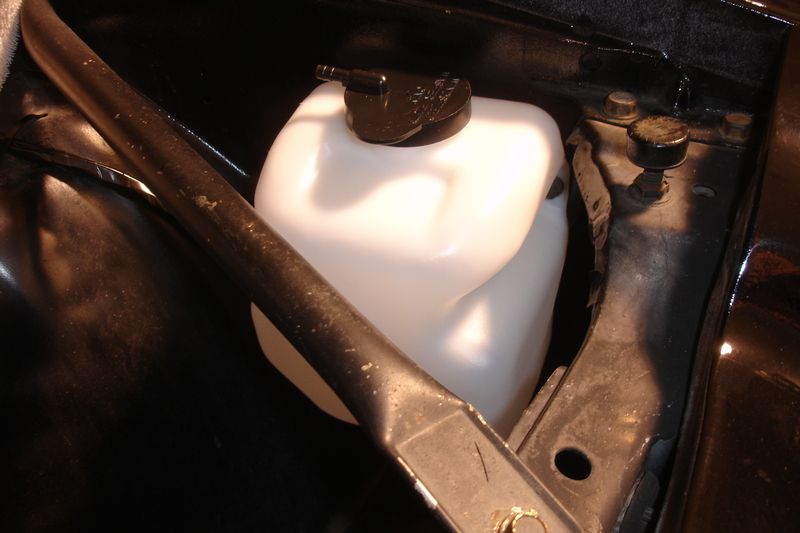
I also picked up a new washer bottle from NPD when I ordered the seatbelts. The bottle was missing from the car and there were no hoses attached to the pump or squirters. I soon found out why... the replacement fender is missing a whole section at the very front and this is where the washer bottle mounts. The assembly manual shows the contour and all I had was the back mounting hole. I actually used the piece cut out of the floor of our Trans Am to make a short extension. The new panel is mounted using the rear washer bottle bolt and a hole through which a plastic harness clip was originally mounted from the back side.
The fabricated piece is not at all like the stock end of the inner fender, however, as it is completely hidden by the washer bottle it really does not matter. My gloss black rattle can was running a bit low so the paint job looks a bit rough as it was splattering. I just wanted to spray some paint on it to keep the edges from rusting for now. With the bottle in place everything looks good. I did install one washer between the bottle and the fender in the rear bolt location and two washers in the front bolt location to space it off the fender just a bit in order to clear the head on the Phillips head screw.
-
08-30-2015, 06:11 PM #7Spaz is My Mentor


- Join Date
- Feb 2009
- Location
- Florida Man Status Acheivement
- Posts
- 11,808
Navy Blue Metallic- 98 T/A, 00 FBVert, 78T/A
1970 Chevrolet Camaro
so Jeff what's the count on split bumper up too?
 http://www.ls1.com/forums/f7/my-6-liter-build-174257/
http://www.ls1.com/forums/f8/my-8-8-rear-build-165553/
6.0L Block - Forged 403ci , Polluter Stg3 Cam, FAST 102mm Intake, NW102 TB, MSD wires, NGK TR6 plugs, Truck Coil Packs, LS3 Fuel Injectors, CC Pacesetter LT Headers, TS&P ORY, QTP e-Cutout, Magnaflow Muffler, 104mm Air Lid & Line Lock, Catch Can, Stage 2 T56 w/Viper shaft, PRO 5.0 Shifter, Tick MC, SPEC Stg3+ Clutch, QT SFI BH, MWC DSL, Full UMI Performance Suspension, Viking Coilovers, YR1 Snowflake Wheels wrapped in NT555 tires & Custom Fab Ford 8.8 rear w/Wavetrac Diff 3.93 Yukon Gears, WSQ Hood, 3"CM Strange Eng Drive Shaft.
00 FB Vert - "Stockish" Belstein Shocks, Hotchkis Springs (1" Drop), C7 Snowflake 17" Wheels
78 FB - Just getting started......
Horsepower never lies, but is often lied about!
-
08-31-2015, 02:46 AM #8Veteran
- Join Date
- Feb 2009
- Location
- Mansfield, PA
- Posts
- 22,146
Black & Blue- '02 WS.6 / '07 Suburban
Just about everyone.

-
08-31-2015, 03:59 AM #9Member
- Join Date
- Feb 2015
- Location
- Harrisburg, PA
- Posts
- 188
Silver- 1995 Firehawk
Nice looking car,.
-
08-31-2015, 04:08 AM #10Veteran

- Join Date
- Oct 2008
- Location
- Wherever life takes me
- Posts
- 12,526
Red- 02 35th LE Camaro SS
Subscribed for later reading. First thing I noticed was the fan and how dangerous that could potentially be. I figured that would be a priority for you. Great looking car.
Boost gets you laid, unless your name is Jon.
-
08-31-2015, 04:41 AM #11Veteran

- Join Date
- May 2006
- Location
- Arizona
- Posts
- 12,557
Good man. I see so many converted improperly to a split bumper without the urethane nose and round parking lights, it's ugly that way. Originally Posted by pajeff02

Unless you're willing to spend the money on the urethane nose, new front valance with round parking lights, and some repainting, then I'd just leave the correct 1 piece front bumper in place.
Good looking car. Has 71 and up front buckets in it. Those 70 buckets with adjustable headrests are harder to find nowadays. Looks like it's going to be a fun cruiser.
I also love the spoiler-less look. To many conversions done with spoilers, refreshing to see the cars the way they actually came.Last edited by Firebirdjones; 08-31-2015 at 04:43 AM.
-
08-31-2015, 10:23 AM #12Veteran
- Join Date
- Feb 2009
- Location
- Mansfield, PA
- Posts
- 22,146
Black & Blue- '02 WS.6 / '07 Suburban
Thanks, guys.
Nail on the head, FBJ. We like it just the way it is, even with the few changes that have been made. Ever drive a car with a ratchet shifter on a Powerglide?
-
08-31-2015, 10:29 AM #13She Moderator

- Join Date
- Jul 2008
- Location
- So Cal
- Age
- 61
- Posts
- 15,660
Arctic White- 2000 Camaro Z28
Nice addition, Jeff

-
08-31-2015, 10:39 AM #14Veteran
- Join Date
- May 2006
- Location
- Arizona
- Posts
- 12,557
Can't say that I have Jeff. Only PG car I have is the 56 Nomad and we yanked the original powerglide out of that back in 1977 shortly after we bought it Originally Posted by pajeff02
It was still original column shift at that time.
Most of those glides are about a 1.76 first gear. A simple 350 turbo swap in that will feel like you just tossed 100 HP at it
Ironically we have been looking at adding a 67-69 RS Camaro and there sure are a lot of them out there forsale with glides.
-
08-31-2015, 11:01 AM #15Veteran
- Join Date
- Feb 2009
- Location
- Mansfield, PA
- Posts
- 22,146
Black & Blue- '02 WS.6 / '07 Suburban
Thanks, D.
The 'Glide is kind of cool and I am surprised at how streetable the car is with only two gears. With 2.83's out back it isn't turning the motor real hard at highway speeds and the V-8 torque helps get things moving down low.
-
08-31-2015, 11:14 AM #16Veteran
- Join Date
- May 2006
- Location
- Arizona
- Posts
- 12,557
Yeah they aren't horrible, I didn't mean to sound like they were bad. Actually yours should be the aluminum case, more desirable as far as powerglides go. Originally Posted by pajeff02
The nomad was the old cast iron version with P-N-D-L-R, so to back up from park the shifter is yanked all the way to the bottom, then back up to drive 2 clicks. Odd setup from what most consider normal. 265 4 barrel and factory 3.55's out back, it ran as good as could be expected and just fine power wise for a cruiser, but it was destined to be a hotrod from the start
If I wind up with another one in a first gen Camaro I might just live with it. With a cruiser gear out back I'd see no need for modern stuff installed, just like you're thinking.
-
09-02-2015, 06:15 PM #17Veteran
- Join Date
- Feb 2009
- Location
- Mansfield, PA
- Posts
- 22,146
Black & Blue- '02 WS.6 / '07 Suburban
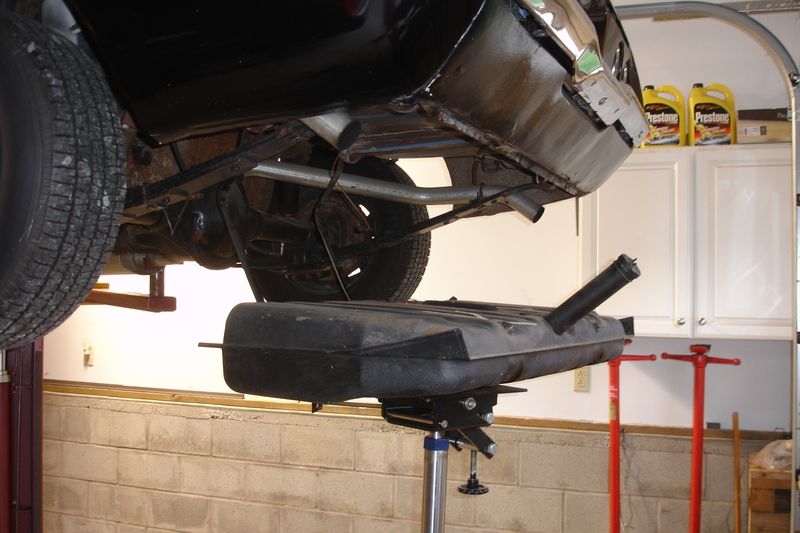
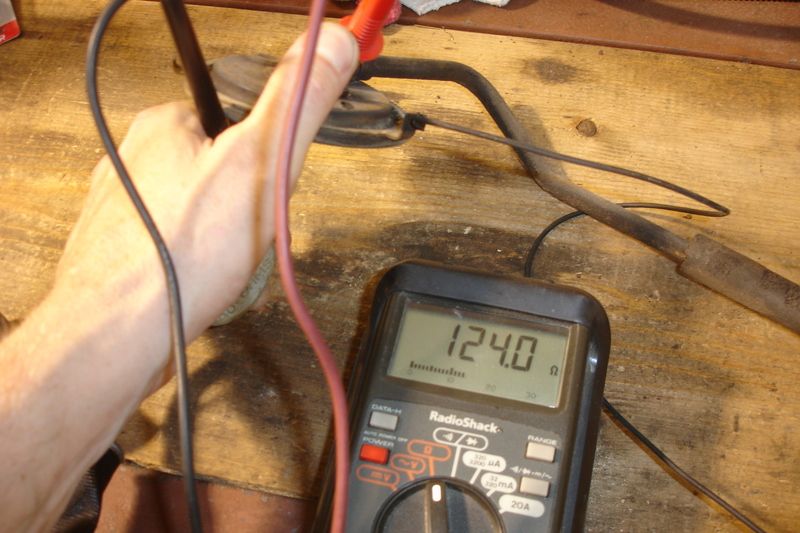
Tonight, despite my garage being an oven, I decided to tackle a few issue with the fuel system. As I related in my intro, the fuel gauge reads way high and testing the sending wire yielded well over 200 ohms of resistance with the tank almost full. Even after cleaning and reinstalling the ground wire the resistance remained unchanged. I wanted to also change out all the rubber lines in the fuel system and since I felt that we were down to around a quarter tank now was the perfect time. I started by slicing the line at the tank connection, disconnected the ground wire and with my transmission jack in place I dropped the straps and lowered the tank. After lowering it several inches, I disconnected the sender wire from the top of the tank.

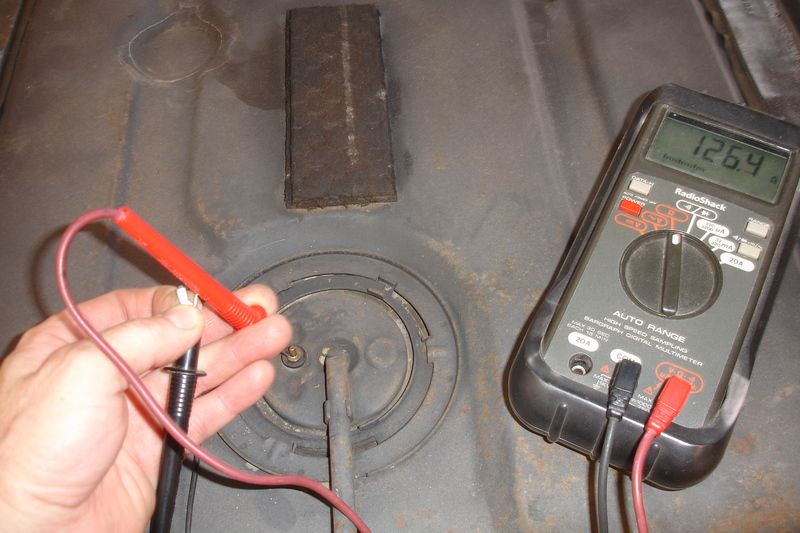
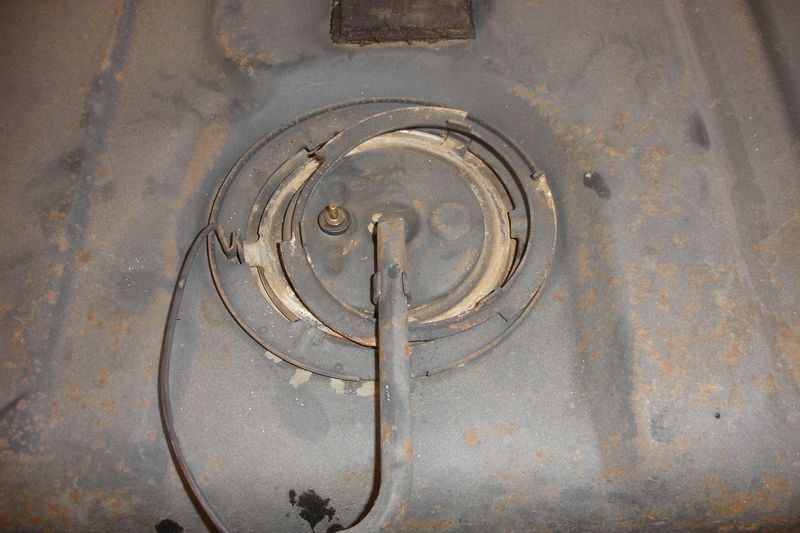
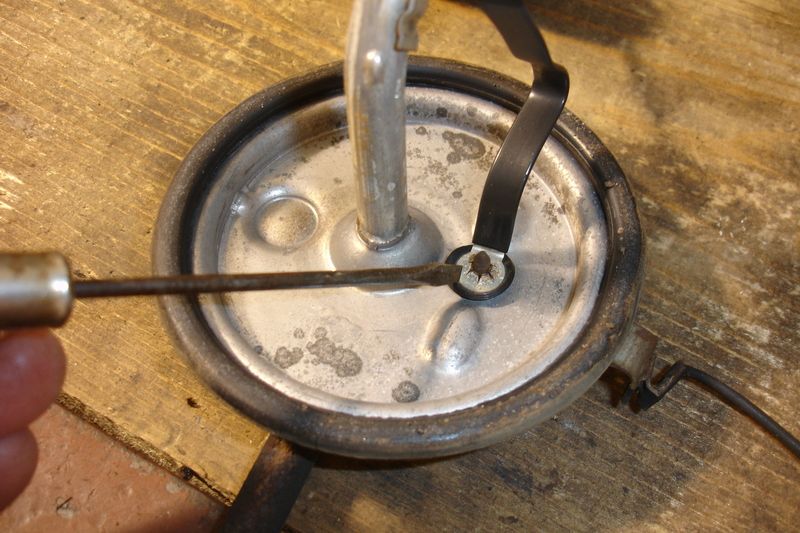
I inspected the ground wire and the connection appeared to be good to the sender. Testing the sender connection again yielded too much resistance so I now knew for certain that the issue was inside the tank. Using a brass drift, I carefully tapped the prongs on the retaining ring to remove it and pulled the sender from the tank.
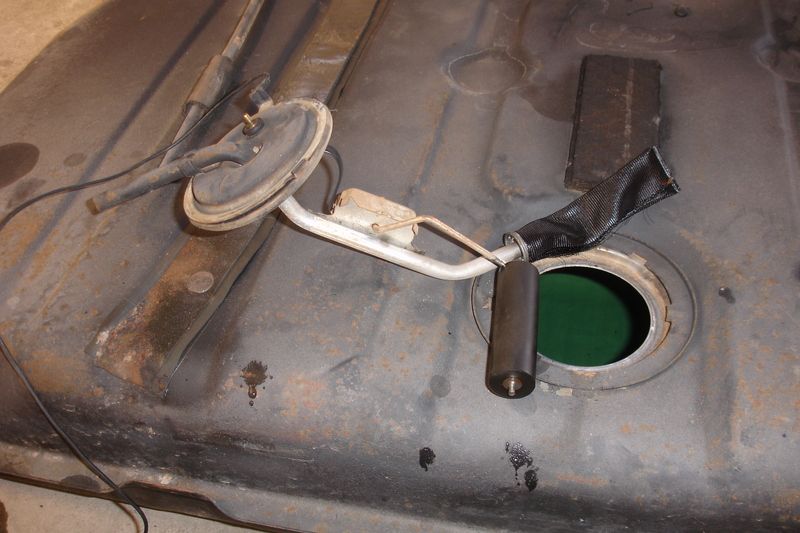
With the sender on my workbench, I started testing the resistance between the connections to ascertain where the actual problem was located. I again found too much resistance between the two points on the strap which connects the sender unit to the mounting plate. I wire brushed the connections to ensure good contact with the probes on my DVOM and still had an issue. Upon bending the strap, the resistance suddenly dropped to what I would consider almost normal. It appears that the connection between the strap and the actual sender was the issue. I worked on the contact point a bit trying to press it on tighter and re-tested several times to ensure that the connection remained good.
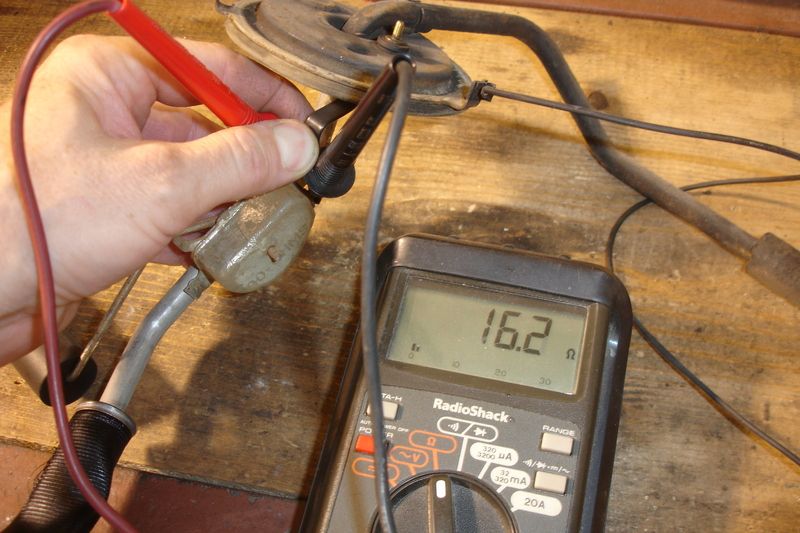
This is the best pic of the strap that I am referring to. I initially suspected the connection on the top plate (which is what I am pointing at) as it appeared to be corroded but this actually tested fine.
I reinstalled the tank and then replaced the rubber fuel lines at the tank, back of the subframe and at the fuel pump. The engine started right up and our fuel gauge now read just below a quarter tank -- perfect. I will be pulling the sender again and will most likely replace it as I believe the problem will crop back up sooner rather than later. Also, I found that the sock on the pickup was split open even though it was still pliable and otherwise appeared to be in good shape.Last edited by pajeff02; 09-02-2015 at 06:17 PM.
-
09-02-2015, 06:31 PM #18Senior Member

- Join Date
- Sep 2010
- Location
- Bel Air, Maryland
- Posts
- 1,750
Silver- '02 Trans Am WS-6, 6M
Personally, I prefer the full bumper. Originally Posted by pajeff02
-
09-03-2015, 03:00 AM #19Veteran
- Join Date
- Feb 2009
- Location
- Mansfield, PA
- Posts
- 22,146
Black & Blue- '02 WS.6 / '07 Suburban
The prior owner had installed an aftermarket Auto Meter tachometer on the steering column which I removed. Being an automatic, Dawn didn't care for the tach and it blocked a significant portion of the speedometer and the left turn signal indicator. With the tach gone, I noticed last night on our test drive that the left side of the speedometer looked dim. This morning I found a blown bulb on that side (so nice being able to actually get to stuff up under the dash!).
I believe the instrument panel lights are supposed to be #168 bulbs, but what I pulled out was a #194. If I recall, the 168 is brighter... can anyone confirm this?
-
09-03-2015, 03:41 AM #20Veteran
- Join Date
- Oct 2008
- Location
- Wherever life takes me
- Posts
- 12,526
Red- 02 35th LE Camaro SS
168 bulb is 3 Candle Power (CP) whereas the 194 is only 2 CP.


 Reply With Quote


Thread Information
Users Browsing this Thread
There are currently 1 users browsing this thread. (0 members and 1 guests)
Similar Threads
-
1969 &1970 Chevrolet Camaro - One For Show, Two For Go!
By Ed Blown Vert in forum Camaro / SSReplies: 0Last Post: 01-29-2013, 02:20 PM -
Ring Brothers 1970 Chevrolet Camaro "Diversion"
By Ed Blown Vert in forum Classic MuscleReplies: 0Last Post: 11-04-2011, 04:40 AM -
1970 Chevrolet Camaro - Performance Minded
By Ed Blown Vert in forum Camaro / SSReplies: 0Last Post: 10-05-2011, 04:20 PM -
1970 Chevrolet Camaro and More - Local Heroes Redux
By Ed Blown Vert in forum Camaro / SSReplies: 0Last Post: 09-29-2010, 03:50 AM -
For Trade: For Sale 1970 Chevrolet Camaro Split Bumper
By fuzzyhall in forum Vehicles For Sale / TradeReplies: 2Last Post: 11-15-2008, 03:21 PM

Bookmarks