

Results 21 to 40 of 129
Thread: Bidding my rear adieu!
-
01-07-2010, 06:30 PM #21Veteran


- Join Date
- Feb 2009
- Location
- Mansfield, PA
- Posts
- 22,146
Black & Blue- '02 WS.6 / '07 Suburban
Finally was able to start on the swap tonight. Began by removing the wheels and brakes. It's been too cold to wash the car lately and I have not wanted to spray down my garage, so sorry about the grime.
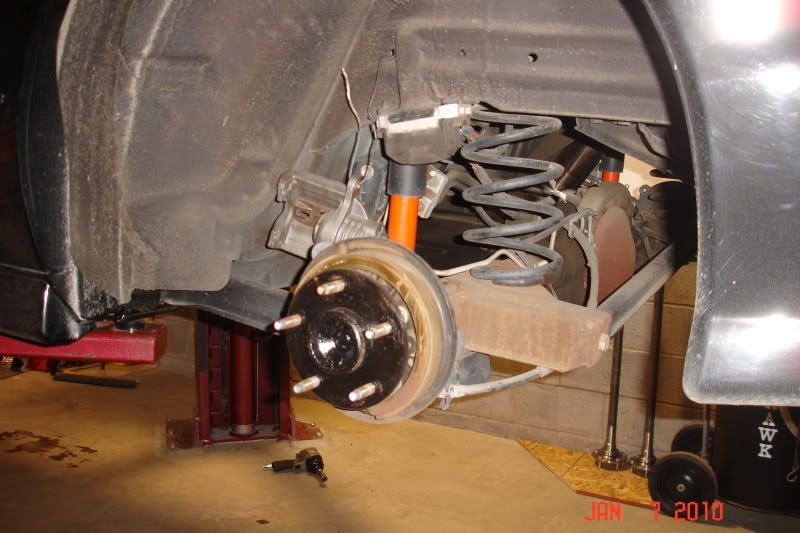
This is what is coming out. I guess I'm not sure how all the brake lines and wiring are going to be re-attached to the new axle. I really do not want to wrap 10 zip ties around the axle to hold everything -- too cheesy imo. I will have to figure that out as I go since most of the brackets are not going to work with my setup, particularly the bracket for the hydraulic brake lines on the front left side of the center section. I will be cleaning and painting all the stock stuff before it is re-installed.
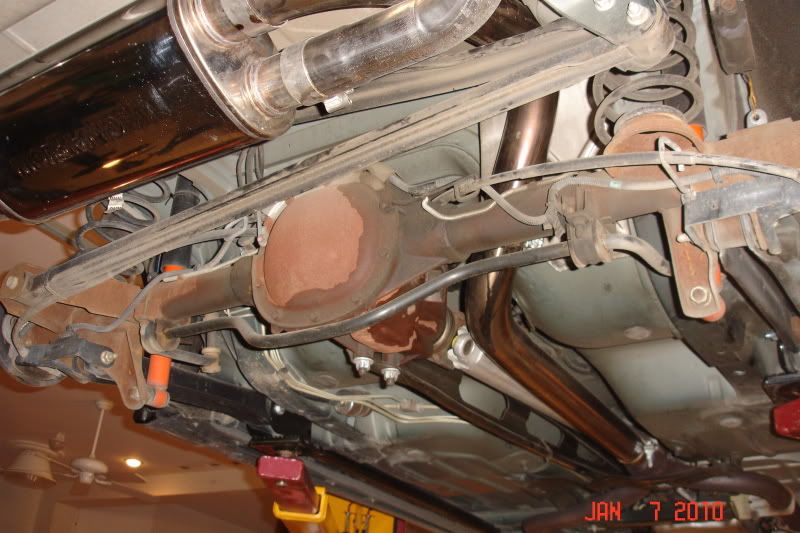
After yanking the sway bar and panhard bar, I dropped the rear cover to allow all the fluid to drain. Everything looks good inside. We did not have any problems with the rear and it never made any noise during the 3,000 or so miles we have put on the car since purchasing it.
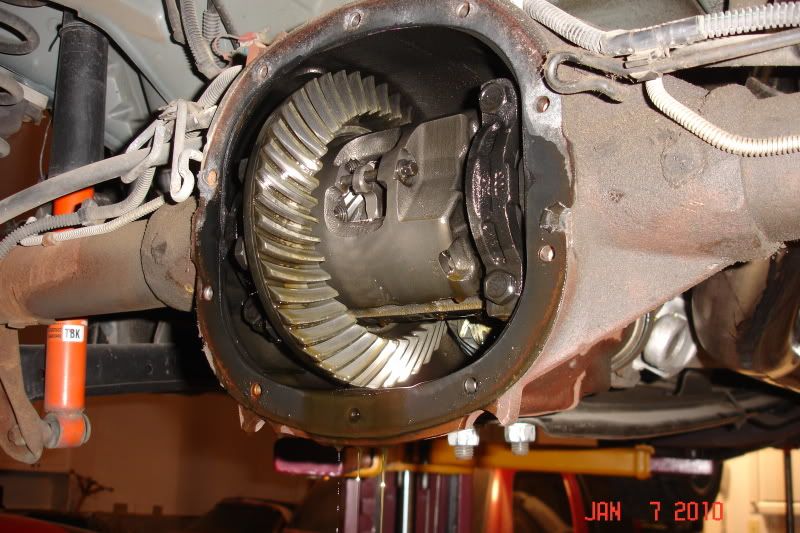
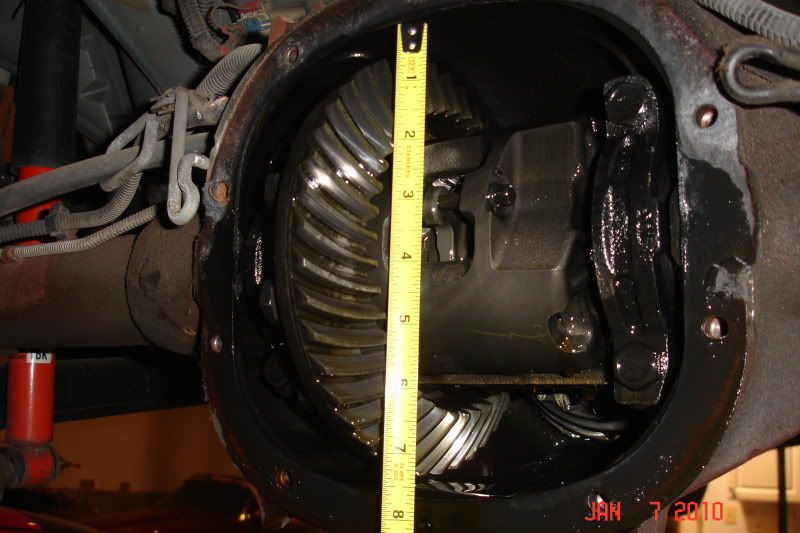
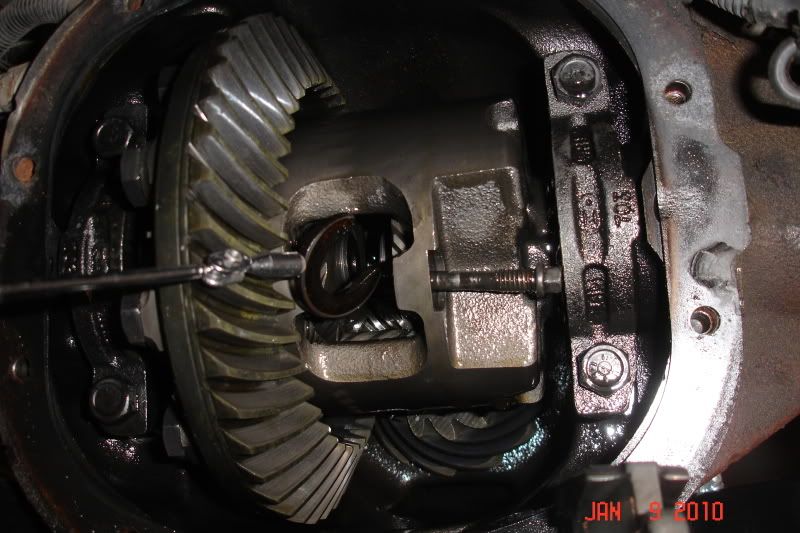
Here was my "OMFG moment" -- as soon as I looked at the ring gear I understood why these rears are not meant for abuse. I could not believe how tiny it was, in diameter, the size of the teeth and its thickness, or I guess lack of thickness would be more appropriate. Even after reading all the stories on here, it was actually seeing it for the first time that made me realize how bad it truly is.
-
01-07-2010, 07:25 PM #22Veteran

- Join Date
- Oct 2008
- Location
- Wherever life takes me
- Posts
- 12,526
Red- 02 35th LE Camaro SS
Great pics Jeff. Looks like you're making steady progress on it.
-
01-09-2010, 04:34 PM #23Veteran
- Join Date
- Feb 2009
- Location
- Mansfield, PA
- Posts
- 22,146
Black & Blue- '02 WS.6 / '07 Suburban
Today I was able to finish removing the 10 bolt. I have something going on with the tailstock (A4) -- when I loosened the lower rearmost bolt for the torque arm bracket, I had a gush of trans fluid. I posted a question in another thread on this as the service manual does not say anything about draining the transmission fluid before removing the bracket. Will have to figure this out later.
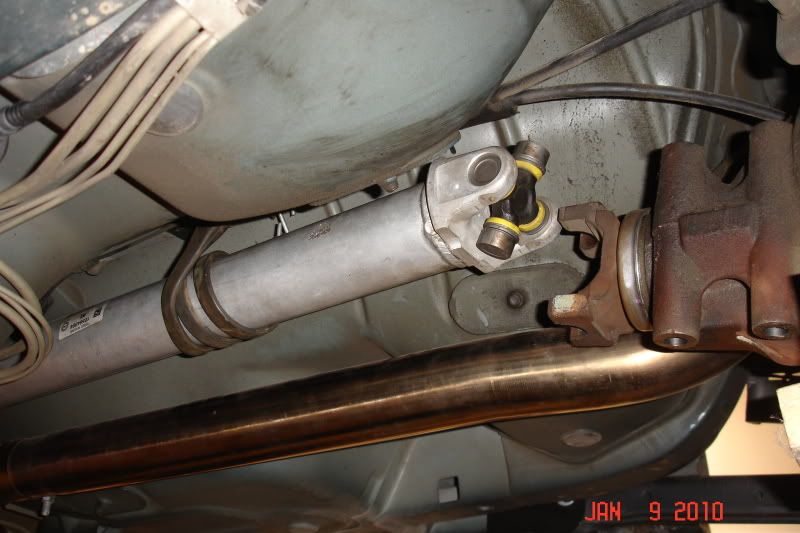
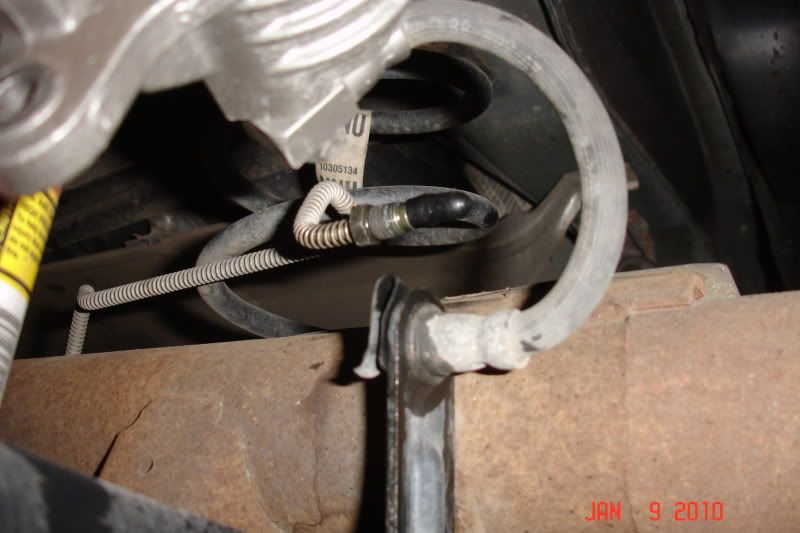
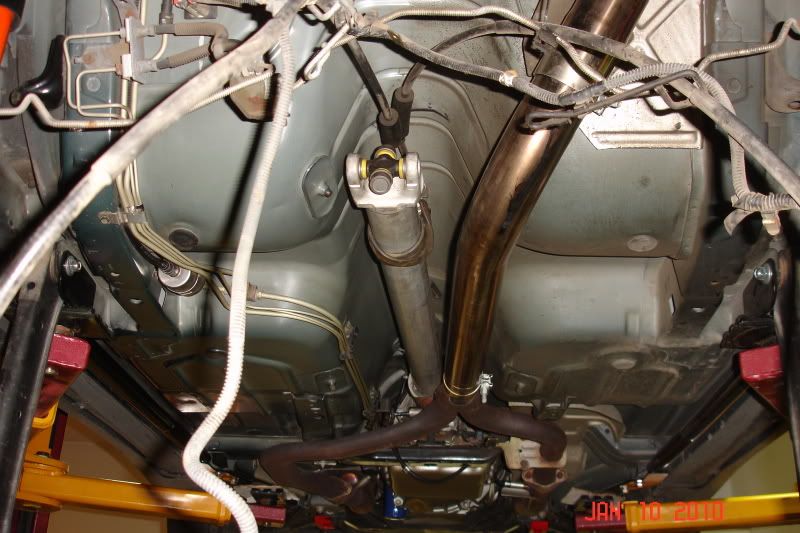
I started with unbolting and removing the torque arm and rear u-joint and then removed the brake lines at the union on each end of the axle. I capped the brake lines as quickly as I could with vacuum caps to prevent fluid loss and air infiltration.
I then removed the axles by taking out the c-clip spacer and pressing inward on each axle to pop the clip. Amazing that clip is all that retains the axles on most GM RWD automobiles. After removing the axles, I unbolted the backing plates and set them aside for cleanup. I then used 2 pieces of angle iron to press the reluctor ring off of each axle.
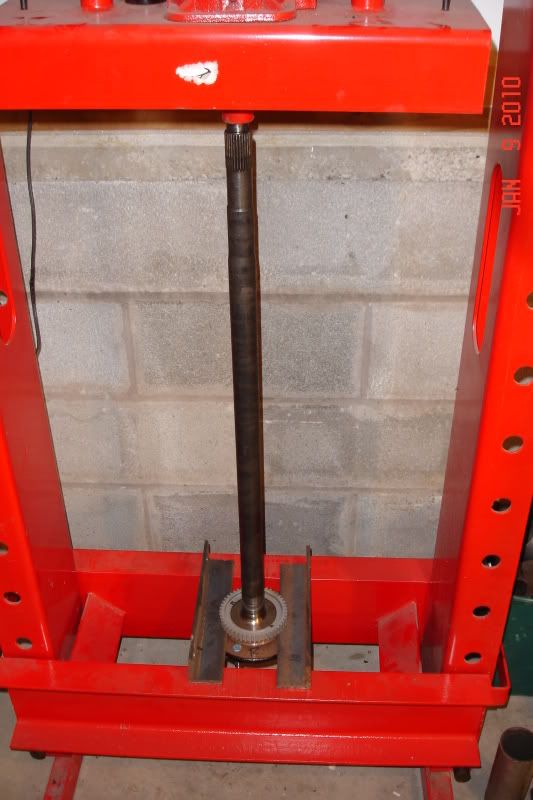
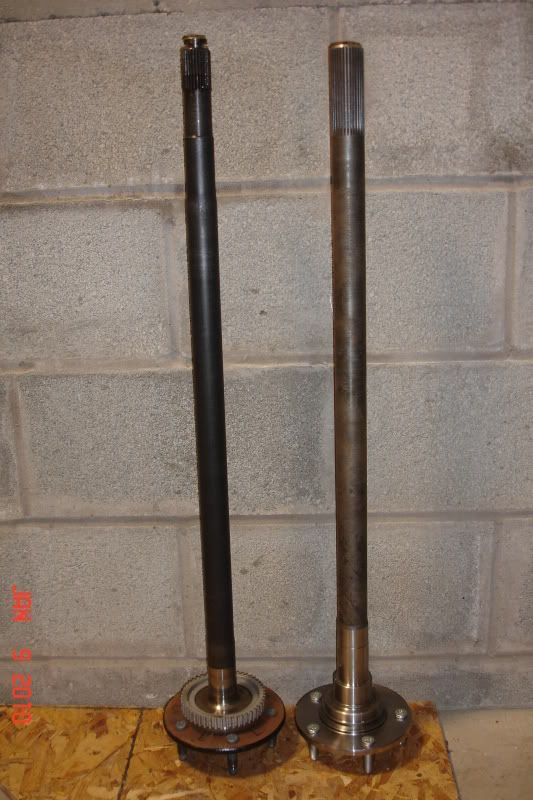
This is a comparison of the stock axle (left) to the 33 spline Moser axle (right). Pretty big difference between them. As you can see, the Moser axles is essentially the same diameter all the way to the splines.
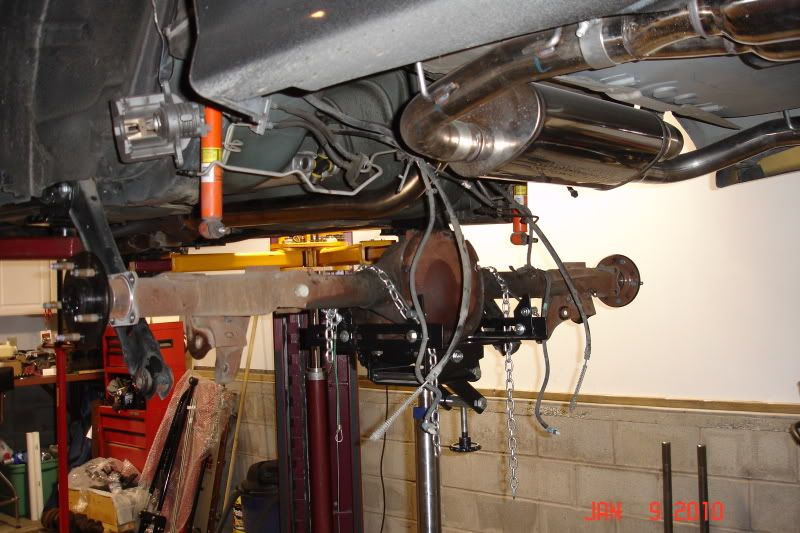
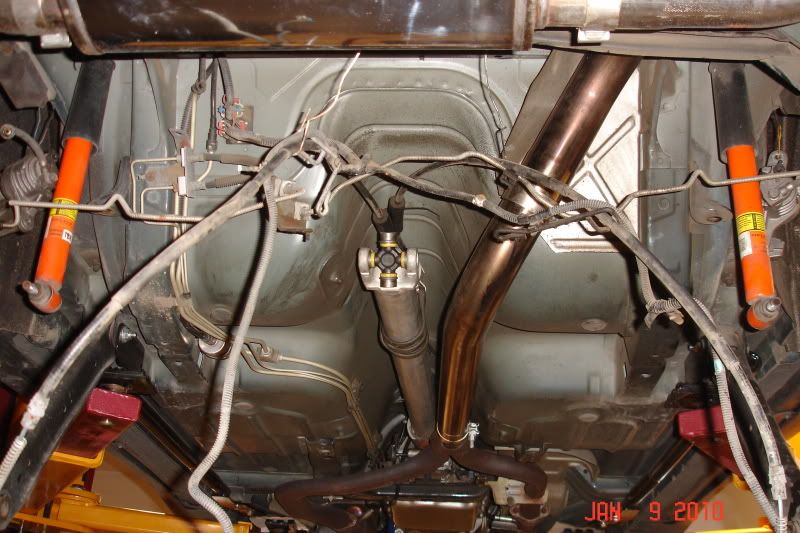
After unclipping the brake lines, removing all the brackets, and popping open the wiring clips, I chained the axle to my hoist. I then unbolted the lower shock mounts and lower control arms and pivoted them down out of the way. Before dropping the axle out of the car, I reinstalled the axles and rear cover to keep everything clean and sealed up. Not much chance it will ever go back in, but you never know. I then dropped the axle down out of the car. This leaves all the wiring and brake lines hanging and awaiting installation of the new axle. My next step will be to clean up the underside of the car -- no way it will ever compare to Preston's, but it does not hurt to try...
-
01-10-2010, 06:19 PM #24Veteran
- Join Date
- Feb 2009
- Location
- Mansfield, PA
- Posts
- 22,146
Black & Blue- '02 WS.6 / '07 Suburban
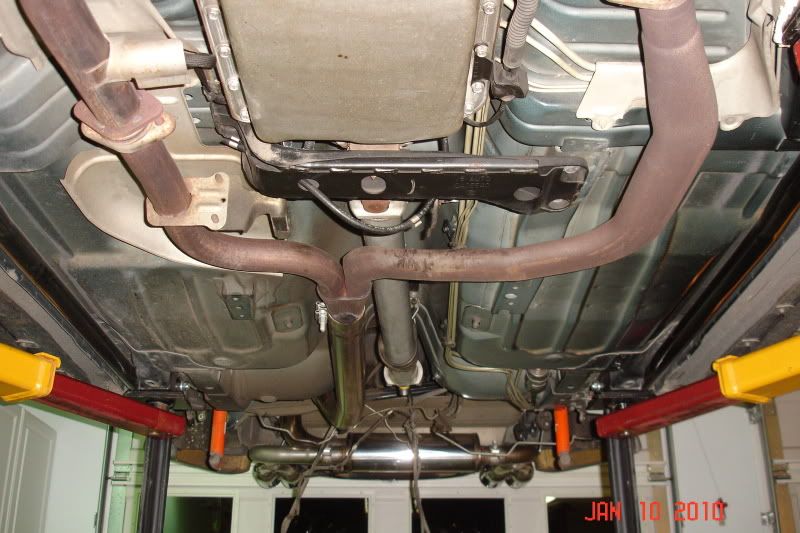
With everything out of the way, I started scrubbing things down late last night on the underbody. There are just a few spots where road debris has started to work away at the paint (what little there is of it) and some very small rust spots have started to form. It would be nice if there was something off the shelf that would semi-match the odd hue of the underbody. Just to see what the difference would be -- I only did the driver side to start. Pretty dramatic difference:
-
01-12-2010, 06:00 PM #25Veteran
- Join Date
- Feb 2009
- Location
- Mansfield, PA
- Posts
- 22,146
Black & Blue- '02 WS.6 / '07 Suburban
Last night I scrubbed down the passenger side of the underbody and that was about it. Monday was a little hectic so I didn't have a whole lot of energy. Tonight, I cleaned up and painted the backing plate and all the e-brake hardware for the driver side, along with the sway bar brackets. I sandblasted the backing plate insert, some of the small hardware, and brackets before painting.
I had to order a new set of parking brake boots as mine are both shredded. I could not find any on-line so I posted up a quick question. Thanks to 35th-ANV-SS for coming through with a link to a supplier that stocks them for $15.00 per pair. Ordered last night and they shipped today.
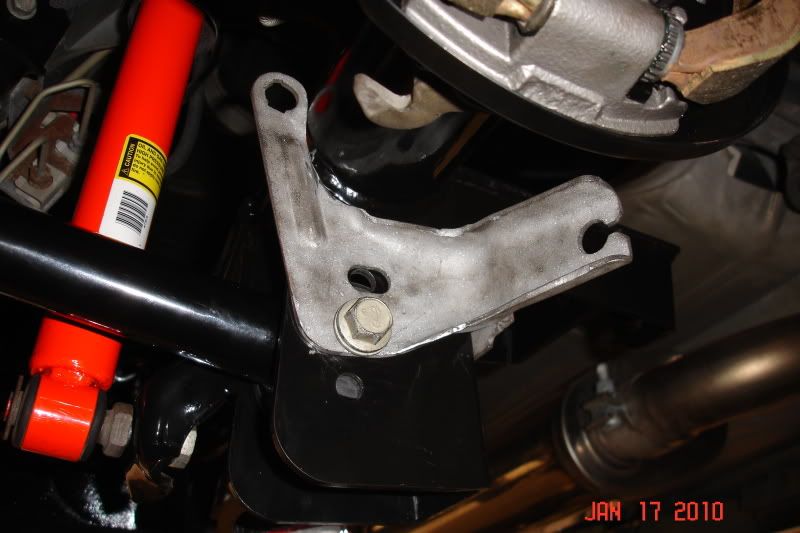
Next issue is the brake line and parking brake brackets. Looks like they will have to be modified as I have welded relocation brackets pre-installed on my new axle. I have to think about it just a bit more, but I believe I will cut off the inner arm and radius the outer arm to clear the LCA bolt holes. I'll then locate and drill two holes, one on the outside and one on the back. This will allow the bracket to be bolted to the axle. I could easily weld them on, but I am not sure if I want to make it so that I can not easily remove them. The stock brackets are pictured below:
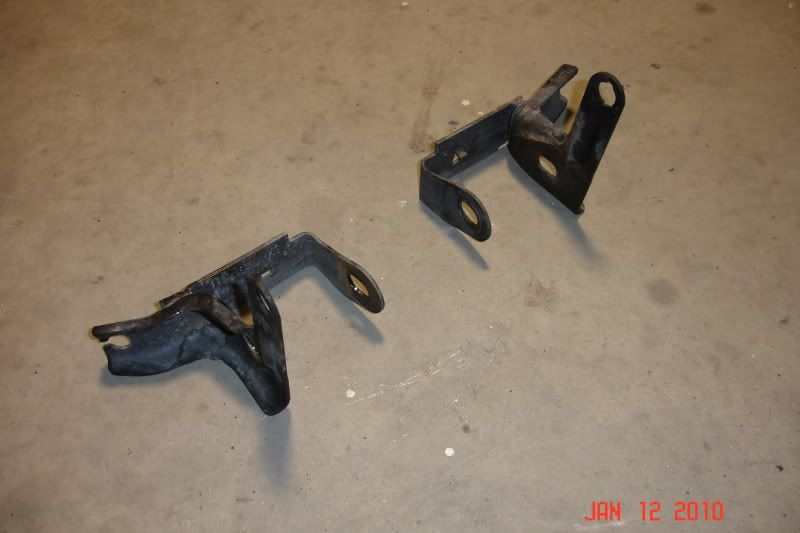
If anyone else has a better plan, or pics of their setup, let me know. I may also have to slightly clearance the ABS/TCS sensors for them to fit. Moser does notch the bearing housing, but in test fitting the sensors they were pressed against it.
-
01-12-2010, 06:06 PM #26Member

- Join Date
- Jan 2010
- Location
- First In Flight
- Age
- 42
- Posts
- 160
white- 83 mustang coupe
Dude you car is clean! How many miles are on it? My car don't have but 50k and it's filthy.
-
01-12-2010, 06:08 PM #27Veteran
- Join Date
- Feb 2009
- Location
- Mansfield, PA
- Posts
- 22,146
Black & Blue- '02 WS.6 / '07 Suburban
 Originally Posted by crossbredfoxbody

It has just over 73,000 on it.
-
01-12-2010, 06:10 PM #28Member
- Join Date
- Jan 2010
- Location
- First In Flight
- Age
- 42
- Posts
- 160
white- 83 mustang coupe
Let me guess, You don't drive it in the rain or on dirt road's right.
-
01-12-2010, 06:13 PM #29Veteran
- Join Date
- Feb 2009
- Location
- Mansfield, PA
- Posts
- 22,146
Black & Blue- '02 WS.6 / '07 Suburban
Originally Posted by crossbredfoxbody
I live 1/2 mile down a dirt road... but I do try to avoid rain.
-
01-12-2010, 06:16 PM #30Member
- Join Date
- Jan 2010
- Location
- First In Flight
- Age
- 42
- Posts
- 160
white- 83 mustang coupe
That helps a lot the whole rain deal.
-
01-14-2010, 05:56 PM #31Veteran
- Join Date
- Feb 2009
- Location
- Mansfield, PA
- Posts
- 22,146
Black & Blue- '02 WS.6 / '07 Suburban
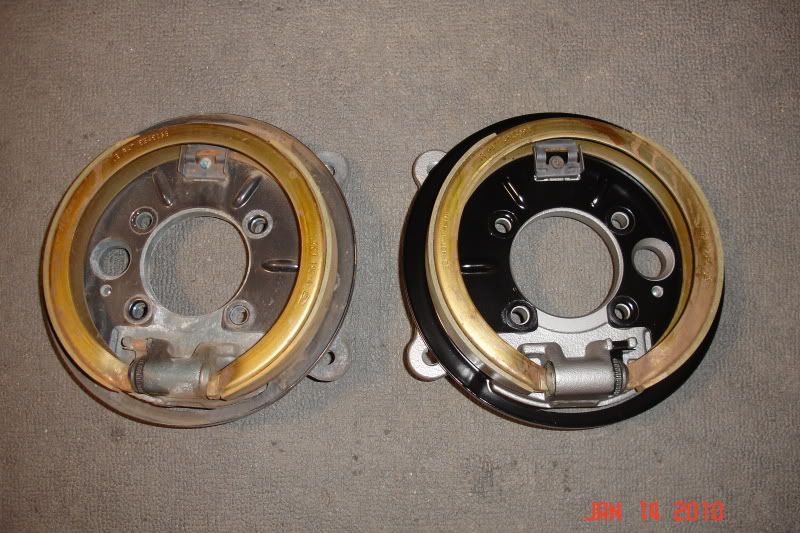
Last night, I cleaned up and painted the axle hubs and reassembled the driver side parking brake. This evening, I pulled the passenger side parking brake apart and refurbished it -- will put it back together after the paint dries. Hopefully, the new boots will arrive tomorrow so I can finish them. Here's a before and after of the backing plate/parking brake assembly:
-
01-16-2010, 12:47 PM #32Veteran
- Join Date
- Feb 2009
- Location
- Mansfield, PA
- Posts
- 22,146
Black & Blue- '02 WS.6 / '07 Suburban
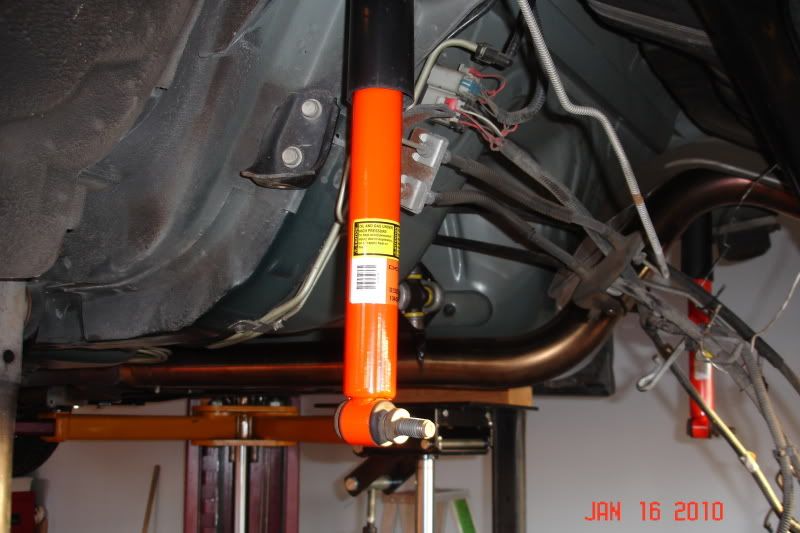
I've made quite a bit of progress today. Started with a little more cleaning under the back of the car. The shocks were bothering me as the paint was chipped up around the base pretty bad. Found that Chevrolet Orange engine paint is just about a perfect match for the stock shocks:
I assembled each of the axles. Started by pressing the reluctor rings back onto each axle and then slipping over the backing plates. The bearing is pressed on next followed by the lock collar. The lock collars are really tight, so I gently warmed them up with a propane torch to gain just a bit less friction.
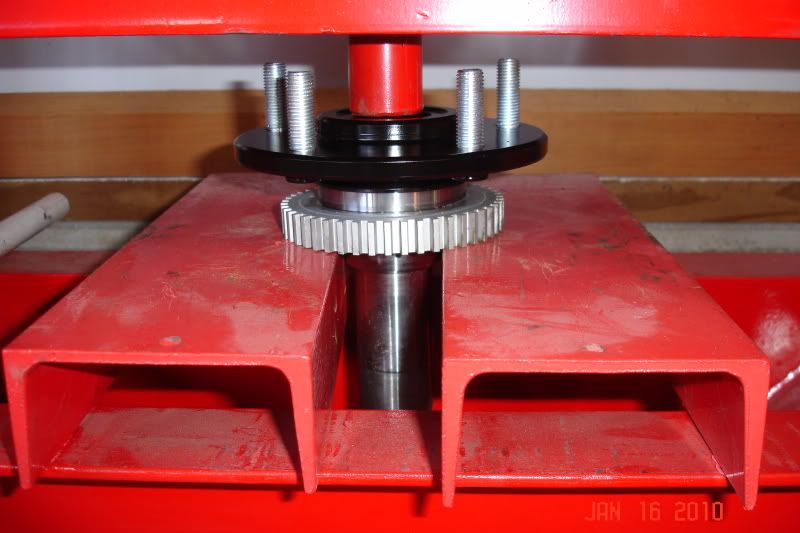
The axle tubes were cleaned using an old T-shirt soaked in denatured alcohol. I pushed it in and out of each tube a few times with a broom stick. I then ran a small bead of sealant around the innermost lip before driving in the axle seals. Had to remove the parking brake as once I had everything together I realized that there was no way to install the lock washers and nuts on the t-bolts. The axle is now ready to go back up under the car for a test fit. I'll need to mark and drill the housing for the center brake bracket and then it should be ready for permanent install.
-
01-16-2010, 03:42 PM #33Veteran

- Join Date
- Nov 2005
- Location
- Florida
- Posts
- 10,467
Black- 1999 TA WS.6
Looking great Jeff!
-
01-16-2010, 05:37 PM #34Veteran
- Join Date
- Feb 2009
- Location
- Mansfield, PA
- Posts
- 22,146
Black & Blue- '02 WS.6 / '07 Suburban
Thank you. Didn't make it quite as far as I wanted today. Spent lots of time cleaning up and painting all the ancillary parts. I had to shave the TCS sensors just a bit with a sanding disc to clear the bearing housing. Probably would have been fine if I had installed them in the backing plate first, but I did not want to damage them. Axle is ready to go up in... but I ran out of steam. Originally Posted by Hi-Po
-
01-17-2010, 06:37 PM #35Veteran
- Join Date
- Feb 2009
- Location
- Mansfield, PA
- Posts
- 22,146
Black & Blue- '02 WS.6 / '07 Suburban
Modded the parking brake brackets today to fit the new axle -- it was a little more work than I anticipated, but the result was what I wanted:
Details on the modifications and more pictures: http://www.ls1.com/forums/showthread.php?t=129401
-
01-17-2010, 06:51 PM #3611 years of bangin gears

- Join Date
- Jan 2009
- Location
- North Jersey
- Posts
- 11,496
Phantom Black Metallic- 2004 GTO M6

Keep at it Jeff. You're almost there. I like the progress.

-
01-17-2010, 06:57 PM #37Veteran
- Join Date
- Feb 2009
- Location
- Mansfield, PA
- Posts
- 22,146
Black & Blue- '02 WS.6 / '07 Suburban
Originally Posted by cammed goat
Thanks! Hopefully will be all done by next weekend. We have a few things scheduled in the evening this week, so I will not be able to spend much time in the garage.
-
01-17-2010, 10:22 PM #38James Bond

- Join Date
- Aug 2007
- Location
- Texas
- Age
- 38
- Posts
- 4,546
2001 3.8 Black - sold- 2000 SS Black M6
because 4:10s are lower? 3:42 is common in a lot of f-bodies, i think it was the standard to be paired with the A4....mine has it. Originally Posted by INMY01TA
with 4:10s hell be running about 4k RPMs down the interstate. They're intended for drag racing, where top speed isnt a factor, acceleration is.
-
01-18-2010, 03:36 AM #39middle aged teenager

- Join Date
- Nov 2009
- Location
- lawrenceville georgia
- Posts
- 518
sunset orange/ black- two 2001 ws6 m6
looks good jeff.
-
01-19-2010, 06:26 PM #40Veteran
- Join Date
- Feb 2009
- Location
- Mansfield, PA
- Posts
- 22,146
Black & Blue- '02 WS.6 / '07 Suburban
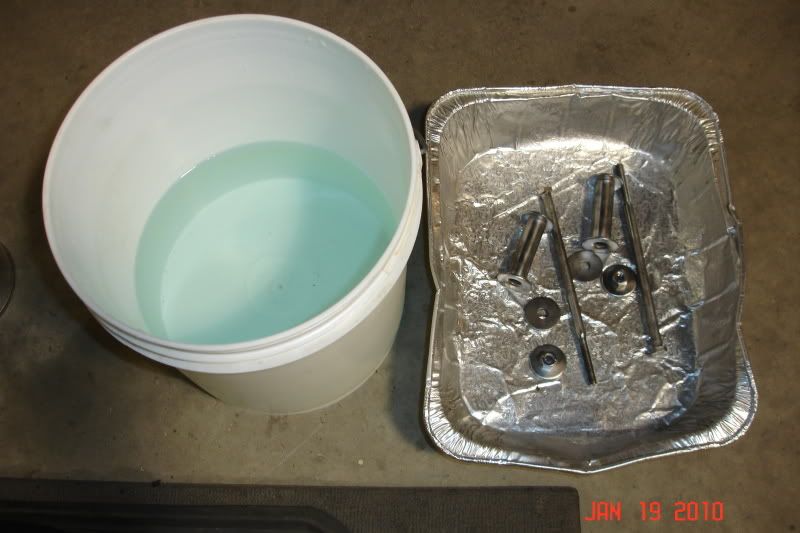
Tonight I masked off and painted the brake line bracket that bolts to the body in front of the left wheel well. It was just starting to rust and since I have everything apart, it had to be done. While that was drying, I sand blasted and wire wheeled my sway bar links and cleaned up the bushings with Bleche-White.
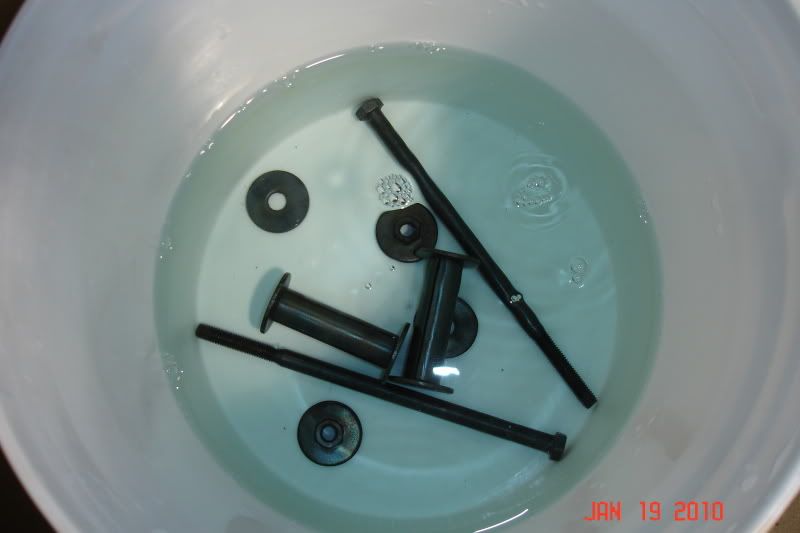
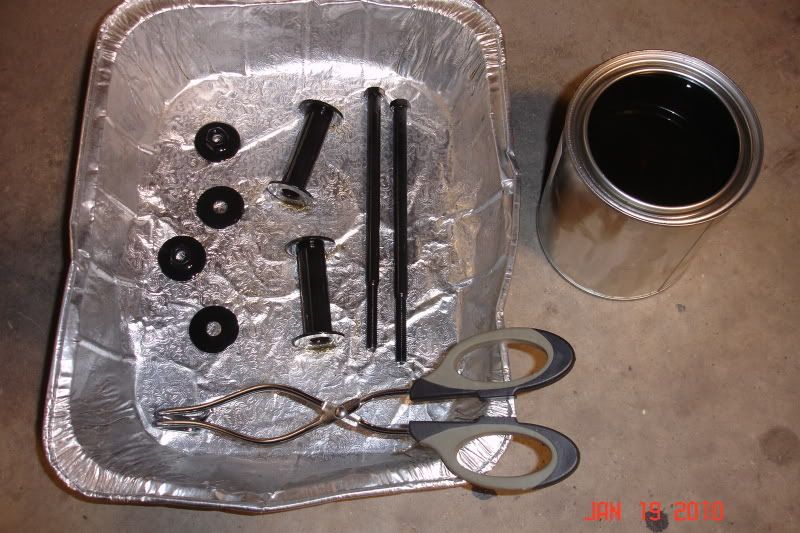
Rather than paint, I used my black oxide kit on the link hardware. It's a two step process that has worked well on parts for our our older cars. I bake the parts in the oven at 200 degrees and then drop them in the blackening solution. After 10 minutes, the parts are removed, rinshed in water and blown dry with compressed air. They then soak in a sealing solution for a bit before being removed to air dry overnight:
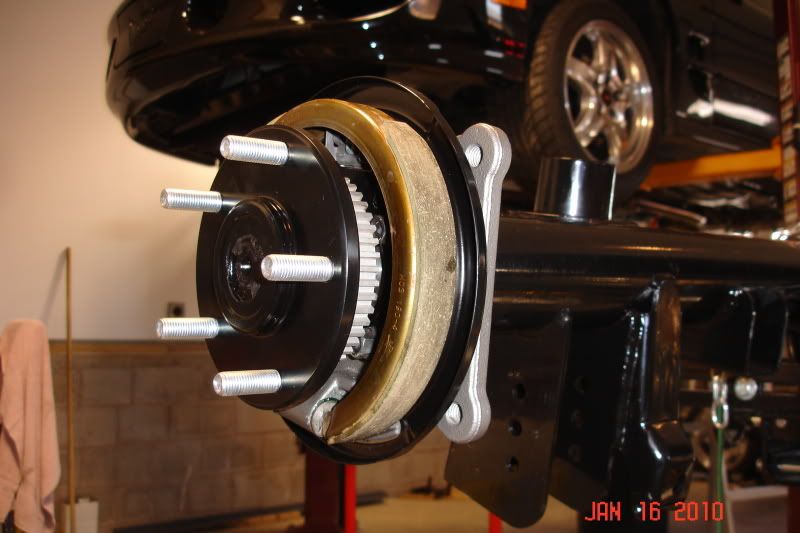
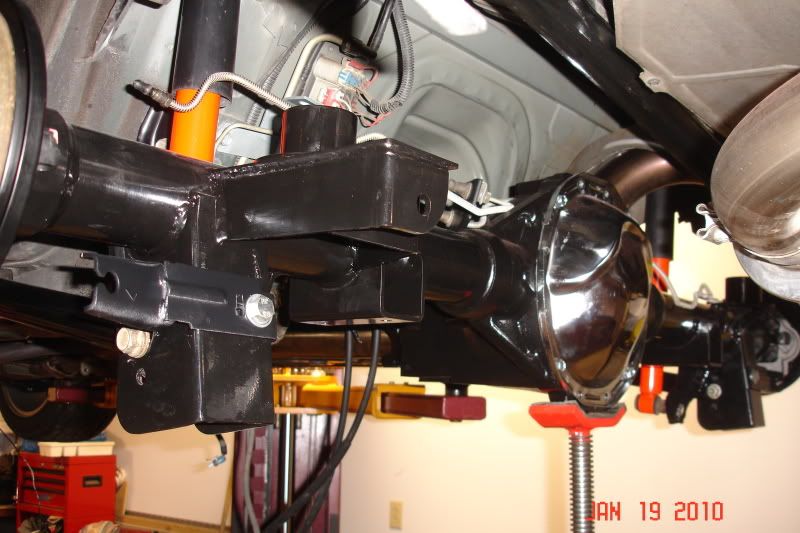
While the parts were taking a bath, I installed the axle in the car for the final time. I had it in and out a couple of times last night to test fit my parking brake brackets and to drill the hole in the center section to mount the middle brake line bracket.

 Reply With Quote
Thread Information
Users Browsing this Thread
There are currently 2 users browsing this thread. (0 members and 2 guests)
Similar Threads
-
Bidding On An SS Camaro....My Search Continues
By fbodyNATION in forum Camaro / SSReplies: 7Last Post: 01-08-2012, 10:32 PM -
Bidding LS1 farewell.
By bmyers in forum Almost Anything GoesReplies: 68Last Post: 10-22-2007, 08:01 PM -
Rear alignment is off after Koni/!= rear isolator lowering, car pulls to right, specs
By anestech* in forum Suspension and HandlingReplies: 13Last Post: 07-08-2007, 09:42 AM -
Randy's Rear End Shop Get's Punked (Prank) - Woman looking for a bigger rear!
By powermelissa in forum Multimedia SectionReplies: 0Last Post: 05-25-2007, 10:37 AM -
President Clinton Emerges in Group Bidding for Philadelphia Inquirer
By zleeper z in forum Political / Debate ForumReplies: 2Last Post: 03-30-2006, 06:50 AM

Bookmarks