

Results 1 to 12 of 12
-
07-07-2016, 01:16 PM #1Spaz is My Mentor


- Join Date
- Feb 2009
- Location
- Florida Man Status Acheivement
- Posts
- 11,785
Navy Blue Metallic- 98 T/A, 00 FBVert, 78T/A
How to bring your car out of the dark ages...HID/LED
Tools:
Wire cutter
Wire Splicer
Screw Driver with cross tip and star bit
10mm socket
8 mm socket
Ratchet for the sockets
Flashlight (for viewing in access panel for the lights)
Electrical Tape and or Heat Shrink Tube
Wire Loom
Connectors
Solder Iron
Solder
Heat Gun
Zip Ties
Parts:
HID Headlights:
High Beam Housing LMC Trucking Part # 36-0303 Need 2 $34.95ea
http://www.lmctruck.com/icatalog/cd/full.aspx?Page=65
Low Beam Housing LMC Trucking Part #: 36-0302 Need 2 $34.95ea
http://www.lmctruck.com/icatalog/cd/full.aspx?Page=65

(On these 2 I went with 35W, 8000k Color Range. Using the 55W will require a relay to be added from DDM Tuning)
Low Beam Light Kit DDM Tuning Need 1 kit (comes as a set of 2) $36.94
DDM HID Kit, 35W, 9005, 8000K (Kit / Package) Bulb Type: 9005 Wattage: 35 Watt, Bulb Color: 8000K
(Bulb Color has different ranges. Higher the number the Bluer the light)
http://www.ddmtuning.com/Products/DDM-HID-Kit-Slim-Ballast-35W-or-55W
High Beam Light Kit DDM Tuning Need 1 kit (comes as a set of 2) $36.94
DDM HID Kit, 35W, 9009, 8000K (Kit / Package) Bulb Type: 9005 Wattage: 35 Watt, Bulb Color: 8000K
(Bulb Color has different ranges. Higher the number the Bluer the light)
http://www.ddmtuning.com/Products/DDM-HID-Kit-Slim-Ballast-35W-or-55W
Fog Lights DDM Tuning Need 2 kits (these are sold as one per kit) $29.95
DDM HID Kit, 35W, 880, 8000K (Kit / Package) Bulb Type: 880 Wattage: 35 Watt, Bulb Color: 8000K
http://www.ddmtuning.com/Products/DDM-HID-Kit-Slim-Ballast-35W-or-55W
Rear Lights
3rd Brake Light LED EBAY $120
Pontiac Firebird Trans Am WS6 High Rise Third Break Light 1993 - 2002
http://www.ebay.com.au/itm/For-Pontiac-Firebird-Trans-Am-WS6-High-Rise-Third-Break-Light-1993-2002-/191756769134?hash=item2ca598176e:g:F18AAOSwYIhWj-~X
Reverse EBAY $17.99 (Comes with 2 bulbs)
3157 LED 2835-21SMD Projector Auto Light Bulbs, Color White (2 Bulbs)
http://www.ebay.com/itm/US-Seller-2Pcs-3157-LED-2835-21SMD-Projector-Auto-Light-Bulbs-Color-White-/151766389602?hash=item2355fb5362
Brake/Turn Signal EBAY $17.99 (Comes with 2 bulbs) Need 2 sets
3157 16SMD 2835 Red White Switchback LED bulbs for Turn Signal Lights (2 Bulbs)
http://www.ebay.com/itm/2PCS-3157-16SMD-2835-Red-White-Switchback-LED-bulbs-for-Turn-Signal-Lights-/321374273828?hash=item4ad3664124:g:Cp8AAOSwgApXB72 w&vxp=mtr
License Plate Lights EBAY 11.49/pair SYLVANIA PREMIUM LED MINIATURE White 194
http://www.ebay.com/itm/131684651843?_trksid=p2057872.m2749.l2649&ssPageNa me=STRK%3AMEBIDX%3AIT
SIDE Marker Lenses EBAY $59.95 98-02 Pontiac Firebird Trans Am Smoke FRONT + REAR Bumper Side Marker Light (4 pieces total)
http://www.ebay.com/itm/4PCS-98-02-Pontiac-Firebird-Trans-Am-Smoke-FRONT-REAR-Bumper-Side-Marker-Light-/301946752945?hash=item464d6dcfb1:g:Bk0AAOSwFL9Tu4f R&vxp=mtr
Front Side Corner Lights EBAY $11.49/pair
SYLVANIA PREMIUM LED MINIATURE Amber 194
http://www.ebay.com/itm/141885723754?_trksid=p2057872.m2749.l2649&ssPageNa me=STRK%3AMEBIDX%3AIT
Rear Side Corner Lights EBAY $11.49/pair
SYLVANIA PREMIUM LED MINIATURE Red 194
http://www.ebay.com/itm/131709363584?_trksid=p2057872.m2749.l2649&ssPageNa me=STRK%3AMEBIDX%3AIT
DRL/Front Turn Signal EBAY $20.99/pair
Amber/Red Switchback 3157 5730 LED Bulbs for DLR/Turn Signal
http://www.ebay.com/itm/321931249614
Resistors Amazon $4.49 (4 in a box, I ordered 3 boxes so I had spares)
4PCS 25W 8Ohm LED Load Resistors for LED Turn Signal Lights
https://www.amazon.com/CUTEQUEEN-TRADING-Resistors-License-Cancellor/dp/B00JIJ99OM/ref=sr_1_3?s=automotive&ie=UTF8&qid=1467208725&sr= 1-3&keywords=load+resistor+25w+fix+led+bulb

HID Lights
Lay out your new stuff, preferably on a table nearby so you’re organized. I had mine laid out as pass side low, then high on the left side of the table and then driver’s side the same way.
For Trans Am guys you need to turn on the headlights, then disconnect the battery leaving the lights up. For Camaro guys (you lucky Bastards) just pull out your lights and start with the wire connectors.
Remove the plastic surround using a cross tip screw driver. Sit to the side. (Side note - I not only cleaned mine up but also touched them up with some paint because it was looking faded.)
Next remove the 4 star head screws from each lamp mounting bracket (See plastic surround for clean up/paint note). Disconnect the wire from each headlamp and sit it to the side. Now on my car the high beam wire connector was routed kinda funny so remember how yours are before you pull it out so you can have better access.
At this point you can test if you want to see what wire is + vs -, mine was black was -, color wire was +. I’ve read that some of the newer years the wiring was different.

I cut the terminal about 3” from it, next remove the plastic sheath about an inch.
At this point I primed both the new harness (that comes with the New Housings) and the car wires with solder. I placed a piece of heat shrink tubing on then using a pair of vice grips to hold the 2 wires together I solder them. Slide the heat shrink over the joint and apply heat. If not using heat shrink you can use electrical tape. Just make sure no stray wires are sticking out.
Please forgive the crappy solder job, I went back after this pic and cleaned it up but forgot to take another pic

Last edited by SMWS6TA; 11-30-2016 at 07:35 AM.
-
07-07-2016, 01:18 PM #2Spaz is My Mentor
- Join Date
- Feb 2009
- Location
- Florida Man Status Acheivement
- Posts
- 11,785
Navy Blue Metallic- 98 T/A, 00 FBVert, 78T/A
Now grab a low beam housing and insert the new bulb from DDM Tuning Kit. Do not use the O ring they provide, it will not seat the light properly. Next connect the ballast to the connector you just soldered. Leave the wiring loose because you’ll need to figure out where to best route it. Insert the new lamp into the pocket routing the wires through the back. Now connect the 2 wires form the ballast and then screw in the mounting bracket with the 4 star screws.
Repeat for the remaining lights.
Now reconnect the battery and see if you have lights on. Don’t panic if no lights are on. These bulbs are single polarity. Meaning they have to be connected correctly. If a bulb is not on go to the connector that you spliced in and flip it 180*. Now it should be one. If not you need to check the rest of the harness, may even need to use multi-meter.
The polarity also applies to the rest of the LED lights as well.
Now once all the lights are working go in and using zip ties to secure them in place to ensure they do not get in the way of the headlights opening/closing.
SIDE MARKER LIGHTS
This is too easy. Using a cross tip or star bit screw driver remove the single screw holding in the housing. Now if you ordered smoked lenses (like I did) just swap the out here, otherwise remove the bulb and replace with the new 194 LED bulb. Now after you gone through all of the side markers remember what I told you about polarity. Check the bulbs before you screw them back in.
Rear Lights
Lift the hatch up, remove the 2 side panels, peel back the carpet and unscrew the 5 plastic nuts holding the lights in place. Carefully remove the tail light. It’s at this time that if you have not done a drill mod on the light I highly recommend doing so. Use a 1/8” bit, drill on the underside directly below where the light bulb sits a hole under each brake and reverse light . This will allow for the housing to drain when they fill with water. You don’t need to go far into the housing; I taped the bit off about a ½”. Then I ran a thin bead of black rtv across the top edge of the light to help seal it. Did this 5 yrs ago and never had my lights fill up with water again.
Outside corners, simply replace the 194 bulb with the LED bulb.

Brake and turn signal lights – swap out the bulbs for the LED, next grab one of those 25w resistors and splice into the red & black wire using the connectors that come with the resistors on both lights. You should install 4 total resistors, 2 on each light.


Once it’s all hooked up like in above pic, time to check again. Remember check the polarity of the bulbs. Run through brake, turn signal and reverse to make sure they are working. All good now clean up those drain holes before you install the light. I used a narrow long screw driver and a shop vac, I was amazed at how much dirt was in them. Insert the light.
FRONT DRL/Turn Signals (I save the pain for last…..)
This will test your patience …you were warned.
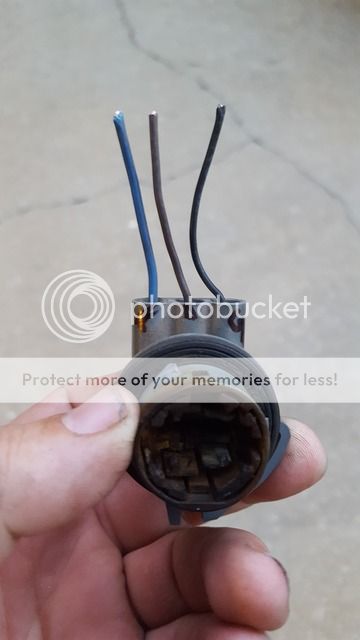
Open the access panel on both sides. Only do ONE Side at a time from here on. Remove the bulb and turn lights on. Using a multi meter you need to check which is the constant 12v and which one is the 12v that the flasher uses. On my car the center wire was -, the color wire was the constant 12v and the third wire was the flasher 12z.
Now once you’ve determine which is what, try to make them so you know. It gets important if you had to replace the housings light I did. Once you cut you need to figure out where the new wires go because as I found out they are not necessary marked correctly for this application. So for here on I’m going to assume you have great connectors and didn’t need to replace them like me. Take a resistor and splice in using their connectors on the – wire and the flasher wire. The constant 12v does not need to have a resistor. Insert the new LED bulb. Turn on light, you may have to turn the key on to get the DRL to light up. If nothing…flip the bulb around 180….(I think I’ve said polarity here a few times…).
When in DRL mode the light should be solid, turn the flasher on and it should blink. If so you’re done on this side and can button it back up. Move on to the other side.
The bulbs I have are white/red. White for DRL’s and Red for turn signal. Not sure why they look orange, but they are red.


Now if you have the misfortune like me you had to replace one or both harness. Multi-meter is your friend on this. Check that the wiring is correct before you tape or seal up. It’s very important you get them right otherwise you’ll blow the led’s and could cause a electrical fire if not fixed correctly.
I also had to file out the DRL housing for the new connector to fit correctly. I also took the time to drill drain holes on the bottom and rear side for drainage.

If you hold the connector like so you should have the ground on the left, constant 12v in the center (this is the DRL) and the flasher is on the right (turn signal) For the relay the ground and the flasher is what you connect the relay to. Caution these things get hot quick, I got burned a few times.
(Ninja Edit) I marked the wires on the connector - F is Flasher, D - DRL's, G - Ground
Hope this helps…Last edited by SMWS6TA; 06-04-2018 at 06:49 AM.
-
07-07-2016, 07:50 PM #3Spaz is My Mentor
- Join Date
- Feb 2009
- Location
- Florida Man Status Acheivement
- Posts
- 11,785
Navy Blue Metallic- 98 T/A, 00 FBVert, 78T/A
Somehow forgot the reverse lights

I'll take some more pics at night to show drivers view.
-
07-07-2016, 07:56 PM #4Spaz is My Mentor
- Join Date
- Feb 2009
- Location
- Florida Man Status Acheivement
- Posts
- 11,785
Navy Blue Metallic- 98 T/A, 00 FBVert, 78T/A
Now that I've hooked all up I think I'll need a relay harness so that the fogs will work without issue. Seems it doesn't have enough voltage when the headlights are on, I'll confirm with DDM Tuning. I'll update when I know more.
Issue fixed without the relay harness. see post further down.Last edited by SMWS6TA; 11-30-2016 at 07:36 AM.
-
07-08-2016, 02:53 AM #5Veteran

- Join Date
- Feb 2009
- Location
- Mansfield, PA
- Posts
- 22,146
Black & Blue- '02 WS.6 / '07 Suburban
Nice write up, Scott!

-
11-30-2016, 07:52 AM #6Spaz is My Mentor
- Join Date
- Feb 2009
- Location
- Florida Man Status Acheivement
- Posts
- 11,785
Navy Blue Metallic- 98 T/A, 00 FBVert, 78T/A
FOG LIGHTS:
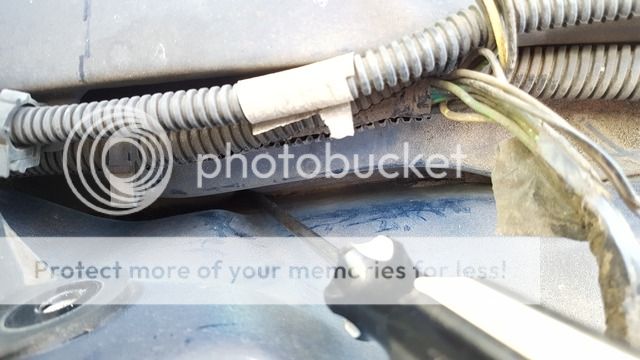
Ok after some researching into the wiring the ground for the fog lights is also tied into the High beams. If you have gone completely over to HID bulbs for FOG, Low & High you'll find that on some cars when you turn the highs on the fogs will come on and turn off the highs or not at all. That is because the stock wiring can't handle the load of the HID's at the same time You'll see your lights flicker but not quite turn on. The solution is easy and cost almost nothing to do.
Disconnect the battery (your going to be messing with the fuse box).
Look for the fuse box that has the FOG light relay.
Loosen the box to where you can access the underside where the wires are coming in.
You will have to break a couple of zip ties to loosen the wires.

Look for a light green wire that is between the brown and orange wires.
Now go as far as you need to get enough wire to be able to cut the light green wire and add a piece.
Cap or tape off the section of wire that is not going into the fuse box/relay.
Now add wire to the lt green wire going into the fuse box/relay. Have enough to be able to reach to the ground post that is on the fender next to the fuse box. I waited till I had everything button back up to cut and install a connector to the post so I had enough.

Now reconnect your battery. Go thru all of your lights make sure they all work. You will now be able to have fog lights on all the time as long as the light switch is on. They will stay on in all positions except off.
-
12-01-2016, 05:32 AM #7Member

- Join Date
- Jul 2016
- Location
- SE IN
- Posts
- 210
Blue Green Chameleon- 2001 Trans Am Vert
Is there an advantage in doing the green wire vs just pulling the relay for the fogs and doing a jumper wire? I dont care about the indicator light on the switch and just want the fogs on with highs and lows.
2001 Trans Am Vert
-
12-01-2016, 08:43 AM #8Mike

- Join Date
- Sep 2006
- Location
- Lawndale, CA
- Posts
- 639
Artic White- 2002 Camaro SS

Nice write up. I ended up using this LED flasher so that I did not have to use load resistors for my 02 Camaro. They work great for the turns and hazards.
https://www.amazon.com/Keep-Clean-FF...+Fixed+Flasher2002 Artic White SS 35th Wheels|Full Hotchkis Suspension|Koni SA|Magnaflow CME|SLP lid|www.fquick.com/The_Guz
-
04-25-2017, 03:15 PM #9Your dealership guy


- Join Date
- Aug 2007
- Location
- USA
- Posts
- 6,565
Velocity Yellow- 2008 Corvette Z06
Just now reading this... impressive write up sir.
Now come to Detroit and do my Vette!!!
2018 Tahoe - Silver - OEM
2008 Z06 - Velocity Yellow - BBE exhuast - Airaid CAI **sold**
2002 Z06 - Electron Blue Metallic - D1 - E85 - 701 rwhp 687 rwtq **sold**
2002 Z28: M6 NBM - cam and boltons - 396rwhp 357 rwtq **sold**
-
04-26-2017, 06:25 AM #10Spaz is My Mentor
- Join Date
- Feb 2009
- Location
- Florida Man Status Acheivement
- Posts
- 11,785
Navy Blue Metallic- 98 T/A, 00 FBVert, 78T/A
Not sure I got info for the fogs from another source. I do know that the high beams and the fog lights on a 98 share the same positive wire but separate grounds. Originally Posted by hardtrailz

-
01-21-2019, 04:33 AM #11Member

- Join Date
- Sep 2008
- Location
- Atlanta, GA,Ft.Walton Bch,FL
- Posts
- 447
- Blog Entries
- 1
silver- 99 ws6
Good news I’ve got the new front bumper on lacking a few 10mm nuts w/ the washer builtin https://www.homedepot.com/p/Everbilt.../204281762that hold the fender to the bumper cover. Originally Posted by SMWS6TA
Now I want decent lights how these look for front blinkers?
https://www.ebay.com/itm/2Pcs-Switch...d=321374273828
need sockets I can test and lable the wires will this work https://www.ebay.com/itm/7443-Bulb-S...frcectupt=true
and I think a resistor https://www.ebay.com/itm/JDM-ASTAR-5....c100005.m1851 https://www.amazon.com/Resistors-Sig...QC0W2D39unsure of where it goe's for the flasher I'm confused on exactly required parts for just the front blinker swap all the other lights )except the third taillight) 100% problem free never even burned a rear tail light. the fronts are a complete nightmare. so any tips is appreciated.https://www.amazon.com/Partsam-Switc...+front+blinkerLast edited by qwik219d9; 01-21-2019 at 05:31 AM.
-
01-22-2019, 07:04 AM #12Spaz is My Mentor
- Join Date
- Feb 2009
- Location
- Florida Man Status Acheivement
- Posts
- 11,785
Navy Blue Metallic- 98 T/A, 00 FBVert, 78T/A
Originally Posted by qwik219d9
These look like an update to the ones I use. Looks like they will work.
The socket on ebay doesn't look like it will work with the housing. I picked replacement up from local autoparts store. Originally Posted by qwik219d9
The last led that has the resistor built in the bulb are new from when I did my thread. IIRC those bulbs came out about a year after. If you get those bulbs (with the resistor) you should not need to add the resistor.

 Reply With Quote
Thread Information
Users Browsing this Thread
There are currently 1 users browsing this thread. (0 members and 1 guests)
Similar Threads
-
Most anything goes: Bring it!
By 67CamaroRSSS in forum Almost Anything GoesReplies: 21Last Post: 07-22-2011, 04:43 AM -
Bring it!
By LSCyaL8R in forum Almost Anything GoesReplies: 24Last Post: 03-18-2010, 03:26 PM -
How much $$$ should my cats bring ?
By Speedy_Gonzales in forum External EngineReplies: 15Last Post: 08-30-2008, 04:58 PM -
What would you bring?
By burnws6 in forum Almost Anything GoesReplies: 29Last Post: 07-05-2007, 11:27 AM

Bookmarks