

Results 1 to 20 of 25
-
10-31-2007, 07:41 PM #1down with the lot lizards


- Join Date
- Dec 2006
- Location
- Pensacola
- Age
- 36
- Posts
- 1,561
Red- 2001 Camaro SS A4

Alternator Instructions (Removal and Installation)
I am not responsible for broken equipment. I have done this 3 times on my car because the auto parts store sold me a bad reman so i had to get a new one. My car is doing better than ever.
Tools Needed:
13mm socket/ratchet or wrench
15mm socket/ratchet or wrench
hammer
ratchet extension
anything else you think you might need
Removal:
First: Disconnect Battery!
First remove the two main bolts holing the alternator on with a 15mm socket or wrench.
Then loosen up the belt with the tensionor (15mm) and ONLY remove the belt from the alternator so you wont lose the belt route.(you may need someone to help you with this step).
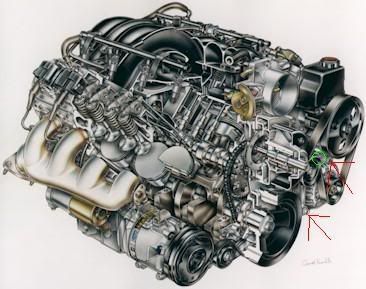
There will be one more smaller bolt on the back side of the alternator (green) around the location of the green circle. It will be tricky to get to and you may need to use an open end wrench for this step.
You will need to tap on the alternator from the top side of the car to free it from the brackets. Once free, remove the clip on top of the alternator (its a plug), and it helps to use a flathead screw driver to pry the clip up and out of the socket.
Next remove the positive charging wire from the alternator. (Remove the rubber boot covering the nut) You will use a 13mm to take this off with.
You will have to shimmy and rotate the alternator out a little ways to free it from the car..dont worry, your going to have minor clearence issues but you will get it out.
(Get new alternator)
Installation:
Now, after getting the new alternator, shimmy it up into its position to intstall it by getting it partially lined up with the way it was sitting. Install you accesories (charging wire and clip)
This is the hard part:
The bracket will have riveted sleeves in it making it almost impossible to "slide" the alternator into the holes to get it into posisition. You must take a big flat head screwdriver and sort of pry the alternator away from the bracket while pushing it into place at the same time.
Once the alternator is barely set in the bracket..tap it with a hammer ((lightly)) to align the holes up. Once done, insert the first bolt and almost snug it.
For the second bolt, (other green one (top one)) all you have to do is tap the opposite side of the alternator and it will basically align itsself and tap itsself into place. then insert the other bolt.
Dont tighten yet. You will have to get the third bolt aligned. Fit your hand back there and insert the bolt into the bracket. You may have to have a friend get some kind of bar and tap the alternator from the top to finally get it to fall into place. This will align the third bolt and allow it to screw into the alternator.
Once all of them are started and on, all you have to do is tighten, put the belt back on, and your done!!Last edited by blackhawk01; 11-01-2007 at 05:04 AM.
-
10-31-2007, 08:13 PM #2Life in the Fast lane

- Join Date
- Aug 2005
- Location
- Bragg NC
- Posts
- 2,834
Met. Sunset Orange- 01 SS

Not a bad wright up but wouldnt the first step be disconnect the battery?
J2001 SS, Its not the car its the Driver that matters....
-
11-01-2007, 05:05 AM #3down with the lot lizards
- Join Date
- Dec 2006
- Location
- Pensacola
- Age
- 36
- Posts
- 1,561
Red- 2001 Camaro SS A4
Fixed Originally Posted by sunsetorangess


-
11-01-2007, 09:37 PM #4Member
- Join Date
- Mar 2007
- Location
- RIVERSIDE, CA
- Posts
- 149
GREEN 95 F/B LS1- 2000 SIERRA 5.3
add-on
not to get picky here, but the alternator bracket
DOES-NOT have riveted sleeves
the main bracket uses 2 floating "crush sleeve" bushings that will align and self-center the alternator once the new one is installed
you may have to pry the old alternator out, but once it is has been removed, you can simply take a pair of pliers or channel-locks and "press" the bushing back into an "open" position by putting 1 jaw on the back side of the bushing ( inside of bracket ) and the other jaw on the outside of the BRACKET ONLY, this will return the bushing to an "open position" allowing the new alternator to slide into place with NO EFFORT AT ALL.
once the bolts and re-installed and tightened, it will align itself and tighten down as-designed
hope this helps
-shane
p.s. - unless the sticker has been removed, or damaged there will be a belt-routing diagram on the driver's side strut tower sheetmetal visible with the hood is open in case you happen to need it
-
11-02-2007, 08:34 AM #5down with the lot lizards
- Join Date
- Dec 2006
- Location
- Pensacola
- Age
- 36
- Posts
- 1,561
Red- 2001 Camaro SS A4
Hmm, did not know that thanks for the input man, I wasnt knowing of those details..but anyways, thanks for the input all help it appreciated to other members !
-
01-11-2009, 10:13 AM #6Junior Member
- Join Date
- Aug 2005
- Location
- San Antonio, Tx.
- Age
- 60
- Posts
- 13
Pewter- 2001 T/A WS-6
Fantastic write up Blackhawk01. Saved my butt while in the middle of replacing my alt. I have a 2001 WS6 and after doing this, here are some do it yourself tips I'd like to add.
There will be one more smaller bolt on the back side of the alternator (green) around the location of the green circle. It will be tricky to get to and you may need to use an open end wrench for this step.
(Remove this bolt first before removing the other 2 bolts. If you remove the other bolts first, then the weight of the alternator is on this one bolt. And by the way, this bolt is a bear to remove and replace.)
You will need to tap on the alternator from the top side of the car to free it from the brackets.
(Since the space that you're working in is so limited, I freed the alt from the bracket and then removed the bracket and slid it out before I slid out the alternator.)
Now, after getting the new alternator, shimmy it up into its position to install it by getting it partially lined up with the way it was sitting. Install your accessories (charging wire and clip)
(When you're ready to place the new alternator, first put it back in the area it came from, then put the bracket in place and tighten.)
As I said, these are the things that helped me. It took me 3.5 hours to do this change, but if I had read this document first, it would have taken me 2.5 to 3 hours. I would also suggest using a ratchet wrench for the bolt on the back side. I didn't have one, and I will be making the investment for future repairs/installs.
-
07-11-2009, 06:19 AM #7Junior Member
- Join Date
- May 2009
- Location
- alittle S/E of Nome
- Posts
- 13
This is an excellent post on Alternator removal and replacement. Thanks for the great work.
I would sticky this one!!!
-
07-13-2009, 03:52 PM #8down with the lot lizards
- Join Date
- Dec 2006
- Location
- Pensacola
- Age
- 36
- Posts
- 1,561
Red- 2001 Camaro SS A4
Thankyou
-
04-06-2010, 02:57 PM #9Junior Member
- Join Date
- Mar 2010
- Location
- Auburn, GA
- Age
- 44
- Posts
- 32
Green- 1998 Trans AM
OK, that was a pain to get it out. I was kinda panicking trying to wiggle that thing out, I kept saying there is no way its going to come out. My only issue is that I did not have a bolt on the back-side of the alternator. I had two that bolted on the front to the bracket and one on the bracket. After that it came loose. I see in the back-side (drivers side) where there is supposed to be a bolt I think. Do I need to get one or is it fine without it.
Last edited by cpw006; 04-06-2010 at 04:44 PM.
-
04-06-2010, 04:23 PM #10Senior Member
- Join Date
- Jan 2010
- Location
- texas
- Posts
- 1,623
silver- 2000 formula
i had to unbolt the sway bar mount bolts and swing sway bar down to have enough room to get the ALT out.....those 15mm and 13mm bolts on the back bracket are a PITA......and BE careful with the top ALT weatherpack connector.......i hear it is very fragile......if you mess it up......you can get 1 off ebay
 ..........have done this MANY times myself
-
04-06-2010, 07:16 PM #11Auto Painter

- Join Date
- Dec 2007
- Location
- Houston, TX
- Age
- 48
- Posts
- 2,002
White- 1998 Trans Am
ALT.
I stay away from that auto part remaned alts. I actuall got a good deal on a 220 amp alt. from powerbasterds.com and it comes in a stock housing and installs and looks stock except i swapped in a 4 gauge running to the red top. I went with it since I have a ASP underdriv crank and even with the overdrive alt pulley it was still low with the a/c and all the hid's on at night stitting a a light in drive, dam auto. I also plan on installing a Memphis bell 5 ch. amp and speakers with a single 10" in the ds pocket and ordering a custom dash plate si I can get a Eclips indash nav. I know the setup works since I have it all in my Trailblazer.
 1998 Trans Am 85k miles.
Bolt ons, MS3 113LSA cam, Circle D Stall, Tune, Modified WS6 style hood, Full Suspension, 6000k HID's, Clear Side Markers w/ Leds, Led 3rd Brake Light and 18" AR Staggered Killer Wheels w/ BFG KDW NT's.- Weekend Toy/DD
02 Trailblazer -Sold
09 Ram 1500 CC - Sold
09 Cobalt SS/TC - Sold
13 ram 1500 LoneStar CC 4x4 - Magnaflow, K&N,and more to come-DD/Toy
-
04-06-2010, 08:57 PM #12Junior Member

- Join Date
- May 2009
- Location
- NEAR SEWER CITY IOWA
- Posts
- 11
red- 1998 Trans Am
I also just replaced my alternator last week. I had good luck on the smaller back bolt with a cheap stubby flex-head ratchet I got at Harbor Freight on sale, that was the perfect tool for the job IMO.I also found out just how fragile that small wire with the clip really is,had to buy a replacement at the stealership for 40.00, so I could drive to work the next day.Very good write-up ,Ijust wanted to share my little adventure.
-
04-06-2010, 09:07 PM #13Senior Member
- Join Date
- Jan 2010
- Location
- texas
- Posts
- 1,623
silver- 2000 formula
could have got that connector ALOT cheaper off ebay

-
04-07-2010, 02:56 PM #14Junior Member
- Join Date
- May 2009
- Location
- NEAR SEWER CITY IOWA
- Posts
- 11
red- 1998 Trans Am

I know but I couldn't wait the 3 or so days for it to get here and the dealer had one on hand.Believe me, I tried every other place in town first.I think it hurt worse knowing how much extra I was paying.
-
04-09-2010, 07:45 AM #15Spaz is My Mentor


- Join Date
- Feb 2009
- Location
- Florida Man Status Acheivement
- Posts
- 11,808
Navy Blue Metallic- 98 T/A, 00 FBVert, 78T/A
I did a write up last month on how you can fix this yourself. I guess it got overlooked, but here it is Originally Posted by ared98ta
http://www.ls1.com/forums/showthread.php?t=133361
-
04-10-2010, 01:37 AM #16Junior Member
- Join Date
- May 2009
- Location
- NEAR SEWER CITY IOWA
- Posts
- 11
red- 1998 Trans Am
I had missed it ,but great write-up ,but hopefully mine is fixed for good.
-
08-01-2010, 08:41 AM #17Awaiting Activation
- Join Date
- Jan 2010
- Location
- Motor City MI
- Posts
- 21
red- 99 Trans Am
Thanks melwoods, for the tips above. I replaced my 99 TA alternator yesterday, and a couple of your tips really helped me out! One was to unbolt the pesky top bolt first - that puppy is just about impossible to get to. The other was the idea to take out the alt mount bracket too - in fact once the stuff was all unbolted I actually took down the BRACKET first and that left more room to rotate and pull down the alt afterwards. Thanks! Originally Posted by melwoods

A couple other things I learned from this:
1. I couldn't get any room at all to turn the top bolt (I used a Snap-on pivot-head 3/8 drive ratchet) until I popped the rubbery watershield loose near the alt/sway bar. Once I did that it was still really tight but at least I could move the ratchet one click at a time.
2. Once the alt and its bracket are out there's a lot of room up in there to clean things up. I did some cleanup on the block and shot a little silver and black paint around to spruce it up. There's a grounding strap nearby on the frame rail, I took that apart and shined up the eyelets for better contact. I also painted the alt mount bracket since it was getting a little grungy

I made sure to mask off the little mount bracket bolt holes since they're part of the grounding path for the alternator.
I also clearcoated my alternator. I'm a little paint crazy
-
08-02-2010, 02:53 AM #18Member

- Join Date
- Oct 2006
- Location
- Fairfield, Ohio
- Age
- 61
- Posts
- 944
Black- 00 WS6
subscribing, just in case I have to replace my alternator....
-
08-02-2010, 08:31 AM #19Member

- Join Date
- Mar 2010
- Location
- EAST bay area Cali
- Posts
- 634
black- 1999 camaro SS
while I was installing a new sway bar and k member I changed my alternator out since I had such easy access to it. I snapped that little wire right off and didn't even notice it. I got one off of eBay for 10 dollars Originally Posted by sjsingle1
-
08-02-2010, 08:19 PM #20Junior Member
- Join Date
- May 2009
- Location
- alittle S/E of Nome
- Posts
- 13
When I removed my alternator, I took it to a rebuilder who replaced the bridge rectifier and the bearings. Charged me $40 to do the work. I don't like to turn in the original cores for something that might not work in my application. This way, I don't have to re-cock the alternator housing to fit in the correct application that pertains to my vehicle.

 Reply With Quote
Thread Information
Users Browsing this Thread
There are currently 1 users browsing this thread. (0 members and 1 guests)
Similar Threads
-
Help: alternator removal
By mbmta99 in forum General HelpReplies: 7Last Post: 11-15-2015, 05:20 PM -
Question: Spare tire and Jack installation instructions
By herculesrider1 in forum Firebird / WS6Replies: 7Last Post: 04-27-2009, 05:52 AM -
installation instructions required
By nokia2005 in forum General HelpReplies: 9Last Post: 08-06-2008, 06:45 PM -
Help: Missing Installation Instructions-Side Grills
By Alpha-Omega in forum Firebird / WS6Replies: 31Last Post: 07-29-2008, 01:58 PM -
Front Grille removal and installation help
By The Rookie in forum General HelpReplies: 2Last Post: 11-29-2005, 05:52 AM

Bookmarks