
Results 1 to 10 of 10
-
08-14-2011, 06:05 PM #1Veteran


- Join Date
- Feb 2009
- Location
- Mansfield, PA
- Posts
- 22,146
Black & Blue- '02 WS.6 / '07 Suburban
Longer is better! Replacing wheel studs.
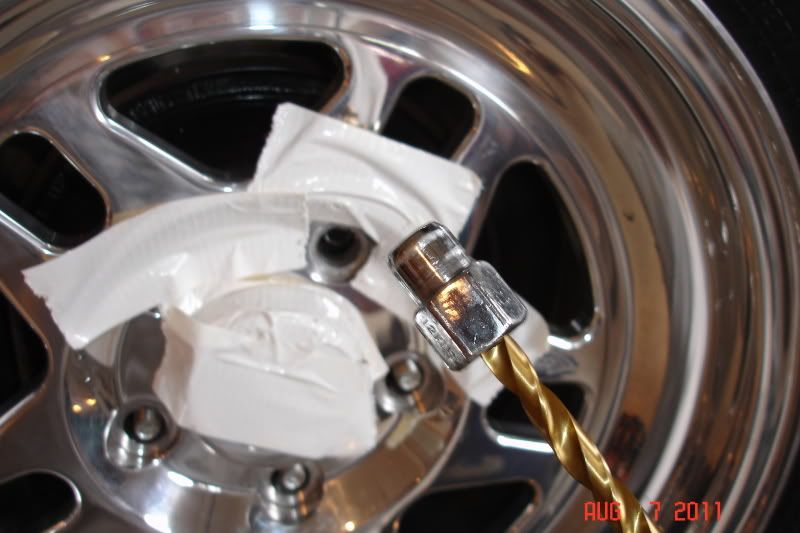
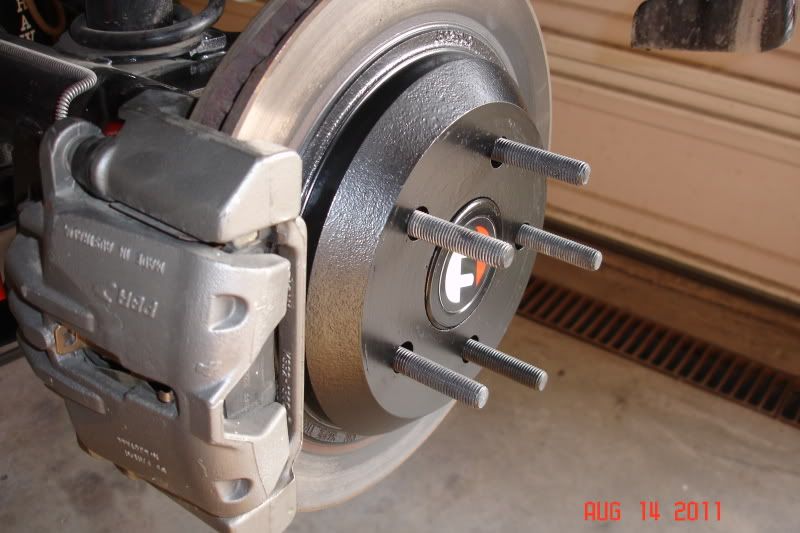
I posted last week on how I must have cross threaded a lug nut on the left rear wheel, causing myself all sorts of grief. After drilling the stud to remove the lug nut I decided to go with a longer stud to ensure that our car meets track rules. The studs that came with the Moser 12 bolt were stock length, which is about 1-1/2". With the Bogarts on the car, the studs did not extend through the mag lug nuts. The amount of stud thread extending into the head of the lug nut exceeded the diameter of the stud by just a fraction. I believe this is the absolute minimum that you want to have. Interestingly, my attempts to order ARP studs completely failed. After checking with several vendors, and then calling ARP directly, I learned that they are on "national backorder" until almost mid-September. Luckily, Moser P/N 8255 is exactly what I was looking for at 2-1/2" long and they were in stock. The stock stud threads are 12 x 1.5 mm and this is identical to the Moser studs.
This is what I started and ended with last week:
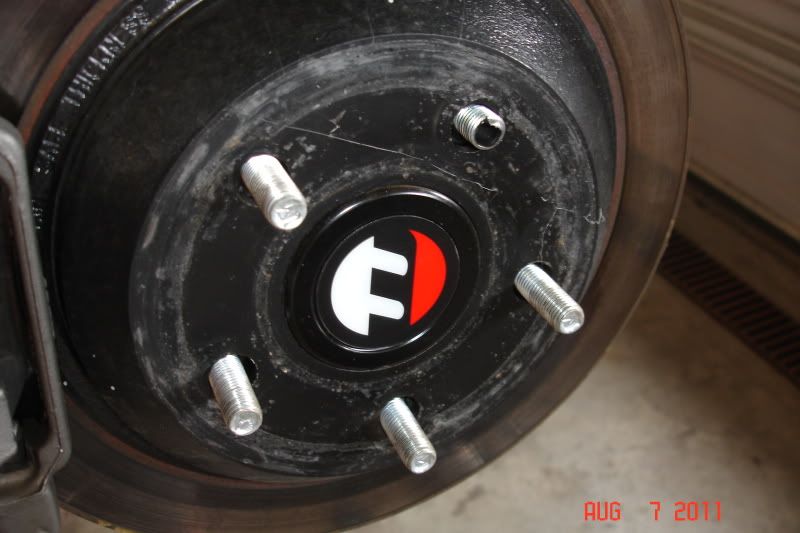
Having a 12 bolt rear means that I did not have to drop the rear cover to remove the c-clips. Rather, the axles are retained by the brake mounting bracket and are easily removed. I understand that you can change studs on the car, however, as I had spun a stud in the flange I wanted to ensure that the hole was not too far gone. In addition, I much prefer pressing the new studs into the flange rather than drawing them in with a spacer and lug nut. I removed the caliper and bracket as an assembly and hung it from the front bumpstop mounting hole using a zip tie. The rotor was then removed, the sensor for the ABS/TCS was unplugged and removed, the parking brake cable unclipped and then the parking brake assembly was slid first upward to clear the top clip, and then down off the piston and removed. After removing the four nuts and lock washers from the t-bolts, I hit the flange a few times with a dead blow hammer to dislodge the axle bearing and slid the axles out.
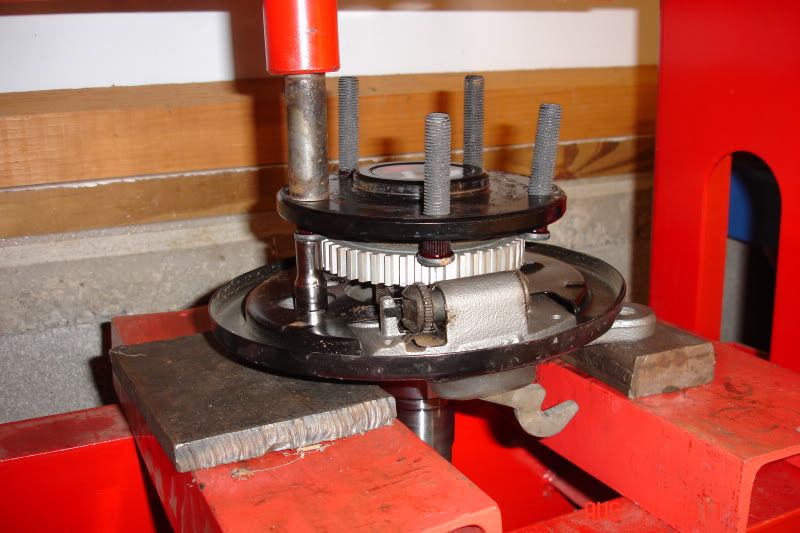
Cleaning off the gear oil, I placed the axles on my work bench and carefully tapped the studs out with a hammer. The reluctor ring is fairly close to the flange and there is just enough clearance for the studs to be removed. Unfortunately, the new studs had a but fatter head and I ended up grinding a very small flat spot on them to clear the reluctor upon installation. I then washed off the oily residue on the new studs with braker cleaner to ensure maximum bite on the splines. With the brake mounting plate setting front edge down on the bench, I rotated the axles and inserted each new stud through the hole for the ABS/TCS sensor. Before moving to the press, I applied red Loc-Tite to the splines of the new studs to ensure maximum grip. I did notice that the new studs had quite a bit larger spline area than the old studs.
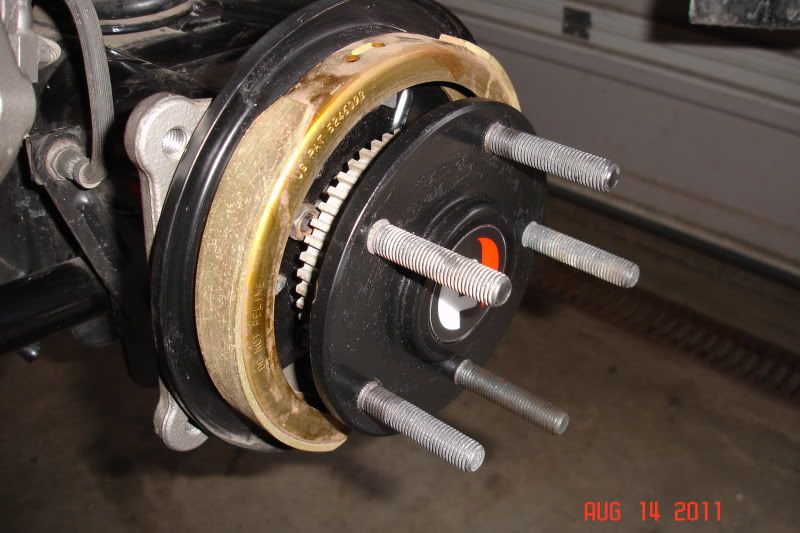
Sorting through my collection of "press tools", I found a spacer from a stock suspension bushing that fit perfectly over the new studs. My 9mm 3/8" socket was used to press against the head of the studs as I applied pressure to the bushing. Again, this was all done through the sensor hole in the brake mounting bracket and it only took a few minutes to press in all 5 studs on each axle. Reassembly was simply the reverse of the above and while I was at it I touched up the paint on the flanges and rotor hats. The caliper bracket bolts were torqued to 74 ft.lbs., however, the wheels were left loosely installed for tonight with the car still in the air. This will allow time for the Loc-Tite to fully cure before the wheels are torqued tomorrow evening. In the third pic, you can see the difference in length from the stock style stud to the replacements.

-
08-14-2011, 06:11 PM #2Electrical Engineer


- Join Date
- Jul 2009
- Location
- North of the Motorcity
- Posts
- 2,612
Custom Swirly Black- 2001 WS6 M6

Nice!
Couldn't you have just used the lugs w/washers to pull the new stud in? That's what I did when my torque wrench malfunctioned and I over torqued mine.
-
08-14-2011, 06:16 PM #3Veteran
- Join Date
- Feb 2009
- Location
- Mansfield, PA
- Posts
- 22,146
Black & Blue- '02 WS.6 / '07 Suburban
Absolutely. However, as I mentioned in the post, I am not a fan of that method if the studs can be pressed in. Using the press, there is no rotational force on the splines and they are less likely to strip out in the future imo.
-
08-14-2011, 06:27 PM #4Electrical Engineer
- Join Date
- Jul 2009
- Location
- North of the Motorcity
- Posts
- 2,612
Custom Swirly Black- 2001 WS6 M6
My apologies, read it college-exam-cram-time fast, lol. School has it's pro's and con's apparently. Originally Posted by pajeff02

Never thought about stripping out the splines though, good call again!
-
08-15-2011, 04:50 PM #5Veteran
- Join Date
- Feb 2009
- Location
- Mansfield, PA
- Posts
- 22,146
Black & Blue- '02 WS.6 / '07 Suburban
Stock wheels and lugnuts:
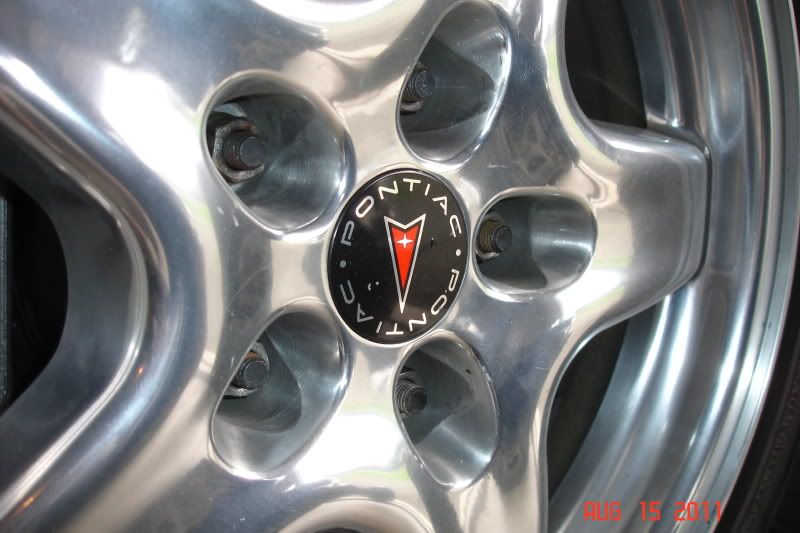
Lucked out and the caps still fit without bottoming out on the stud. I installed the caps after taking this pic, gave her a bath and went for an evening cruise.
-
08-15-2011, 06:12 PM #6Senior Member

- Join Date
- May 2010
- Location
- Wilkes-Barre, PA
- Posts
- 1,547
Black/Black- 98 WS6/04 Sierra Dmax
Good write up Jeff! Glad everything worked out well. Hopefuly everything goes just as smooth when i receive my studs.
-
08-15-2011, 06:38 PM #7Veteran

- Join Date
- Oct 2008
- Location
- Wherever life takes me
- Posts
- 12,526
Red- 02 35th LE Camaro SS
Not having a c-clip to remove the axle is indeed a nice feature...especially when you have to replace the axle seal 3X before it stops leaking

-
08-16-2011, 03:37 AM #8Senior Member


- Join Date
- Apr 2008
- Location
- Madison, WI
- Posts
- 7,006
1999 Formula WS6 M6-sold- 2001 Silverado Z71
Stickied!
-
08-16-2011, 05:34 AM #9Senior Member

- Join Date
- Dec 2007
- Location
- Orlando, FL
- Posts
- 3,352
Mean Black- 1998 Trans Am
Nice job Jeff!
-
08-16-2011, 08:18 AM #10Veteran
- Join Date
- Feb 2009
- Location
- Mansfield, PA
- Posts
- 22,146
Black & Blue- '02 WS.6 / '07 Suburban
Thanks, guys. Took it for a shakedown cruise last night to test the new power steering cooler, trans temp gauge and to make sure the wheels don't fall off. All seems good.

 Reply With Quote
Thread Information
Users Browsing this Thread
There are currently 1 users browsing this thread. (0 members and 1 guests)
Similar Threads
-
Question: Wheel Studs
By WS6ICK in forum Wheels and TiresReplies: 23Last Post: 10-31-2009, 01:49 PM -
Wheel Studs
By ls1camino in forum DrivetrainReplies: 6Last Post: 03-11-2009, 02:52 PM -
which wheel studs
By LT1 > LS1 in forum DrivetrainReplies: 4Last Post: 09-17-2008, 01:39 PM -
wheel studs
By kyemt in forum GTOReplies: 9Last Post: 12-09-2007, 07:38 PM -
Wheel Studs>>Help
By mikriman1 in forum Wheels and TiresReplies: 3Last Post: 04-23-2006, 05:13 PM

Bookmarks