
Results 1 to 20 of 97
Thread: Step By Step - HID Light Upgrade
-
11-17-2010, 10:59 AM #1Junior Member


- Join Date
- Jun 2007
- Location
- New York City, NY
- Posts
- 60
Red- 2002 Firehawk #0689
Step By Step - HID Light Upgrade
As we all know, the stock lighting on our cars leaves much to be desired. There has been a lot of discussion on the forums on how to upgrade to a better system. However, there has not been much in the way of a Step-by-Step Pictorial on how to get it done. What follows here is how I upgraded my 2002 Firehawk’s system using parts from LMC Trucks and DDM Tuning.
Camaro owners, I am not sure about your headlights, but the fog light install will work for you as well.
Skill Level: 1 If I can do it, so can you!
This is a very easy mod to do, and once everything is laid out, it basically falls together. It takes about ½ hour per side for the Headlights and ½ hour per side for the Fog Lights.
Tools you will need:
10mm Socket
Torx 15 Driver
Phillips Head Driver
Double sided tape
(Optional) Electrical Connectors and Crimper
(Optional) Trim removal tools (to open up the plastic GM Rivets under the bumper)
First step is to replace the stock sealed beams with these following units that I got from LMCtruck.com.
In the search bar at the top of the website choose the following:
“Chevrolet” – “Pickup Truck” – “1988 thru 1998” – “36-0302”
Look at “Euro Style Lighting” and you will see the housings at the middle of the page. You will find the Bulb 2 pages further on in LMC’s “Catalog”.
Here is what you should order:
Qty: Part #: Description:
2x 36-0303 Inner Headlight Housing (High Beam) – comes with white H1 bulb and connector
2x 37-0303 Inner Blue H1 bulb (Optional, but I like them)
2x 36-0302 Outer Headlight Housing (Low Beam) – comes with white H1 Bulb and connector
• You do not need any other harness; these parts are “Plug and Play”. The connectors included have a power and a ground wire, which correspond to the factory harness on the car. On the Low Beam, this connector will be attached to the ballast of the HID System.
Here is the Housing with the supplied connector:

These units are very nice, and in looks alone are huge improvements over the stock sealed beams.

If you just want to stop here, I think you get a nice improvement with the 9006 bulbs. However, I like the look of the HID’s so I went ahead and installed them in the Low Beams. I will also be installing them in the Fogs as well.
Let’s note here, that HID’s do not like to be switched, so they are best suited for the Low Beams, and not the Highs. So when I install them into the Fogs, I will also have to make sure that the Fogs will not blink when setting the security system.
Here is where I ordered my HID Kit From:
www.ddmtuning.com
Go into HID Kits and choose the “Slim Ballasts”
For the Low Beams:
I chose the DDM HID Kit, 35W, 9006, 8000K (Kit / Package) - The exact description is below:
Bulb Type: 9006
Wattage: 35 Watt
Bulb Color: 8000K – or whatever color you desire
For the Fog Lights:
DDM HID Kit, 35W, 880, 8000K (Kit / Package)
Bulb Type: 880
Wattage: 35 Watt
Bulb Color: 8000K – or whatever color you desire.
You do not need anything else.
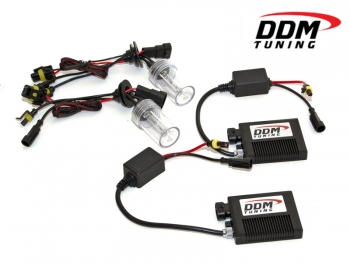
The kits you get each consist of a pair of ballasts, wire adaptors and bulbs.
Once again, this is almost plug and play for our cars. DDM has a very good installation guide you can download. Use that in conjunction, I will try and clear up some of the fuzzy issues.
So on to the installation:
Remove the 3 screws from the plastic cowling around the headlights. Carefully remove the cowling from the headlight fixture and carefully put aside.

(This picture was obviously taken after the install for this guide )
To replace the Headlamp Housings, you will need a 15 Torx driver. There are 4 “silver” Torx screws. Do not confuse them with the 2 black “adjustment” screws. It will be readily apparent which is which. When you remove the stock units, hang on to the black metal frames, they will be used on the new housings.
A quick tip: When you are replacing the Headlamp Housings, leave the two lower securing screws loose, but backed out as far as possible. This will give you a good “platform” to rest the new housing on while you fiddle with starting the 2 upper Torx securing screws. See below:

First off, here is what the LMC High Beam housing looks like installed:

And compared to the stock Sealed Beam:

A close up of the LMC Low Beam unit:

Here is the wiring harness you are going to use:

As you can see you are going to cut off the Blue and black wire combination, and remove it from the grommet.

Once you have all the connectors and ballasts laid out next to each other, you will easily see how everything is going to go together, and how it will attach to the car’s connector. Remember the connector supplied with the Headlight Housings? This will be connected to the DDM Tuning Ballast and wired into the connector on the car; Black wires are the ground wires. Now take the existing 2 connectors on the ballast and connect them to the corresponding connectors for the HID Bulb. Make sure you do not touch the bulb with your hand. If you do, make sure to thoroughly clean the bulbs with alcohol.
Note: I have no idea where these 2 supplied O-rings go, I think they are superfluous. The bulbs have a red O-Ring installed already, and seem to make a nice watertight connection.

Also note that the grommet on the harness will not seal up the rear of the headlamp unit (as far as I can tell – I could be wrong, let me know if I am!), but will not interfere with mounting.
Once everything is mounted up, test your lights:

Here you can see the Driver’s side Low beam with the HID System, the Driver’s Side High Beam with the Blue H1 Bulb, and on the passenger side, the High Beam has the supplied white H1 Bulb and the Low Beam is the stock Sealed Beam.
Once everything is running, you have to securely mount the ballasts. They are super thin, but you have to take in to consideration that they need to clear the lights' movement. That said on the Driver’s side, I mounted the ballast here:

I made sure to clean it well with adhesive cleaner so that the Double sided tape will bond well and keep the Ballast in place.
Here is the Ballast installed:

As you can see, it sits underneath an overhang, and is safe from being hit by the lights. I left the wires with the small “box” on them loose. I think they will be OK, but I can always secure them if need be.
On the passenger side, I ran into the fact that in the corresponding location is the horn. I was not comfortable enough that I could get enough contact for a strong bond. There is a bit of frame work where the ballast tucks in nicely. Had I had not already mounted the Driver’s side, I would have also mounted it here on that side as well, but I am leaving well enough alone. Here is a picture of what I mean:

-
11-17-2010, 11:00 AM #2Junior Member
- Join Date
- Jun 2007
- Location
- New York City, NY
- Posts
- 60
Red- 2002 Firehawk #0689
Once that was done, I reassembled the black plastic cowling on the lights and checked the results.

So, on to the HID Fog Light Upgrade.
Once again, here is what you will be ordering from DDM Tuning:
DDM HID Kit, 35W, 880, 8000K (Kit / Package)
Bulb Type: 880
Wattage: 35 Watt
Bulb Color: 8000K – or whatever color you desire.
For Trans Am owners, this install is a bit trickier than the Low Beams. But, it took me longer to figure out how to access them than it took to do the actual conversion. Hopefully this write-up will save you that problem.
If you want to do this on your Formula or Camaro, your access point is easier to get to (I think – I have never worked on either one, so I am possibly talking out of my Butt!) Your access points should be here, on the corners of front clip. The view is looking up at the bottom of the car:


When I loosened up all the 10mm bolts underneath these sections on my T/A, I found access to the Amber Front Markers and Quarter Panel Side Markers. I would think for Formulas and Camaros you would get to your Fog Lights here as well. For us T/A owners, getting everything loose here will be very helpful. All the plastic here is very malleable, and you will not damage anything by bending things in order to get access underneath.
So, if you are working on a T/A, we need to get some more access which is blocked by the plastic of the front bumper in between the sections pictured above. See the Pic below:

You can see the GM plastic rivets which hold the plastic in place. You can see the centers have already been popped out. Pop up these centers carefully; I used a trim removal tool that had a “V”. Much like the claw end of a hammer. Do not use pliers, the plastic will tear. Once the centers are popped, the rivets slide out easily. Here is what they look like.

When you are done, put these rivets back in with the centers extended, and then push them in to lock everything in place. It’s very easy – you will understand when everything is laid out in front of you.
Once the rivets are out, You will be able to bend the plastic cover back to reveal the rear of the fog lights, where the bulb can be removed. You will also see the light’s housing bracket, and the 2 10mm bolts that hold them in place.

Remove the two bolts in order to maneuver the housings so that the stock bulbs can be removed.

Tilt the Fog housing like so:

You will see this connector attached at the bulb:

Remember this connector; you will be attaching the DDM loom’s Blue and Black wires into it.
And here is the actual bulb housing which will be replaced by the HID:

So, on to the DDM Tuning Kit.
On the low beam conversion, the black and blue wire combination on the kit’s loom was not necessary (if you used the LMC housings). On the fogs, though, you will need them intact.
Here is a pic of the loom:

Attached to the Ballast:

Now, twist the HID bulb into the light housing to install. Make sure to use the seal included with the bulb. Here are the stock bulb and HID together. You can see that the stock bulb has a white rubber seal and the new HID has a clear rubber seal (Stock bulb on top, HID on bottom).

Here is the bulb installed:

Run the bulb wires towards the outside of the car and re-secure the Fog Light housing to the car:

-
11-17-2010, 11:01 AM #3Junior Member
- Join Date
- Jun 2007
- Location
- New York City, NY
- Posts
- 60
Red- 2002 Firehawk #0689
The exposed pins at the free end of the blue and black wires are the Power and Ground wires that will be attached to the connector that was removed from the stock bulb.

Space is a bit tight in there. However, if you want, you could cut off the factory connector and solder or butt connect the wires together. However, this area is pretty well protected, so I just secured the wires with electrical tape. If there is a problem later on, I can still go back and connect everything permanently.

I then mounted the ballasts on the outside of the fog light housing brackets with double sided tape, and zip tied the wires for neatness sake.


Button everything back up together, and take a look at your new improved lighting!


Now, if you want to have your Fog Lights stay on with the High Beams, follow these instructions:
This is a good Mod to follow up what you just did. HID’s do not like being switched, so let’s keep them on with the High Beams as well.
The procedure is very simple and can be done in about ½ hour or so.
First we need to get into the upper rightmost fuse box in the engine compartment.

You can see the relay we want. It is Circled in Yellow. Before we do anything, the fuse block must be lifted in order to expose the wires beneath.
The screwdriver in the picture is releasing the locking tab, circled in Blue, that holds the fuse block in place. Once the tab is released, the fuse block may be slid up and to the left.


Here you can see the wires now exposed ( the whole block is lifted out to the left). We want to deal with the light green wire (between the brown and orange in the picture).
Another view:

Here is the wire loom coming out of the fuse block. We are going to cut the Light Green wire as far down the loom as we feel comfortable doing.

Here is the wire cut:

The cut wire must now be sealed off so that it cannot make ground. Make sure you are not doing this to the wire coming off the relay!!!! We will deal with the relay side momentarily. Here is how I sealed off my wire. I used a butt connector over the Lt. Green Insulation and capped with electrical tape. Should be secure enough to never make ground.

Now back to the relay side. I tried to leave as much length as possible to attach to this body ground just above the fuse block. I cut mine too short, so I will have to lengthen the light green wire with some spare wire of the same gauge.
The body ground and the eyelet I am going to use:

The wire extension with Butt connector:

Attached, and then you can see the red heat shrink wrap that I will put over the connection:
-
11-17-2010, 11:02 AM #4Junior Member
- Join Date
- Jun 2007
- Location
- New York City, NY
- Posts
- 60
Red- 2002 Firehawk #0689

Eyelet attached:

The ground (needs some cleaning):

Attached (post ground cleaned up!):

All buttoned up. Yes, I am anal, and besides… yellow makes it go faster!!!!
Yes, I got the wrench out!

Voila!

So, I hope that clears up some of the confusion about this install. If I used someone's pictures (the LMC Housing and connector) please claim credit for it!!!Last edited by dagersh; 11-17-2010 at 11:04 AM. Reason: Add on
-
11-17-2010, 11:11 AM #5Spaz is My Mentor


- Join Date
- Feb 2009
- Location
- Florida Man Status Acheivement
- Posts
- 11,759
Navy Blue Metallic- 98 T/A w/ mods, 00 FBVert
Vote for Sticky!!!!!!!
-
11-17-2010, 11:13 AM #6Junior Member
- Join Date
- Jun 2007
- Location
- New York City, NY
- Posts
- 60
Red- 2002 Firehawk #0689
Only due to your sage advice!
-
11-17-2010, 05:10 PM #7Senior Member
- Join Date
- Jan 2010
- Location
- texas
- Posts
- 1,623
silver- 2000 formula
trade ya a LS6 valley cover install for your HIDs

-
11-17-2010, 05:36 PM #8Senior Member


- Join Date
- Apr 2008
- Location
- Madison, WI
- Posts
- 7,006
1999 Formula WS6 M6-sold- 2001 Silverado Z71

It has been added to the Sticky: tech stickies thread in the General Help section!!!
-
11-17-2010, 05:41 PM #9Senior Member
- Join Date
- Apr 2008
- Location
- Madison, WI
- Posts
- 7,006
1999 Formula WS6 M6-sold- 2001 Silverado Z71
I also added it to the Sticky: All the basic Firebird stickies combined into one thread in the Firebird/WS6 forum section
-
11-17-2010, 06:23 PM #10expensive tires

- Join Date
- Mar 2006
- Location
- phoenix
- Posts
- 1,951
white- 04 2500 4x4 crew cab
nice write up, i will def be doing the same.
-
11-17-2010, 06:59 PM #11old timer

- Join Date
- Sep 2005
- Location
- Texas
- Age
- 37
- Posts
- 3,806
Navy Blue Metallic- 2002 Z28
nice! it is easier on a camaro tho i am guessing due to your pics. gotta love the hids, i want to do em on my quad but that gonna cost me

-
11-17-2010, 07:25 PM #12Just me

- Join Date
- Nov 2006
- Location
- Broken Arrow, OK
- Age
- 49
- Posts
- 23,345
Pewter metallic- 2000 Camaro SS
Added Originally Posted by SMWS6TA


-
11-17-2010, 07:54 PM #13Impounded
- Join Date
- Apr 2010
- Location
- IN
- Posts
- 2,148
so the housing is actually a Chevy Truck Housing? From LMC?
so if we buy the housing...can we then just buy a "plug n play" HID kit?
-
11-18-2010, 05:43 AM #14Junior Member
- Join Date
- Jun 2007
- Location
- New York City, NY
- Posts
- 60
Red- 2002 Firehawk #0689
Pretty much. I have no relation to either company, other than that their products work and seem to be of good quality. Originally Posted by BashamWS6
-
11-18-2010, 06:42 AM #15Impounded
- Join Date
- Apr 2010
- Location
- IN
- Posts
- 2,148
Mind if i ask the budget needed for this? you can PM me if you like.
-
11-18-2010, 10:27 AM #16Spaz is My Mentor
- Join Date
- Feb 2009
- Location
- Florida Man Status Acheivement
- Posts
- 11,759
Navy Blue Metallic- 98 T/A w/ mods, 00 FBVert
It's about $310 if you order everything at once (Inner/Outer/Fog).
-
11-18-2010, 03:56 PM #17Member

- Join Date
- Jun 2009
- Location
- Winston,OR
- Posts
- 272
blue- 2001 WS6
Very nice write up....good job...
-
11-18-2010, 07:10 PM #18Impounded
- Join Date
- Apr 2010
- Location
- IN
- Posts
- 2,148
so. all i need from LMCtrucking is the Inner/Outer Housings and from DDMTuning the HID Kits (Slim Ballasts).
Will 55W fit? since theyre longer?
and for the options..
do i need the Dual In/Dual Out HID Harness (extra $12.50)?
or the Type 3 error eliminator (extra $15)? *i dont think we do since we dont have a "headlamp out warning"
or the Adaptor Cables (H1/H7 to 9006) (extra $8)?
and where could i get the materials needed for the fog light mod?
sorry for all the questions...
-
11-19-2010, 01:26 PM #19Spaz is My Mentor
- Join Date
- Feb 2009
- Location
- Florida Man Status Acheivement
- Posts
- 11,759
Navy Blue Metallic- 98 T/A w/ mods, 00 FBVert
you may need to pm him to get a faster response to your questions with this thread now a sticky.
From my understanding of the thread and asking him some of the same questions you do not need the DI/DO harness or the eliminator or adapter cables.
Fog Light materials are also listed in post 1 and 2
but I'd check with him to be sure. I might have missed that.
-
11-21-2010, 01:04 PM #20Junior Member
- Join Date
- Jun 2007
- Location
- New York City, NY
- Posts
- 60
Red- 2002 Firehawk #0689
What he said! Originally Posted by SMWS6TA

 Reply With Quote
Thread Information
Users Browsing this Thread
There are currently 1 users browsing this thread. (0 members and 1 guests)
Similar Threads
-
Step By Step: Tight Locking Trans Dipstick
By Ed Blown Vert in forum General HelpReplies: 0Last Post: 10-10-2014, 02:10 AM -
Step By Step - Chrysler 440 Six Pack Electric Choke
By Ed Blown Vert in forum General HelpReplies: 1Last Post: 06-24-2014, 05:11 AM -
Step By Step - Starting A Vintage Top Fuel Dragster
By Ed Blown Vert in forum General HelpReplies: 0Last Post: 11-06-2013, 05:10 AM -
Brake System Maintenance - Flushed Out - CHP Step By Step
By Ed Blown Vert in forum Camaro / SSReplies: 0Last Post: 01-29-2011, 02:30 AM -
Chevy 630 HP Small-Block Engine - Rockin'- Step By Step - CHP
By Ed Blown Vert in forum Camaro / SSReplies: 1Last Post: 10-19-2007, 04:04 AM

Bookmarks