
Results 1 to 20 of 121
Thread: Front End Pedders Install (Pics)
-
01-09-2008, 05:14 AM #1Grand Imperial Wizard


- Join Date
- Aug 2005
- Location
- Texas Department of Corrections
- Posts
- 18,128
- Retired Outlaw Sum Bitch
Front End Pedders Install (Pics)
on how to "fix" our strut rub/lazy ass steering response etc. I have concluded to my satisfaction anyway....that all one needs is this....
ProductsBaseFinal
GTO EPC27 Front Sway Bar Bushings
GTO EP3451 Sway Bar Front Link Urethane Bushing
GTO EP9166 GTO Caster Adjustable Radius Rod Front Bushings
You do not need $2000 dollars worth of "stuff" regardless what the internet experts say. If your struts arent leaking...basically this is it....$300 bucks worth of "stuff"......and a 4 wheel alignment.....
I'll do a picture supported step by step.....this will tighten up things considerable....improve handling/steering and braking.....Yes you can get the same stuff from Noltec cheaper.....but I could not get the sum bitch to call me back and Pedders warehouse is just up the road. So I'll do a pic/step/instructions for any and all "gotcha's".......then a truthfull butt dyno writeup.....seems on some forums any discussion on the suspension turns into a Pedders "war"....fuck that....Before and after pics to follow....I'll measure slack etc. also so we all can compare...these suspension mods are good for 04/06/06 GTO's. I did the rear a couple of years ago.....so this is just the front....
-
01-11-2008, 06:39 PM #2Junior Member

- Join Date
- Apr 2007
- Location
- Brownsboro, AL
- Posts
- 23
Quick Silver- 04 GTO
Looking forward to your results. With my 06 I want the several grand road, and it made it way to stiff.
Id like to see what you come up with. Oh what do you have for the rear? As you mentioned you have already done it.
-
01-12-2008, 04:37 AM #3Grand Imperial Wizard
- Join Date
- Aug 2005
- Location
- Texas Department of Corrections
- Posts
- 18,128
- Retired Outlaw Sum Bitch
Well on my GTO the rear end is built and has been for awhile. Pedders Springs/Koni's/Sway Bar/Bushings etc. took care of launches.
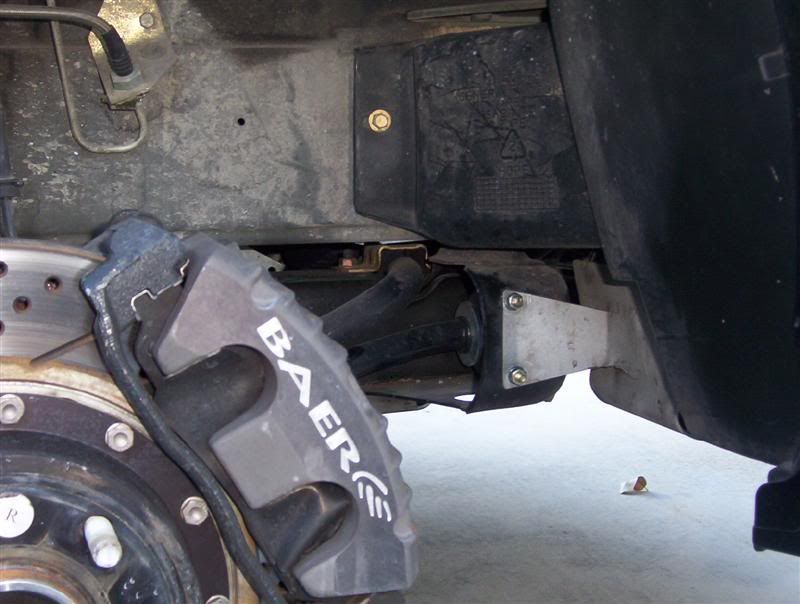
The front end is the focus today. The GTO comes from the factory with "lazy steering" IMHO.....Braking is soft at best. Even with the BAER upgrades I have. She stops but has never been "crisp". She rolls in turns when hauling ass. I find myself constantly correcting my line when driving down the highway. Not pulling one way or the other but sorta drifting.....and of course strut rub which I temporarily fixed with 235's versus 245's and some alignment adjustments. I read on various forums till my eyeballs fell out. I got lots of info on "how to" and read through lots of replacement stories but not a single one of the 52,483 threads I read talked about the basic issues nor what it was they were trying to fix. Just lots of "Suspension Days" and lots of selling a shitload of parts Screw that.
So I focused on three things I wanted to accomplish.
1. Make the steering responsive and solid.
2. Increase the braking performance and experience.
3. Reduce or eliminate "roll".
Now suspension is not an area I am any good in. I am like all the other knuckleheads who just buy "packages" and hope for the best. Not this time. I am very fortunate to have some suspension experts right here in my little town. Greg Spreen is a very successful race engine builder...his Dad was a SCCA National Champion and he is no slouch in late model NASCAR....but he builds his son, Dillon, race car and this kid is a up and coming star. You will see him in a few years on TV. Greg knows all about suspensions and how to do it obviously as many contribute his sons success with his Dad’s ability to set up his car..... http://txsz.com/forums/index.php?showtopic=16163 ....Ray Goodman is a top NHRA altered class stud. His Dad was a nationally known Funny Car builder in the 60's and 70's. They still build and race some mean/wild dragsters and know their stuff. They both are my pals and live right here...so I ask them and spent time discussing the GTO. Damn....these guys know how to diagnose and fix anything related to suspensions......so I just wanted to make sure anybody reading this knows I am not the guy....I give all the credit to Greg and Ray for walking me through all of this and what to do.......
OK....so the consensus was this...the GTO engine is about 6 inches past the centerline where it should be. We are nose heavy guys. This puts significant stress on all the front end components. Not the struts or springs but the swaybar/radius rod bushings and end links. The radius rod bushings control the forward and backward forces to keep the wheel stable. Braking and the radius rods want to go through the front fender along with your wheel. The bushings keep this from happening….or is suppose to…the factory bushings are a layered soft POS and allow the wheel to move forward when braking. Guess what?..…this also contributes to strut rub…something we proved in Rays shop…..when you are braking the wheel moves forward a tad and allows the tire to rub. The factory bushings do not keep the wheel in place. It does move. The end links are adequate….and are built to stabilizes the strut under load…..problem again is the bushings are flimsy POS and allow the end link to stress thus allowing the strut to walk on you……even just driving down the road I can clearly see where the radius rod bushings and the end links would allow the car to “drift” around and the steering to be “soft” at best…and clearly you are giving up braking power because the fricking wheel moves forward under breaking. The sway bar comes from the factory a 28MM and more than adequate to keep both wheels on the ground….and prevent roll…but once again it cannot do it’s job when mounted with flimsy rubber POS bushings to hold it in place.
So now focused…I went off to find replacement Radius Rod Bushings/End Link Bushings and SwayBar Bushings to tighten this thing up. And I must say…..on some forums clearly the majority of debate/conversation is the Strut Mount….we looked at 3 GTO’s…my 04 and two 05’s. All three were in perfect shape. One of the 05’s had over 45,000 miles on it. Also the guys dismissed the strut mount as a major contributor to the real problems anyway. So I didn’t go there…..so….there seems to be two companies involved in performance suspension parts for our GTO’s. Pedders and Noltec. Pedders dominates the forum sponsorship of GTO boards…..so you will find most folks have upgraded with Pedders….Noltec has a cult following and the GTO guys that upgraded utilizing their stuff swear by it. So I have no doubt both Pedders and Noltec have superior bushings over what we have stock. Here are links to these companies….
http://www.peddersusa.com/
http://www.noltecsuspension.com/
I paid $314 bucks from Pedders for the end links/radius rod bushings and swaybar bushings. I did price the same thing out with Noltec and they came to roughly $245.
I went with Pedders for two reasons. The Texas Pedders guy lives here in my little town and their warehouse is less than 20 minutes up the road in Kerrville. He brought me the parts You make up your own mind who to buy from. I am probably reaching the “word limiter” so I’ll get into the install next page……
Last edited by Sarge; 02-02-2008 at 04:26 PM.
-
01-12-2008, 04:54 AM #4Grand Imperial Wizard
- Join Date
- Aug 2005
- Location
- Texas Department of Corrections
- Posts
- 18,128
- Retired Outlaw Sum Bitch
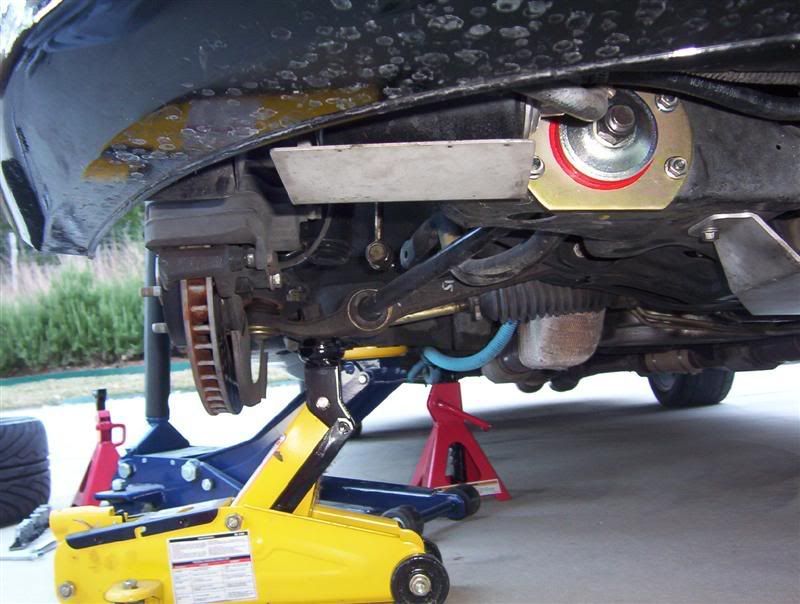
First things first. All these bushings are easy to access and change out. Couple of notes from my installation I'll share so you don't have to learn new cusswords.
1. I pulled the GTO up on my ramps and took the old radius rod bushings out. When I went to put the new ones in the fricking rod was sticking out about two inches too far. I had to jack the wheel up off the ramp to get the Radius Rod to relax and go back so I could put the new bushings in. So I suggest jack stands so you don't have to do this.
2. When your pulling the end link off.....you will have to also jack up the control arm a tad to get the sway bar to relax to get the end link out....this also will allow you to release the sway bar and get the sway bar bushing out...so your killing two birds with one stone.
3. Pontiac will tell you the 24mm radius rod bushing nut is a one time thing and you must buy a new one. Do what you want....but I used blue locktite on all the nuts. Hell at 109lbs of torque and blue LockTite I think I'm good.....
4. Lots of debate on caster....caster is where your tire is in relation to the center of the wheel well. Too much forward and you rub the inner wheel well....too much negative caster on the tire goes back and rides rougher.....so I went standard and the sports setting on the outer bracket...I'll show you what I mean later.
5. Clean the shit out of everything before installing the new bushings. Grease is supplied with the parts...
6. Get a 4 wheel alignment after the install. Cost me $125 bucks. I'll supply the alignment specs later...the specs are not stock Pontiac but work damn well and make much more sense to the experts than the stock specs. I'll attest the proof is in the pudding later.
here are all the parts.
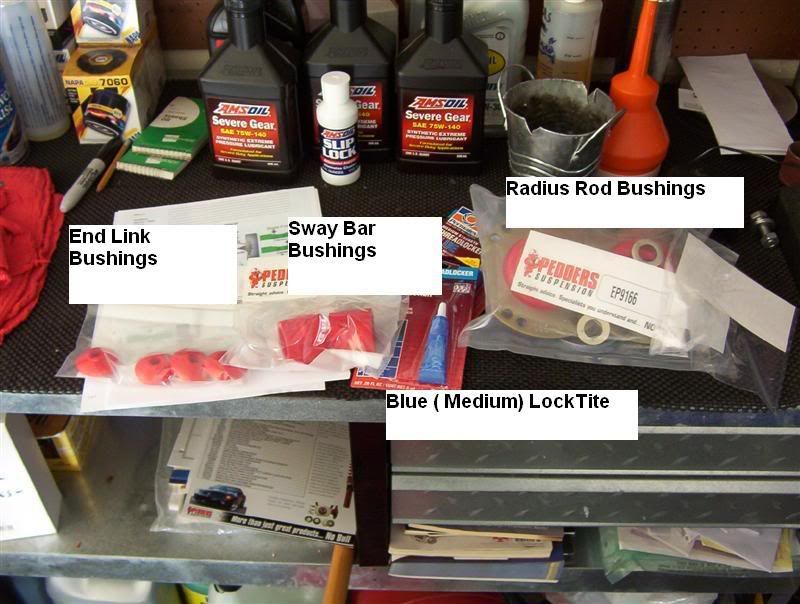
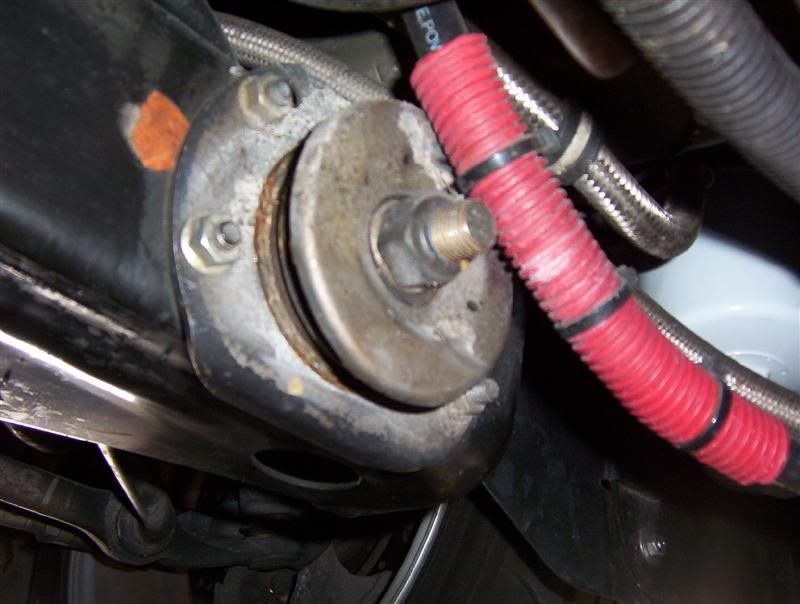
The drivers side Radius Rod Bushing....I have dual remote oil filters so you guys are seeing them here....dont try and figure out what in the hell those things are
Last edited by Sarge; 01-12-2008 at 01:43 PM.
-
01-12-2008, 05:04 AM #5Grand Imperial Wizard
- Join Date
- Aug 2005
- Location
- Texas Department of Corrections
- Posts
- 18,128
- Retired Outlaw Sum Bitch
Take off the 24mm nut in the center first. Sum bitch is on there so grow a set and get it broke loose. The remaining 4 13mm nuts come right off no problemo and the bushing will slide out. Grease the inside of the new bushing and the face and rear face. Slide the metal bushing into the new bushing center hole. Now comes the settings. Here is Pedders little "sheet" you get with the parts.
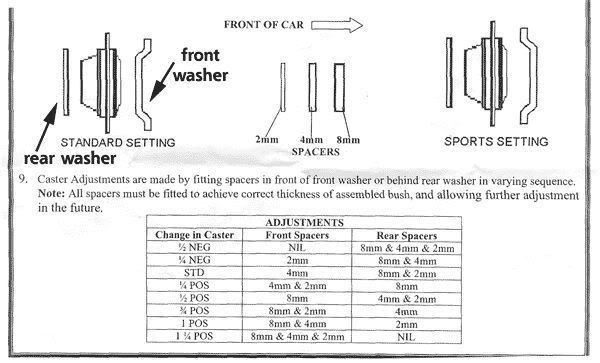
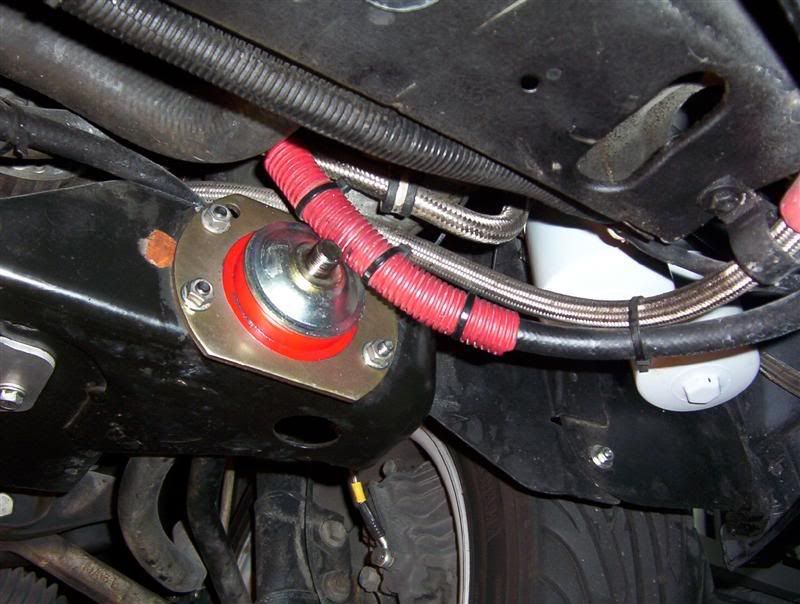
The consensus around the shop was the 8mm and 2mm in the rear and the 4 as the spare in front. Also the sports setting for the front bracket/washer...so that is what I did. There is a washer on the very back of the radius rod. So put your two size washers up against that. Then slide on the big washer from Pedders. Then your bushing. Then the bracket/washer. Then the spare sizing washer ( in my case the 4mm) Then the 24mm nut. I cleaned it all good and used locktite. The manual calls for 35lbs torque on the 4 13mm bolts and 109lbs on the 24mm. I hand snugged everything down and bounced the car a few times to settle it all in good...then torqued em all down. Repeat the process on the passenger side. This is the new bushing in before I put the 24mm nut on.....
-
01-12-2008, 05:29 AM #6Grand Imperial Wizard
- Join Date
- Aug 2005
- Location
- Texas Department of Corrections
- Posts
- 18,128
- Retired Outlaw Sum Bitch
Utilizing highly scientific measurement tools and methodologies I had measure two points of interest to me....1. The distance between the edge of the tire and the inner wheel well. 2. Distance between the tire and the strut (remember I have 235's)...after I installed the radius rod bushings I pulled out my precesion measuremnt tools and compared. Before the wheel was two and one half fingers and after it was a full three fingers.This is old man forefingers by the way. Before the strut was barely a pinkey finger away from the tire. After it was a full forefinger away. So "standard" settings did move the wheel back (negative) a tad.....thus changing the wheel orentaition all around. I was a little concerned on the impact of this but we will get to that later. Simple install guys. I only learned on the 24mm nut. Dont try and use a deep socket as you will not have room for your ratchet....I used a regular short 24mm socket....in case any of you need to go buy one
Radius Rod Bushing Installation
Tools needed
13mm socket
24mm socket
torque wrench
LockTite or new nuts.
Time start to finish about 1 hour and I had 2 smoke breaks and talked on the phone once Easy job here guys.
Finished passenger side Radius Rod Bushing...(that is the transmission fluid filter before it goes up to the cooler there)
Last edited by Sarge; 01-12-2008 at 06:29 AM.
-
01-12-2008, 05:37 AM #7Grand Imperial Wizard
- Join Date
- Aug 2005
- Location
- Texas Department of Corrections
- Posts
- 18,128
- Retired Outlaw Sum Bitch
On to the swaybar bushings and the end link bushings.
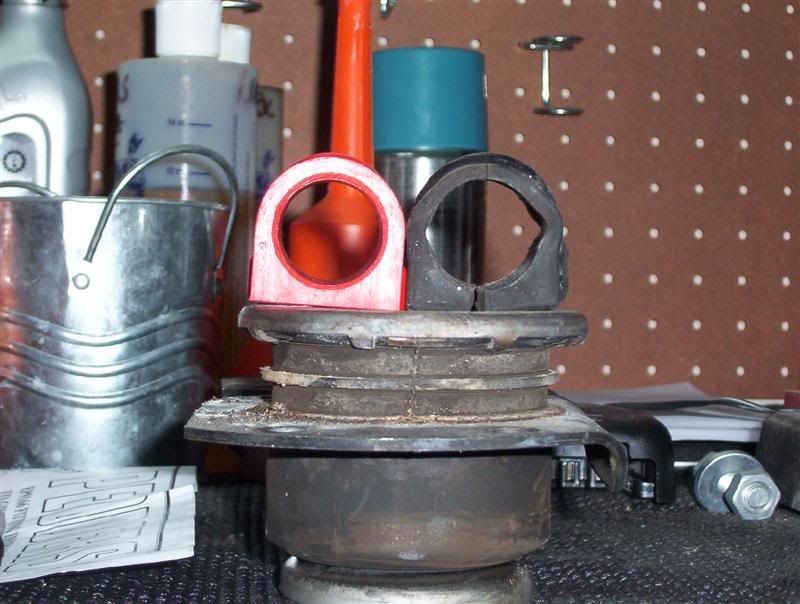
Pic of OEM swaybar bushings and the new pedders.....you can see the black factory bushing is a joke. Flimsy POS. The new Pedders is solid. By the way they are sitting on top of the POS factory Radius Rod bushing.
Here is what we are after....these pics are from the passenger side by the way....
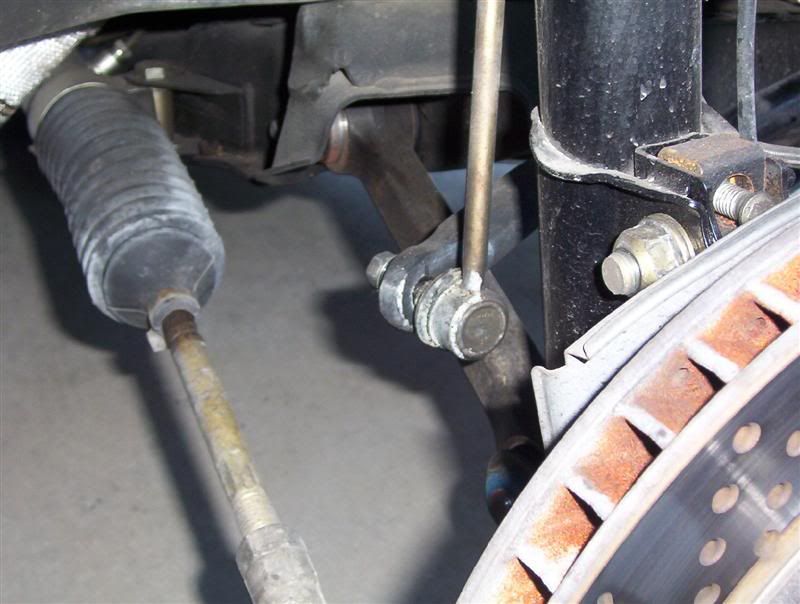
Here is the swaybar bushing....see the copper bracket holding it in....
Now I started to take it off using a open end wrench....but that got old...so I opened the hood and you can get right to both of the nuts ...look down and there they are. I used a couple of extension and got after them. Came right off. Once you get the bushing bracket off...you need to break the swaybar loose.....break the end link from the swaybar here....You may need to jack up the control arm about an inch or two to let the swaybar come loose.....
Go ahead and pull the old swaybar bushing out...clean it up good....grease the inside of your new bushing and set it in there....retighten the bracket and nuts. I torqued them to 35lbs. Here is the new one installed....

Now remove the end link for its new bushings. You need a 16mm wrench for the top nut and a 14mm wrench to hold it while your taking the nut off. I measured the distance between the first washer and the end of the bolt so I could put it back the same distance.
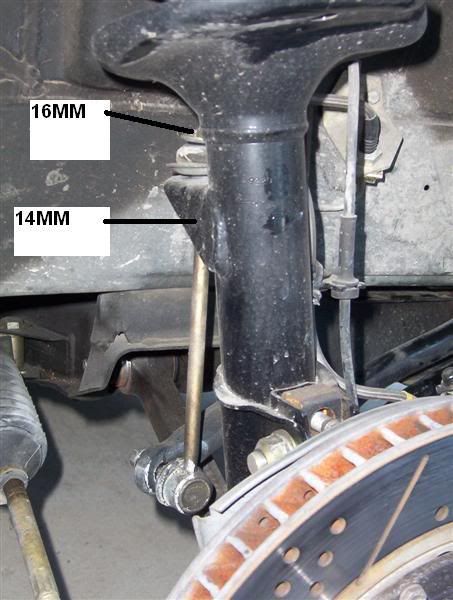
Last edited by Sarge; 01-12-2008 at 06:32 AM.
-
01-12-2008, 05:46 AM #8Grand Imperial Wizard
- Join Date
- Aug 2005
- Location
- Texas Department of Corrections
- Posts
- 18,128
- Retired Outlaw Sum Bitch
Pay attention to the order of things coming off and put everything back in the same order. Pull the POS fatory bushings out and install the Pedders ( or Noltec whatever) and reinstall in reverse order. Here is a comparison which do not do the Pedders bushings justice. The OEM bushings are rubber POS. I dont see how anybody ever felt they would provide any stability at all. The new ones sure as hell will.
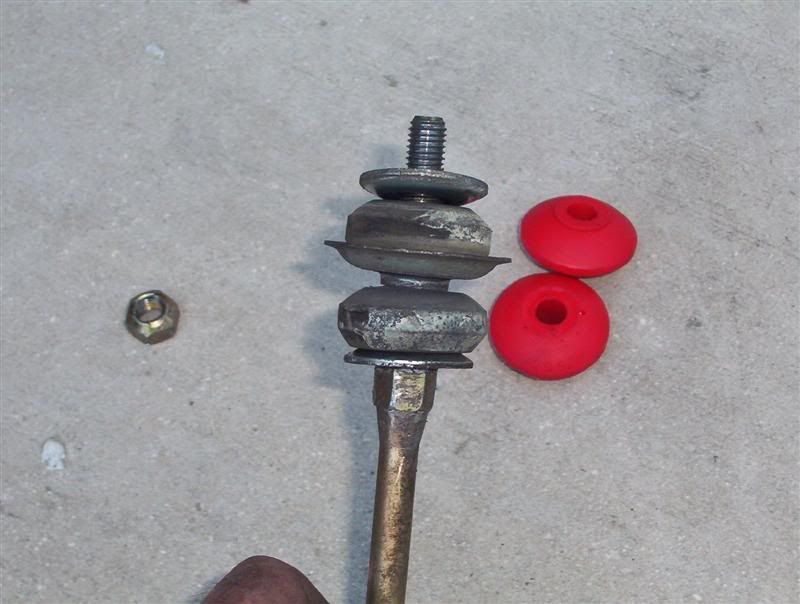
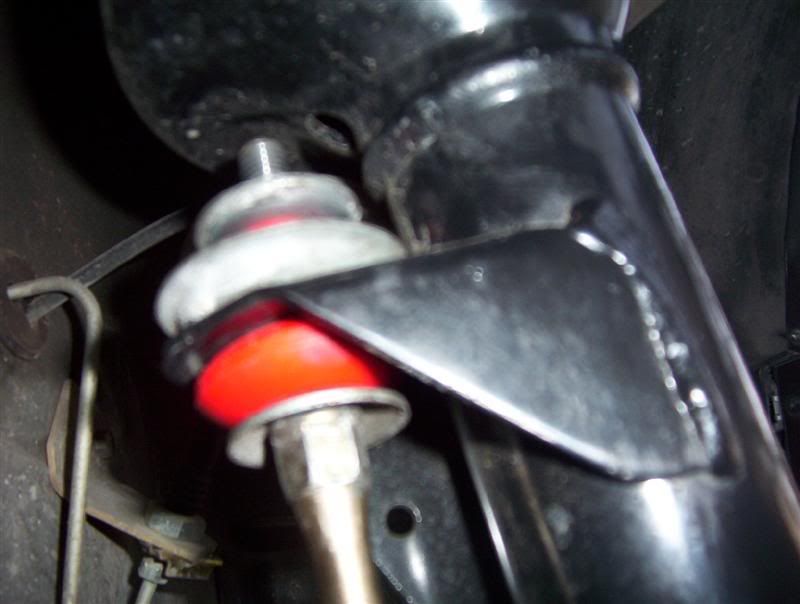
No grease for the endlink bushings guys. Here they are installed. You cant see the top one......
That is pretty much it.....do the drivers side.......swaybar and endlink bushings...on to the alignment.Last edited by Sarge; 01-12-2008 at 06:22 AM.
-
01-12-2008, 05:47 AM #9Grand Imperial Wizard
- Join Date
- Aug 2005
- Location
- Texas Department of Corrections
- Posts
- 18,128
- Retired Outlaw Sum Bitch
Here are the alignment specs we used. Use whatever blows your skirt up. We used these though.
http://www.peddersusa.com/images/PDF...nt%20Specs.pdfLast edited by Sarge; 01-12-2008 at 06:13 AM.
-
01-12-2008, 06:11 AM #10Grand Imperial Wizard
- Join Date
- Aug 2005
- Location
- Texas Department of Corrections
- Posts
- 18,128
- Retired Outlaw Sum Bitch
No special tools are needed for any of this. Couple of jackstands and a good old floor jack. Figure about 4 hours for everything.
The Results.
Well I will try and keep from sounding like a 13 year old girl at a Hannah Montana concert here....but I may not be able to......
Before I even got to the road...I noticed the brakes. Stout and crisp. I felt the sum bitches for the first time since I had the car. Hallelujah! I got stout brakes finally.
Heading to the highway I did not notice any difference in the ride quality. It isn't stiff or hard (blow me goes out in advance to the smartasses)......The steering wheel definitely has more "feel of firmness"....she tracks straight as an arrow at all speeds. No more "wandering"......I did go into a couple of turns fairly hard and she stuck...I felt zero roll......
All in all....I met my goals on all three accounts. I just cannot verbalize how much better the old black bitch drives. She feels like she should have coming from the factory for the first time in 3 years. If I would have known these simple inexpensive
"mods" would have made this much difference...I would have done this first before even a CAI or dyno tune......it really makes that much of a positive difference.
$400 bucks and 4 hours...a damn good deal for you and your GTO.Last edited by Sarge; 01-12-2008 at 06:24 AM.
-
01-12-2008, 07:18 AM #11doesn'tplaywellwithothers

- Join Date
- Jan 2007
- Location
- Mayberry....(Indiana)
- Posts
- 1,634
Black- 2004 GTO
Very nice write up Sarge, and very informative.......NOW come on up here and give me a had with mine....LOL

-
01-13-2008, 07:30 AM #12Grand Imperial Wizard
- Join Date
- Aug 2005
- Location
- Texas Department of Corrections
- Posts
- 18,128
- Retired Outlaw Sum Bitch
Bring that black bitch to me.....I'll fix her ass.
Man I just went out on my Sunday morning terror run. I just cannot get over how much better this car drives. I wish I had done this day one.....
-
01-15-2008, 04:51 AM #13Junior Member

- Join Date
- Jan 2008
- Location
- Boerne
- Posts
- 11
Thanks Sarge,
So you like Hannah Montana??
-
01-15-2008, 07:10 AM #14Grand Imperial Wizard
- Join Date
- Aug 2005
- Location
- Texas Department of Corrections
- Posts
- 18,128
- Retired Outlaw Sum Bitch
She is the bomb.
-
01-15-2008, 07:11 AM #15Grand Imperial Wizard
- Join Date
- Aug 2005
- Location
- Texas Department of Corrections
- Posts
- 18,128
- Retired Outlaw Sum Bitch
I'm ordering the rear radius Rod bushings right now....I dont know what in the hell I was thinking not doing them last week with everything else.......oh well....
-
01-15-2008, 06:49 PM #16Member
- Join Date
- Jan 2008
- Location
- West Michigan
- Posts
- 173
- -
Yeah, that's how it starts, get a little taste, want more to get the fix, then next thing you know you're a full blown user. Originally Posted by Sarge

-
01-16-2008, 03:58 AM #17Grand Imperial Wizard
- Join Date
- Aug 2005
- Location
- Texas Department of Corrections
- Posts
- 18,128
- Retired Outlaw Sum Bitch
I need to align the front cradle.......hurry up with Lesters....few of us are waiting.....
-
01-16-2008, 11:01 AM #18Suspension Specialist

- Join Date
- Jan 2008
- Location
- Michigan
- Posts
- 54
Red and Silver- 2004 GTO, 2008 G8 GT
 We are on it... Brandon is on the road. I need to get down to Texas. Originally Posted by Sarge
-
01-16-2008, 11:15 AM #19Grand Imperial Wizard
- Join Date
- Aug 2005
- Location
- Texas Department of Corrections
- Posts
- 18,128
- Retired Outlaw Sum Bitch
Folks you probably noticed the GTO forum is now sponsored by PeddersUSA and ol JusticePete runs that outfit. So welcome JusticePete to LS1.COM. We check our tampons at the door here unlike "some forums".
I'm glad you could join us...folks Pedders is the new GTO Forum sponsors here and I am very excited to have them as part of the forum. Welcome Pedders.
-
01-16-2008, 11:24 AM #20Paid 2 Post Daycrew

- Join Date
- Jul 2005
- Location
- Canada
- Age
- 44
- Posts
- 9,481
Blood Red- Z28
Nice very well written install guide Sarge, great job!
 =
= 

 Reply With Quote
Thread Information
Users Browsing this Thread
There are currently 1 users browsing this thread. (0 members and 1 guests)
Similar Threads
-
Wings West front Lip Install
By Ramairgod84 in forum Appearance SectionReplies: 4Last Post: 10-28-2009, 06:08 AM -
Question: Front A-Arm Bushing install
By kool-aide in forum Suspension and HandlingReplies: 10Last Post: 06-12-2008, 02:19 PM -
Front Sway Bar Bushing Install
By surfinjoe in forum GTOReplies: 4Last Post: 04-07-2008, 05:19 AM -
INSTALL progress pics -- rear well box for 12" -- PICS
By fredmr85 in forum Stereo and ElectronicsReplies: 0Last Post: 05-28-2007, 12:37 PM -
Front strut install
By ZandSS in forum Suspension and HandlingReplies: 8Last Post: 05-19-2006, 11:59 AM

Bookmarks