
Results 1 to 16 of 16
-
01-06-2007, 07:45 AM #1dot COM


- Join Date
- Aug 2005
- Location
- GEORGIA
- Age
- 42
- Posts
- 548
two tone- 2003 harley davidson f150


CETA rear bumper how-to (painting rear bumper)
Painting Your rear bumper - Trans AM
this technique works for most any applications
by B. Jackson
Note: For painting plastic pieces such as your interior pieces I recommend using "paint adhesion promoter" this helps paint to stick. Use this before any primer or paint is put on whatever it is you are painting. You spray the adhesion promoter on then wait 10 minutes and then spray the primer or paint. You do not want the promoter to dry before you paint because the promoter and paint/primer bond together as they both dry. Any automotive store carries this and WalMart.
What you'll need:
Mineral Spirits,
600, 800 grit wet sand paper,
Paint of your choice:
(I used Duplicolor Bumper Coating - Flat Black);
Primer of your choice:
(I used spray paint Rustoleum Auto. Primer)
Thin masking tape;
Thick masking tape
Remove your license plate;
Clean the area off first off;
Use mineral spirits on a cotton cloth to make sure no grease or tar is on there;
Tape off the area. I didn't paint the inside groove around the tailpipes.... use the thin masking tape to tape around the area making sure it's stuck flush so no paint can go under the tape.. tape up your exhaust tips too.
Once you've done that use the thick masking tape to pretty much tape off from the top of your taillights down to the thin tape. This is so you don't overspray any paint onto your car. You can tape more or less if you want... it's just however good you are at painting lol.
Once clean and taped.... use the 600 grit wet sandpaper in small circle motions on the rear area to be painted. Make sure you are dipping the sandpaper in a bucket of water OR you can run water through the hose onto the area the whole time you are sanding. This is to remove the dust from the surface without the sandpaper "clogging" up. Do not press hard while you are sanding you do not want to make humps with your fingers.
Once you've sanded the whole area use your mineral spirits rag again to clean the surface. The mineral spirits helps to clean the surface as well it dries the surface fast. It also helps if you have the car in the sun to help dry the surface faster.
Once dry and clean.... use your primer spray and spray the surface. follow the paint's instructions as far as distance away to spray and such.... The Primer is usually ready to wet sand within 15-30 mins and safe to dry sand after 4 hours..... I personally hope a few layers of primer is done that there are no runs in the primer and it's ready for paint... BUT if you do have any runs in your primer wait 20 mins. and you can wet sand them until they are gone using the same small circular motions with the water running over the surface. Remember to clean the surface after you sand with mineral spirits to remove any debris.
K, you've primed the surface with a few layers and NO runs or NO mess-ups (or you have now sanded away any mess-ups)... time to move on...
Once the primer has dried (20-30 mins. depending on how many layers you sprayed) You are now ready for paint.
Simply do the same thing as the primer... follow instructions and if you have any runs in the paint or mess-ups you can wet sand them away and respray.
You can use these instructions for spray paint or automotive paint in a spray gun/air compressor. It just depends on how much you want to spend. I have not had any complaints with the spray paint types I've used in the past.
You can spray clear coat over the paint but I didn't because I wanted the flat black look.
version 2.0:

for verision 1.0 on my white/flamed TA i used 3M rubberized spray. it gave a textured look and flat black in color... on version 2.0 i used dupont bumper coating in a flat black. it gave a smooth texture and flat black in color
want more how-tos? go to http://www.evlls1.com/ls1.htmlLast edited by EVL LS1; 01-06-2007 at 07:55 AM.
Brandon
http://www.keepbringingit.com
-
01-06-2007, 08:14 AM #2Just me

- Join Date
- Nov 2006
- Location
- Broken Arrow, OK
- Age
- 49
- Posts
- 23,345
Pewter metallic- 2000 Camaro SS
Good write up and thank you a lot!
I added it to the write ups sticky
-
01-06-2007, 11:44 AM #3Senior Member

- Join Date
- Apr 2002
- Location
- San Jose
- Age
- 43
- Posts
- 2,050
Red- 1998 Pontiac Trans Am
now why didn't anybody ask me to post the write up lol
-
01-06-2007, 11:44 AM #4Senior Member
- Join Date
- Apr 2002
- Location
- San Jose
- Age
- 43
- Posts
- 2,050
Red- 1998 Pontiac Trans Am
THanks a lot B
 BTW Happy New Year!
-
01-06-2007, 12:56 PM #5Just me
- Join Date
- Nov 2006
- Location
- Broken Arrow, OK
- Age
- 49
- Posts
- 23,345
Pewter metallic- 2000 Camaro SS
I wished everyone would start doing some technical write ups for the sticky. I already did one or two myself, you guys are behind
-
01-06-2007, 03:13 PM #6dot COM
- Join Date
- Aug 2005
- Location
- GEORGIA
- Age
- 42
- Posts
- 548
two tone- 2003 harley davidson f150
lol man take whatever you need off www.evlls1.com/ls1.html Originally Posted by Y2KPewterSS

Originally Posted by Redphoenix1998
SUP man how's the new year treating ya?=)
-
01-07-2007, 01:50 AM #7Senior Member
- Join Date
- Apr 2002
- Location
- San Jose
- Age
- 43
- Posts
- 2,050
Red- 1998 Pontiac Trans Am
waiting on the supercharger and getting ready to clean up the WS6 and restore the camaro. Starting building the camaro engine and pulling about the wiring, PITA!!!! Going to Dynamat the entire WS6 and repaint the car as well as redoing the interior. Gonna be fun, lots of work but fun
-
05-27-2007, 01:55 PM #8Member

- Join Date
- Apr 2007
- Location
- Oklahoma
- Posts
- 726
Black- 2002 Trans Am WS.6 R.I.P.
loving the car man. gotta love free mods, it just makes you look original sometimes.
-
05-27-2007, 02:32 PM #9Senior Member

- Join Date
- Nov 2006
- Location
- d
- Age
- 39
- Posts
- 3,661
white- 2002 z28
wished i would of did that to my TA
-
02-09-2009, 05:07 PM #10Junior Member

- Join Date
- Feb 2009
- Location
- Anderson sc
- Age
- 37
- Posts
- 84
Silver- 98 Trans Am
it does add to the awesome looks of the back end of the TA.s. I'm planning on doing mine with flat paint, but what about when you wash it? it seems like the FLAT paint wouldn't last long. Especially if you wash it as much as i do lol
-
02-12-2009, 05:55 PM #11dot COM
- Join Date
- Aug 2005
- Location
- GEORGIA
- Age
- 42
- Posts
- 548
two tone- 2003 harley davidson f150
mine lasted as long as i had the car. if it chips or anything u can always reshoot it though. they make a flat clear coat too now... on the costly side though.. i'd prob just use the bumper paint in a rattle can though.
-
02-15-2009, 05:10 PM #12Junior Member
- Join Date
- Feb 2009
- Location
- Anderson sc
- Age
- 37
- Posts
- 84
Silver- 98 Trans Am
file:///C:/Documents%20and%20Settings/brandon%20debose/My%20Documents/My%20Pictures/Picture/367177578_1265764755_342696593_1234748996918.jpeg
-
02-15-2009, 05:11 PM #13Junior Member
- Join Date
- Feb 2009
- Location
- Anderson sc
- Age
- 37
- Posts
- 84
Silver- 98 Trans Am
opppssss trying to insert pics of my painted bumper that i painted today. I have them saved on my comp. so i dont have a URL for them. any help
-
02-21-2009, 05:38 PM #14Auto Painter

- Join Date
- Dec 2007
- Location
- Houston, TX
- Age
- 47
- Posts
- 2,002
White- 1998 Trans Am
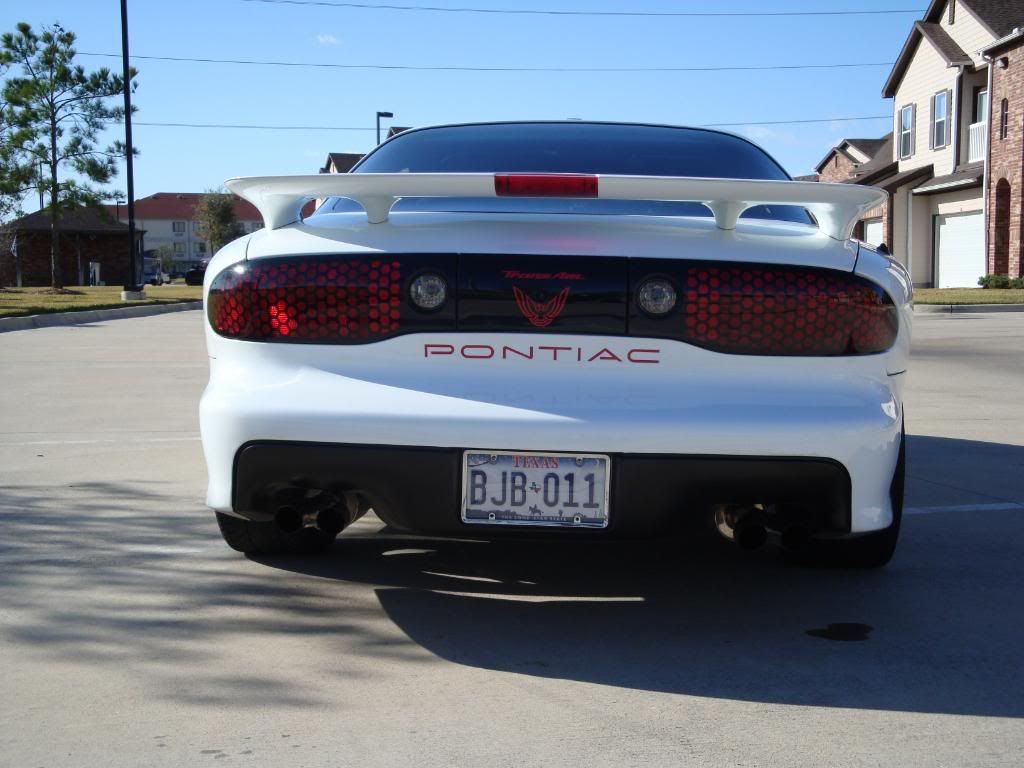
Here a b4 and after on mine. 1st pic is like `15 months ago,the second pic is about 2 months old. I got corsa clone tips since I didn't like the slp tips.
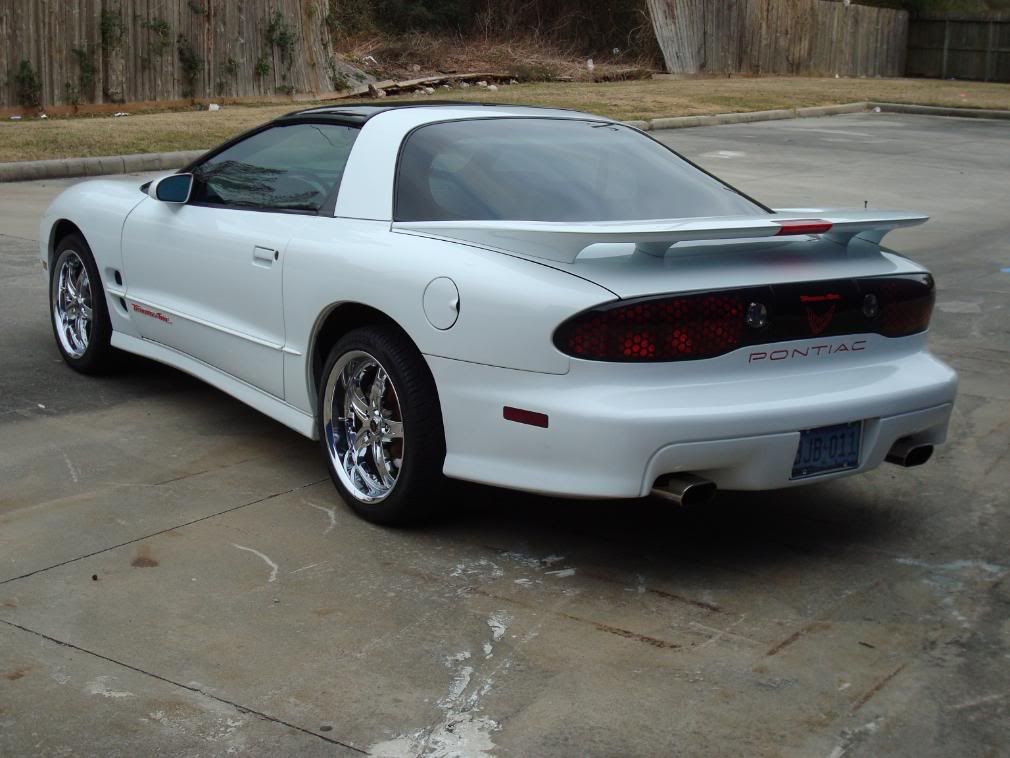
SEM Trim Black Paint get it at any local paint store. I use it at my shop all the time on fender flares and trim. newer had it chip or discolor and get a nice smooth finish.
I went about doing mine a bit different. i used a scuff pad and sanding paste and wax and grease remover to clean it, and the SEm paint doen't need a primer it sticks to almost anything good.Last edited by RyanJM; 02-21-2009 at 05:40 PM.
 1998 Trans Am 85k miles.
Bolt ons, MS3 113LSA cam, Circle D Stall, Tune, Modified WS6 style hood, Full Suspension, 6000k HID's, Clear Side Markers w/ Leds, Led 3rd Brake Light and 18" AR Staggered Killer Wheels w/ BFG KDW NT's.- Weekend Toy/DD
02 Trailblazer -Sold
09 Ram 1500 CC - Sold
09 Cobalt SS/TC - Sold
13 ram 1500 LoneStar CC 4x4 - Magnaflow, K&N,and more to come-DD/Toy
-
02-24-2009, 11:16 AM #15Junior Member
- Join Date
- Feb 2009
- Location
- Anderson sc
- Age
- 37
- Posts
- 84
Silver- 98 Trans Am
look so much better. Awsome bird man and love the wheels ( i spy different exhaust tips too )
-
02-24-2009, 07:21 PM #16Auto Painter
- Join Date
- Dec 2007
- Location
- Houston, TX
- Age
- 47
- Posts
- 2,002
White- 1998 Trans Am
Actually I got rid of thiose SLP tips for corsa clones from afterthoughs auto. The 1st tips I got from my buddys Midas with a Flowmaster for $150 installed. Second pic is after my long tubes/ory, when i dumped my raspy flowmaster for a SLP Power Flo with the duals. Now I dumped those for the clones.
Last edited by RyanJM; 02-24-2009 at 07:23 PM.

 Reply With Quote
Thread Information
Users Browsing this Thread
There are currently 1 users browsing this thread. (0 members and 1 guests)
Similar Threads
-
Painting rear bumper!!
By thechad125 in forum Appearance SectionReplies: 5Last Post: 12-01-2010, 05:21 AM -
ceta rear bumper
By LS1_ws6 in forum Appearance SectionReplies: 3Last Post: 07-18-2009, 08:42 AM -
For Sale: Silverado Rear Bumper & Camaro Rear End
By GOODZ/BADZ in forum Parts For Sale / TradeReplies: 5Last Post: 10-24-2008, 04:57 PM -
Ceta Rear Bumper Question
By ericosu84 in forum Appearance SectionReplies: 3Last Post: 06-21-2007, 06:31 PM -
CETA rear bumper mod
By SicWs6 in forum Firebird / WS6Replies: 9Last Post: 03-31-2007, 09:40 PM

Bookmarks