
Results 41 to 60 of 83
Thread: 1970 Chevrolet Camaro
-
04-02-2016, 08:43 AM #41Veteran


- Join Date
- Feb 2009
- Location
- Mansfield, PA
- Posts
- 22,146
Black & Blue- '02 WS.6 / '07 Suburban
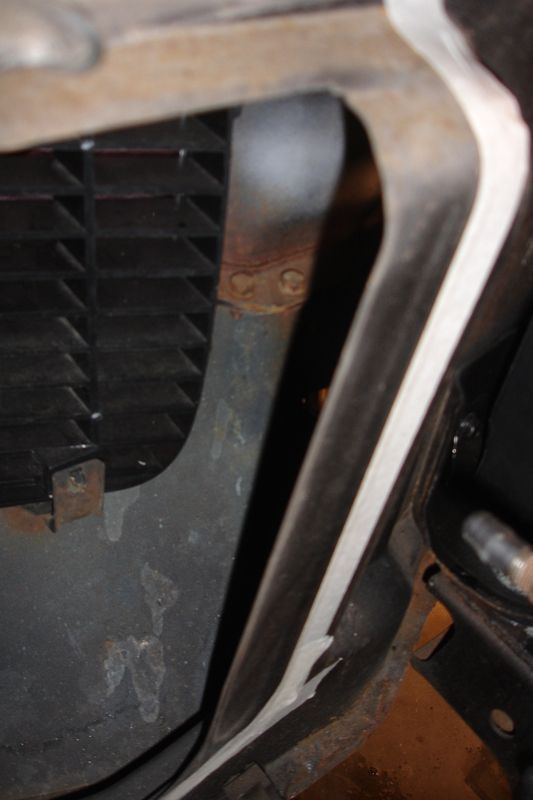
I noticed that the rear axle is attached to the spring with T-bolts. All of our other cars are coil spring rear, so that was a surprise to me to see them. The rubber isolators are pretty checked and will be on the replacement list at some point. I will most likely service the transmission and cooling systems as well. I also need to open up the radiator support to better accommodate the HD radiator.
-
04-02-2016, 09:45 AM #42Giant Dicks Car Club

- Join Date
- Nov 2006
- Location
- Millerton, PA
- Posts
- 5,191
2005 Ram- 1978 Firebird

1970 Chevrolet Camaro
OER sells a nice, complete kit for the rear end. I had one and sold it last spring at Carlisle, actually. I had bought it to do the rear swap but ended up with everything I needed when I purchased the suspension kit.
-
04-07-2016, 03:48 AM #43Veteran
- Join Date
- Feb 2009
- Location
- Mansfield, PA
- Posts
- 22,146
Black & Blue- '02 WS.6 / '07 Suburban
Continued on the front of the car last night and, unfortunately, I found some carnage that requires a few replacement parts. It appears that the left front caliper has had a brake bleeder repair kit installed at some point. Unfortunately, the sleeve does not have a hex head on it and when I finally broke the bleeder free the entire assembly unscrewed from the caliper. This required a fair amount of fire and patience but the bleeder was still stuck in the repair sleeve.
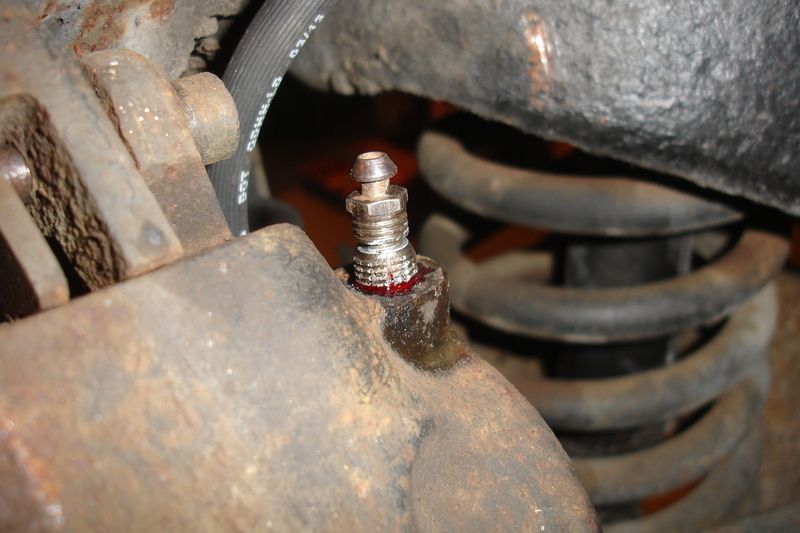
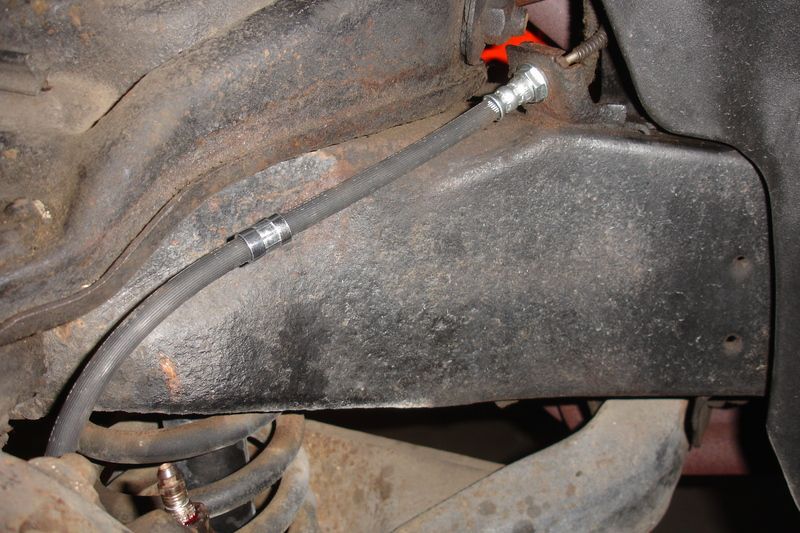
After looking it over, I clamped the caliper in my vise and threaded the sleeve and bleeder back into it tight. I then put the fire to it again and worked it with some candle wax. Gripping the sleeve lightly with my vise grips I was able to break the bleeder free. I then cleaned everything up and reinstalled the sleeve with red loctite. The bleeder on the right side caliper was stock, but was also seized and required the torch and wax treatment to break free. Other than these issues, the brake lines unbolted from the hoses quite easily and the new ones were a perfect match. There was evident checking on the hoses and I am thinking that they might even be the originals.
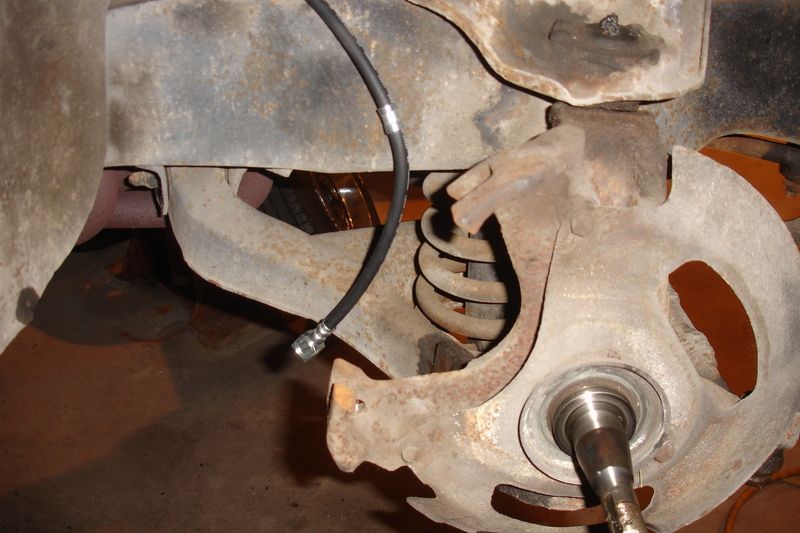
Here is where I found the carnage. I also removed the front hubs to clean and repack the wheel bearings and install new seals. The driver side looked good, although there wasn't a whole lot of grease on the bearings. It was evident that this side had been apart previously by the look of the grease. I also believe that it is a replacement hub as it differs quite a bit from the passenger side. I cleaned everything up in my parts washer, ran the bearings through a packer and after installing a new seal reassembled that side.
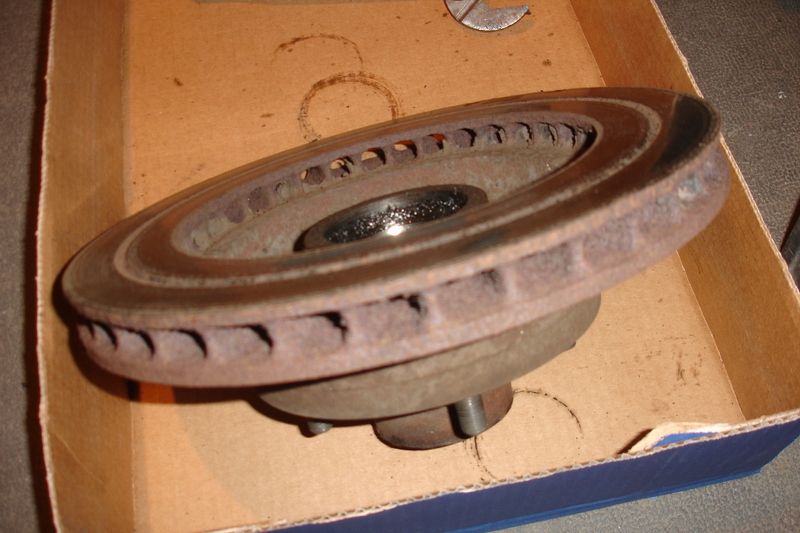
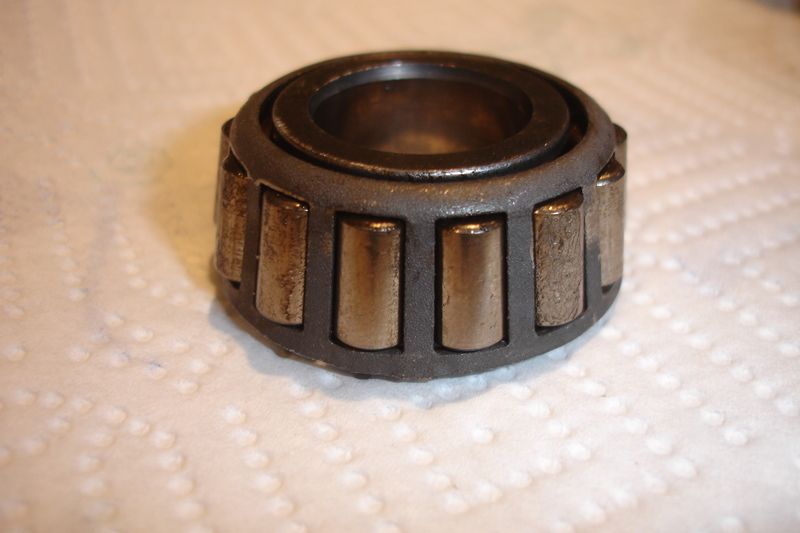
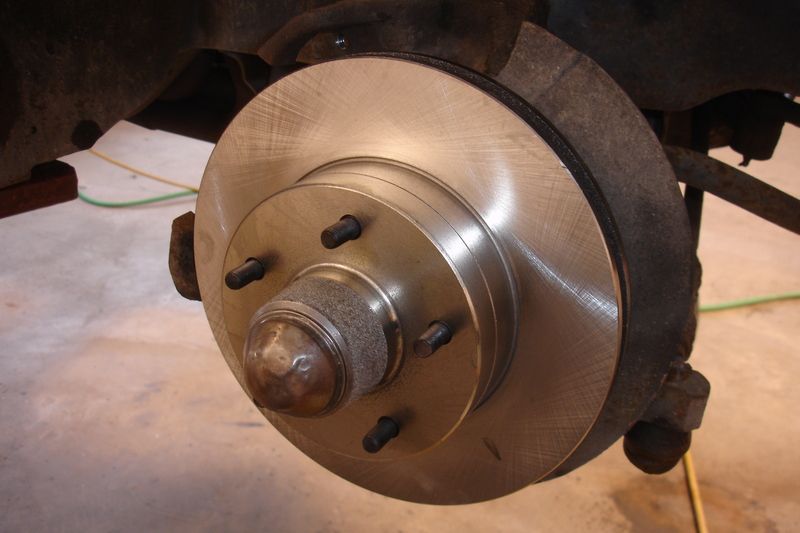
On the passenger side, I noted right away that the inner rotor face appeared thin. I looked it over, checked it with my calipers, and it is definitely wasted. After removing and cleaning the bearings I could see that the outer bearing was in bad shape with heavily galled rollers. These two things shut me down last night and I will be heading to the parts store this morning to order replacements.
While I wait for parts, I will be dropping the coolant, replacing the hoses and thermostat and opening up the radiator support to accommodate the HD radiator that is in the car. I will also flush the power steering fluid and look everything else over in preparation for the first drive of the season.
-
04-08-2016, 03:11 AM #44Veteran
- Join Date
- Feb 2009
- Location
- Mansfield, PA
- Posts
- 22,146
Black & Blue- '02 WS.6 / '07 Suburban
Went out to the garage last night and started on some other stuff while I await arrival of the replacement parts. I drained the coolant utilizing the radiator petcock and engine block drains. I was very pleased that the block drains came out easily. The coolant looked a bit on the weak side and was probably a few years old. It did not have any oily or rusty residue at all in it and I was very pleased to see that. I will run a bottle of flushing solution through the system before refilling it. All the hoses and thermostat will also be changed out and I will pull the radiator to enlarge the opening.
I also broke down and painted the rear brake drums. Tonight, I will paint the front calipers and hub centers. I wasn't really going to do any restoration work at this time as Dawn is eager to drive the car. However, with the weather being less than great I decided to take advantage of the time on the lift. We're on a two week countdown to Spring Carlisle and a batch of new parts for the car. The one thing that still escapes me is the proper hardware for bolting down the front seats. It has later model buckets and I am not certain if there are supposed to be studs in the floor or if bolts were used. I think Zap sent me a pic at one point of his seat mounts. Whatever it is, the washer needs to be quite large and I have been unable to locate a suitable alternative in black oxide.
-
04-09-2016, 05:21 AM #45Giant Dicks Car Club
- Join Date
- Nov 2006
- Location
- Millerton, PA
- Posts
- 5,191
2005 Ram- 1978 Firebird
1970 Chevrolet Camaro
if I get out to the garage today I will snap some pictures of the bolts, seats and holes, I actually have my seats out right now.
-
04-09-2016, 06:50 AM #46Veteran
- Join Date
- Feb 2009
- Location
- Mansfield, PA
- Posts
- 22,146
Black & Blue- '02 WS.6 / '07 Suburban
Thanks! None of the parts catalogues seem to list the bolts -- seems to be that they only have the bolts that mount the bracket to the seat bottom.
I just installed the new hub on the passenger side and buttoned up the brakes. I wasn't going to do it, but I broke down and painted the hubs semi-gloss black and calipers with cast iron gray. Going to get the brakes bled and then start the cooling system flushing process.
-
04-09-2016, 05:04 PM #47Giant Dicks Car Club
- Join Date
- Nov 2006
- Location
- Millerton, PA
- Posts
- 5,191
2005 Ram- 1978 Firebird
1970 Chevrolet Camaro
all 4 bolts are the same size and length with identical washers. the holes in the seat tracks are different though. three are the same, but the front outermost is larger. There's also a cover under the bolts on the front that cover the ends of the tracks.


-
04-09-2016, 07:59 PM #48Junior Member
- Join Date
- Jan 2016
- Location
- US
- Posts
- 14
Gotta love those style Camaros, it looks like your HEI power source is spliced to the factory resistor wire. Is if that is true your ignition coil is working on 6-8 volts.
When I do a HEI install on pre-74 cars I head to the local salvage yard and get a HEI power wire (pink) from a vehicle that has it, remove the bulk head connector so you can release the wire. Remove it from the conduit and now you have a 12guage power wire that will feed full power to your ignition.
Sent from my SM-T530NU using Tapatalk
-
04-11-2016, 03:43 AM #49Veteran
- Join Date
- Feb 2009
- Location
- Mansfield, PA
- Posts
- 22,146
Black & Blue- '02 WS.6 / '07 Suburban
Thanks Zap - I'll be searching again once we hit the fairgrounds.
Doug - you read my mind. The birds nest on the firewall is my next attack. I have looked at that a few times since we acquired the car and wondered if the distributor was attached to the resistor wire.
I did a whole bunch of work on her this weekend and will post up the pics when I get a chance.
-
04-17-2016, 03:27 AM #50Veteran
- Join Date
- Feb 2009
- Location
- Mansfield, PA
- Posts
- 22,146
Black & Blue- '02 WS.6 / '07 Suburban
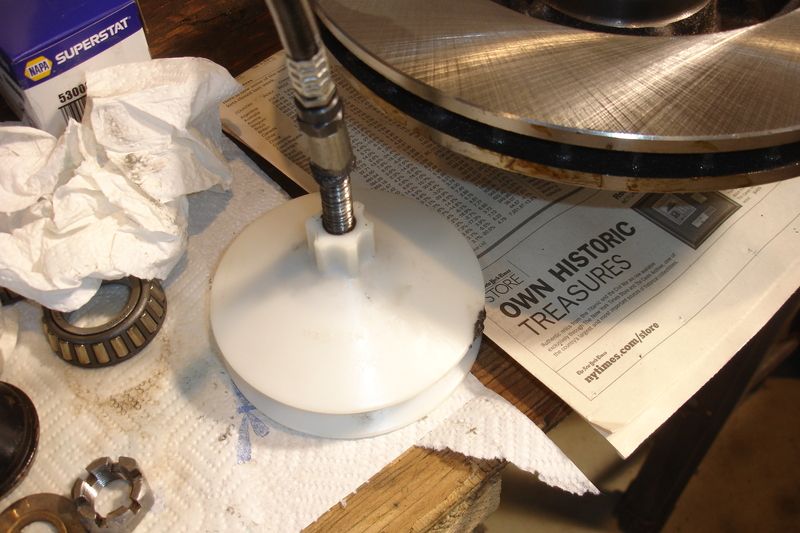
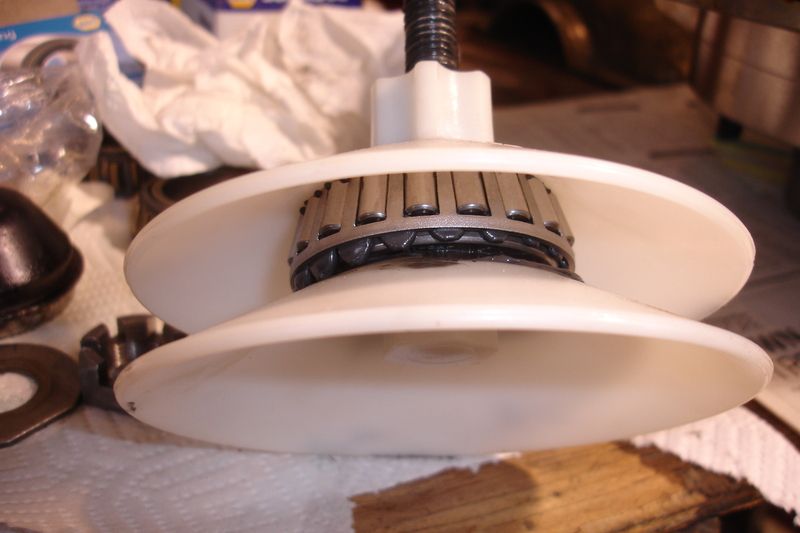
After the new parts arrived, I cleaned the hub and bearings to remove any manufacturing debris and oily residue. I used my bearing packer which forces grease into the bearing much easier than hand packing. After greasing the bearing race and hub, I dropped the inside bearing in place and tapped in a new seal.
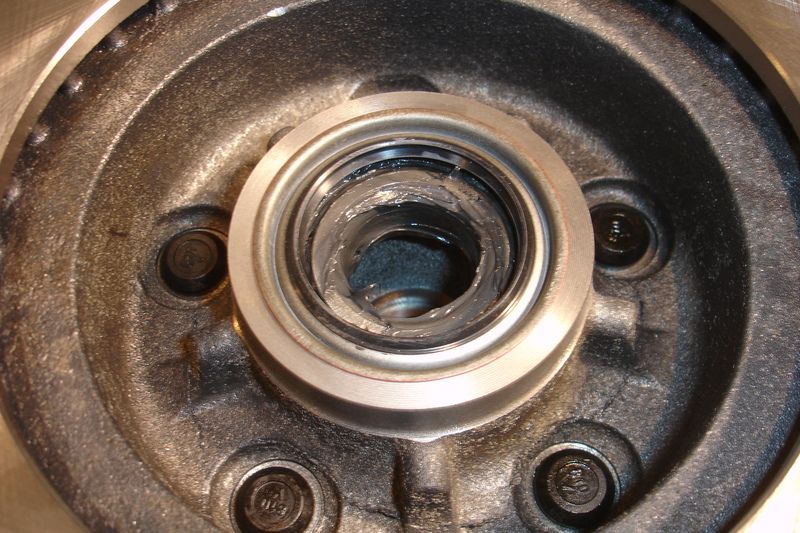
I bled the brakes and have a nice firm pedal. Still kind of odd driving a car with manual brakes on it, but they actually do work very well.

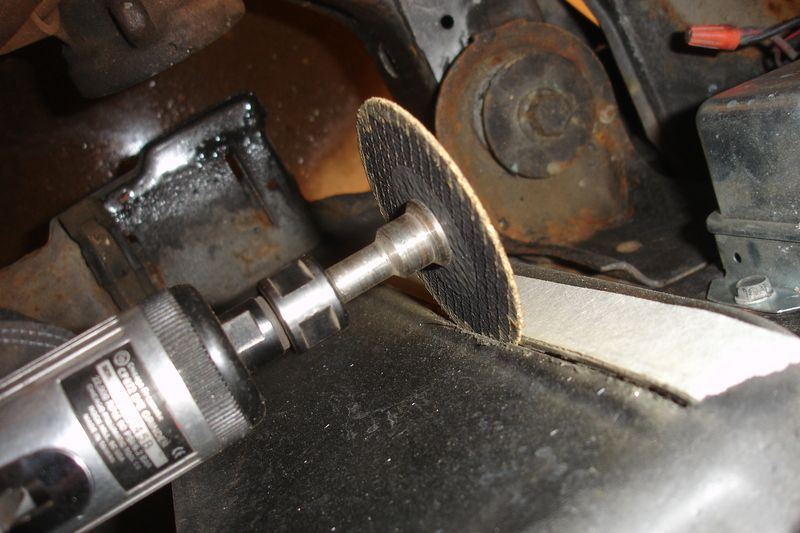
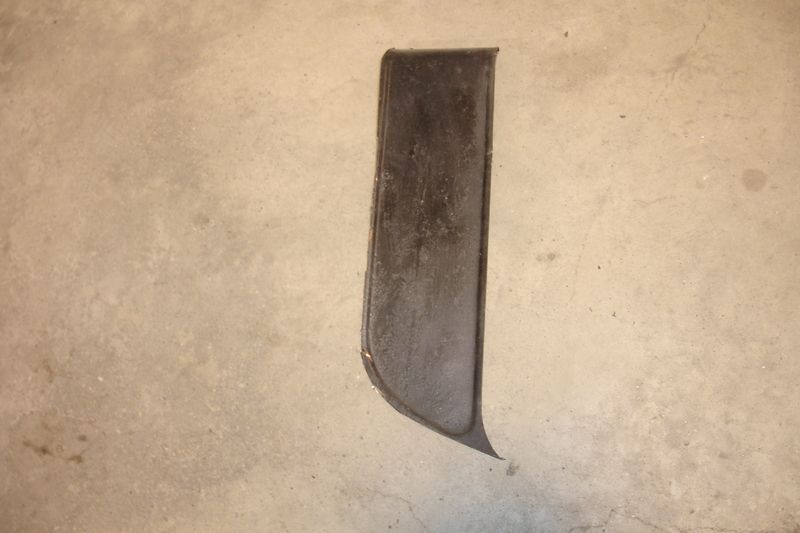
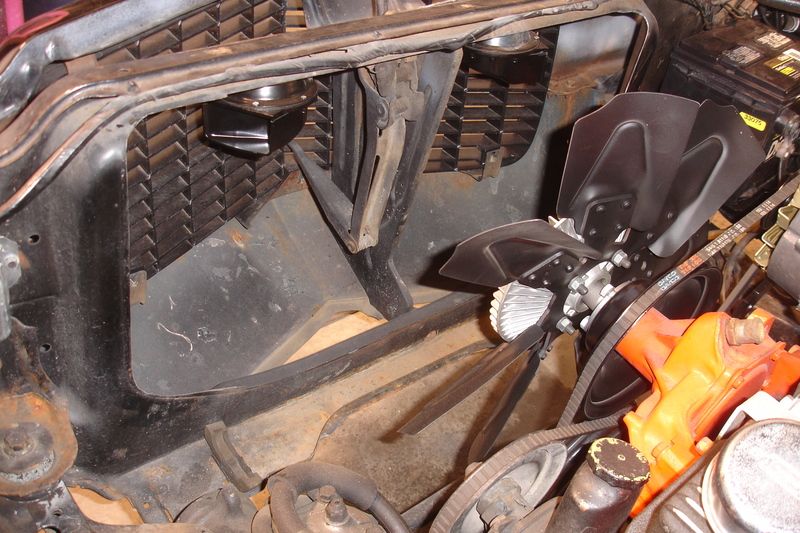
The coolant swap and hose change went well. With the radiator out I was able to open up the radiator support to accommodate the HD radiator. I taped off the size of the new opening utilizing the pressed in contours as a guide. The cuts were made with my die grinder and a cutoff wheel and then smoothed with a sanding disc, file, and sanding block. Just guessing, but I removed maybe a 2" strip on the passenger side and a 5" strip on the driver side.
I ran a flushing solution through the cooling system after draining out all the old coolant. There was still some crust in the radiator so I installed the cap and laid it on the garage floor with the inlet and outlet facing up. I filled the radiator with a gallon of white vinegar and from time to time rocked it back and forth to force the vinegar through the tubes. I left it overnight and then rocked it again the next afternoon before dumping it and flushing it with water. This worked fairly well and removed most of the remaining scale and deposits.

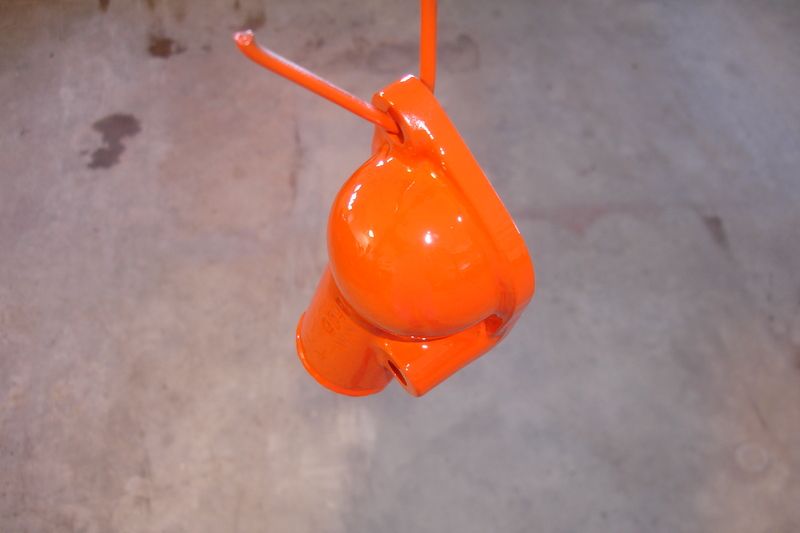
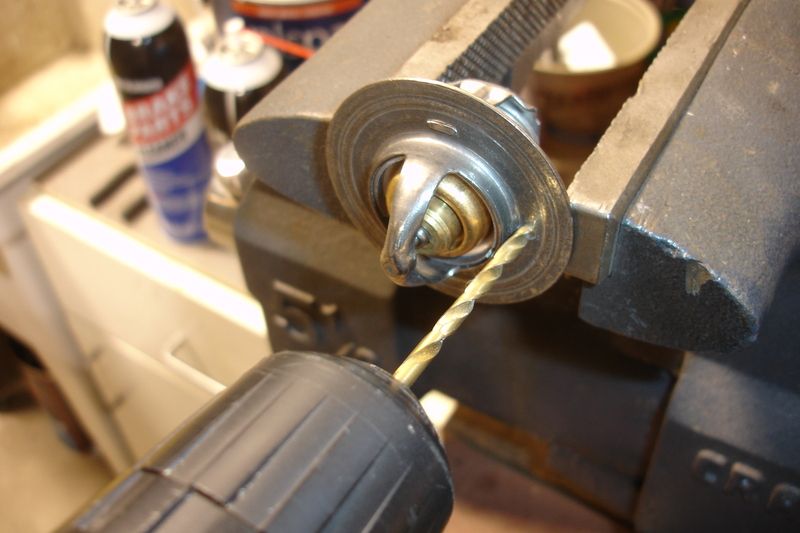
Before installing the new hoses, I blasted and painted the cast iron thermostat housing and drilled a 1/8" air bleed in the thermostat. This allows any trapped air to escape and prevents the thermostat from air locking. I opted for a 180 degree thermostat in place of the 160 degree thermostat that came with the car.
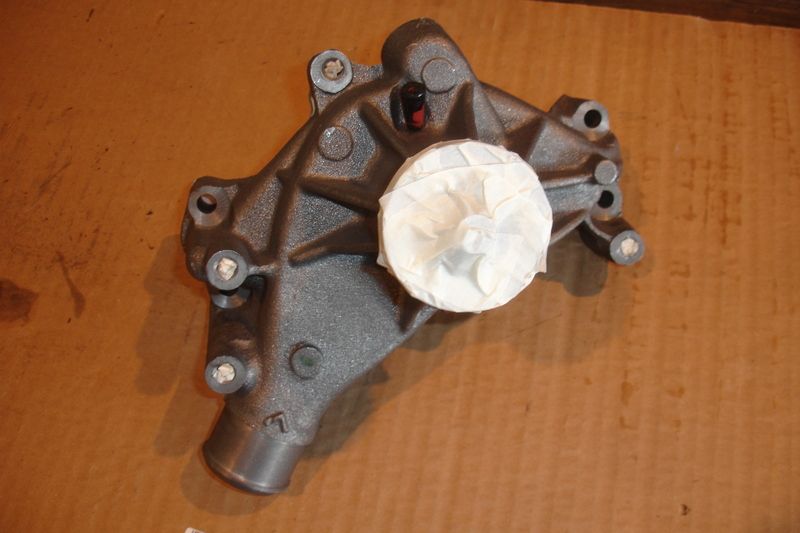
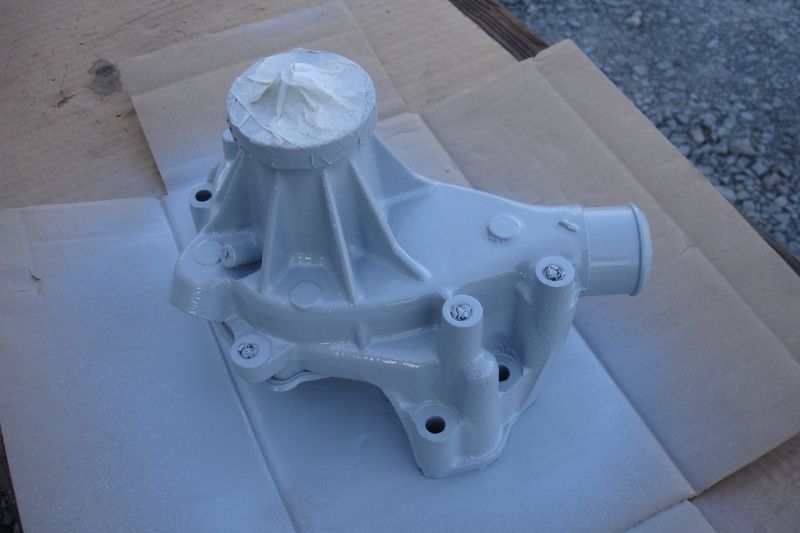
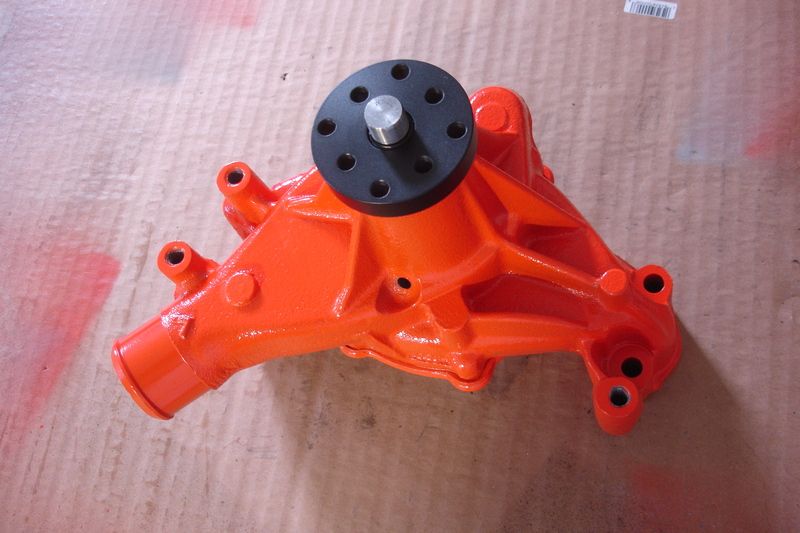
We drove the car a bit Friday night and all seems good. The only thing I noticed is that I have play in the water pump bearing and although it is not currently leaking, it will in time. When we install the new fan shroud after Carlisle I will be swapping out the water pump.
-
04-17-2016, 09:15 AM #51Junior Member
- Join Date
- Jan 2016
- Location
- US
- Posts
- 14
What type of grease did you pack your bearings with?
Sent from my SM-T530NU using Tapatalk
-
04-17-2016, 12:50 PM #52Veteran
- Join Date
- Feb 2009
- Location
- Mansfield, PA
- Posts
- 22,146
Black & Blue- '02 WS.6 / '07 Suburban
I would have to check the tube -- I always keep it filled with "wheel bearing approved" grease and never buy the cheap stuff.
-
04-17-2016, 02:03 PM #53Junior Member
- Join Date
- Jan 2016
- Location
- US
- Posts
- 14
Nice
Sent from my SM-N920P using Tapatalk
-
04-19-2016, 03:20 AM #54Veteran
- Join Date
- Feb 2009
- Location
- Mansfield, PA
- Posts
- 22,146
Black & Blue- '02 WS.6 / '07 Suburban
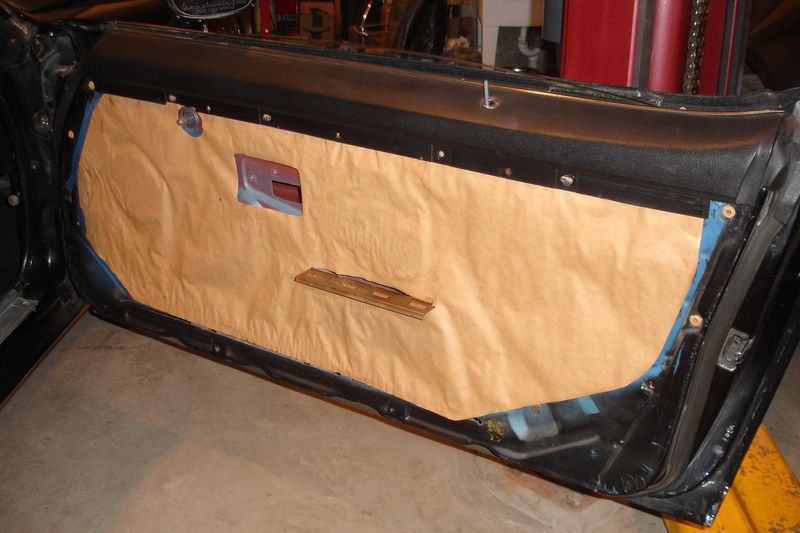
Pulled the interior panel off the driver door this morning. Have something that rattles in there pretty good that I have been meaning to fix. Figured I had better look into it before leaving for Carlisle in case I need any parts.
-
04-22-2016, 03:46 PM #55Veteran
- Join Date
- Feb 2009
- Location
- Mansfield, PA
- Posts
- 22,146
Black & Blue- '02 WS.6 / '07 Suburban
The Camaro was the big winner at Carlisle today: Another set of seat hinge covers for the inner hinges, new rubber isolators for the radiator, HD cooling fan shroud, battery cables, a new fuel tank sending unit, one (1) washer for the subframe bushings (we had one that was rusted too much to reuse), new dash pad and a new instrument cluster bezel.
-
05-14-2016, 05:40 PM #56Member

- Join Date
- May 2015
- Location
- Blossburg, PA
- Age
- 34
- Posts
- 472
Silver Metallic- 2000 Trans Am WS6
I have never ever worked with nor seen a serviceable wheel bearing. That is interesting. This car is in great hands as are all of your vehicles Jeff.
2000 Trans Am WS.6 M6
SLP lid & bellow w/ K&N, GMMG catback w/ Corsa Clones, UMI SFC, UMI Adj. Panhard, UMI Adj. TQ arm w/ relocation kit, QTP Longtube headers ORY, LS6 intake, EGR/A.I.R delete.
Eibach prokit, Bilstein HDs, Nitto NT555s, skip shift elim, whiteface overlays, 20% tint, matte black decal/overlays
YouTube.com/DarrenWS6
-
05-16-2016, 04:13 AM #57Veteran
- Join Date
- Feb 2009
- Location
- Mansfield, PA
- Posts
- 22,146
Black & Blue- '02 WS.6 / '07 Suburban
Been getting a few more things done on the Camaro recently. Had a rattle in the passenger door that was getting a bit annoying so pulled the panel off and investigated. Only thing I found was a rod clip that was disconnected so I fixed that and it seems to have settled down now. Everything looked good inside the door and I lubed the lock mechanism while I had everything apart.
I think I posted before that the water pump bearing definitely has some slop in it. I discovered this while swapping out the hoses and flushing the cooling system. I ended up purchasing a Stewart EMP water pump from Summit and finally got around to prepping and painting it for installation.
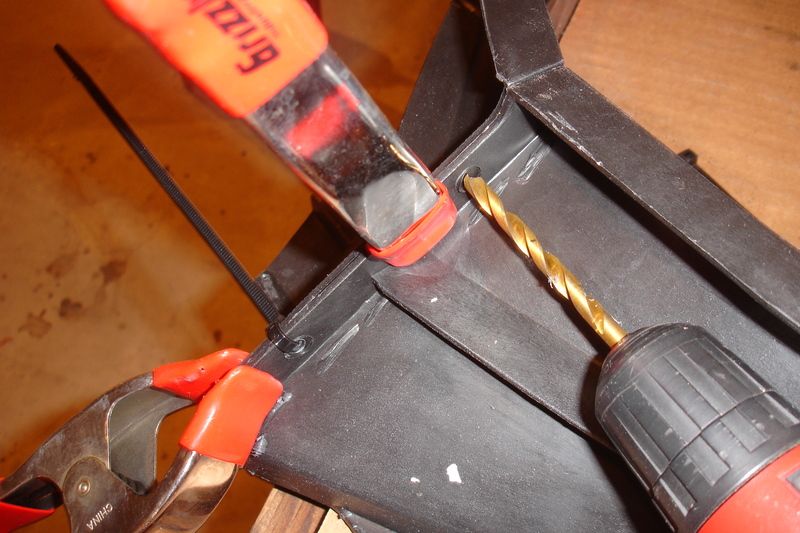
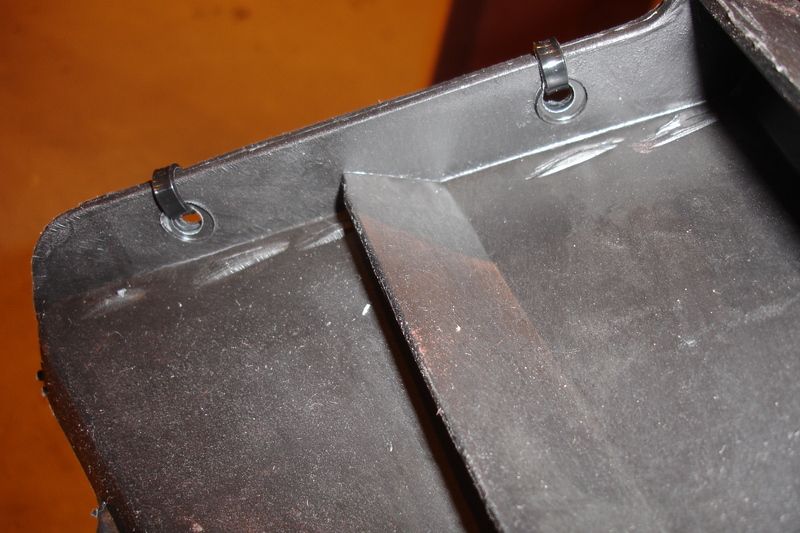
I picked up the correct fan shroud at Spring Carlisle and found that apparently no one makes a fastener kit for the two halves. The stock assembly is stapled together and looking on the internet I see that most everyone simply bolts the halves together. I opted for zip ties as they are black and will never rust up. I clamped the two halves together to ensure proper alignment and then drilled the holes. Both sides are also pinned so this should work just fine. I made sure to install the locking tabs towards the bottom.
-
05-16-2016, 09:31 AM #58Spaz is My Mentor


- Join Date
- Feb 2009
- Location
- Florida Man Status Acheivement
- Posts
- 11,759
Navy Blue Metallic- 98 T/A w/ mods, 00 FBVert
As always Jeff...superb work, are you sure you were meant to be a lawyer?
Looks to me your calling would be in Automotive Restorations.
-
05-16-2016, 09:38 AM #59Junior Member
- Join Date
- Jan 2016
- Location
- US
- Posts
- 14
That sounds good, too bad zip ties dry rot and break off
Sent from my SM-N920P using Tapatalk
-
05-16-2016, 11:23 AM #60She Moderator

- Join Date
- Jul 2008
- Location
- So Cal
- Age
- 60
- Posts
- 15,660
Arctic White- 2000 Camaro Z28
Your vehicles are very lucky, Jeff


 Reply With Quote


Thread Information
Users Browsing this Thread
There are currently 1 users browsing this thread. (0 members and 1 guests)
Similar Threads
-
1969 &1970 Chevrolet Camaro - One For Show, Two For Go!
By Ed Blown Vert in forum Camaro / SSReplies: 0Last Post: 01-29-2013, 02:20 PM -
Ring Brothers 1970 Chevrolet Camaro "Diversion"
By Ed Blown Vert in forum Classic MuscleReplies: 0Last Post: 11-04-2011, 04:40 AM -
1970 Chevrolet Camaro - Performance Minded
By Ed Blown Vert in forum Camaro / SSReplies: 0Last Post: 10-05-2011, 04:20 PM -
1970 Chevrolet Camaro and More - Local Heroes Redux
By Ed Blown Vert in forum Camaro / SSReplies: 0Last Post: 09-29-2010, 03:50 AM -
For Trade: For Sale 1970 Chevrolet Camaro Split Bumper
By fuzzyhall in forum Vehicles For Sale / TradeReplies: 2Last Post: 11-15-2008, 03:21 PM

Bookmarks