
Results 1 to 14 of 14
Thread: R-12 to R-134a Conversion
-
05-31-2015, 06:04 PM #1Veteran


- Join Date
- Feb 2009
- Location
- Mansfield, PA
- Posts
- 22,146
Black & Blue- '02 WS.6 / '07 Suburban
R-12 to R-134a Conversion
The AC system on our 1985 Monte Carlo SS has not worked since we bought the car in 2010. It has never been much of an issue as we keep the car in Beaver Springs and simply utilize it for touring around and on track days. Last year, I purchased the components to retrofit the AC system from R-12 to R-134a in hope that I could make it blow cold once again. I understand that this conversion process is not ideal and that although the system will function, it will not blow as cold and may not last as long as if I had replenished the system with R-12. After lots of reading on the internet, I decided to give it a go and see what the results are. I first checked the low pressure port and there was no pressure in the AC system at all.
I have a gauge set and all the tools to work on AC systems. It was a good investment and as the tools will only be utilized occasionally, buying them through Harbor Freight made the added capability in my garage very cost effective. Since last year, I have used the tools on five separate vehicles to diagnose AC issues and they have worked perfectly each time. For the conversion on our Monte Carlo, I purchased a new Accumulator/Dryer from NAPA, an assortment of O-rings (made for use in AC systems), adapters for both the high and low pressure ports, Ester Oil, and five (5) twelve ounce cans of R-134a.
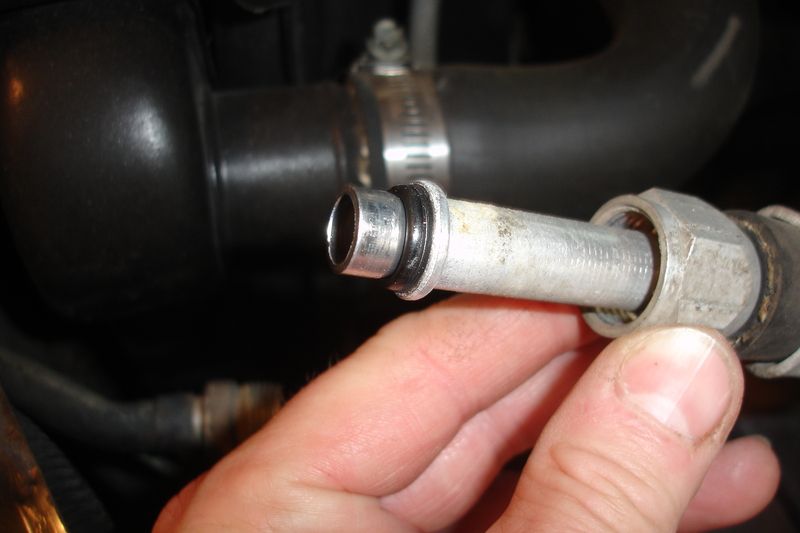
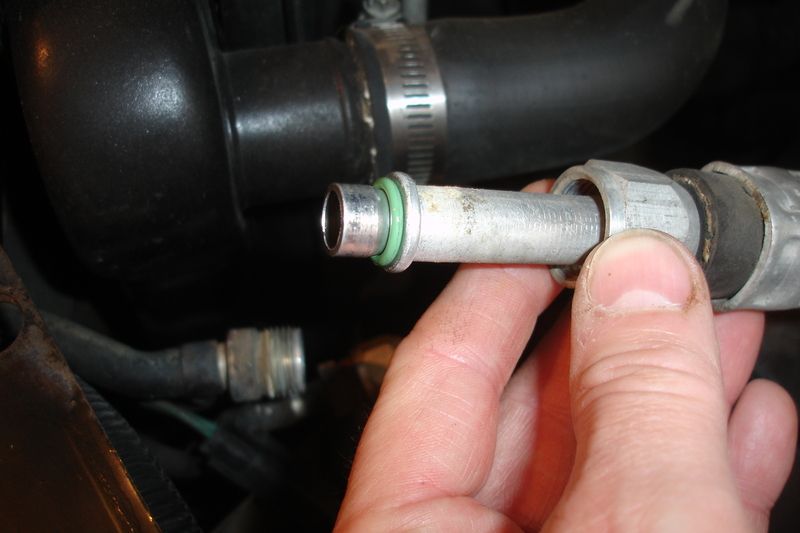
Essentially, the work consisted of swapping out all the O-rings in the system and installing the new Accumulator/Dryer and ports. I started on the condenser and replaced the O-rings on both fittings at the radiator support. The stock O-rings are black and the replacement O-rings are green. Being careful not to introduce debris into the system, the fittings were unscrewed and Ester Oil was applied to the new O-rings before reassembly:
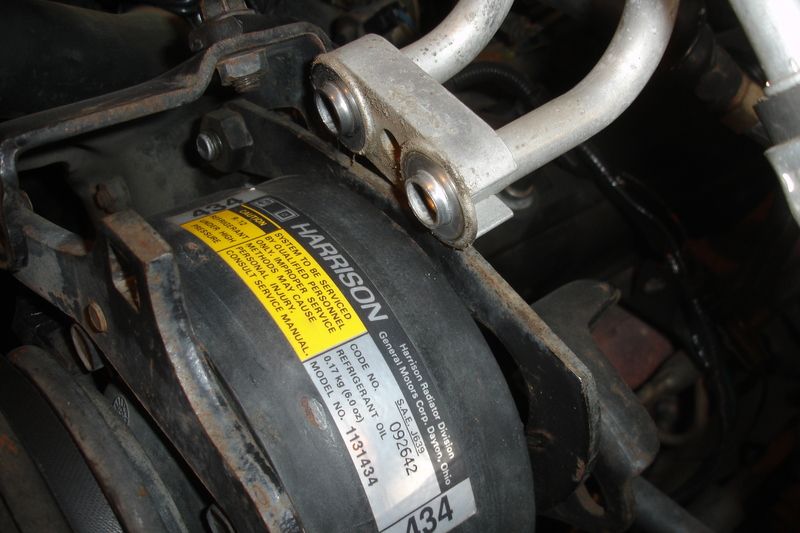
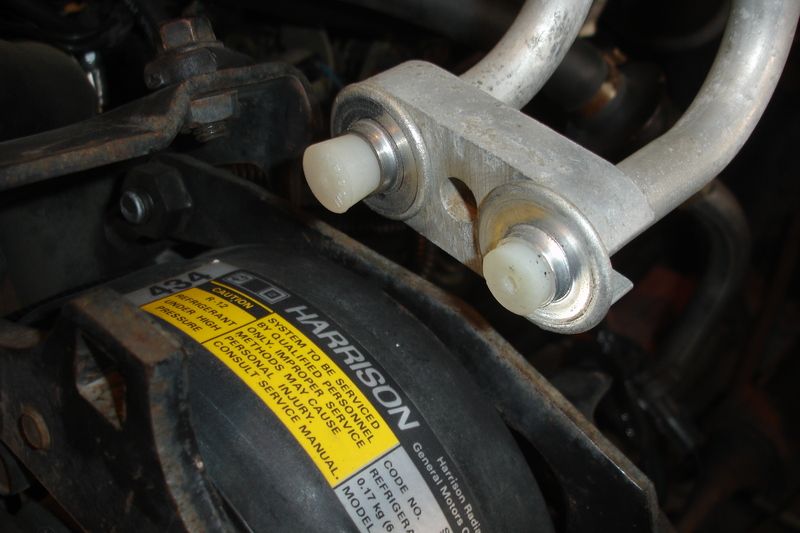
At the compressor, the lines are connected to an aluminum block that bolts to the back side of the compressor. After carefully removing the bolt, the connector is lifted up out of the way, the O-rings were removed, and then rubber plugs were inserted in the holes before everything was carefully cleaned. Again, the new O-rings received a light coating of Ester Oil.
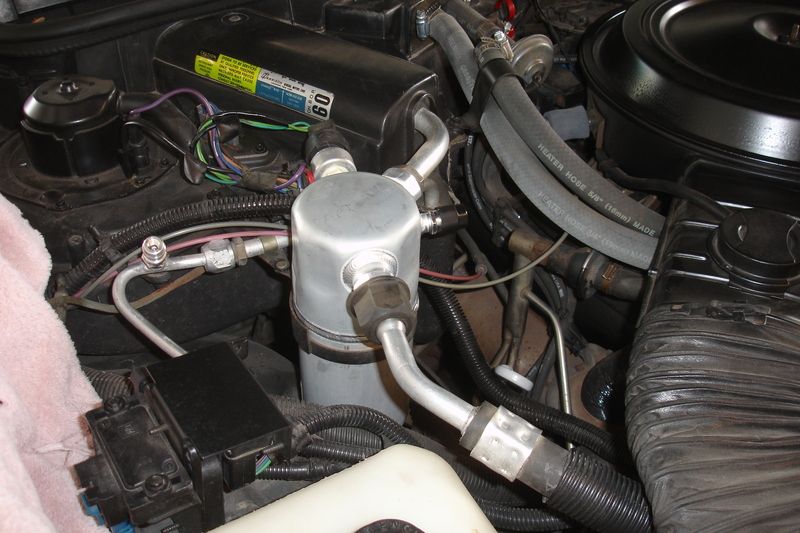
Over on the passenger side, I matched up the new Accumulator/Dryer to ensure that the ports were properly oriented.
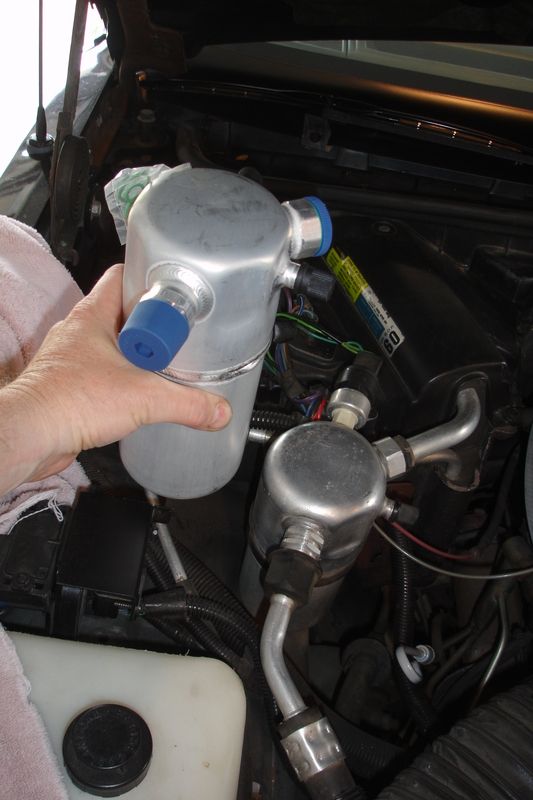
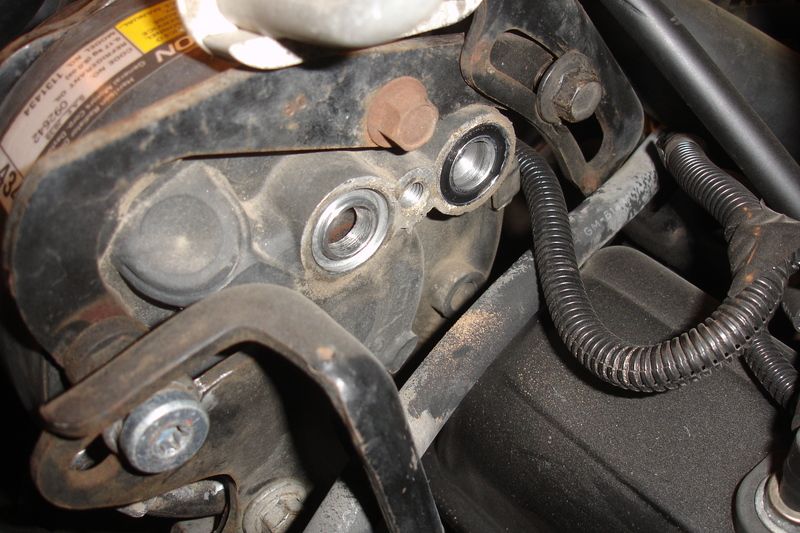
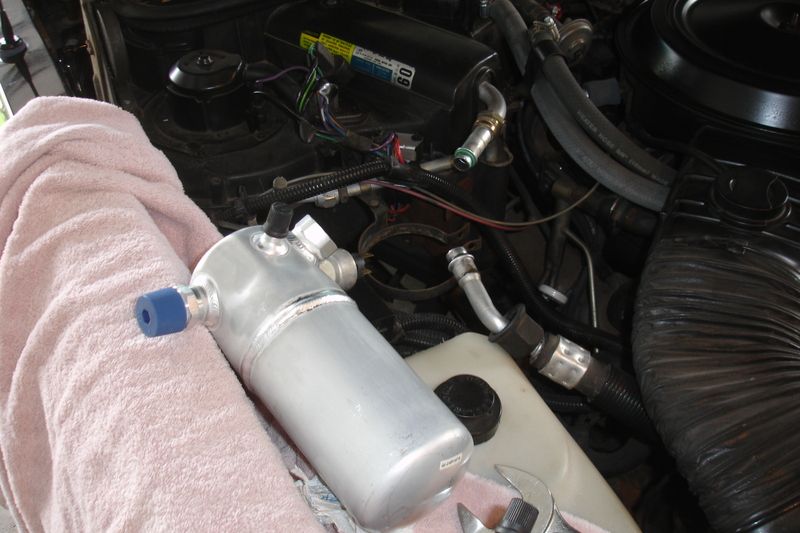
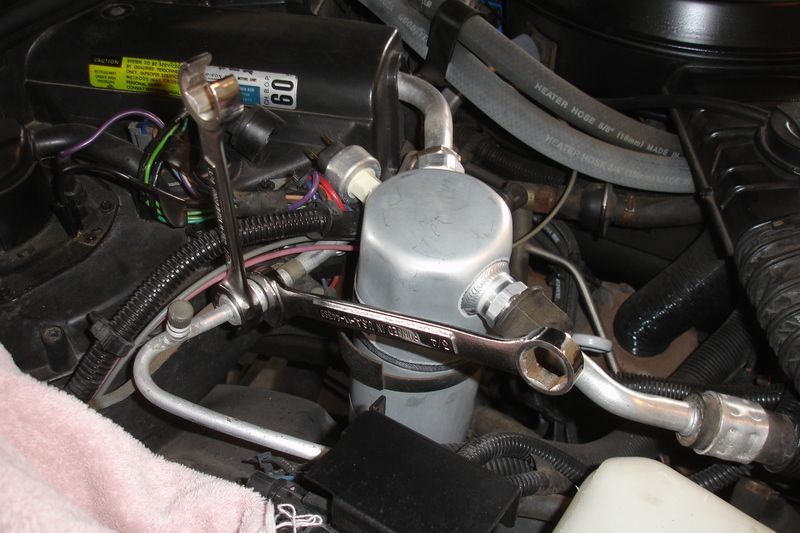
The lines to the Accumulator/Dryer were disconnected and the clamp that secures the unit to the HVAC box was unbolted. Upon removal, everything was again carefully cleaned and new O-rings were utilized for installation of the new unit. I removed the pressure switch from the old unit and swapped it over. Behind the unit is the high pressure line and I also swapped out the O-ring in the connection adjacent to the high pressure port.
Once everything was reassembled, I installed my gauge set and vacuumed the entire system down to 25 inches. As the pump runs, you can actually see the water vapor venting from the pump as it is boiled out of the system by the vacuum. After running the vacuum pump for approximately 15 minutes, I closed the valves on my gauge set, shut down the pump, and let it set for around 15 minutes to determine if there were any leaks. The system held vacuum the entire time so I then removed the low pressure line from the Accumulator/Dryer and added 4 ounces of Ester Oil to the system.
The oil is distributed throughout the AC system and per the service manual you are supposed to drain and measure all the oil out of whatever component has been removed and then add that much back in, plus a little extra. I could not get any oil to drain out of the old Accumulator Dryer, which is supposed to have approximately 2 ounces of the total oil charge. On this basis, I gambled a little and decided to add 4 ounces of Ester Oil to the system. Too much oil is bad, too little oil is worse... so we'll see what happens.
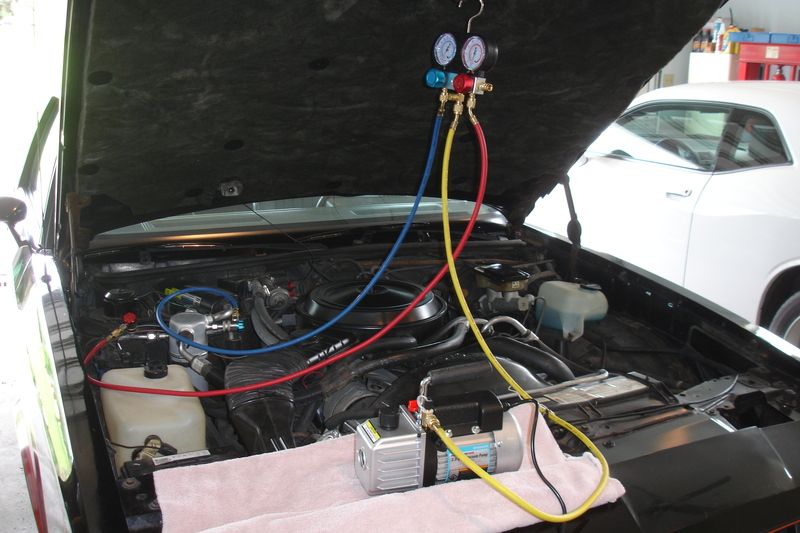

After adding the oil, I reconnected the hose, turned the vacuum pump back on and opened the valves on my gauges. This time, I allowed the pump to run for almost an hour to evacuate all the moisture from the AC system. After the hour was up, I again closed the valves on the gauges, turned off the pump, and again checked the system to ensure that it held vacuum. After 15 minutes with no movement whatsoever on the gauges, I started adding refrigerant through the low pressure port. This is done with the engine running and the AC turned on high. After the first can was almost in, I disconnected the pressure switch on the Accumulator/Dryer and jumpered it to engage the compressor for short duration runs. This helps draw refrigerant into the system and speeds up the process. After the second can was emptied, the system then had sufficient pressure to run on its own and the switch was reconnected.
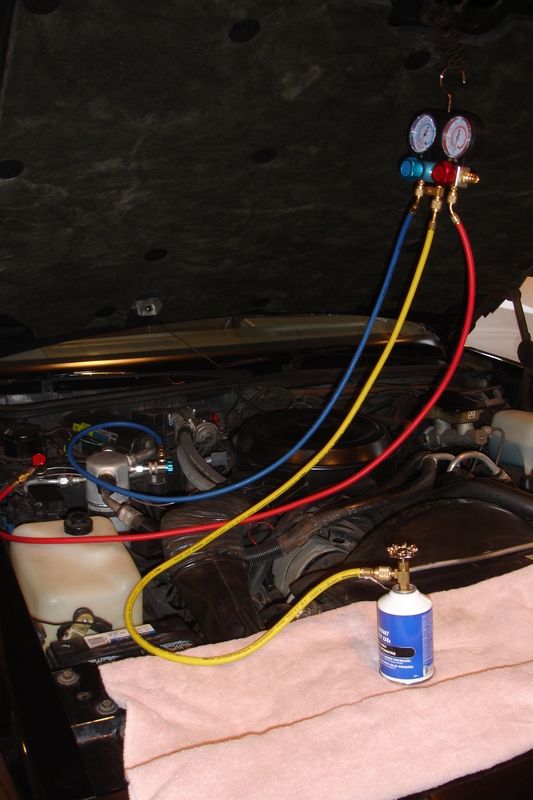
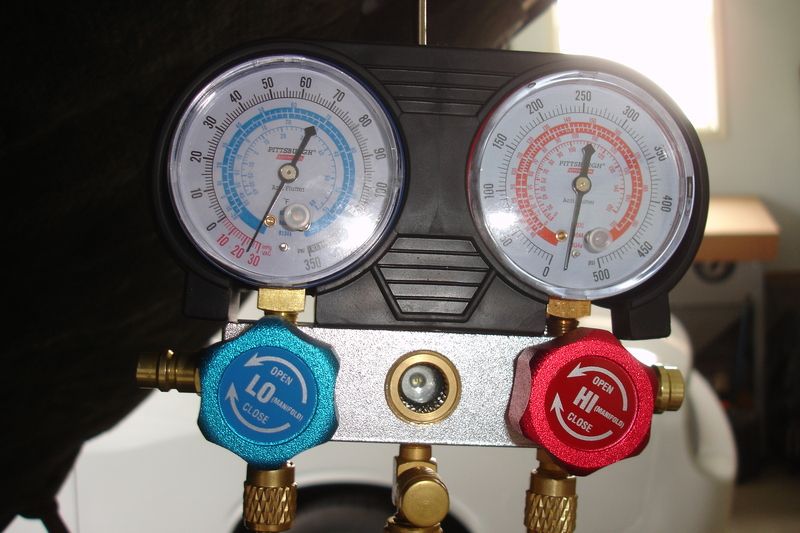
Generally speaking, in an R12 to R-134a conversion you install approximately 90% of the rated charge. The AC system in this car has its specifications printed on a decal and called for 3.25 lbs of R-12. This converted to just under four (4) twelve ounce cans of R-134a. As I was also going by system pressures, I utilized my gauge set and at 65 degrees (the temperature in my garage this afternoon) I was looking for around 30 psi on the low pressure side and 135 psi on the high pressure side. I ended up adding a bit more R-134a out of a fifth can to obtain the results I was seeking.
Utilizing a thermometer in the center vent, I had temps around 50 degrees. With the vehicle being stationary and no significant airflow through the condenser that was ok for starters. I will have to see how the system performs out on the road later this week. My only issue in a project that went very smooth was a leaky schrader valve in the high pressure port. Upon removing my gauge set, I immediately noticed a soft hissing sound. I tightened the valve, however, it continued to weep just a bit. Fortunately, installing the heavy plastic cap (after removing the adapter) stopped the leak for now. I will have to obtain a new valve and attempt to swap it out without losing all of my charge.
-
06-01-2015, 10:18 AM #2Giant Dicks Car Club

- Join Date
- Nov 2006
- Location
- Millerton, PA
- Posts
- 5,191
2005 Ram- 1978 Firebird

Any idea what size the connection is at the leaking Schrader? We've got a Schrader tool that allows us to change them under pressure without losing any charge.
-
06-01-2015, 10:21 AM #3Veteran

- Join Date
- May 2006
- Location
- Arizona
- Posts
- 12,557
I think you'll be happy with the results Jeff. I've converted about 5 of my old R12 systems over to 134 and they were all successful.
If there is any complaint, and it's small one, is that you might notice that sitting still for long periods of time (traffic or parking lot) with the AC running, that the temp blowing at the vents tends to warm up slightly, still cool, but not cold. This is because I always reused the original R12 condensor which I assume you did as well.
Because R12 is so much more efficient, the condensors didn't have to be. R134 condensors are much more efficient with more fins per inch to cool the charge because 134 just isn't as effective. You can switch to a 134 specific condensor on most classic cars if this bothers you, but I have found with all the conversions I've done, it's really not necessary, it blows cold enough to suit me.
-
06-01-2015, 05:10 PM #4Veteran
- Join Date
- Feb 2009
- Location
- Mansfield, PA
- Posts
- 22,146
Black & Blue- '02 WS.6 / '07 Suburban
Zach: I bought three (3) new valve cores at NAPA today. They appear to be identical to a tire valve as far as the installation tool is concerned. Would that work with your tool?
FBJ: I'll let you know how this works out. Just excited to have working AC in it and anything is better than nothing on a hot and humid day.
-
06-01-2015, 05:45 PM #5Giant Dicks Car Club
- Join Date
- Nov 2006
- Location
- Millerton, PA
- Posts
- 5,191
2005 Ram- 1978 Firebird
R-12 to R-134a Conversion
Yeah, the schraders are identical to the ones in a valve stem. It is the size of the actual tap on the line I'm interested in. Our tool is standard 1/4" flare, which is standard on residential ac systems, we've also got an adapter to go to 5/16", but I'm not positive I can make that work.
-
06-02-2015, 05:27 PM #6Veteran
- Join Date
- Feb 2009
- Location
- Mansfield, PA
- Posts
- 22,146
Black & Blue- '02 WS.6 / '07 Suburban
I just went out and tried it - the threaded nipple on the high pressure line is smaller. The tool just slips over top of it, so I toyed with the idea of trying to hold it tight to the nipple as it does have an o-ring seal. I held it on and backed the valve out about two turns and then I tightened it back down. Lo and behold, it stopped leaking! I had tightened it on Sunday, but never backed it out at all so apparently it was just hung up a bit. I will probably invest in the correct tool as that would be a handy thing to have for working on automotive AC if I ever encounter this issue again.
Thanks, Zach!
-
06-03-2015, 06:40 PM #7Giant Dicks Car Club
- Join Date
- Nov 2006
- Location
- Millerton, PA
- Posts
- 5,191
2005 Ram- 1978 Firebird
R-12 to R-134a Conversion
no problem, too bad it wasn't exact. leak fixed after tonight's test ride?
-
06-03-2015, 06:42 PM #8Veteran
- Join Date
- Feb 2009
- Location
- Mansfield, PA
- Posts
- 22,146
Black & Blue- '02 WS.6 / '07 Suburban
Seems good - everything works great as far as I can tell and no leaks that I can find. Just need a hotter day to really put the system to task.
-
06-03-2015, 06:59 PM #9Giant Dicks Car Club
- Join Date
- Nov 2006
- Location
- Millerton, PA
- Posts
- 5,191
2005 Ram- 1978 Firebird
R-12 to R-134a Conversion
it's coming soon. 80s at some point this week I heard
-
06-06-2015, 05:04 AM #10Veteran
- Join Date
- Feb 2009
- Location
- Mansfield, PA
- Posts
- 22,146
Black & Blue- '02 WS.6 / '07 Suburban
Brought the Monte back to the Beaver house and ran the AC all the way down to Montoursville last night (about an hour's drive). It blew nice and cold the whole way and seems to be working good. Only issue I had was once we pulled up on to the four lane, and settled into a 65 mph cruise, I could feel the compressor engaging and disengaging. Seemed to be short cycling, but it was only in the 70's and I had the system set on "bi-level" and "low". It felt like it improved as we drove, but no question that I can feel it operating. Around town and at lower speeds the compressor is not at all noticeable.

-
06-06-2015, 07:22 AM #11Veteran
- Join Date
- May 2006
- Location
- Arizona
- Posts
- 12,557
That sounds pretty normal to me Jeff. On the highway running the compressor at a faster speed, combined with the cooler ambient temps, it's not going to run for too long as the pressure switch cycles it back and forth at a much faster rate. Originally Posted by pajeff02

You can really feel these older compressors kick on and off too, especially the old giant A6 compressors that I generally use, but they pump like no other compressor. I've converted a couple of them to the "supposed" more effecient sanden compressor. Yeah they are less HP robbing and more gentle with the "on-off" cycle, but I also notice they don't pump as well as the old A6-er's and AC performance suffers a bit.
So it's a trade off, and one that I'm not willing to make anymore after trying both. So I stick with the A6, plus it just "looks right" under the hood of a classic anyway.Last edited by Firebirdjones; 06-06-2015 at 07:25 AM.
-
06-06-2015, 08:40 AM #12Veteran
- Join Date
- Feb 2009
- Location
- Mansfield, PA
- Posts
- 22,146
Black & Blue- '02 WS.6 / '07 Suburban
Good to know, FBJ. Had me a bit concerned last night, especially as our '87 Regal does not at all feel like that with the AC engaged.
-
06-09-2015, 04:06 PM #13Senior Member

- Join Date
- Feb 2006
- Location
- Orange County, NY
- Age
- 48
- Posts
- 2,693
always dirty- 2013 Ram 2014 Caddy ATS
Nice write up.
-
06-09-2015, 04:18 PM #14Veteran
- Join Date
- Feb 2009
- Location
- Mansfield, PA
- Posts
- 22,146
Black & Blue- '02 WS.6 / '07 Suburban
Thanks. It is a project that I have been meaning to tackle for quite a while now.


 Reply With Quote
Thread Information
Users Browsing this Thread
There are currently 1 users browsing this thread. (0 members and 1 guests)
Similar Threads
-
IN lbs to FT lBS Conversion
By SMWS6TA in forum General HelpReplies: 4Last Post: 09-24-2010, 02:28 PM -
Ram Air conversion?
By UKXK189 in forum Firebird / WS6Replies: 13Last Post: 06-28-2007, 09:40 AM -
Ls1 vs Lt4 conversion
By bandit-00 in forum Firebird / WS6Replies: 14Last Post: 10-24-2006, 07:26 PM -
FS: T56 conversion for LS1
By 1badchicken in forum Parts For Sale / TradeReplies: 1Last Post: 10-24-2006, 01:30 PM -
Conversion to Ram Air
By 2001bird in forum External EngineReplies: 0Last Post: 10-19-2006, 08:58 PM

Bookmarks