
Results 41 to 60 of 114
Thread: K-member swap and upgrades
-
02-28-2012, 06:00 PM #41Veteran


- Join Date
- Feb 2009
- Location
- Mansfield, PA
- Posts
- 22,146
Black & Blue- '02 WS.6 / '07 Suburban
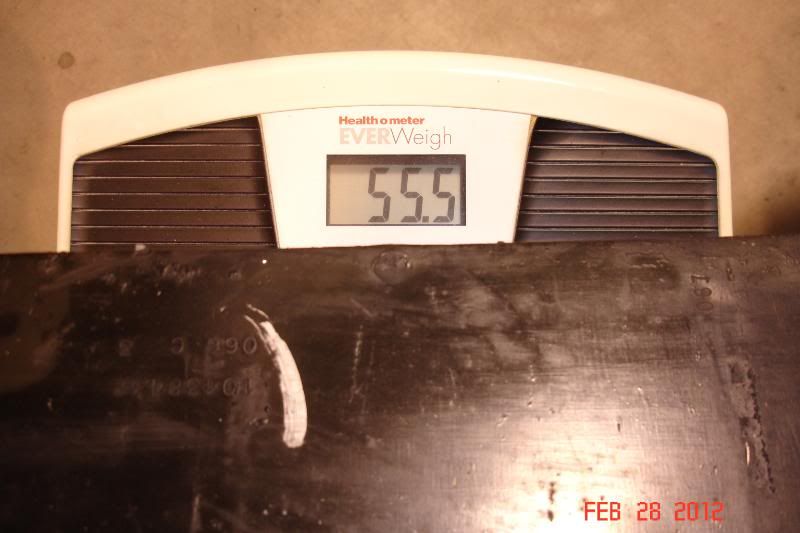
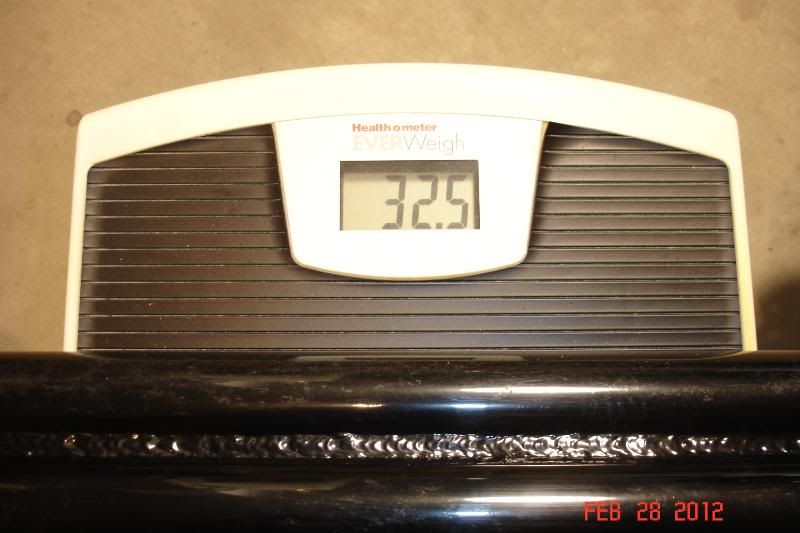
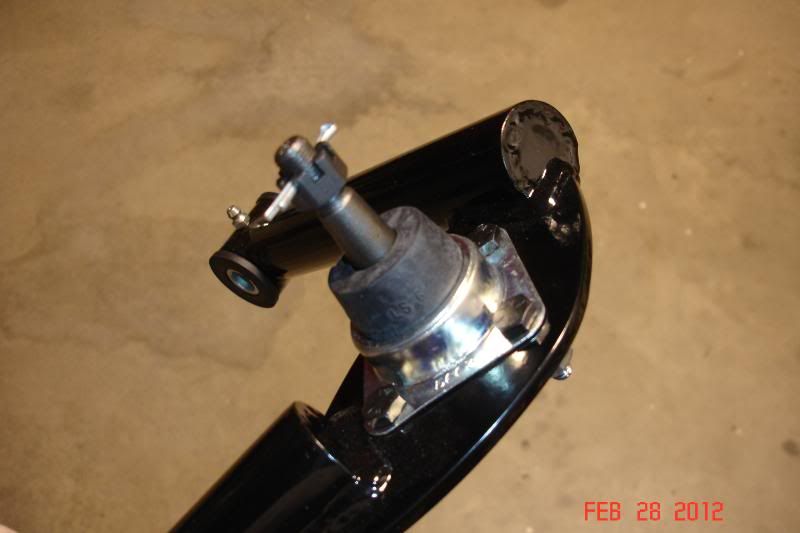
It was a little bit of everything in the garage tonight. I started by knocking out the lower ball joints and then unbolted the lower control arms from the K-member. After a few pics were taken, I then had to toss them on the scale to see the difference.
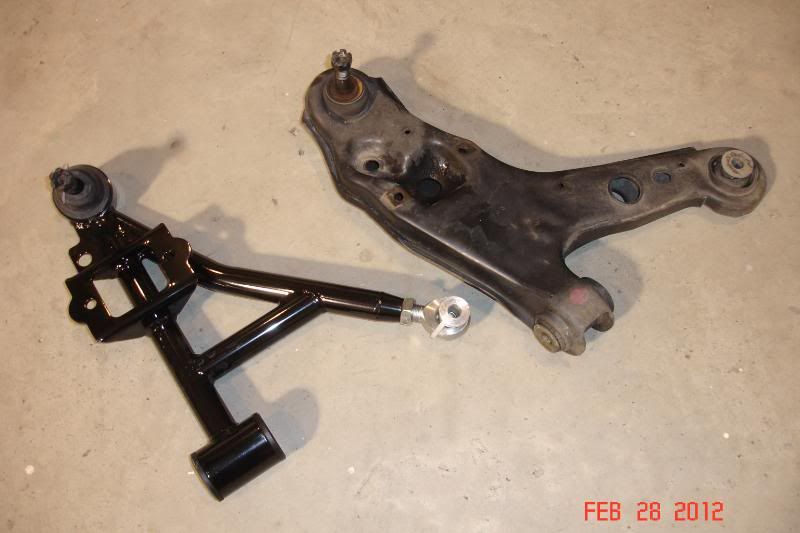
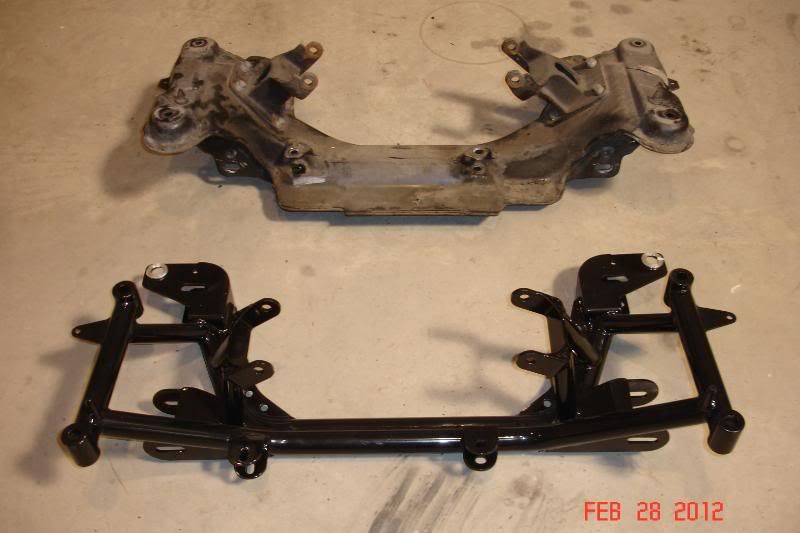
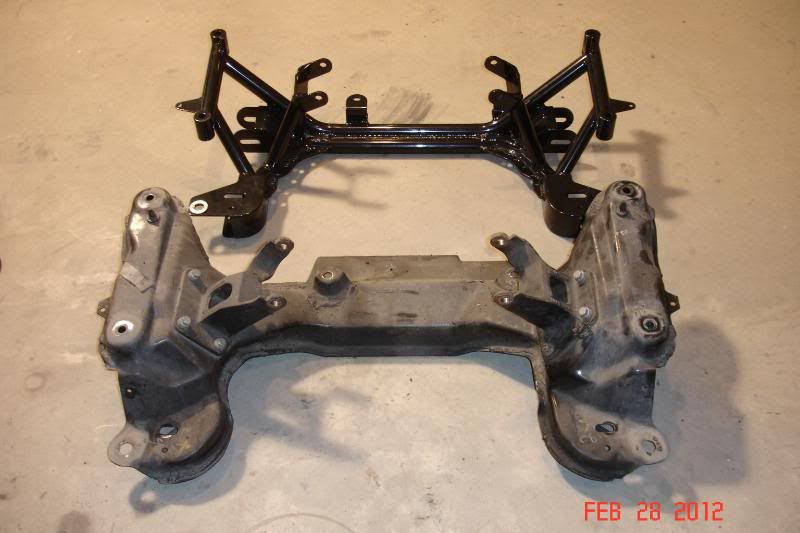
The stock K-member is a "chunky monkey" at 55.5 lbs. while the UMI piece came in at 32.5 lbs. -- a total difference of 23 lbs. with the added benefit of a lot more accessibility under the car once it is installed. Unfortunately, neither the stock lower control arm or UMI piece were heavy enough to register on my bathroom scale. There is a difference though and the UMI piece is again the lightweight.
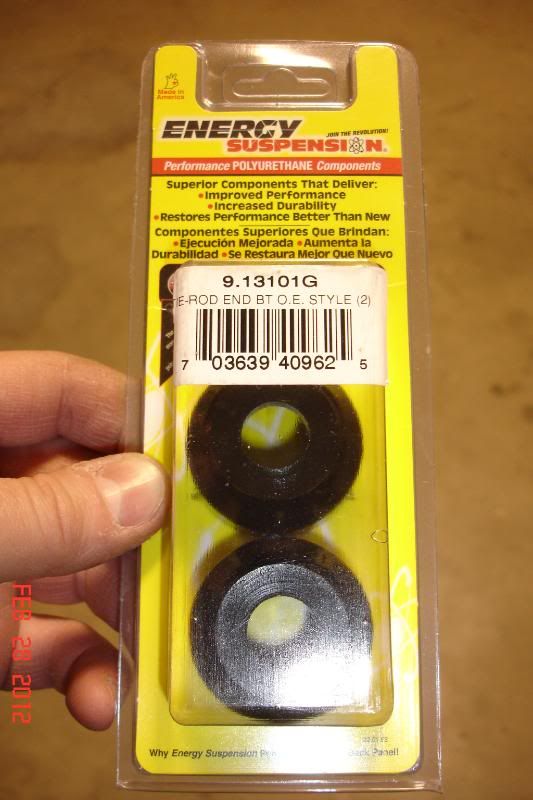
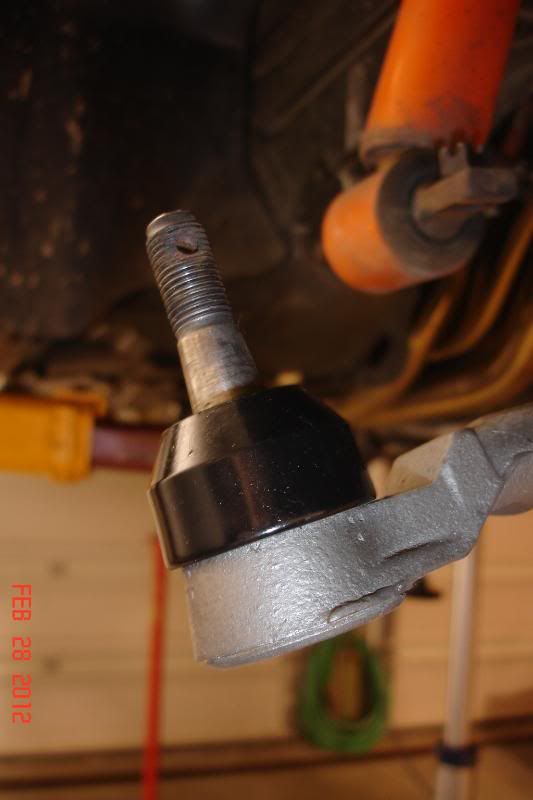
I then moved on to the outer tie rods. I noticed last summer that the boots were cracking and looking a bit weathered. While shopping for the upper ball joints on Advance Auto Parts website, I came across a listing for Energy Suspension poly boots that were direct fit replacements. After removing the stock boots by tapping them with a screwdriver and hammer from below, I added a bit of grease to the joint and installed the new boots. The fit was perfect and they should last quite a long time.

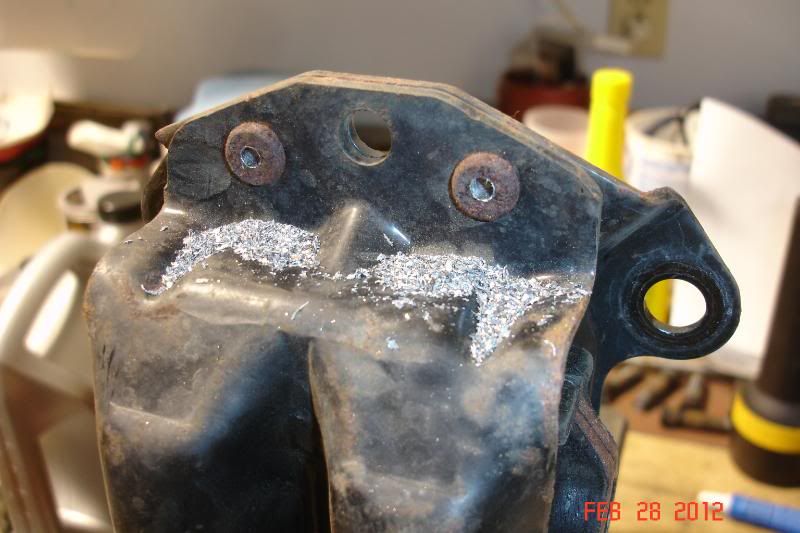
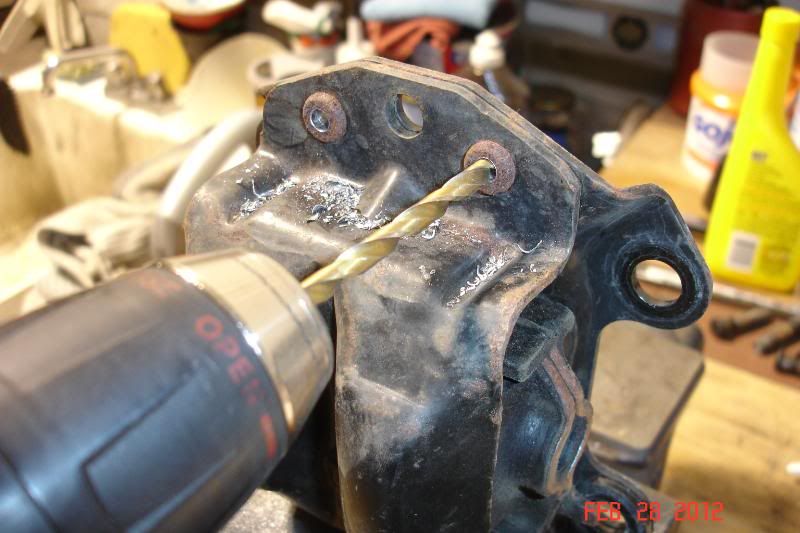
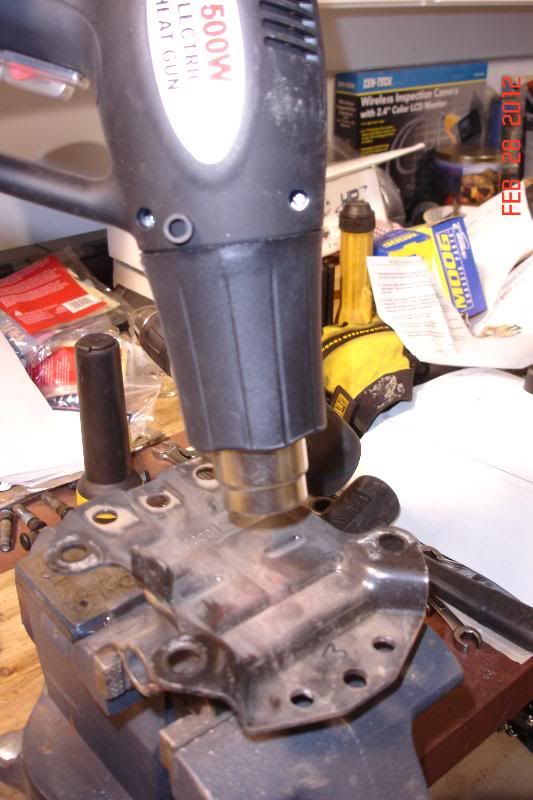
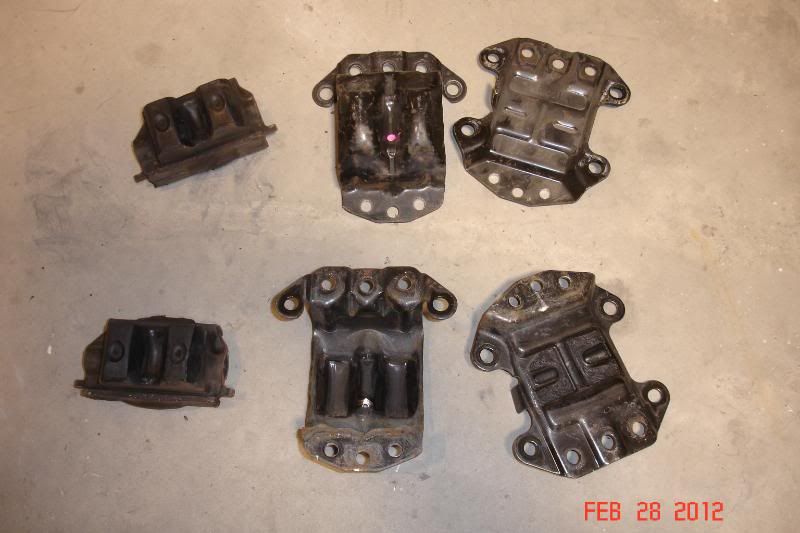
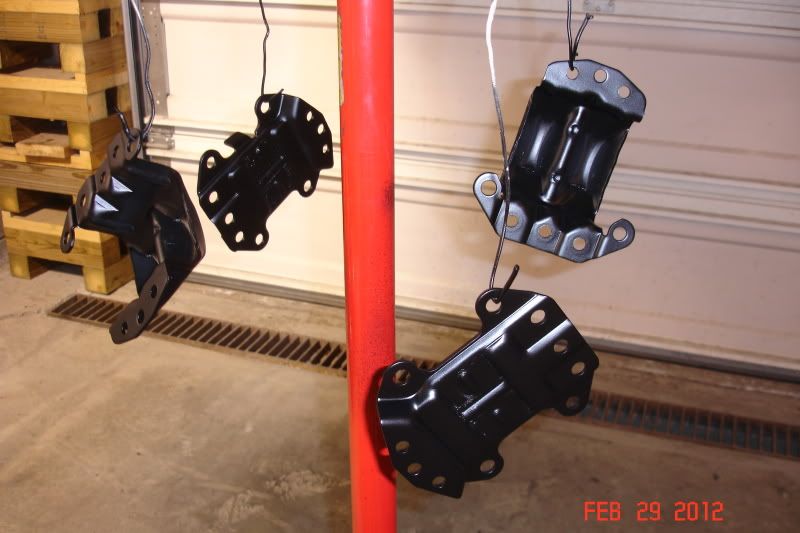
I then tackled the engine mounts and began by center punching the rivets on each mount. Once a starter hole was drilled through each of the two (2) rivets, I began stepping up the drill bit size until a final diameter of 3/8" was obtained. The other side of the mount has three (3) open style rivets and I found that 3/8" was not quite enough to allow them to break free. I drilled one size larger with a lettered bit and then wedged the mounts apart -- again with a screwdriver and hammer. The rubber is bonded to the shell and the instructions call for the use of a torch to break the bond. I really did not want to stink and smoke up my garage so I went at them with the highest setting on my heat gun and they quickly released.
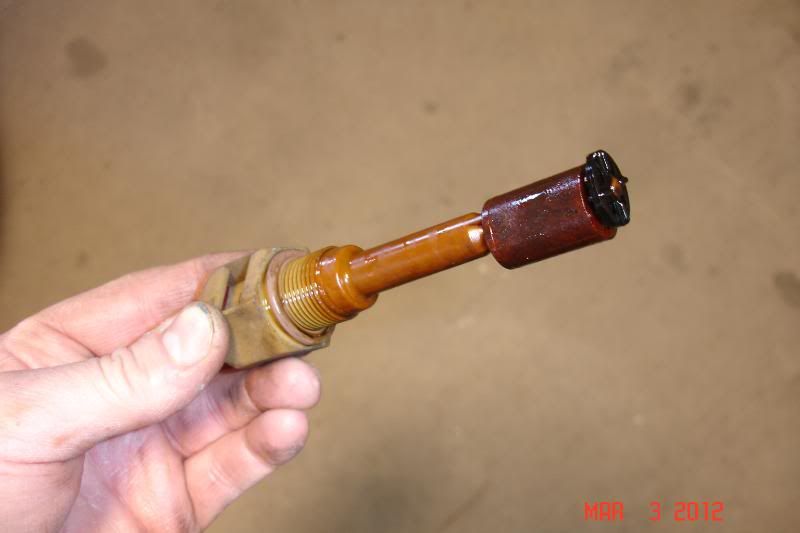
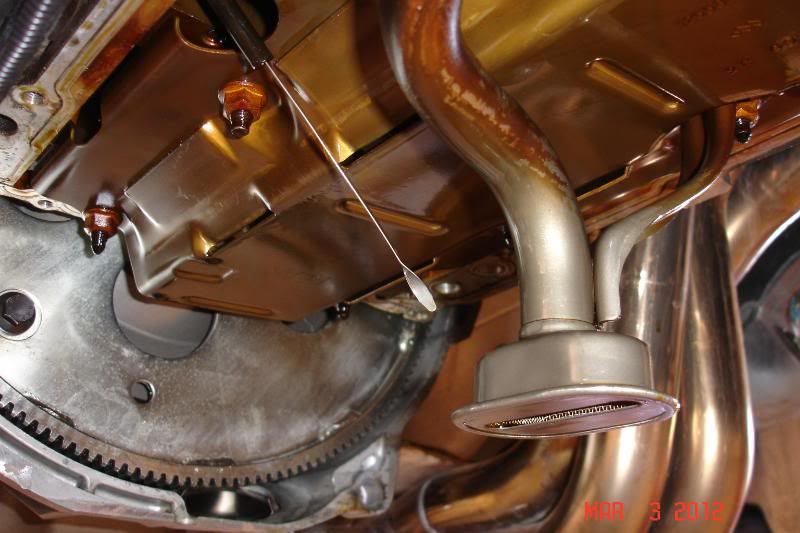
The final two projects of the night were removing the plastic shield from the passenger side of the block in preparation for dropping the oil pan and changing the gasket. I have to remove the filter and will then unbolt the driver side shield as well. As previously posted, the UMI upper arms do not come with balljoints installed. I ordered a set of Moog joints from Advance which although pricey, are American made and should last the life of the car. The new joints bolt in place and there is a good orientation picture in the UMI instructions to ensure that you do it right.
-
02-28-2012, 06:08 PM #42None Shall Pass


- Join Date
- Jan 2010
- Location
- East of Cleveland, Ohio
- Posts
- 3,827
Black- 99 WS.6 - Modified
Looking good Jeff!
-
02-28-2012, 06:26 PM #43Veteran
- Join Date
- Feb 2009
- Location
- Mansfield, PA
- Posts
- 22,146
Black & Blue- '02 WS.6 / '07 Suburban
Thanks Walt. Really enjoying this one and so far everything seems to be going well.
-
02-28-2012, 06:30 PM #44None Shall Pass
- Join Date
- Jan 2010
- Location
- East of Cleveland, Ohio
- Posts
- 3,827
Black- 99 WS.6 - Modified
Things always are more enjoyable when you don't have to fight things. Quite a dramatic difference in weight too! I suspect it will be noticeable in the ride.
-
02-28-2012, 08:47 PM #45ʢ ൧ ൨ ൩ ൪ ൫ ൬ ൭ ൮Ր Ց Ւ Փ

- Join Date
- Feb 2009
- Location
- Pittsburgh
- Posts
- 9,963
White- 2008 Hummer H3
Awesome! Thanks for the tip on the tie boots!
-
02-29-2012, 06:44 AM #46Member

- Join Date
- Oct 2005
- Location
- Arkansas
- Posts
- 1,235
2000 Camaro SS- '02 Z28 parting-out
It may be to late this time. The next time you need to weigh something that is a few pounds but not enough to show up on the scales, weigh yourself holding the part. Then weigh yourself not hold the part and take the difference. Originally Posted by pajeff02

-
02-29-2012, 07:06 AM #47Spaz is My Mentor


- Join Date
- Feb 2009
- Location
- Florida Man Status Acheivement
- Posts
- 11,759
Navy Blue Metallic- 98 T/A w/ mods, 00 FBVert
Jeff on the R&P, I'm trying to make mine last till I do this mod, but when the time comes, do you think it will be easier to mount the R&P on the UMI K member while on the ground or is there an issue that I'm not seeing yet that would make me mount it differently?
-
02-29-2012, 08:32 AM #48Veteran
- Join Date
- Feb 2009
- Location
- Mansfield, PA
- Posts
- 22,146
Black & Blue- '02 WS.6 / '07 Suburban
Originally Posted by blackcar
That's how we weigh our fat and furry cat. I was hoping to get pics is why I didn't do that last night. Rather than borrowing my parents' dial scale, I'll jump on the digital scale and do some math. Thanks!
I'll just snake mine into place under the car when the new K-member goes in. I was just being lazy so I wouldn't have to disconnect the lines and make a mess in the process. The only difference will be that the driver side bolt for the rack will be installed from below, rather than above this time. Probably do the same with the rear lower control arm bolts too. Originally Posted by SMWS6TA
-
02-29-2012, 05:59 PM #49Veteran
- Join Date
- Feb 2009
- Location
- Mansfield, PA
- Posts
- 22,146
Black & Blue- '02 WS.6 / '07 Suburban
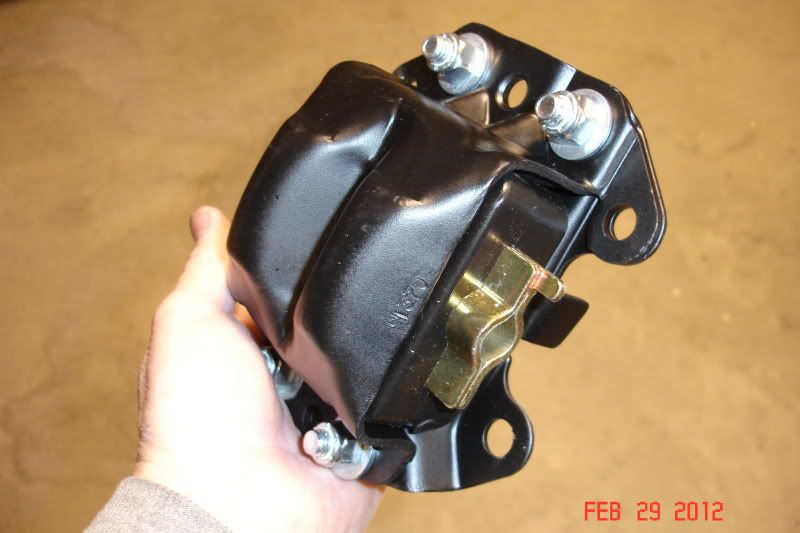
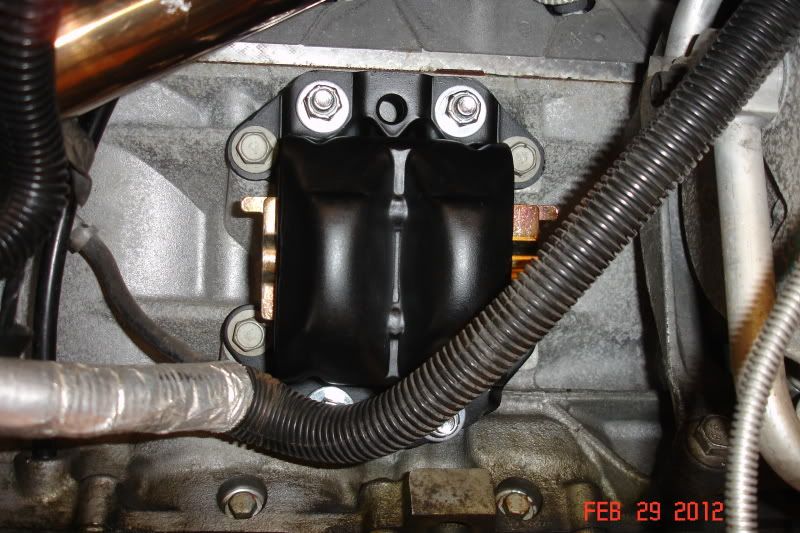
I played with the motor mounts for most of the evening and finished swapping out to a set of Prothane poly inserts. I couldn't resist dropping the clamshells in the blast cabinet before painting them. The instructions are quite clear and you simply need to make sure that the tabs on the inserts are oriented correctly before bolting the two halves back together. The instructions call for 30 ft.lbs. on the bolts, however, I read a recent article in GMHTP where this was deemed too much as they snapped their bolts. I therefore snugged mine down to 25 ft.lbs. and called it good. The mounts were then re-installed onto the engine and torqued to 37 ft.lbs. There was some minor interference with the driver side heat shield on the clamshell bolts, however, a little bit of a bend and it went back on the studs and the nuts were torqued to 89 in.lbs.

-
02-29-2012, 06:48 PM #50Junior Member

- Join Date
- Jan 2010
- Location
- Lake In The Hills IL
- Posts
- 78
black- 2000 Z28
Damn!! Those look good!!!
-
02-29-2012, 06:51 PM #51Veteran

- Join Date
- Oct 2008
- Location
- Wherever life takes me
- Posts
- 12,526
Red- 02 35th LE Camaro SS
Jeff doesn't do anything less than 110%, that's damn certain.
-
02-29-2012, 06:56 PM #52Veteran
- Join Date
- Feb 2009
- Location
- Mansfield, PA
- Posts
- 22,146
Black & Blue- '02 WS.6 / '07 Suburban
 I just try to do things right the first time. Thanks guys!
-
02-29-2012, 07:06 PM #53Veteran
- Join Date
- Oct 2008
- Location
- Wherever life takes me
- Posts
- 12,526
Red- 02 35th LE Camaro SS
You mean you read and do your homework and take the advice given on this forum? Nonsense
I actually hate coming into any of your threads to be perfectly honest. It makes me want to add even more to my car every time. First rotors and now this. Jeff, please, for the love of God, do NOT drop in a 408
-
02-29-2012, 07:09 PM #54Veteran
- Join Date
- Feb 2009
- Location
- Mansfield, PA
- Posts
- 22,146
Black & Blue- '02 WS.6 / '07 Suburban
Only if the 346 goes "poof" on me.
-
02-29-2012, 08:36 PM #55Spaz is My Mentor
- Join Date
- Feb 2009
- Location
- Florida Man Status Acheivement
- Posts
- 11,759
Navy Blue Metallic- 98 T/A w/ mods, 00 FBVert
What I hate is seeing how supper clean his car is. Makes me wonder if he ever drives it.
-
03-01-2012, 08:36 AM #56Veteran
- Join Date
- Feb 2009
- Location
- Mansfield, PA
- Posts
- 22,146
Black & Blue- '02 WS.6 / '07 Suburban
 A quarter mile at a time for the most part.
-
03-01-2012, 11:25 AM #57Spaz is My Mentor
- Join Date
- Feb 2009
- Location
- Florida Man Status Acheivement
- Posts
- 11,759
Navy Blue Metallic- 98 T/A w/ mods, 00 FBVert
Jeff,
I know you aren't finish yet but this needs to be sticky!!!!
-
03-01-2012, 05:18 PM #58Veteran
- Join Date
- Feb 2009
- Location
- Mansfield, PA
- Posts
- 22,146
Black & Blue- '02 WS.6 / '07 Suburban
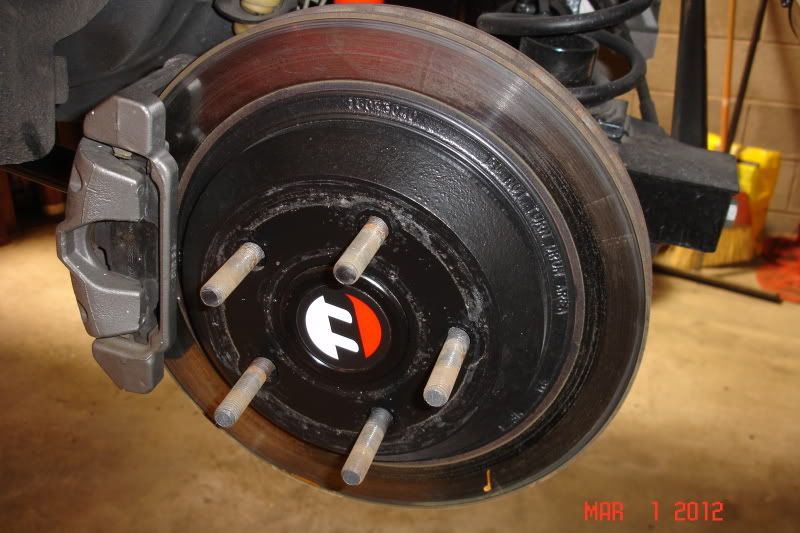
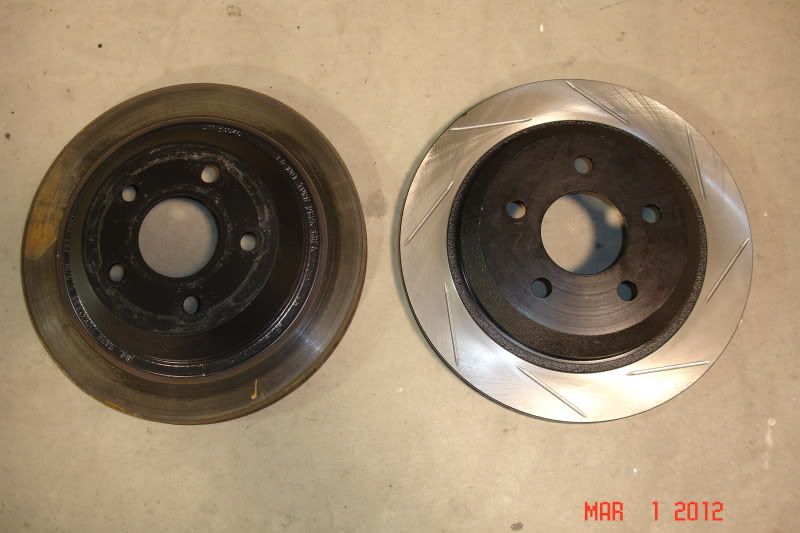
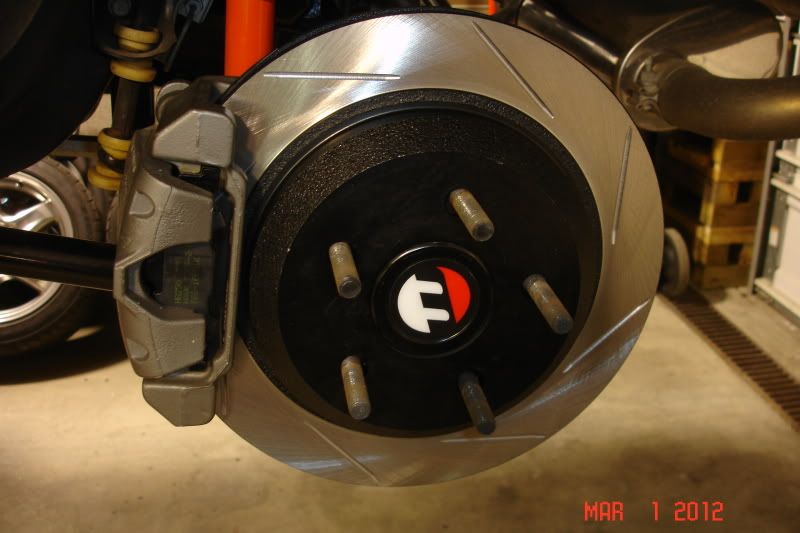
Moved to the back of the car this evening and played with the brakes. My next step up front is to remove the oil pan for the gasket swap, but I want to do that all in one shot so I'm saving it for this weekend. I unpacked the R1 Concepts rotors and they appear to be quality pieces. Comparing them to the stockers they are certainly much nicer and the e-coating on the hats has both good coverage and adhesion. The rotors are not marked, and there were no instructions in the boxes, so I had to do a little on-line research on how to install them. Since the internal cooling fins are straight, rather than curved, my understanding is that they can be mounted in either direction. The rotors come as a set, so the slots will run identical on both sides of the car no matter which direction they are installed in. I tried them both ways and liked the look that you see in the last pic best. This is the stock rear rotor with a set of unknown pads that came with the car when we purchased it:
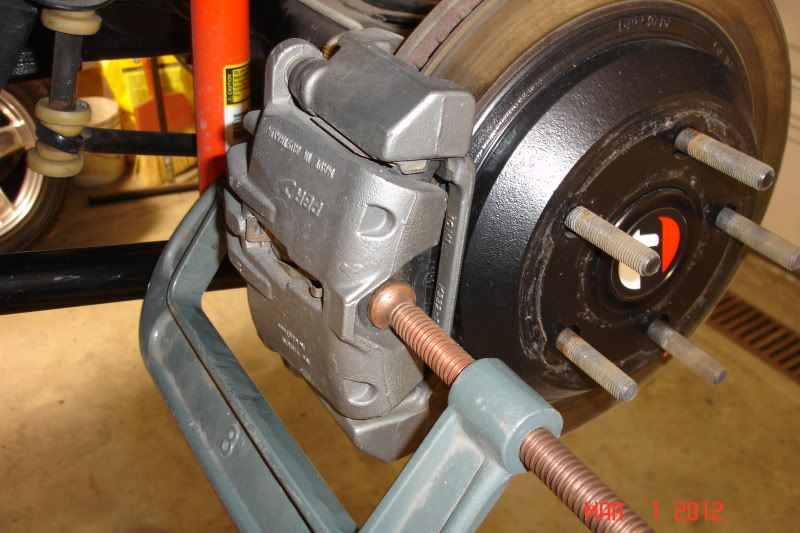
Since I had previously serviced my calipers and lubed the pins with synthetic caliper grease, I left the pins intact and unbolted the caliper bracket from the backing plate. However, before removing the bolts, a large c-clamp was utilized to compress the piston. My brake system was drained when a vacuum cap let go on an open front line, so there was no need to pop the cap on the reservoir. The bolts are 15mm and once removed the caliper was hung from a wire. Never allow a caliper to hang from the hose -- even though I am also replacing the hoses with braided lines, I could not bring myself to let them hang free during the swap. Old habits die hard...
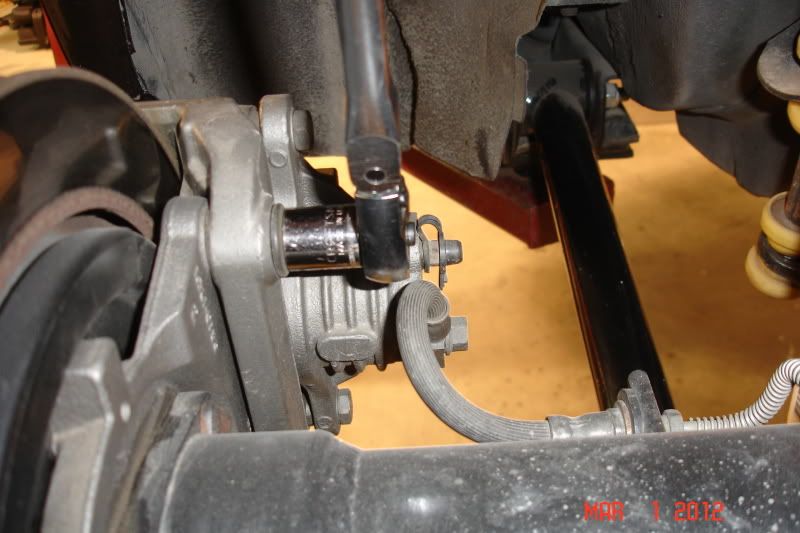
Once the calipers are free, the existing pads are easily popped out and the new ones installed. Normally, you need to use spray brake cleaner and sometimes a wire brush to clean things up. Since our car didn't see a lot of highway miles last year, everything was still pretty clean so I was able to set the new pads in place without messing around. I elected not to apply grease to the slides or back of the pads -- to me, this just attracts dirt and grime. I have never had an issue with squeaky pads or rust on the Trans Am. The old rotors were removed and the new ones sprayed down with brake cleaner and blown off to remove any oil or manufacturing grime before being installed over the studs. Once the new rotor was installed, the caliper bracket was slipped in place and the bolts threaded in with Blue Loc-Tite and then torqued to 74 ft.lbs.
-
03-04-2012, 07:03 PM #59Veteran
- Join Date
- Feb 2009
- Location
- Mansfield, PA
- Posts
- 22,146
Black & Blue- '02 WS.6 / '07 Suburban
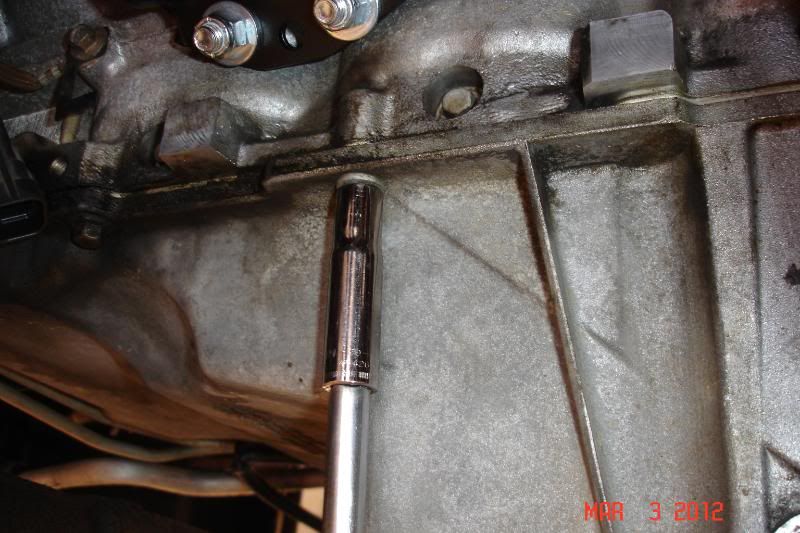
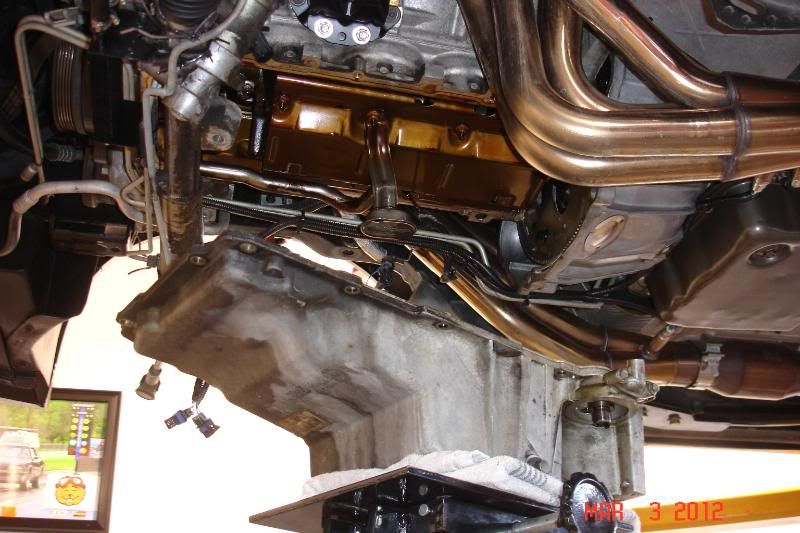
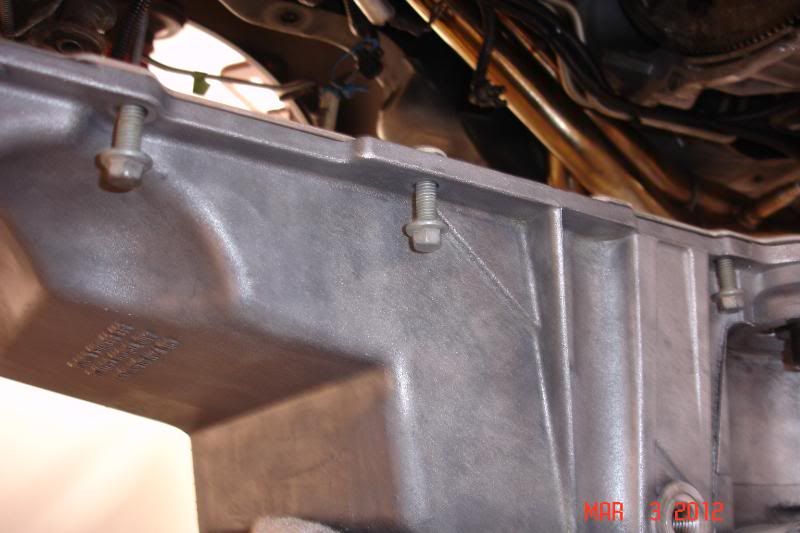
Made a lot of progress over the weekend and the K-member is now bolted in place. I began by dropping the oil pan Saturday morning in order to swap out the gasket. The engine has weeped oil since we bought the car and although it wasn't even to the point of a drip, I have wanted to fix it. The pan is secured to the engine by 10mm bolts around the perimeter with the very back bolts being quite long as they extend into the rear cover. Also, there are two 13mm bolts at the very back of the pan that attach the transmission bellhousing to the oil pan. In order to drop the pan, there is one clip bolted to the front passenger side of the oil pan rail that secures the transmission cooler line. After this is removed, and since the K-member is out of the car, it is very easy to lower the pan and work it back from the steering rack to drop it out from under the engine.
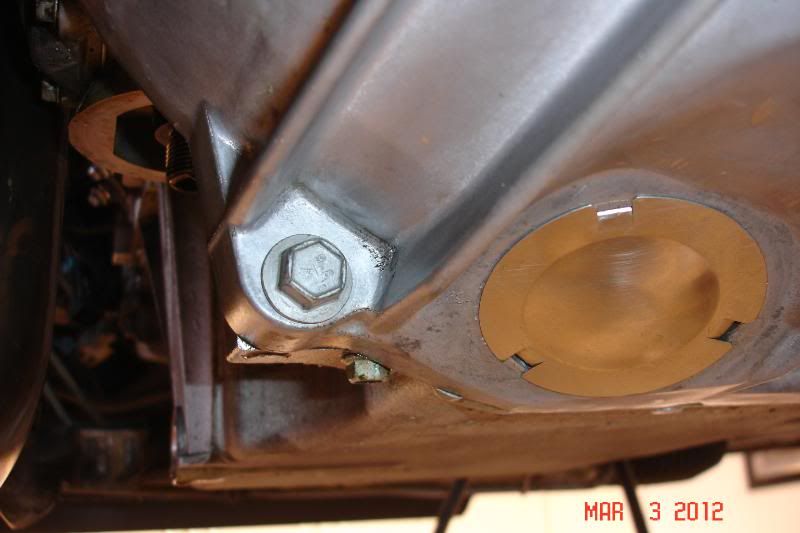
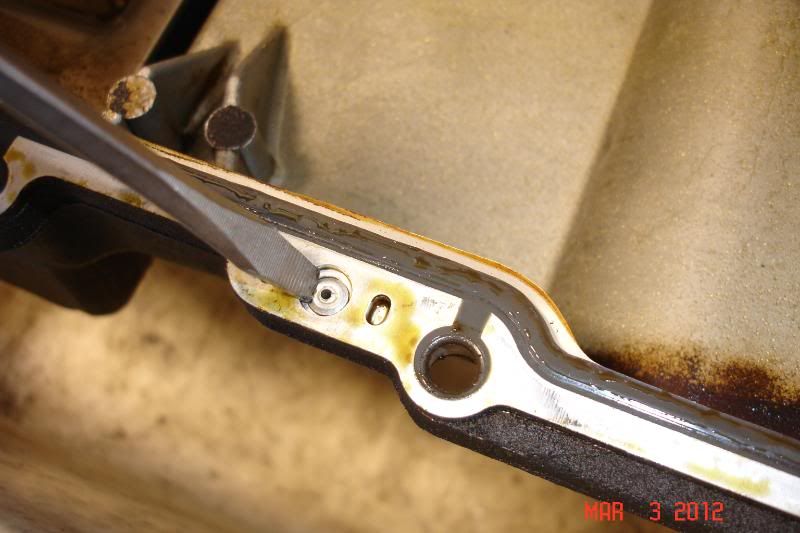
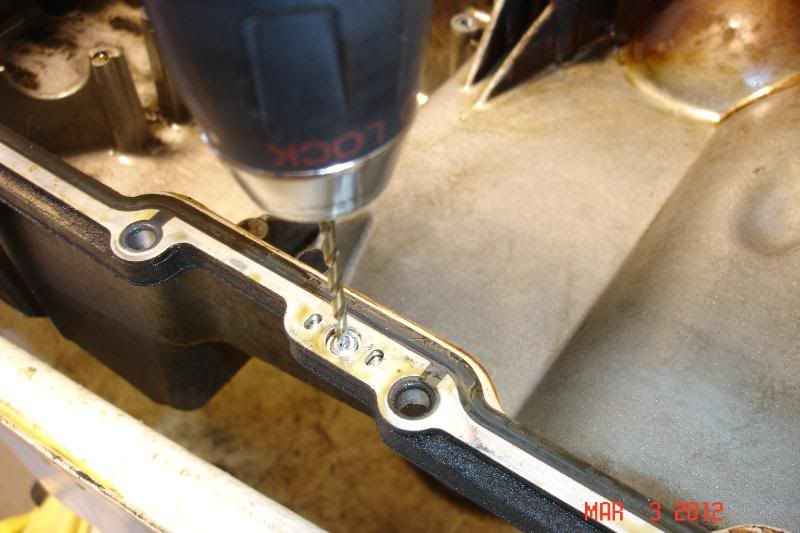
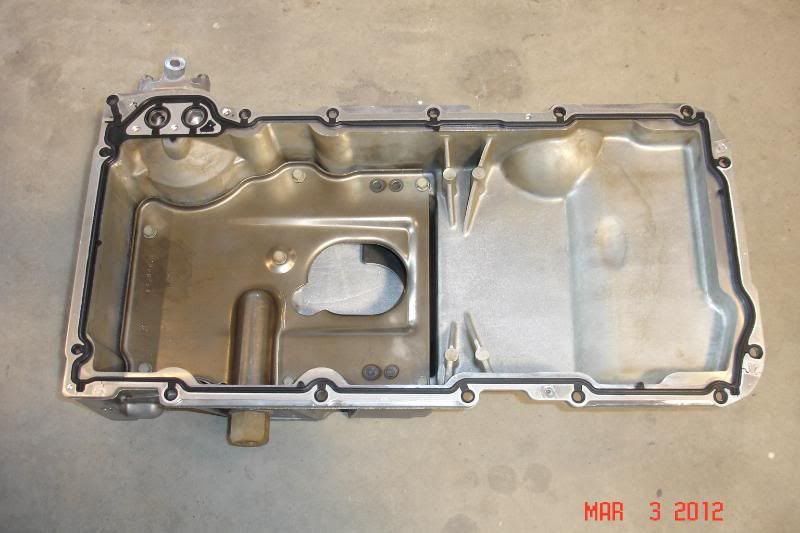
The factory oil pan gasket is attached to the oil pan by two small rivets that must be drilled out. Upon installing the new gasket, the service manual states that these rivets do not need to be replaced. I also unbolted the baffle and remove the oil level sensor in order to properly clean the oil pan. This started with a trip through the parts washer and then a final wash down with spray brake cleaner followed by compressed air. All the bolts were washed in lacquer thinner and then scrubbed with a small brass brush before also being final washed before re-installation. The oil level sensor is sealed by an O-ring and is torqued in place to 115 in.lbs., followed by the baffle with just a small dab of Loc-Tite on the threads of each bolt before torquing them to 106 in.lbs.
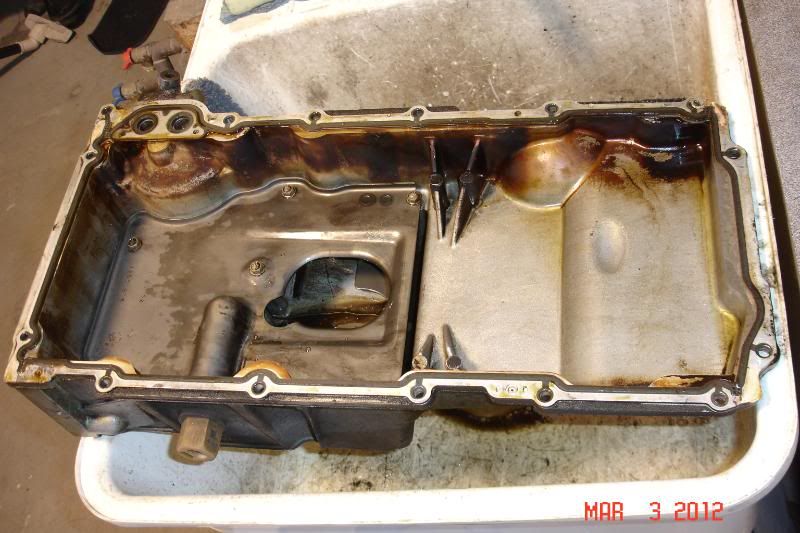
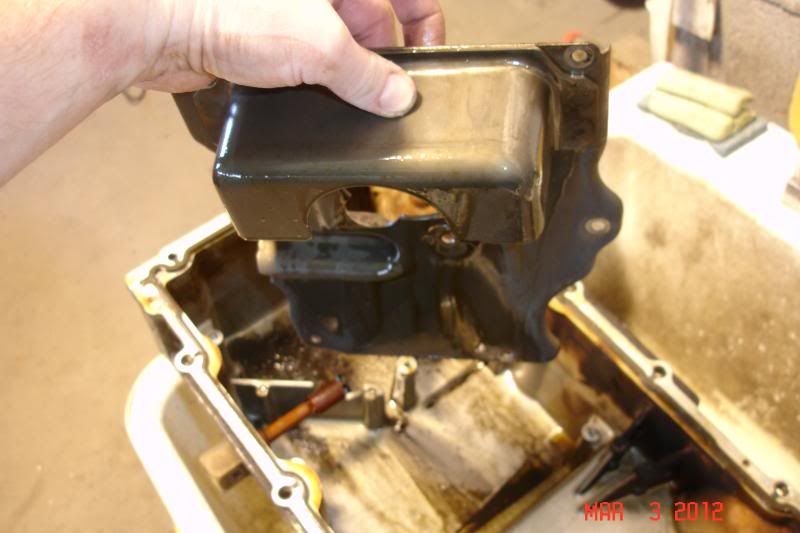
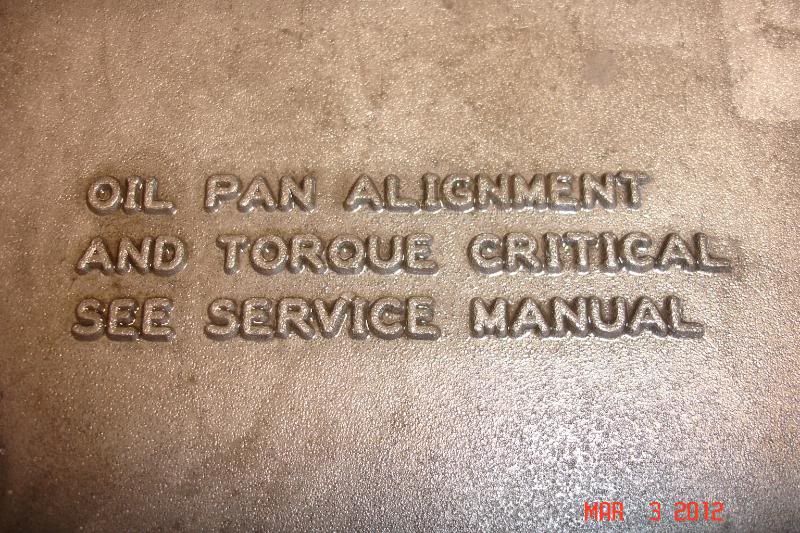
With the oil pan off the car, you can easily see the bolt which retains the pickup tube to the oil pump. Unlike the old school SBC, with the oil pump running off the distributor shaft, the LS1 oil pump is driven off the front of the crank and a long pickup tube is required. Also, the oil pan is an integral part of the engine structure and must be properly installed so that it is flush with the back of the engine.

-
03-04-2012, 07:17 PM #60Veteran
- Join Date
- Feb 2009
- Location
- Mansfield, PA
- Posts
- 22,146
Black & Blue- '02 WS.6 / '07 Suburban
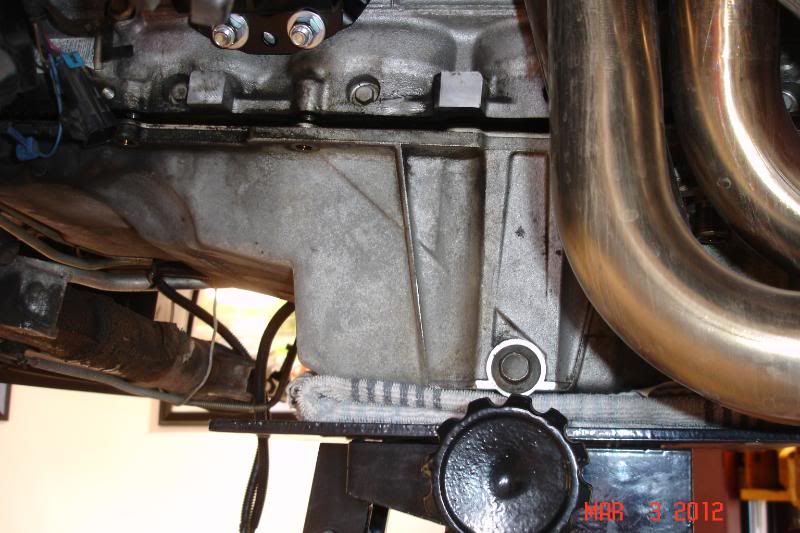
While the oil pan was off, I carefully cleaned around the perimeter of the block and also wiped down the pickup tube and baffle that mounts to the main caps. There was very little debris in the pickup tube, so I cleaned the screen first with suction from the Shop Vac and then liberally rinsed it down with spray brake cleaner. Once everything was clean, I then set the new gasket in place on the pan and inserted a couple of bolts through each side. Before installing the pan, a dab of gasket sealer must be applied to all four corners of the engine block where the front and rear covers attach. There is a small gap in each of these areas that must be sealed in this manner to prevent oil leaks. The gasket held the bolts in place and once the oil pan was back in position under the engine it was very easy to thread the first few bolts into the block to retain the pan while the remaining bolts were installed.
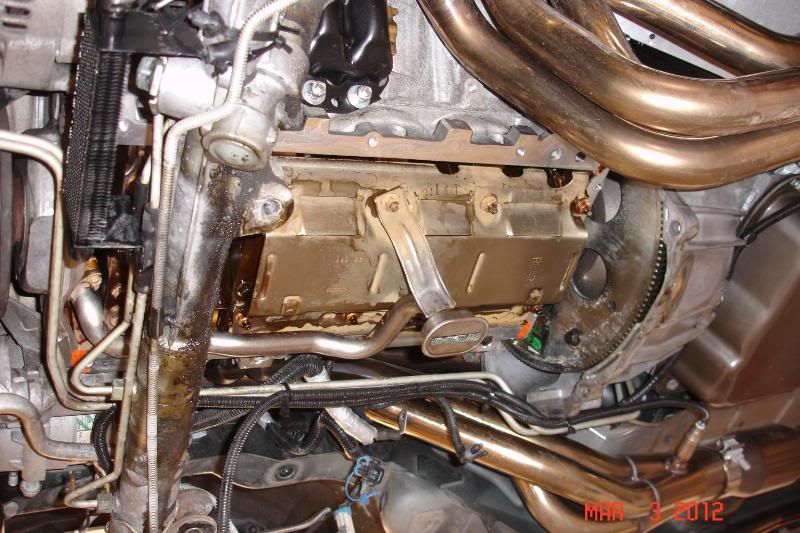
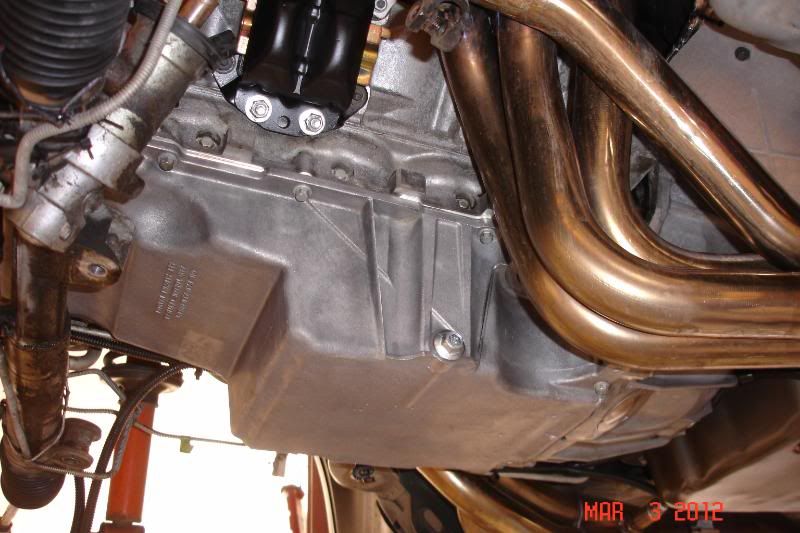
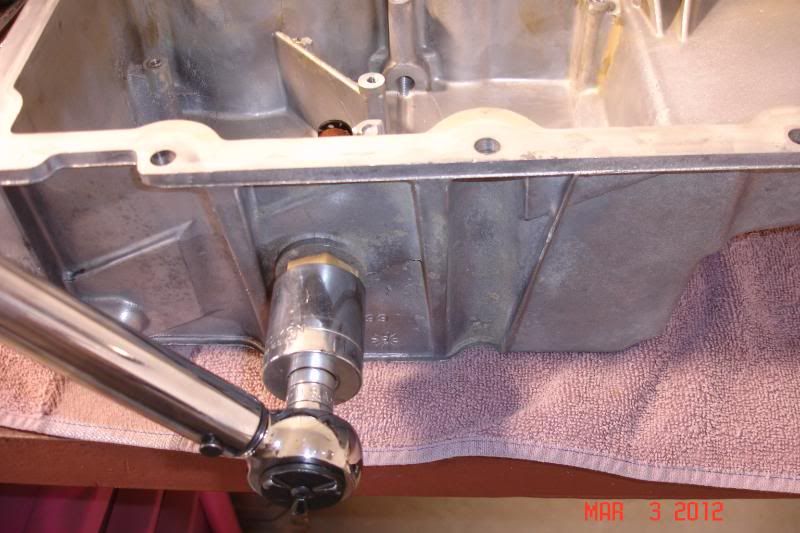
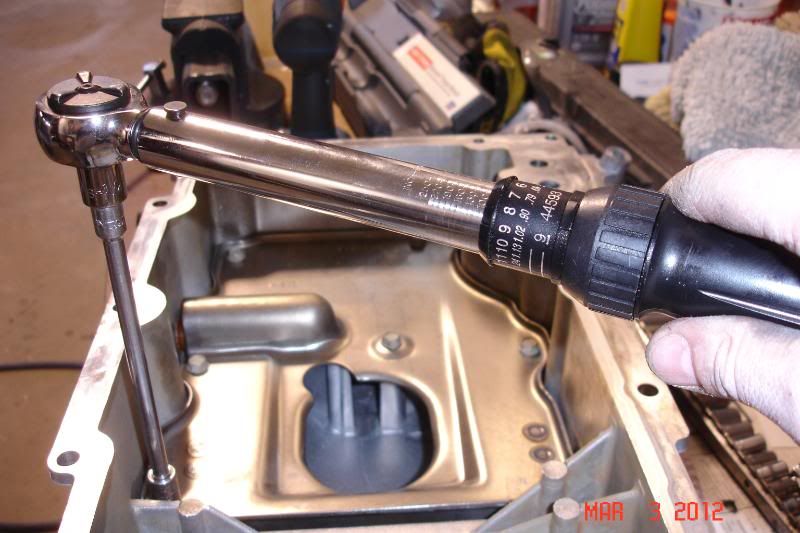
I loosely installed all the bolts and then used the bottom bellhousing bolts to pull the pan backwards. The service manual calls for the use of a straight edge, however, since my transmission is attached to the engine this was not possible and I had to use the face of the bellhousing as my reference. The bellhousing bolts were then loosened slightly while the oil pan rail bolts were tightened in steps to 18 ft.lbs., the very back rail bolts (longer bolts that thread into the rear cover) are only torqued to 106 in.lbs., followed by torquing both bellhousing-to-oil pan bolts to 18 ft.lbs.
It's getting late, so I'll have to finish the writeup on this weekend's work tomorrow...Last edited by KahanaReef; 04-03-2012 at 05:31 PM.

 Reply With Quote
Thread Information
Users Browsing this Thread
There are currently 1 users browsing this thread. (0 members and 1 guests)
Similar Threads
-
NEED HELP!! LS1 swap, HP upgrades
By spoonman4 in forum General HelpReplies: 13Last Post: 10-25-2013, 06:58 PM -
what upgrades should i do?
By Talon_II in forum Firebird / WS6Replies: 11Last Post: 03-04-2011, 11:26 AM -
Wanted: LS1 Swap K-Member 3rd Gen
By HP52TA in forum Parts Wanted / TradeReplies: 0Last Post: 11-10-2010, 06:44 PM -
Need help with some upgrades for an a4
By 02_WS6 in forum Automatic TransmissionReplies: 12Last Post: 04-17-2007, 07:49 PM

Bookmarks