
Results 21 to 35 of 35
Thread: Winter Mods
-
12-26-2010, 05:25 AM #21expensive tires


- Join Date
- Mar 2006
- Location
- phoenix
- Posts
- 1,951
white- 04 2500 4x4 crew cab
And for emissions, the systems aren't ready to be checked until that light comes back on. Emissions won't let you complete test until all systems are ready. I tried to cheat and clear the codes in the parking lot. I was told to let it get ready and return. SO, I had to fix, and return. Originally Posted by Packy


-
12-26-2010, 06:03 PM #22Veteran

- Join Date
- Feb 2009
- Location
- Mansfield, PA
- Posts
- 22,146
Black & Blue- '02 WS.6 / '07 Suburban
Originally Posted by BashamWS6
Yes, I had to extend the wiring -- just don't recall by how much.Last edited by pajeff02; 12-26-2010 at 06:07 PM.
-
12-26-2010, 06:24 PM #23Spaz is My Mentor


- Join Date
- Feb 2009
- Location
- Florida Man Status Acheivement
- Posts
- 11,759
Navy Blue Metallic- 98 T/A w/ mods, 00 FBVert
Current Winter Mods planned:
Install Hotchkins Springs - CHECK Did them today
LS6 Valley Tray + Catch Can + New Knock Sensors - Jan
Income Tax - New wheels and tires
-
12-26-2010, 06:53 PM #24Impounded
- Join Date
- Apr 2010
- Location
- IN
- Posts
- 2,148
great...more effort required Originally Posted by pajeff02
-
12-26-2010, 07:26 PM #25Slow'er'Ass

- Join Date
- Aug 2005
- Location
- Thornton, CO
- Posts
- 23,773
Red Tint Jewelcoat- 2008 Trailblazer SS
If I still have it in July....I will not be selling. Originally Posted by BashamWS6

I had someone call today on it...talked for 40 minutes. He has cash in hand, and is going to start working out shipping.
-
12-27-2010, 07:26 AM #26Member

- Join Date
- Jul 2010
- Location
- Kearny NJ 07032
- Posts
- 256
sunset orange metallic- 2002 T/A convertible
Snowtires!!

-
12-27-2010, 03:41 PM #27Impounded
- Join Date
- Apr 2010
- Location
- IN
- Posts
- 2,148
Well glad to hear...but shame to see it go Originally Posted by Mr. Luos
-
12-27-2010, 05:28 PM #28;)

- Join Date
- Apr 2001
- Location
- Surf City, NC
- Posts
- 2,499
Black/Screaming Yellow- 99 S/C TA WS6 & 04 Cobra
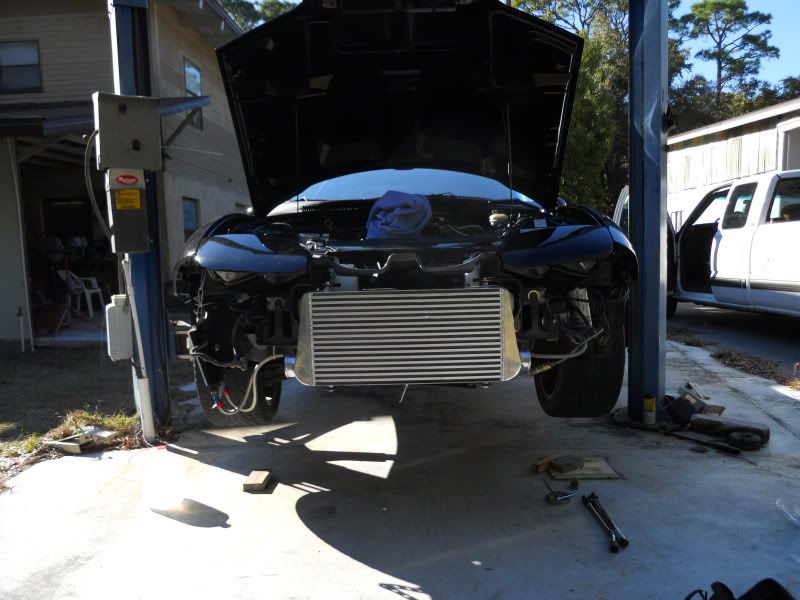
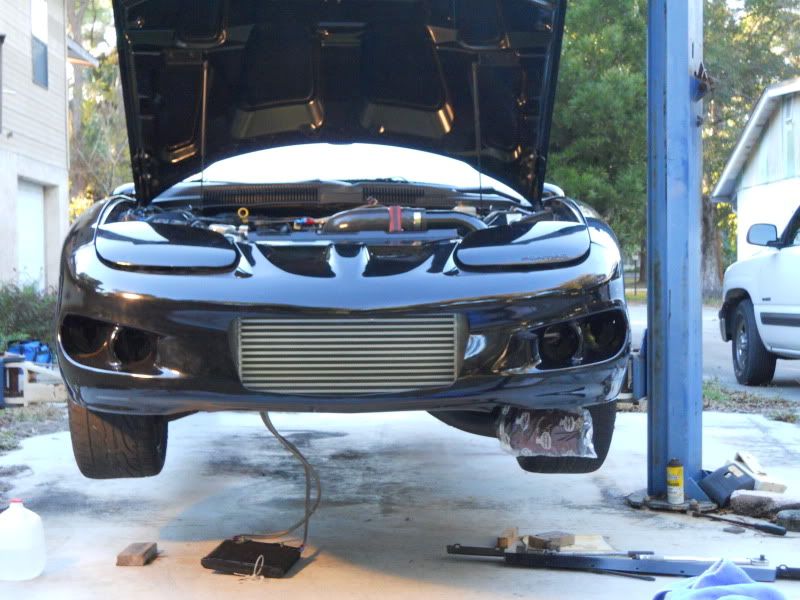
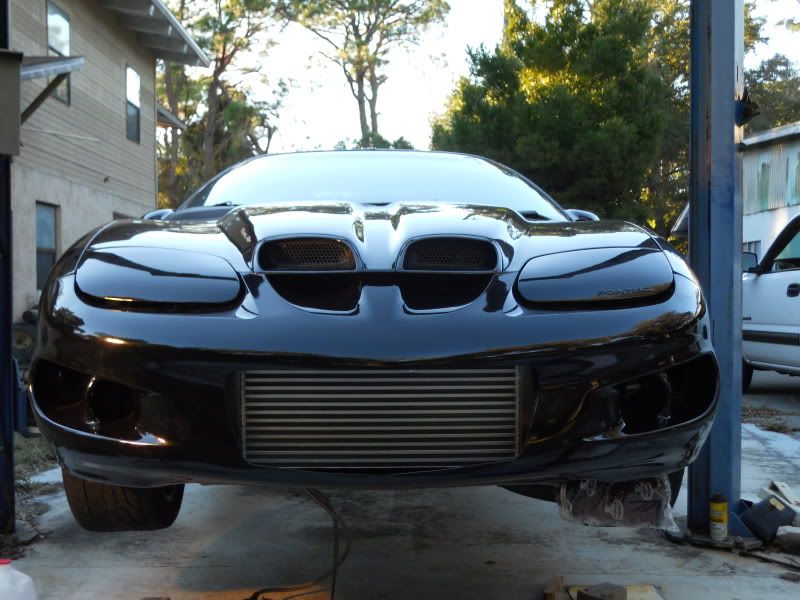
Today's progress.
-
12-27-2010, 05:29 PM #29Veteran
- Join Date
- Feb 2009
- Location
- Mansfield, PA
- Posts
- 22,146
Black & Blue- '02 WS.6 / '07 Suburban
What all are you doing, Packy?
-
12-27-2010, 05:36 PM #30;)
- Join Date
- Apr 2001
- Location
- Surf City, NC
- Posts
- 2,499
Black/Screaming Yellow- 99 S/C TA WS6 & 04 Cobra
I changed the motor mounts from stock 11 year old POS mounts to some Prothane mounts, put a Be Cool Direct fit Radiator in, EPP FMIC kit, and a Formula front bumper cover. Originally Posted by pajeff02
-
12-27-2010, 05:37 PM #31Veteran
- Join Date
- Feb 2009
- Location
- Mansfield, PA
- Posts
- 22,146
Black & Blue- '02 WS.6 / '07 Suburban
How was the motor mount install to do?
-
12-27-2010, 05:39 PM #32;)
- Join Date
- Apr 2001
- Location
- Surf City, NC
- Posts
- 2,499
Black/Screaming Yellow- 99 S/C TA WS6 & 04 Cobra
Originally Posted by pajeff02
It was a bitch, but I can do it in 3-4 hours now for both sides. The first time always takes me twice the amount of time but once I know what to take off and how to get at them now.
-
12-28-2010, 08:33 AM #33Impounded
- Join Date
- Apr 2010
- Location
- IN
- Posts
- 2,148
Epp Fmic kit? And care to go into detail about motor mount install?
-
12-28-2010, 08:40 AM #34Veteran

- Join Date
- Oct 2008
- Location
- Wherever life takes me
- Posts
- 12,526
Red- 02 35th LE Camaro SS
EPP is Exotic Performance Plus. They are no longer in business as that name. Their new name is Brute Speed. They are located in Indiana. Bob is the main guy/owner. They just sell parts now. Originally Posted by BashamWS6
-
12-28-2010, 02:25 PM #35;)
- Join Date
- Apr 2001
- Location
- Surf City, NC
- Posts
- 2,499
Black/Screaming Yellow- 99 S/C TA WS6 & 04 Cobra
Originally Posted by BashamWS6
This is the guide I used to install them. I pirated it from another site...
Prothane Motor Mount Install
Tools needed:
-13mm rachet gear end wrench (This is a MUST to do this easily)
-10mm rachet gear end wrench
-Deep and short metric socket set.
-Rachet with a few different extentions and swivel joints
-Flathead Screwdriver
-Vise or Decent sized C-Clamp
-Drill with small bit and a 3/8 bit
-High floor jack with 2 jackstands and a block of wood.
-Vise grips are good to have too
Steps:
1. Disconnect battery since alternator and starter will be disconnected later.
2. Disconnect intake bellow from throttle body with a screwdriver.
3. Using a 15mm socket, take out the 4 A/C compressor and bracket bolts that can be accessed from the hood area. Take off both belts too.
4. Raise car up as high as the jack will allow and place jackstands under.
5. Using a 15mm socket, first take off the idler pulley and then take off the 3 bolts that hold the alternator and bracket on. Then be sure to take the small electrical connector out of the top of the alternator. Then move alternator foward by laying it on the sway bar.
6. Place jack with block of wood up to the oil pan to support the weight.
7. Now you can see the mount area well. What I did was put a set of vise grips on the nut in the back and a 18mm socket on the front to get the mounting bolt out. Go ahead and unbolt it and pull the long bolt out. Now that side of the engine is detached from the chassis. Go ahead and raise the motor a little with the jack to give yourself more room to work with.
8. Now you will take the clamshell that hold the actual rubber/poly mount out. On the top of my driver clamshell there was a heatshield that I had to take off to expose the clamshell to motor bolts. Use a 10mm wrench to get the heatshield bolts off then remove the heatshield. Once the heatshield is out use the 13mm rachet end wrench to take the clamshell bolts out of the motor block. They are in there tight and you will need to use a lot of force to loosen them. The rachet wrench will be your savior when taking these bolts out, without it it is very difficult. On the back bottom bolt I was able to get a long thin socket extention up there to get that one out.
9. Once all 4 clamshell bolts are out you can now pivot the clamshell around till you get it out, it can be kinda frustrating. Once it is out you will notice there are 2 rivets on one end and 3 on the other. These need to be drilled out to split the shell. I first used a very small bit and followed up with the needed 3/8 bit. After it is drilled you cn use vise grips and the C-Clamp to split the shell, it takes some force because each half of the shell is bonded to the rubber mount inside.
10. Once it is split you can take out the old rubber mount and place the new poly mount in there, make sure you place it with the tabs being faced up when it is all done. You can use a vise or a C-Clamp to force the new mount into the shell, once its in put the new bolts in that will hold the clamshell together. Now you are ready to attach the shell back to the motor.
11. Pivot the shell until you get it back in place, remember TABS UP!! Put the shell to motor bolts in, then use the jack to line the holes up and put the long bolt through the mount pedestal. Then just plug the alternator wire back in and mount the alternator and replace the idler pulley. Now we can go to the passenger side.
12. At the passenger side, take out the remaining A/C compressor bolts and move the compressor foward some, then remove the A/C belt tensioner, this will expose the A/C bracket bolts, remove these too and then take the entire bracket and set it aside somewhere.
13. Now go and remove the 13mm starter bolts and drop the starter. then remove the wires from it and set it aside.
14. Remove all electrical connectors that look like they can be in the way. Once you remove them you will have a great amount of room to work in compared to the drivers side.
15. Like the other side, go ahead and remove that 18mm pedestal to clamshell bolt. Then use the 13mm rachet wrench and take the 4 clamshell to motor bolts out. Then go ahead and pivot the shell around until you can get it out.
16. Perform steps 9 and 10 again to break the shell and install the new poly mount.
17. Pivot the shell again to get it in position and then bolt it to the motor. Then use the jack again to line up the holes and push the bolt through. This side was harder to line up since the other mount was already installed.
18. Reconnect the starter, electrical connectors, belts, and the A/C components.
19. Dont forget to reinstall the bolts for the A/C compressor and bracket from the top area. Then just reconnect your intake stuff to the engine.
20. Thats it, youre done fire it up and watch the stillness of the engine in the bay.
I can not stress the importance of the rachet end wrench. That is what allowed me to do this in half decent time. Without it it would have taken me an easy 3 hours longer at least. If you dont have one you better go get one. I also only did one side at a time. A lift is perfect for this if you have one available. ALso a buddy to help you would work out great too. I did it by myself.
I am not sure how much different this install would be with other type headers. I have Mac mid-length crap headers. This should help some. I did it in around 5-6 hours.

 Reply With Quote
Thread Information
Users Browsing this Thread
There are currently 1 users browsing this thread. (0 members and 1 guests)
Similar Threads
-
2004 Cobra w/mods Vs. R34 Skyline w/mods
By Packy in forum Kill StoriesReplies: 88Last Post: 08-31-2009, 06:26 PM -
Pontiac Winter Storage - 35 Winter Storage Tips
By Ed Blown Vert in forum Firebird / WS6Replies: 6Last Post: 01-10-2009, 02:39 PM -
$2000 on suspension mods or on motor mods??
By greatwhiteZ28 in forum Suspension and HandlingReplies: 6Last Post: 09-27-2007, 06:04 AM -
winter is almost here, what do you drive in the winter?q
By easytoremember in forum Mid-West MembersReplies: 10Last Post: 09-20-2007, 06:07 AM -
Should I buy a LS1 in the winter?
By AFFINITY1 in forum General HelpReplies: 25Last Post: 10-16-2005, 05:03 PM

Bookmarks