
Results 1 to 20 of 38
Thread: Homemade Tools
-
04-10-2011, 04:39 PM #1Veteran


- Join Date
- Feb 2009
- Location
- Mansfield, PA
- Posts
- 22,146
Black & Blue- '02 WS.6 / '07 Suburban
Homemade Tools
Over the years, I have sometimes had to fab up a tool to get a job done. I'll never remember them all, but by way of example on my '95 Eagle Talon I had to make a tool to hold the crank pulley when I changed the timing belt. When I had my Harley, I elected to modify my oil filter wrench to clear the sensor mounted in the front of the engine case rather than spend $$ on the special H-D tool. There have been several others that I simply do not recall at the moment.
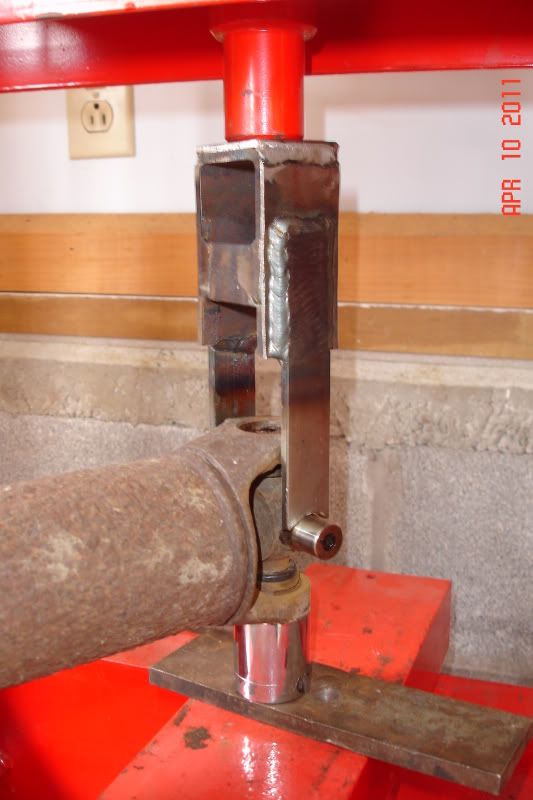
My favorite homemade tool is one I made about 2 years ago to help me press out u-joints. I have never been a fan of pressing on just one side of the u-joint as it can collapse the yoke and make it very difficult to install the retaining clips. I welded this tool up from a piece of rectangular stock and a few pieces of flat stock that I cut with a hacksaw and die grinder. The prong ends have been ground concave to keep the tool centered on the joint.
This tool allows for a u-joint to be pressed out without any chance of harming the driveshaft. I generally support the driveshaft with my step ladder and raise the height of my shop press accordingly. I first used this tool on our stock Trans Am driveshaft. Today, I pressed out the 13 year old u-joints on our Durango's drive shaft. Anyone else have a homemade tool to share?

-
04-10-2011, 05:51 PM #2Electrical Engineer


- Join Date
- Jul 2009
- Location
- North of the Motorcity
- Posts
- 2,612
Custom Swirly Black- 2001 WS6 M6

I didn't have anything too creative, I glued a magnet inside each one of my nut drivers. Then a few years later I found some Klein ones that came with them.

-
04-10-2011, 06:15 PM #3Senior Member


- Join Date
- Apr 2008
- Location
- Madison, WI
- Posts
- 7,006
1999 Formula WS6 M6-sold- 2001 Silverado Z71
That's pretty sweet jeff!
I've made a few tools. Nothing that cool though. Most of my homemade tools involve grinding, cutting, or heating/bending. I did weld a 2 nuts to a bolt once to make an 18mm allen wrench socket.
-
04-10-2011, 06:40 PM #4Veteran

- Join Date
- Oct 2008
- Location
- Wherever life takes me
- Posts
- 12,526
Red- 02 35th LE Camaro SS
I made one when I was having my axle seal issue. I found it difficult to install the seal without crushing it and also tapping it in straight so I machined a piece of bar like .005" smaller than the OD of the seal (looked like a solid washer about 1/4" thick when complete) and welded a stud to it (used a large dia bolt for the stud) to pound on.
This way, when tapping the seal in, I was able to tap it in straight and have full contact on the entire surface, causing it to not crush at all.
-
04-10-2011, 06:57 PM #5its short but its skinny.

- Join Date
- Oct 2009
- Location
- The Woodlands/spring/houston
- Posts
- 2,142
pewter- 99 trans am
when i need to remove window cranks on vehicles with manual windows, i have a fork that only have the 2 center prongs on it (i broke the other ones off)...i bent the ends of the two prongs at a 90degree bend, and stick it behind the crank and pull off the clip....it can also be used to push it back into place.
-
04-10-2011, 07:26 PM #6Electrical Engineer
- Join Date
- Jul 2009
- Location
- North of the Motorcity
- Posts
- 2,612
Custom Swirly Black- 2001 WS6 M6
LOL, that's good thinking. I paid the 8 bucks for that stamped piece of metal. Originally Posted by jiveass

-
04-11-2011, 03:02 AM #7Veteran
- Join Date
- Feb 2009
- Location
- Mansfield, PA
- Posts
- 22,146
Black & Blue- '02 WS.6 / '07 Suburban
Originally Posted by 35th-ANV-SS
I made a seal driver once out of a piece of PVC and a union. It served the purpose and did not break.
Originally Posted by jiveass
That is a great idea!
Originally Posted by KMdef9

-
04-11-2011, 03:48 AM #8its short but its skinny.
- Join Date
- Oct 2009
- Location
- The Woodlands/spring/houston
- Posts
- 2,142
pewter- 99 trans am
its an old trick my dad taught me.....theres also the old method of using an old school bumper jack to break down a tire....anyone ever done that? i didnt know what a tire shop was until i got my own vehicle and moved to the city....
-
04-11-2011, 03:20 PM #9Senior Member
- Join Date
- Apr 2008
- Location
- Madison, WI
- Posts
- 7,006
1999 Formula WS6 M6-sold- 2001 Silverado Z71
I just use a sock or a rag. It'll snag on the clip and pull it out. Originally Posted by jiveass
-
04-11-2011, 03:31 PM #10None Shall Pass

- Join Date
- Jan 2010
- Location
- East of Cleveland, Ohio
- Posts
- 3,827
Black- 99 WS.6 - Modified
I made a spanner wrench once for a stupid oil filter that would not come off. I tried every other method until all I was left with was the ring that threads onto the block. Made a spanner wrench and threaded the proper size bolts into the holes in the filter. Worked wonderfully. Other than that, just the usual tools - flat head screwdrivers bent to a 90 degree angle, ground down box and open end wrenches, modified pliers, ect.
Necessity is the mother of invention....
-
04-18-2011, 01:24 PM #11Junior Member
- Join Date
- Apr 2011
- Location
- Olympia, WA
- Posts
- 11
White- 83 Datsun 280ZX
My favorite is a 12"x12"x3/8" thick plate of aluminum with a handle welded to the backside. I use it to choke the life out of run-a-way motors when firing up for the first time.
-
04-19-2011, 05:16 PM #12Veteran
- Join Date
- Feb 2009
- Location
- Mansfield, PA
- Posts
- 22,146
Black & Blue- '02 WS.6 / '07 Suburban
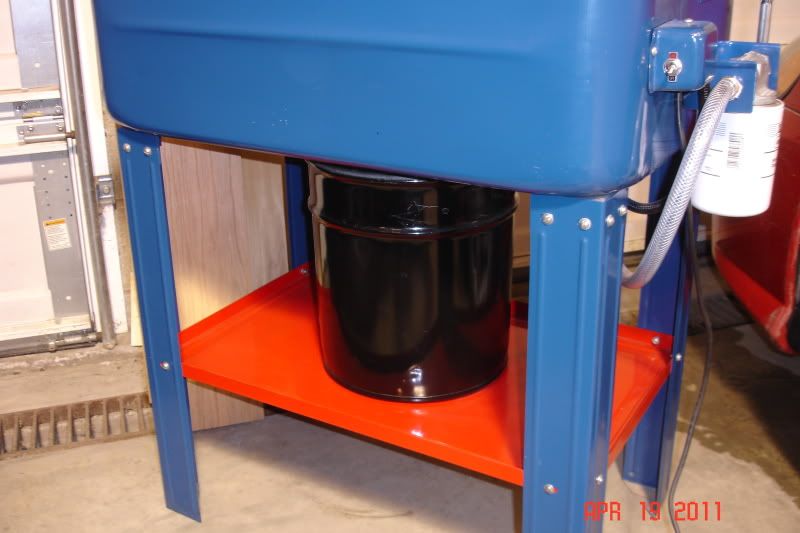
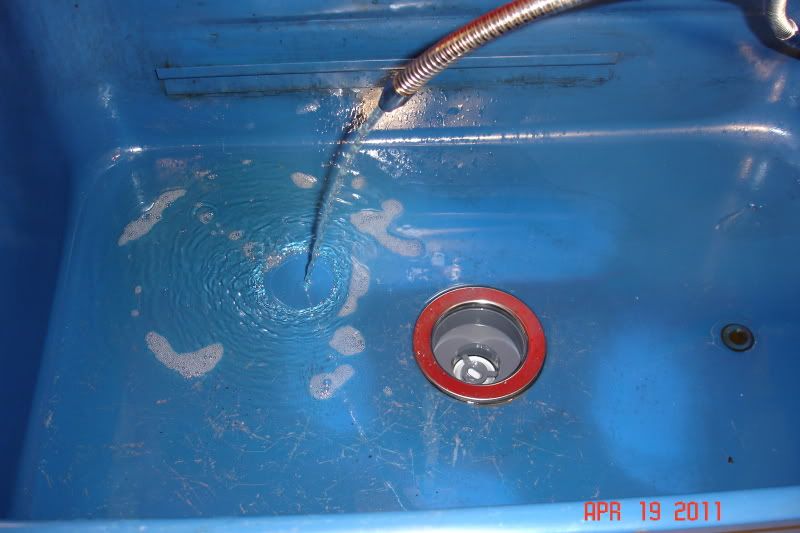
I'll call this one "semi-homemade". It's a cheapo parts washer that has been in our family for at least 15 years now. I used it extensively during the Corvette restoration and really hated the fact that I was always working in a dirty fluid bath with larger parts. I was originally going to just purchase a drum style parts washer... but after looking at this one decided I could modify it to suit my needs.
I started by removing the lid from a 5 gallon metal container and the lower tray on the parts washer. I found that the bucket set perfectly on the tray underneath the tub. I cut a hole in the bottom of the tub and installed a sink drain with a 4" tube. I then disassembled the pump from its casing that used to hang on the side of the parts washer. I welded a piece of angle iron to the bottom of the tub that extended about halfway into the bucket. I then mounted the pump to the angle iron. I also welded a ring onto the bottom of the tank that is instered into the top of the bucket. This prevents any fluid from splashing out or escaping by tracking on the bottom of the tub.
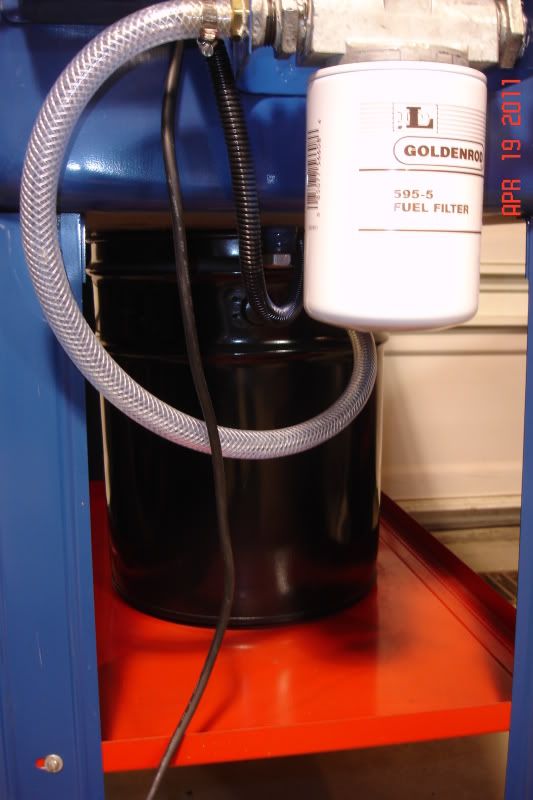
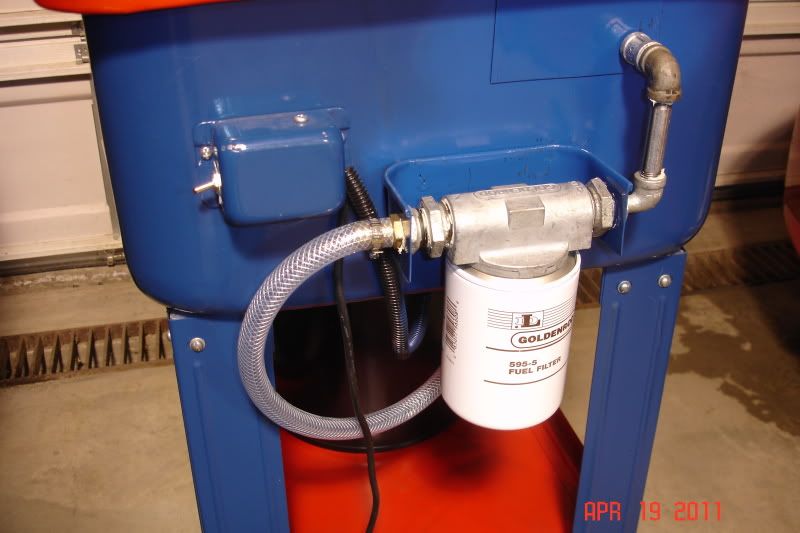
Holes were cut at the top lip of the bucket for the wiring and a hose that is rated for chemical use. I mounted a filter assembly I purchased at Tractor Supply using a piece from the old pump housing that is welded to the side of the parts washer. The filtered fluid is then piped into the tub. A cotton gauze filter pad will be inserted into the bottom of the sink drain to keep any chunks from entering the reservoir. Should any debris get past this filter it should simply settle into the bottom of the bucket.
Other than the fact that my existing nozzle has a slight leak, it seems to work as planned. This will maintain a clean flow of fluid to whatever I am working on. It will also mean no hunting for dropped parts in cold murky fluid in the bottom of the tub.
-
04-19-2011, 07:05 PM #13Member

- Join Date
- Mar 2009
- Location
- Maryland
- Posts
- 867
Black- 1998 Trans Am
^^^ that is pretty cool
-
04-20-2011, 03:01 AM #14Veteran
- Join Date
- Feb 2009
- Location
- Mansfield, PA
- Posts
- 22,146
Black & Blue- '02 WS.6 / '07 Suburban
Thanks! It'll get its first workout on an upcoming Muncie rebuild.
-
05-27-2011, 12:40 PM #15Mustang Eater

- Join Date
- Feb 2010
- Location
- Springfield, Missouri, United
- Posts
- 221
Maroon- 2000 z28 6 speed
i machined out a straight piece of stainless, and flattened the end of it to fit inside these fasteners on my intake.. turns out someone beat me to them.. flathead screwdrivers..
-
05-30-2011, 05:04 AM #16Junior Member
- Join Date
- Jan 2007
- Location
- Flower Mound
- Posts
- 26
Black- 1997 Z-28
I also have made an axle seal driver, but not with PVC. I took a 3ft section of 1" od pipe, a cheapo 3" 3/8 ext, and MIG to make mine. Insert ext into pipe, center was not critical for this tool so I just measured quick and clamped, tack 4 sides, remove clamps, fully weld up. Still have mine also, way overkill but works great.
Bunch of small stuff like wrenches and sockets that have been cut down and welded at different angles for ease.
-
06-08-2011, 08:39 PM #17Member

- Join Date
- Sep 2005
- Location
- Cedar Park, Texas
- Posts
- 250
Red- '72 Chevy C10 SWB
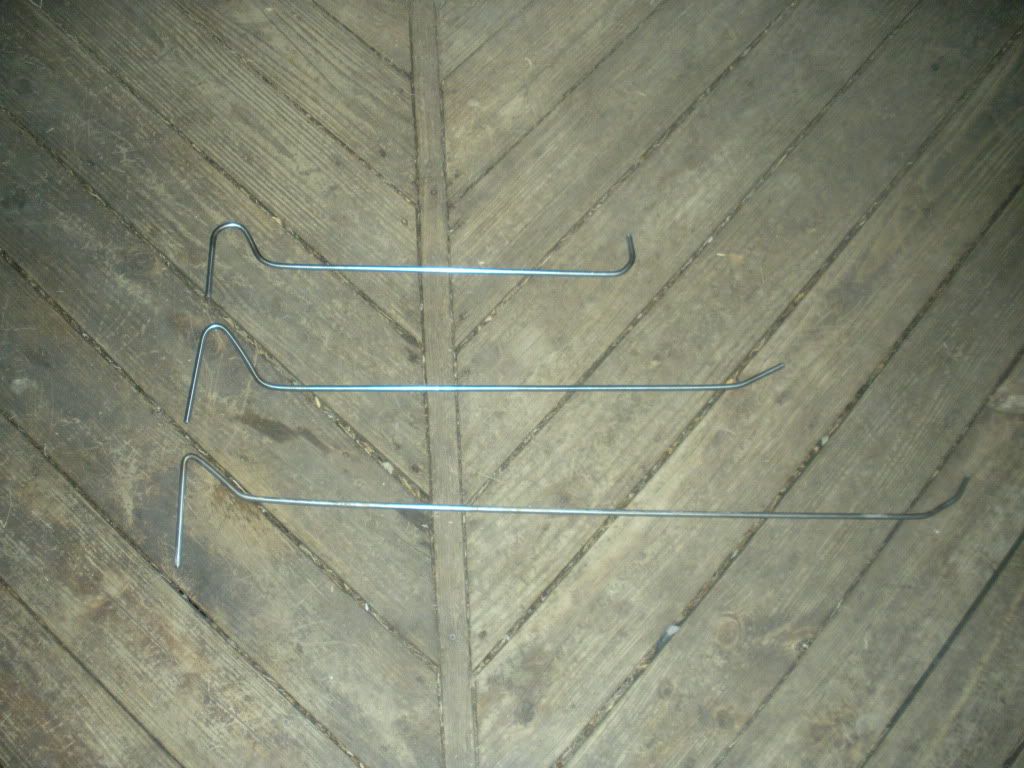
I love homemade specialty tools. My favorite in my collection are some paintless dent repair tools that I made from some scrap stainless rods at work. I've only made 3 so far, different lengths and little bit different angles bent on the ends. BRB, taking pics...
Not the greatest, but they've worked pretty well so far on a few things
Last edited by TexasLS1; 06-08-2011 at 08:52 PM.
-
06-08-2011, 09:35 PM #18Senior Member

- Join Date
- Oct 2008
- Location
- Coral Springs, Fl
- Posts
- 5,774
Sunset Orange Metalic- 2001 Camaro SS
haven't really made anything myself but some good ideas in here
-
06-08-2011, 09:51 PM #19Exalted Cyclops

- Join Date
- Feb 2007
- Location
- San Diego, CA
- Posts
- 5,823
2002 Z28 A4 NBM- Sadly now demodded :(
Took a 1/2" open end wrench and carved it down to fit for the installation of the very back bolt on headers with AC suitcases for SBC engines. Works on all GM cars.
There are other tools I carved up or shortened for specific jobs but I can't remember what. When I look in the tool box I'll get back with ya'llz...
-
03-05-2012, 05:41 PM #20Veteran
- Join Date
- Feb 2009
- Location
- Mansfield, PA
- Posts
- 22,146
Black & Blue- '02 WS.6 / '07 Suburban
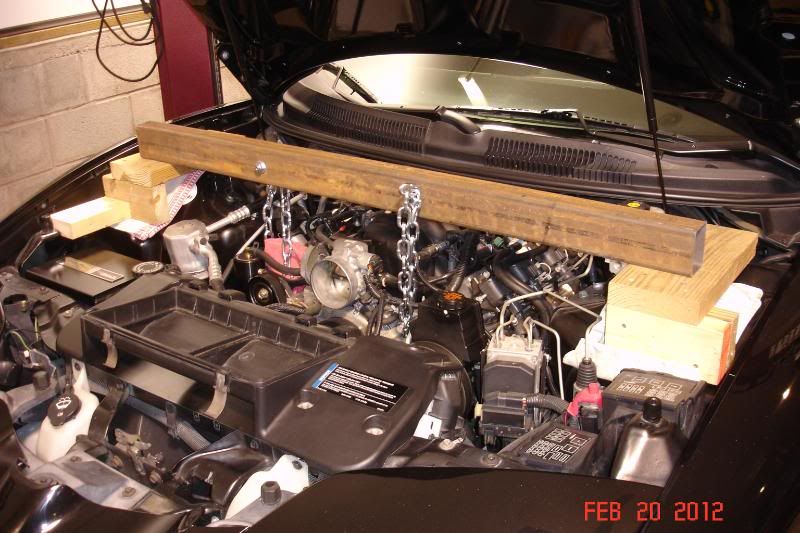
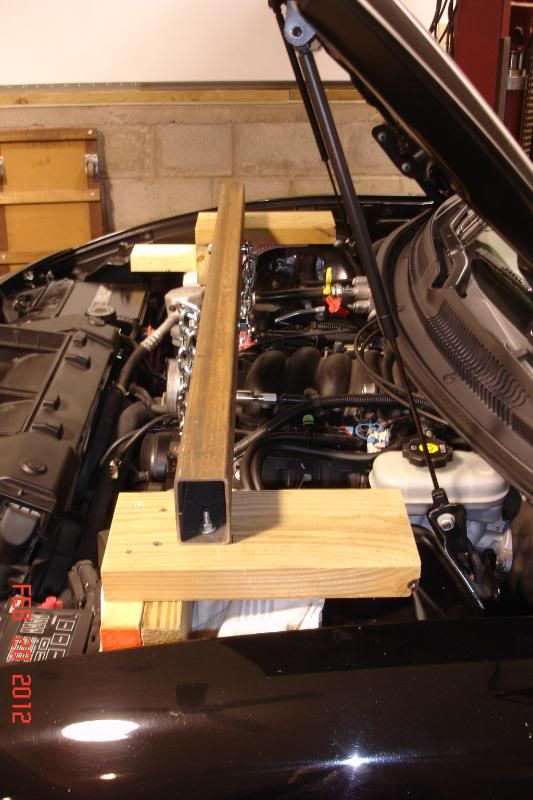
Put together a support for holding the engine with the K-member out of the car. The support was constructed out of a 50" piece of 2" x 4" rectangular stock that I picked up from the local welding shop, two pieces of chain, some bolts and a couple of scrap pieces of wood. On the passenger side, the support is wedged behind the hood bumper bracket since that is a more narrow ledge. I also ran a set of straps around the beam and hooked them under the hood support brackets for an extra measure of safety. The thickness of the beam matched the offset of the heads almost perfectly and allowed me to suspend the driver side chain from the front and the passenger side chain from the rear -- this way there was no possibility of the beam trying to flip over.

 Reply With Quote
Thread Information
Users Browsing this Thread
There are currently 1 users browsing this thread. (0 members and 1 guests)
Similar Threads
-
Larry Ingham's Homemade Tools
By Ed Blown Vert in forum General HelpReplies: 0Last Post: 10-04-2013, 04:10 PM -
Homemade Hummer
By DanWS6 in forum Almost Anything GoesReplies: 43Last Post: 06-26-2008, 03:34 PM -
Kicker l7 Sub Box Homemade and or Sub
By JattGunMan in forum Parts For Sale / TradeReplies: 4Last Post: 02-02-2007, 10:41 PM -
~Homemade STS~
By pyro71985 in forum Forced InductionReplies: 0Last Post: 09-06-2006, 12:12 AM -
Homemade Kit
By pyro71985 in forum Forced InductionReplies: 6Last Post: 09-05-2006, 07:48 PM

Bookmarks