
Results 1 to 20 of 33
-
03-05-2011, 11:39 AM #1Senior Member


- Join Date
- Mar 2008
- Location
- Lake Geneva, WI
- Posts
- 1,539
Red- 98 Trans Am
How to Install a K-member and A-arms.
Hello there!
I decided since this is one of those install that are a little mysterious but somwhat easy, its just time consuming and at times... painful lol.
Today we have here the mighty UMI Road Race K-member along with Upper and Lower Arms.
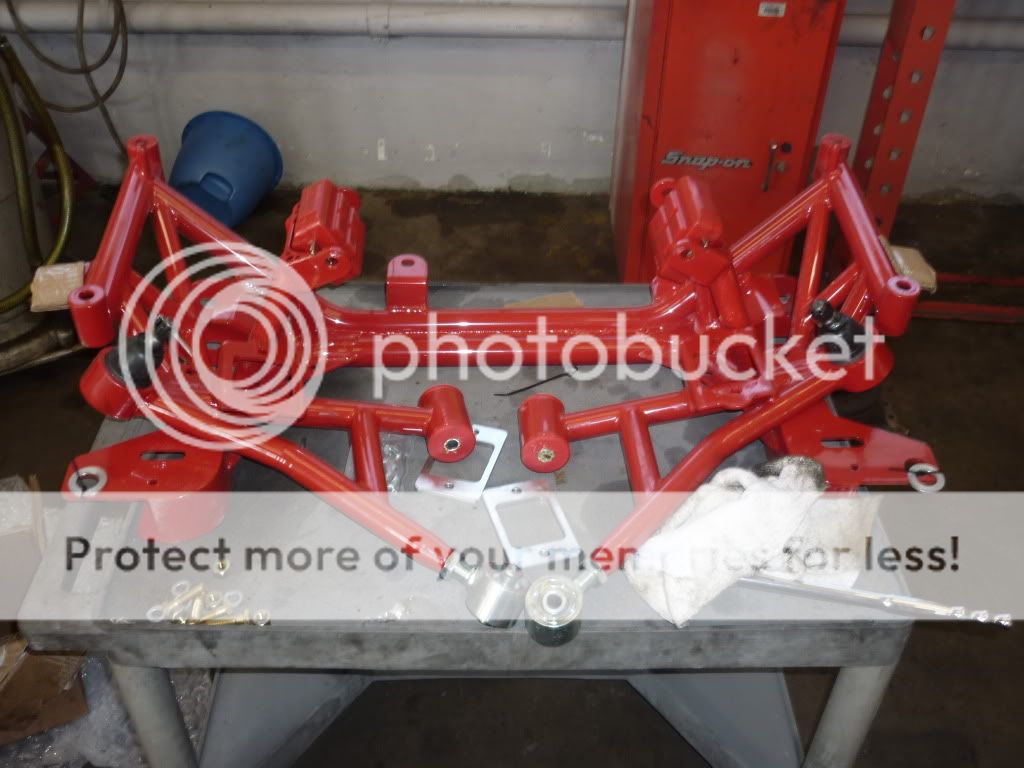
Obviously already installed lol

Ok before we start,
IF YOU ARE NOT COMFORTABLE WITH CHANGING YOUR OIL.... this install is
NOT FOR YOU. this install is intensive and requires alot of attention to detail.
This install requires you to COMPLETLY remove you engine support cradle while the engine stays put.... Like so

If this scares you or you dont think you can do it.... please dont. This can be a dangerous install if you let it get that way. Any and ALL info on this how-to is at owners risk. I will not be held responsible for you hurting yourself or endangering yourself for being STUPID or unsafe. with that said..
LETS BEGIN
THE PREP!
Depending on what you are doing, if you are JUST doing a Kmemeber with stock a arms or vise versa, jsut do what applys to you and your install. In this install I will share what I installed but use what you like.
PARTS
-Main components
K-member (UMI, BMR, SPHOON... etc your choice)
Upper A-arms (UMI, BMR, Sphoon... Adjustable, non adjustable....)
Lower A-arms (UMI, BMR, Sphoon... Adjustable, non adjustable...)
Zip ties
-Optional components.. since your in there you might as wel lol
New upper ball joints (recommended but you can use originals but why?)
Poly or solid motor bushings (Umi, Prothane,....)
New alternator.. perferable the 143amp truck alt mod
Swaybars or at least new links (UMI, Strano, BMR, Sphoon...)
Shocks (Koni... you know the drill lol)
Springs (stranos, vogtlands... blah blah)
new brakes (stock setup, C5, CTS-V, Aftermarket... you pick)
New hubs (not a bad idea if you have over 100K on them already
Strut tower bar.... if you really want to. i already had one.
New rack (stock setup, manual rack...)
New suspention hardware ie nets and bolts. most are supplied but not nessary
steel braided brake lines
TOOLS
LOL ALOT lol heres what i used to get the job done
A lift... you can use jacks and jack stands but like headers, you need alot of room 18" atleast
Trans jack or jackscrew if your on the lift. another floor jack if you are on the ground.
Block of wood.
Sockets 3/8s set and 1/2s sets with ratchets and universal joints
Wrenches from 10-24 ranges...
Ratch wrenches help ALOT
Impact wrenches will help ALOT but breaker bars will do too, but tire you out quick lol
Allen sockets or wrenches
Torx sockets or wrenches
plyers normal and needle nose
wire cutters
lacing wire... i elaborate later
Pry bars small and large
Grinder (optional)
drill or Drill press (I recommend the press)
ANd anything else oyu think you need or i forgot... you need alot of good tools for this one. theres alot of things to take out
THE TEAR DOWN
Here we go, take a breathe and relax, its just a k member lol
Alright, depending on your install you can either skip to A arm install or start here. Heres the beginning.
Disconnect the negative terminal from your battery... unless you want to electricute yourself
Get the car up in the air. Its gonna be there for a minute. so get it at a comfortable level. I used a lift lucky me
If on the ground AT LEAST 18" to move around under the car.
the patient is ready
[IMG]http://i535.photobucket.com/albums/ee357/JT_Grooms/P1000637.jpg
[/IMG]
Once lifted work your way from the outside in;
tires off

Get calipers off or hung up (if your doing new lines unhook em and set em aside)
Get caliper brackets off
Rotors off
If doing new hubs take those out too.
Unbolt the swaybar links
Make sure to disconnect ABS wire from hub and lower A-arms and up around the stock k member. Also check under the power steering and ensure the brake line is off it too
Also while there, unbolt the brake line mount from the K-member seen here...

Disconnect shock from bottom. set aside hardware for later
Go top side and disconnect the two bolts on the ABS and brake resivor from booster. then unbolt the two torx on the driver side shock.
Unbolt upper a arm from spindal
Remove shocks
I wont go into detail but if your going to do shocks, get your new springs and shocks mated now to ease insatallation phase, do the rear too while your at it. but for now, we will stick to the front end.

Remove upper A arm perch and set aside

-From here we will do part of the install for ease of installation.
Remove Stock Arms from perch.
Install new Upper ball joints on New A-arms or use your old stuff. Grease everything now. Also.. make sure all you grease ponts are pointing down and the curve in the arm faces the front of the car. Also ensure the new bolts for the new ball joints are facing up so nut sits on top.
Install new Arms on perches using either new hardware or original. Adjust them if you have adjustables now as close to stock as possible.
Mate the perch with new upper A-arms on Strut assembly and bolt it back on the car up top. It helps with a frind but you can do it by yourself.Adjust the shocks if they are adjustable before hand for sionce they are out in the open now. For now the two will be ok if you have a ATB to put on later. Go ahead and put ABS and Resivour back on. you wont need to bo back in there after this.
Bolt you spindal back onto the new upper a arms and let be
To recap you have installed new Upper Aarms, Ball joints, Shocks and springs.
BACK TO Tear down
Place trans jack, jackscrew, or jack with wooden block under engine oil pan avoiding the drain plug for even weigh distibution and apply enough pressure just to be able to engage the block but dont lift it completely.
remove your surpentine belt
Unbolt lower a arm from spindal
Unbolt Rack from K-member but leave the tie rods on.
Loosen motor mount bolts but dont remove yet
REmove Alternator (if needed, remove swaybar for this)
THeres a plug on the back so becarful
THE POINT OF NO RETURN
Now here the tricky part...
the motor mounts are a pain in the ass so take your time.
The drivers side is easy, just unbolt it. leave it for now
The passenger side is a PITA!! unbolt the entire pedistol from the stock kemember. There are four. With a ratchet wrench you can get them all. Take your time.
once unbolted apply or release pressure enough to remove the drivers side motor mount bolt.
Make sure the reack is out of the mounting
next you may need a friend but i managed on my own.
Unbolt the 6 bolts that hold the stock cradle. remove the brck ones first and work your way back. apon removal of the last bolt be prepared to grab the k member or have freind avalible.
Wiggle it out and set it down.
GO back and unbolt the rest of the motor mount off the engine and set it aside
Take a breather, you might need it right about now lol
this is what you should have right abuot now

Unbolt the stock lower a arms from the stock K-member MAKING NOTE where the bolts were located to semi have the same idea were to place them on the new K-member
Alright now for some easy but delicate work
If your using solids like what UMI supplys, then skip this part.
I would recommend new motor mount bushings since you are already there and the old stock ones are probably on the way out if they havnt fallen out yet lol
drill out the rivits on the old calm shell and open them up to about 3/8s or what ever size bolts came with your new bushings. Ensure you orientat the tabs on the bushings correctly (sitting on top of the mount so it doesnt fall)
Bolt you new bushing inside the clam shells.
Now this is how i did this.
- Bolt the Drivers side bushing back on to the block
AND THEN
- bolt the passenger side bushing on the NEW UMI Kmember.
Take this time now to grease any bushings on the new lower control arms now to take a break.
-
03-05-2011, 11:40 AM #2Senior Member
- Join Date
- Mar 2008
- Location
- Lake Geneva, WI
- Posts
- 1,539
Red- 98 Trans Am
THE MAJOR INSTALL
Now go back and insure all you wires and whatnot are out of the way.
Ensure your powersteering is ok and all brake lines as well.
Now with either a freind or with some serious muscle Grab your new K member and your Kmember bolts manuver and wiggle the new kemember into position and loosly place the bolts into position.
Make sure all brake lines and wires are out of the way and in the proper position as you are placing it in there. you dont want to have to unbolt it all again because you crushed a brake line.
Also take note of how your motor mounts are lined up. Dont crank on the bolts yet since you need to line up alot of things. There are also location pins that go into the body of the car that need to be into place.
work on the motor mounts first.
YOu may have to play around with the transjack/jackscrews to get them to line up
-Bolt the drivers sides four bolts on the engine.
-then wiggle, pry, cuss, cry, and finally BOLT the drivers side in lol
THen once everything is in its place
tighten the 6 bolts down. make sure on the back part of the Kmember that the supplied washers are on the top.
bolt the rack back into place and remove the trans jack.
VIOLA!! you have a New K-member


You are now on the home strech
Ensuring you grease the fittings, install the new lower a arms into possition using your old hardware (or new) ensuring you have the locating pin in place on the back one. I found that doing the back one first and then swinging the front one into positon somwhat from the top makes it easier.
If you have rod ends this may be easier but if youhave poly/rotos like me its a tight fit so use them muscles.
once in to position either bolt them down good enough to drive to an alignment shop if you cant do it yourself.
place the shock spacer thats supplied (umi) between the shock and the lower a arms. YOu should have some new bolts that are shorter for the new bottom shock mounts. YOu can use the old nuts (since i got the wrong sized nuts for the bolts) dont tighten yet but get them into position
Mate the lower ball joints to the spindal and toque it down until it stops, then install supplied new cotter pin (same for upper by the way lol)
Tighten down the lower shock bolts as well now.
Now is the time for new hubs
If you are using a C5 bracket feed the bolts in through the bracket, through the spindal and into the hub... if not then just bolt your new hubs in if you are install new ones.
If doing new Braided lines, nows the time to do it then bolt the brake braket back on to the new K-member
The put the rest of your brakes back together
Be a good time to get your brakes done (pads, rotors)
should end up with somthing like this


But your not done yet! but your REALLY close lol
Reinstall you alternator (recommend the 145amp truck Alt to get rid of the flickering lights.
replace your belt
install your swaybar
Now check EVERYTHING. Anything you touched double check it. Triple check it. Check torque specs to ensure everything is good.
connect your battery
put your tires back on and get your ass to an alignment shop.
the drive should be used to "settle" the suspention so that the alignment should be more precise.
LISTEN to the car and drive carfully. you have changed the geometry of the suspention, so its gonna handle a bit off. dont go chargin corners until you get it aligned. endure you tell the shop what you have done. YOur toe should be fine, it will be camber and caster that need more attention.
If you have questions PLEASE ASK and if i left somthing out PLEASE TELL ME, there alot of stuff involved with this install so i might have left somthing out or somthing simple that most of us deem common knowledge others may not even think about it until its too late and somthing breaks. Please let me know and ill add too or take away as nesscary.
and with that there you have it!
-
03-05-2011, 12:50 PM #3Rockin the Ruckus!

- Join Date
- May 2008
- Location
- Line Lexington, PA
- Posts
- 2,670
NBM- 2002 z28 camaro
Great write up!!!!
I have yet to do this so I am going to assume you didn't leave anything out. I am sure others will chime in and correct or confirm what you have written.
-
03-05-2011, 01:06 PM #4Senior Member
- Join Date
- Mar 2008
- Location
- Lake Geneva, WI
- Posts
- 1,539
Red- 98 Trans Am
thanks, I welcome any additions or corrections if there is needed needed. Theres alot to cover and this install has alot of things with safety and i dont want anyone to get hurt or damage their car. Originally Posted by 02Sweet

-
03-05-2011, 01:22 PM #5James Bond

- Join Date
- Aug 2007
- Location
- Texas
- Age
- 37
- Posts
- 4,546
2001 3.8 Black - sold- 2000 SS Black M6
why are your back tires different?
-
03-05-2011, 01:32 PM #6Senior Member
- Join Date
- Mar 2008
- Location
- Lake Geneva, WI
- Posts
- 1,539
Red- 98 Trans Am
lol Really? out off all things you pick out my tires? lol
Its actually a stupid story that happened last wednesday. I went to replace my cracked drivers side rotor and wound up doing a tire swap. I got too close to the lift on the passengers side and managed to slash my tire... stupid continental tires. great for all season driving but sidewalls are usless.
So i had some 255/45s laying aorund so i replaced two and put them on the rears.
-
03-05-2011, 02:29 PM #7Senior Member
- Join Date
- Jan 2010
- Location
- texas
- Posts
- 1,623
silver- 2000 formula
driven enough to tell a difference yet?
-
03-05-2011, 02:33 PM #8James Bond
- Join Date
- Aug 2007
- Location
- Texas
- Age
- 37
- Posts
- 4,546
2001 3.8 Black - sold- 2000 SS Black M6
your drivers side is the same as my last set i think...so naturally i looked at the passenger side.....
-
03-07-2011, 10:52 AM #9Spaz is My Mentor


- Join Date
- Feb 2009
- Location
- Florida Man Status Acheivement
- Posts
- 11,759
Navy Blue Metallic- 98 T/A w/ mods, 00 FBVert
This needs to be sticky!!!
Josh - how long did it take you? R&P - was it a PITA?
-
03-07-2011, 12:03 PM #10Senior Member
- Join Date
- Mar 2008
- Location
- Lake Geneva, WI
- Posts
- 1,539
Red- 98 Trans Am
in all honesty by myself it took about 5 hours. The only PITA was aligning the the motor mounts to tne new k member and trying to feed the bolts in. Other then that it was pretty much a straight forward install. Getting the kmember up snd boltong by myself was a task but with a friend u can have an easier time lol
Last edited by JoshuaGrooms83; 03-07-2011 at 12:05 PM.
-
03-07-2011, 12:20 PM #11Senior Member

- Join Date
- May 2009
- Location
- college station, tx
- Posts
- 2,557
sold: 1999 firebird- 1998 Trans Am
yeah this needs a Sticky bigtime, I've looked everywhere for a write up like this with no luck until now
-
03-07-2011, 12:25 PM #12Spaz is My Mentor
- Join Date
- Feb 2009
- Location
- Florida Man Status Acheivement
- Posts
- 11,759
Navy Blue Metallic- 98 T/A w/ mods, 00 FBVert
One more very important question.
How did you keep the motor in the air? I honestly don't think you were able to with just one stand with a block of wood on the oil pan.
-
03-07-2011, 01:19 PM #13James Bond
- Join Date
- Aug 2007
- Location
- Texas
- Age
- 37
- Posts
- 4,546
2001 3.8 Black - sold- 2000 SS Black M6
i held mine up with a block of wood and a jack underneath the bell housing.
it was on my v6, the oil pan is stamped, didn't trust it
-
03-07-2011, 01:21 PM #14Spaz is My Mentor
- Join Date
- Feb 2009
- Location
- Florida Man Status Acheivement
- Posts
- 11,759
Navy Blue Metallic- 98 T/A w/ mods, 00 FBVert
I think I see...the trans holds up the rear and the block under the bell housing should hold up the rest giving it 2 points of contact. Originally Posted by Spikito
I wonder if there is any other spots to be used?
-
03-07-2011, 02:09 PM #15James Bond
- Join Date
- Aug 2007
- Location
- Texas
- Age
- 37
- Posts
- 4,546
2001 3.8 Black - sold- 2000 SS Black M6
ive heard of people routing a chain through the headers/exhaust manifolds, then wrapped around the strut tower brace, if you have one
-
03-07-2011, 09:27 PM #16Senior Member
- Join Date
- Mar 2008
- Location
- Lake Geneva, WI
- Posts
- 1,539
Red- 98 Trans Am
all i used was a block of wood and a trans jack to the hold the motor in place. The tranny and mount r still in place to hold everything else in place while u work. The trans jack is rated to 1000 lbs. I think it can manage.
-
03-08-2011, 05:58 AM #17Spaz is My Mentor
- Join Date
- Feb 2009
- Location
- Florida Man Status Acheivement
- Posts
- 11,759
Navy Blue Metallic- 98 T/A w/ mods, 00 FBVert
Josh my question was where exactly did you place the trans jack. In the pic it looks like you placed it under the oil pan. Originally Posted by JoshuaGrooms83
-
03-08-2011, 07:15 AM #18Senior Member


- Join Date
- Dec 2007
- Location
- Orlando, FL
- Posts
- 3,352
Mean Black- 1998 Trans Am
i vote for Sticky!
-
03-08-2011, 08:40 AM #19Senior Member
- Join Date
- Mar 2008
- Location
- Lake Geneva, WI
- Posts
- 1,539
Red- 98 Trans Am
Oh my bad. Yeah its on the engine oil pan itself. I thought i put that in there for the lifting portion. Ill check. Originally Posted by SMWS6TA
-
03-08-2011, 09:20 AM #20Spaz is My Mentor
- Join Date
- Feb 2009
- Location
- Florida Man Status Acheivement
- Posts
- 11,759
Navy Blue Metallic- 98 T/A w/ mods, 00 FBVert
I thought you should never put anything on the oil pan because the weight of the engine would crush it.

 Reply With Quote
Thread Information
Users Browsing this Thread
There are currently 1 users browsing this thread. (0 members and 1 guests)
Similar Threads
-
Aftermarket K-member, upper and lower control arms???
By rll2 in forum Suspension and HandlingReplies: 9Last Post: 02-13-2008, 08:10 PM -
Bayarea...Nitrous install? recommend me a shop or member to do the install? Price?
By 2klude in forum Western MembersReplies: 5Last Post: 04-11-2007, 09:30 PM -
how to:install on BMR torque arms?
By greatwhiteZ28 in forum Suspension and HandlingReplies: 15Last Post: 04-08-2007, 06:38 PM -
WTB BMR tubular K member and A arms
By rbrtlux in forum Parts Wanted / TradeReplies: 3Last Post: 03-30-2007, 04:19 PM -
K-member install
By mikriman1 in forum Suspension and HandlingReplies: 2Last Post: 04-20-2006, 04:40 PM

Bookmarks