
Results 1 to 19 of 19
Thread: Header install (other details)
-
02-25-2010, 02:17 PM #1Senior Member


- Join Date
- Mar 2008
- Location
- Lake Geneva, WI
- Posts
- 1,539
Red- 98 Trans Am
Header install (other details)
Ok this is to help those that need a little more clarification on Header and Y-pipe install. THis is on the more affordable OBX Stainless Steel Headers.
PRE-INSTALL

Gather your parts, your tools, a place, and time. Unless you have alot of time behind the wrench, this install will take a good part of your day. So start earily or leave a couple days (like a weekend) to do this.
PARTS
HEADERS (OBX in this case)
Y-pipe (LLP ORY in this case)
3 3" lap joint band clamps
2 Bosch 13111 O2 sensors
8 Spark plugs of your choice (NGK tr5ix in this case)
8 spark plug wires (MSD)
Manifold Gaskets (Felpro comes with EGR/AIR gaskets as well)
6 new bolts and nuts for the EGR/AIR tubes, new headers dont come with threads

TOOLS
Im not going to list EVERY SINGLE tool but heres what will really help you.
PB BLASTER and ANTI-SIEZE
3/8 drive Metric Socket set shallow and deep. (universal sockets,even better)
A short/stubby and a long (or extendable) 3/8 ratchet
wide variety of 3/8 extentions and universals
Set of metric wrenches (perferably ratchet)
O2 socket of some kind. Helps, trust me
Sparkplug socket
Spark plug Gapper
Ball pein Hammers and a dead blow hammer
Pry bar set
Vise grips and plyers
small latter or step stool
4 jacks and a jack with at least 18" of lift .... or if you can, a lift
-opional-
Small air compressor and air ratch (saves so much time in removal)
PREP
The first thing to do is run your car. Run it for at least 15 minutes to let it warm up. Dont work on a cold car. You will only find yourself swearing and breaking or grunting for hours on end.
Next, unless you have a lift, you are gonna get your jack stands a jack and carefull start lifting you car. Do it in stages on both side so you dont have one side of the car all most 2 feet off the ground and the other side still on the ground. If you have some thin pieces of wood or pad, place it between the jackstand and car so you have some "cushion" and grip between the two so you have a bigger area to hold the car and not scratch or crush metal under the car. The rear doesnt need to be 18" above the ground but at least a jack and a half up. the front on the other hand needs to be as high as safely possible. 18" is the minimum cause you'll need room to wiggle and rotate your new headers as well as work under the car yourself. by the way, make sure you turned off your car by now.

NEXT AND I CAN NOT STRESS THIS ENOUGH... PB BLAST ANYTHING AND EVERYTHING! EGR/AIR bolts, exhaust manifold bolts, flanges, Clamps, O2's,...anything thats bolted or slide on, gets blasted and dont be shy about it.
I MEAN EVERYTHING!
Now go get you tools organized and grab yourself a cup of coffee or beer and let your car cool off a bit. if you can touch your manifolds, go ahead a lets get started. If not, just stay away from them for now lol.
THE REMOVAL
Here we, the moment of truth, lets do it.
Grab that stool of yours and head up top. Youll bee there for a minute.
-first off diconnect your negative off your battery, you might need to work around the starter later so no need to eletrocuit yourself. plus youll be removing some coils so might as well be safe.

-If you have a strut tower bar, take it off. Its easy. gives you alot of room that you will need.
-Next disconnect the EGR/AIR tubes 10m from the manifolds and remoe the EGR pump via its bracket on the front of the passenger side head. Two 15m bolts.
Gives you room for later. If you dont want to keep it, then go ahead and remove it. I kept all my EGR/AIR stuff.

-Remove all wires you can get to. it will take some effort, but they will litterally pop off. Also, i recommend keeping the heat shields. If you have new wires, they still fit. If you cant get the passenger rear off, dont strees you can get that out a little later.
-COILS- Now this is a tricky part, but if you have a 98, all you have to remove is the first 3 coils on the passenger side. If you have anything above that, you gotta take you braket off. Not sure if you have to take them all off, but on 98's you dont even need to take off any on the driver side. Experiment alittle. If you have room, then dont take em off.

-Next, get all your Spark plugs out. 5/8 socket. All but the passenger rear. You will get that one out later as well trust me Either set them aside of throw em away. But i highly recommend putting new ones in while your in there. While you are around your spark plugs, check your gaps on your new plugs.

-Next start working those exhaust manifold bolts. just loosen them for now. Dont take em all out yet.

-Get that dipstick tube out of there. There is a bolt on the side of the head. 15m. This part may try your pacients. Yank, pull, cuss, and tap this thing out. it will come out but its a booger.it was a little washer inside the oil pan that holding it in. Once you get enough of it out, there is a collar on the base of the dipstick where you can get a pry bar and a little hammer and tap it out carfully. If you want, you can remove the starter but i didnt so its possible to do so.
If you cant, go ahead and start on the next parts and then come back to this.

alright, now for the bottom
-unhook the o2 harnesses. If you can unbolt them under the car, go ahead, but you have more leverage with it out from under the car.
-Start with the exhaust maniold to cats bolts (15m) and either unbolt them or they will snap off. As long as you can save 2 of the 6 your golden, i unbolted all but 2.

-If you wish unbolt the coupler in the driverside of the y-pipe.
-Unbolt the band clamp on the I-pipe and unbolt the passenger side support brace. keep the bolts.
-next remove tunnel brace and set it aside. You will have to wait and see when you have you whole set up in wether you can bolt it back in or shim and then bolt it back in. Be ready to catch the y-pipe as it may shift on you.
-you are now ready to remove the y-pipe. Wiggle, rotate, and pull it out. YOu should have pb blasted this earlier so with a little muscle, it will come out. take your time. rotating it helps alot.

-next go back to your driver side manifold and remove all the bolts. Use what ever you can, its gonna be tight. A stubby ratched and a 10m ratchet wrench comes in handy in the rear. Use what ever helps. If you have removed the dipstick already, go ahead and remove the passenger side. If not, try and work it out. if not, dont worry, you can still unbolt the maifold but you wont be able to remove it until you ge that dipstick out. take a break and and go ahead to the next step.
-while your crying about the dipstick, remove that last sparkplug wire and plug that you left in there now that you have all that room
Notice i never told you to cut or torch anything. Thats cause you let your car run for a little bit and the heat and pb blaster help to break up the rust and whatnot. How ever. if you feel the need to do this, go right ahead.
-
02-25-2010, 02:17 PM #2Senior Member
- Join Date
- Mar 2008
- Location
- Lake Geneva, WI
- Posts
- 1,539
Red- 98 Trans Am
INSTALL
it what you have been cussing, bleeding, and cry for all this time
Alright your half way there.

-remember that plug you just took out. Put your new one right in its place. That is of course if you have removed that dipstick tube of course no worries. you can still come back to that antisieze the sparkplugs by the way.
-now go back to drivers side and get that brand new shiny header you got and slowy rotate, wiggle, and "nudge" it in. You maay have to hammer a little depending on the brand. For the OBX, youll find that the flange catches on the firewall alittle. hammer where it catches (shouldnt be much bigger than the size of your ball pein your using) then line it up in there.

-get you new gaskets and either your used or new header bolts (I used my original bolts) and thread your headers bolts in but do not torque them down yet. your still got a y-pipe to install. Anti seize the bolts

-Alrigth, if you got your dipstick and passenger side manifold out NOW, go ahead and slide in your new header in there as well. This side went in with NO hammering. thread in the bolts and let it sit. No torqueing yet. However, if you dont have the dipstick and manifold out yet lol dont worry you still have time
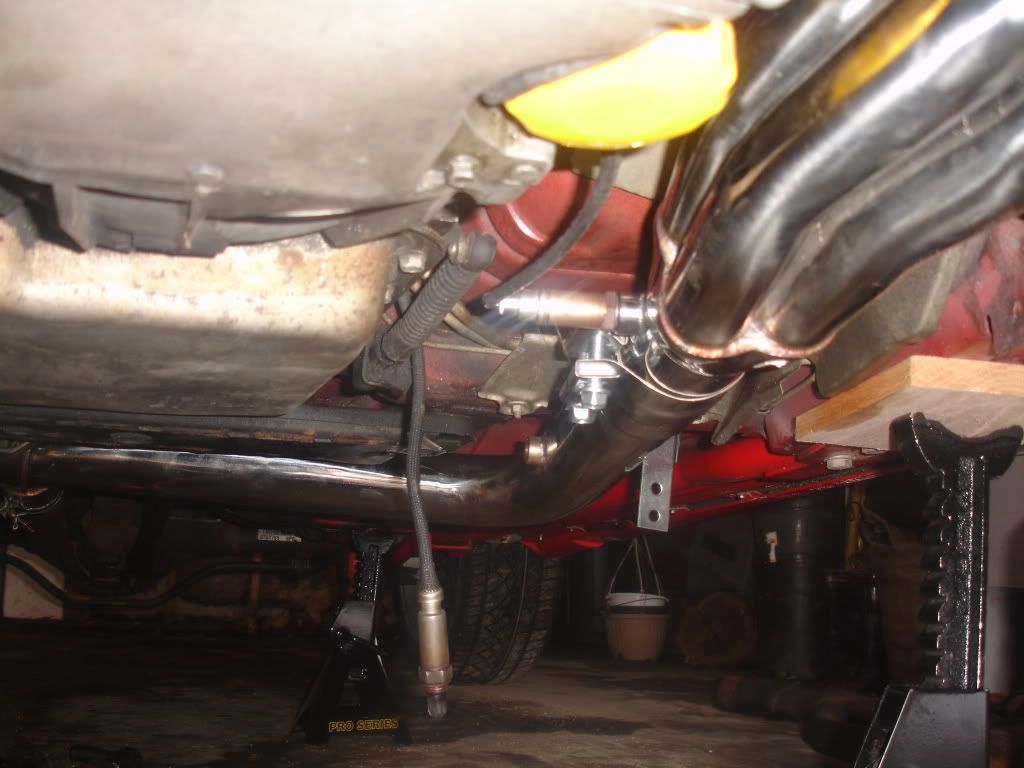
-Grab your y-pipe and get under the car. get somthing that will spead the exsisting I-pipe cause its a tight fit as well. I used the deadblow hammer and spead it from the inside out. Make sure you open the band clamp all the way on it. Make sure you have all your band clamps and in their respective positions if they are preformed like alot are. slide and wiggle the new y-pipe in the i-pipe and then on the headers. If you are like me, one header at a time. The y-pipe should have a two piece passenger side section.
-next tighten but dont torque down the band clamps. Antisieze the bolts
-alright, now you have to have the dipstick tube and old passenger side manifold out cause you HAVE TO HAVE the new header in there now.
Getting the rear header bolt in is easier with a 10m ratchet wrench from under the car.
-Get the small section of pipe, thread in your old rear O2 sensor, or a cap and then get it on there. tighen but dont torque down the band clamp.
-Get your new O2 sensor in the headers and run the wires so that they are up and out of harms way. ei heat and moving parts. I ran mine to the passener side and zip striped them to the trans lines. YOu got plenty of wire so be creative. Go ahead and put in your old o2 or a cap in the driver side rear o2 bunge. Make sure you put antizieze on your o2s. Bosch puts them on there before hand for you but a little extra on the thread wont hurt.
-Back up top and tighten and torque down the header bolts. Look up the TQ specs. I wont say cause im not sure. start form the insides and work your way out. REmember, they dont need to be 200 ft lbs. You got aluminum heads. Dont pull out the thread. I snugged mine down. Some where around 80 ft lbs i believe but dont quote me on that.
-SPARKPLUGS!!! antiseize and thread em in there. should be easy now that you got headers in there
Bolt the dipstick tube back on... even though you may wanna just throw it way for all the trouble it caused.
-Starting fom the rear, put your coils and wires back in (either new or old) make sure your wires click TWICE on the coils and line up right. Make sure you put the heat shields back on. Seeing how you got nice new and soon to be HOT headers on there, a little heat protection could go a long way. Mine fit.
-Bolt back in your AIR/EGR tubes (or take it out and cap your tubes) I have all mine back on. Bolt the EGR pump bracket back on the head.

-go ahead and put you stb back in cause your done up top
-remember those two nuts I told you to save from the cats, use those to bolt the passenger support brace to your new y-pipe.
They thread right on.
-If your ypipe comes with it, bolt your driverside support hanger in where there is a heatsheild bolt. bolt it UNDER the heatshield.
-Tighten and torque down everything under the car. Band clamps, O2s
-Check your work. Check your harnesses, your bolts, your coils, your wires, your, make sure you dont have tools left in the car.. if you touched it, check it. give every bolt a once over.
ALL DONE
-drop the car... carfully...., hook up the battery and start it up and listen. let it run for a minute. It might smoke for a minute or so. Its burning off anythng residue that was on your headers (water, stickers, blood...) check you manifolds and pipes. for any obvious leaks. and ENJOY
-
02-25-2010, 02:20 PM #3Senior Member
- Join Date
- Mar 2008
- Location
- Lake Geneva, WI
- Posts
- 1,539
Red- 98 Trans Am
Alright, i think i got everything, if i left something out, jst remind me, it alot to remember. Ill edit my info if anyone has anthing i had missed or need to clarify or just didnt do it right lol
-
02-25-2010, 03:43 PM #4Junior Member
- Join Date
- Sep 2007
- Location
- North America
- Posts
- 91
Navy Blue Metallic- 1999 Trans-Am
Thanks for putting this up man. I really appretiate the extra effort to take pics and post step by steps. Looks awesome.
-
02-25-2010, 06:44 PM #5Senior Member
- Join Date
- Mar 2008
- Location
- Lake Geneva, WI
- Posts
- 1,539
Red- 98 Trans Am
sorry if I didnt take enough pics but when your getting mad at a dipstick tube you start to forget to take pictures sometimes
-
02-25-2010, 11:17 PM #6Impounded
- Join Date
- Feb 2010
- Location
- dif every month
- Posts
- 7
- 01 Trans am
looks good man, I had a bitch of a time getting the dipshit back in
-
02-26-2010, 12:58 AM #7Member

- Join Date
- Apr 2008
- Location
- Bay Area
- Posts
- 8,114
On your ass flashing- my highbeams
Very nice write up.
-
03-08-2010, 06:37 AM #8Junior Member

- Join Date
- Sep 2008
- Location
- MA
- Posts
- 5
Black- '00 Z/28 Camaro
Nice thread, thanks man.
-
03-21-2010, 09:18 PM #9Junior Member
- Join Date
- Feb 2010
- Location
- MI-YAYO
- Posts
- 21
BLACK- 1998 BIRD T/A CONVERT
very nice thanks for the info im going with the same setup obx lpp ory cant wait
-
03-21-2010, 10:08 PM #10Junior Member
- Join Date
- Oct 2009
- Location
- new york
- Posts
- 38
- 1998 trans am
nice thread man, i did the same but with bbk heads,enjoy man
-
03-21-2010, 10:39 PM #11Junior Member

- Join Date
- May 2009
- Location
- NEAR SEWER CITY IOWA
- Posts
- 11
red- 1998 Trans Am

Really awesome write-up!I'm looking to do the same in the next couple months also.The best part was it being done on a red 98 TA like mine,hope mine goes as smoothly as yours did.By the way where do I go to get that y-pipe ?Thanks again for the great write-up .
-
03-22-2010, 03:32 AM #12Junior Member
- Join Date
- Feb 2010
- Location
- MI-YAYO
- Posts
- 21
BLACK- 1998 BIRD T/A CONVERT
 Originally Posted by ared98ta

look up LPP headers and you will find it
-
03-22-2010, 06:50 PM #13Senior Member
- Join Date
- Mar 2008
- Location
- Lake Geneva, WI
- Posts
- 1,539
Red- 98 Trans Am
Ebay. Everything i got, i got on ebay. jusst type what your looking for in the seach bar and it should come up. type in ls1 y pipe Originally Posted by ared98ta
-
03-22-2010, 06:53 PM #14Senior Member
- Join Date
- Mar 2008
- Location
- Lake Geneva, WI
- Posts
- 1,539
Red- 98 Trans Am
No prob and good luck. yeah, i had to kinda represent the 98's Originally Posted by ared98ta
-
03-23-2010, 11:16 AM #15Spaz is My Mentor


- Join Date
- Feb 2009
- Location
- Florida Man Status Acheivement
- Posts
- 11,759
Navy Blue Metallic- 98 T/A w/ mods, 00 FBVert
<<<<Give's fist bump to JoshuaGrooms83 from another 98' T/A
-
02-21-2011, 09:29 AM #16Senior Member
- Join Date
- Mar 2008
- Location
- Lake Geneva, WI
- Posts
- 1,539
Red- 98 Trans Am
Headers are still running strong and no leaks. I did have HF cats welded on the Ypipe too to smooth out the exhaust note a bit.
I am however swapping to an LS6 intake Manifold so im deleting the evil EGR pics will follow. promise 
-
02-22-2011, 03:54 PM #17Waiting on the Tree

- Join Date
- Jul 2005
- Location
- Niagara Falls Ont.Canada
- Posts
- 927
NBM- 1999 TA A4
Great write up,my OBX's go on next month.
2010 Camaro SIM 2SS/RS A6
1999 TA A4 NBM
12.265 at 110.52mph
-
02-22-2011, 07:29 PM #18Senior Member

- Join Date
- Jan 2006
- Location
- Marylandistan
- Posts
- 5,761
Black- 2001 Trans Am (sold)
Good job. Should have cut off the air/egr fittings to avoid the fustration of having to pull the header off again after they break off.
-
02-22-2011, 11:17 PM #19Senior Member
- Join Date
- Mar 2008
- Location
- Lake Geneva, WI
- Posts
- 1,539
Red- 98 Trans Am
I dont think the EGR or AIR tubes are gonna break on these. for one... they are stainless steel tubes. and anothering thing is they arnt butt welded in. they stick in a little and then are welded in. They these headers are robust. Ive been running these now for a year and some change and now im runnning aruond here in germany with the cobble stones and autobahn. No leaky leakys. I am however gonna get ride of my EGR system for now. And possible the AIR. I know im having it tuned out, but not sure if i wanna get ride of it yet. I got Caps coming for both though. Going to an LS6 intake.

 Reply With Quote
Thread Information
Users Browsing this Thread
There are currently 1 users browsing this thread. (0 members and 1 guests)
Similar Threads
-
Install shop or DIY header install?
By dethinboots in forum External EngineReplies: 7Last Post: 09-24-2011, 06:35 PM -
Help: Header Install
By jharders in forum External EngineReplies: 13Last Post: 03-29-2011, 02:22 PM -
Post LT header install header issues
By ob02z28 in forum External EngineReplies: 20Last Post: 02-18-2010, 04:10 PM -
lt1 header install
By 6801 in forum LT1Replies: 3Last Post: 07-30-2009, 05:39 PM -
header install so cal?
By sscamed in forum External EngineReplies: 0Last Post: 10-26-2008, 11:18 PM

Bookmarks