
Results 1 to 20 of 25
-
06-25-2011, 04:42 PM #1ʢ ൧ ൨ ൩ ൪ ൫ ൬ ൭ ൮Ր Ց Ւ Փ


- Join Date
- Feb 2009
- Location
- Pittsburgh
- Posts
- 9,963
White- 2008 Hummer H3
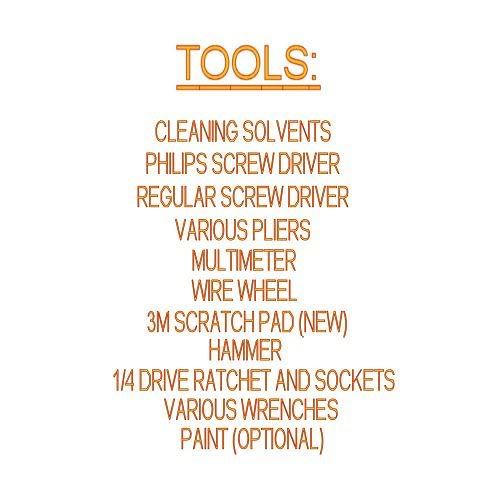
DIY starter rebuilding, the lost art..
You can go nearly as far back as when some of the first starter motors were used, and still find nearly indentical componets in the average automotive starter motor. Whether today or 40 years ago, starter motors use the same basic principles. Solenoid, electric motor, and switches.
Now a days, most folks just replace rather than rebuild. A high percentage of the remaned starters today are filled with chinese parts. This is truely one of the exceptions to, "you get what you pay for".. I would put a high dollar 100% chinese internal remanded starter against, ANY 100% American starter with good "reused" internals..
I'am going to show you how to tear down inspect and reuse a 20 year old starter with all reused American made only parts. The starter we will be remanning will be the starter I'll use on my TT project engine.. Twice, American made with pride..
Rebuild kits can be had for just about any starter if you're willing to look.
BUT, as you're about to see, stuffing you're old starter full of parts (made whom knows where) is'nt always needed nor always a good idea..
Here goes.........Last edited by Smittro; 06-25-2011 at 08:01 PM.
-
06-25-2011, 05:07 PM #2ʢ ൧ ൨ ൩ ൪ ൫ ൬ ൭ ൮Ր Ց Ւ Փ
- Join Date
- Feb 2009
- Location
- Pittsburgh
- Posts
- 9,963
White- 2008 Hummer H3
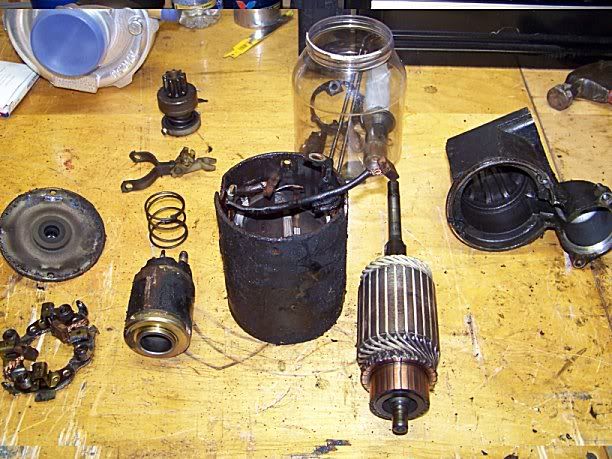
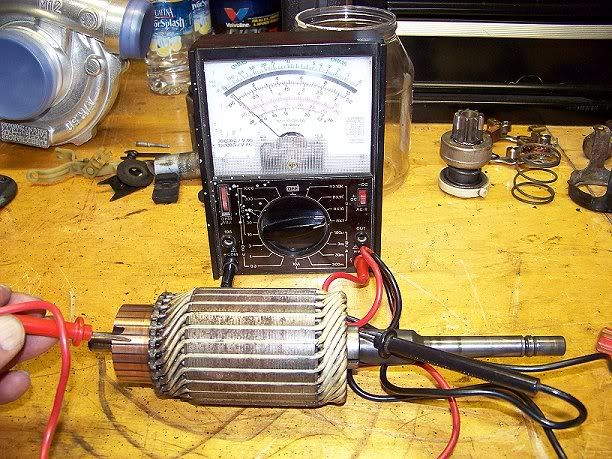
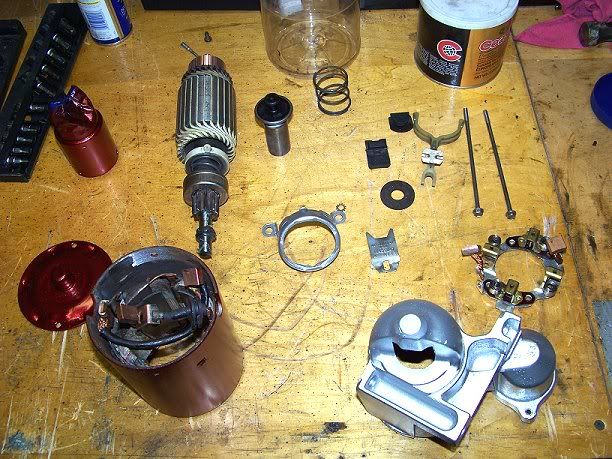
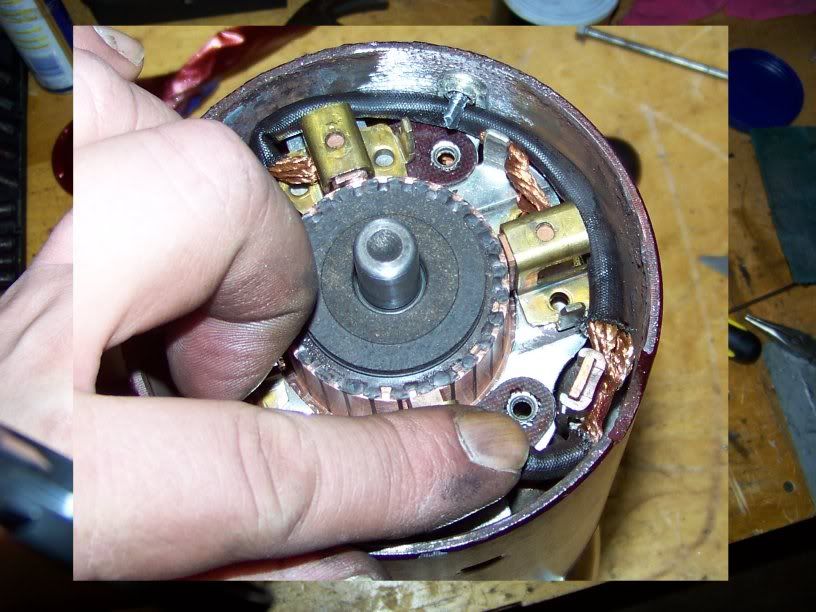
First, tear you're old piece down and begin inspecting and clean..
Then test the fields (hot to ground) to the field case under the lowest OHMS setting on your multi meter. The reading should be 0..
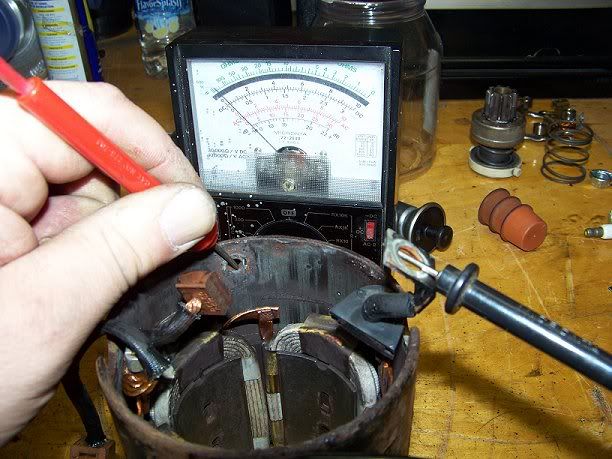
Then test both hot poles of the fields them selves. This should quikly max out the meter.
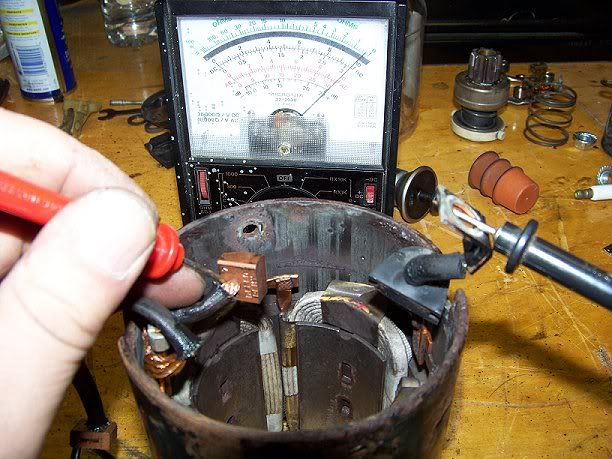
Now test the armature from the shaft to each bar on the commutator.
Mark one bar with a sharpy marker so you can know where to stop.
Each bar should read "0" ohms. If you get an ohms reading there is a short in the armature windings and the arm is junk.
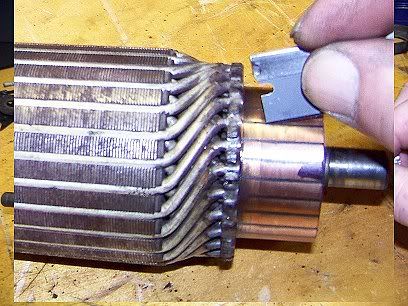
Between each bar on the comm. is a formica seperater. Take a scribe or a sharp razor blade and scride each one from the base of the comm to the top. Go easy you're just scribing a small amount of material and dirt out.
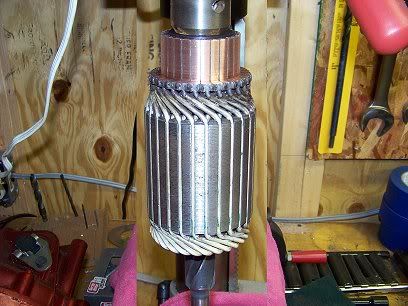
Now over to the drill press. Lock the drive side of the shaft in the chuck and rotate the armature by hand looking for any arm wobble. If it wobbles it's no good and you'll need a new armature before you go any futher.. Ours checks out good.
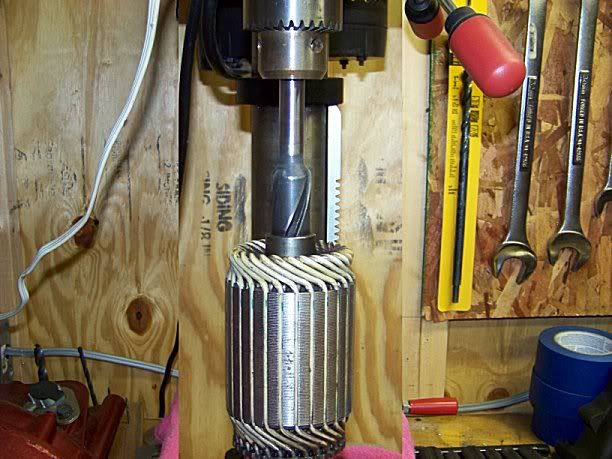
Now with 3m pad in hand start the press on it's lowest setting possible.
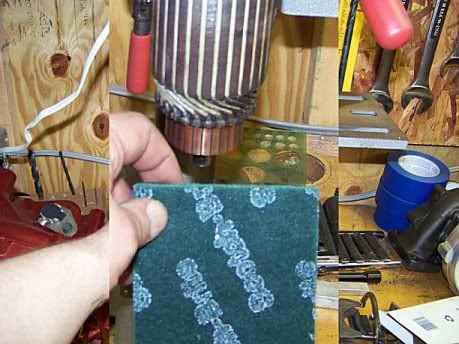
Then carefully rub over the arm while it's turning in the press. No he-man stuff just gental pressure.
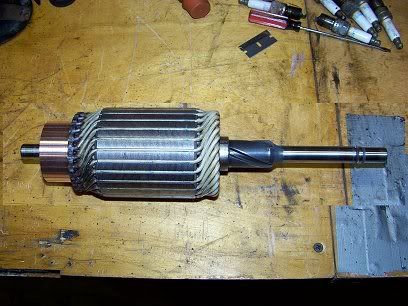
Then flip the arm and "polish" the comm and the end of the shaft.
this will be your finished piece, clean but not going nuts that you remove any of the laquer finish that protects the windings of the arm.
Now on to the field case. DO NOT TRY TO OVERLY CLEAN the inside of the field case and NEVER try to "scrub" the field windings themselves. You just want a desent cleaning and blow it dry with air. DO NOT SOAK the fields in solvent for long. Swish the case around submerged in cleaner, then go strait into a hot as you can stand bucket of soapy water. Rinse and blow dry with compressed air.
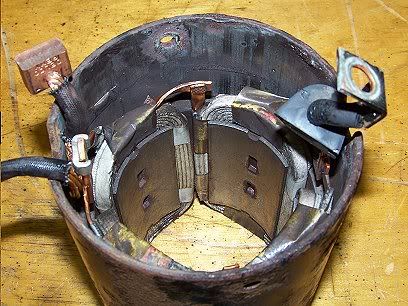
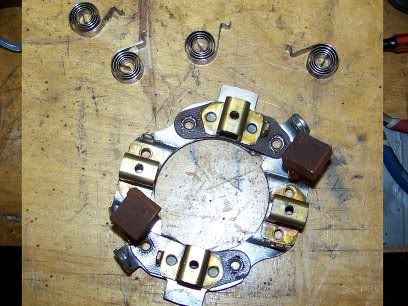
Once dry...Clean up the brush holder mounts with a Dremel or air Moto tool.
Last edited by Smittro; 06-26-2011 at 08:05 AM.
-
06-25-2011, 05:23 PM #3ʢ ൧ ൨ ൩ ൪ ൫ ൬ ൭ ൮Ր Ց Ւ Փ
- Join Date
- Feb 2009
- Location
- Pittsburgh
- Posts
- 9,963
White- 2008 Hummer H3
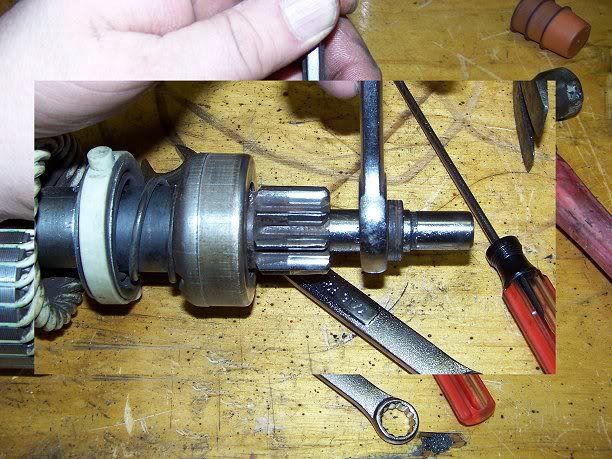
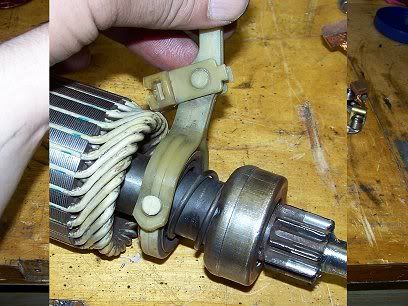
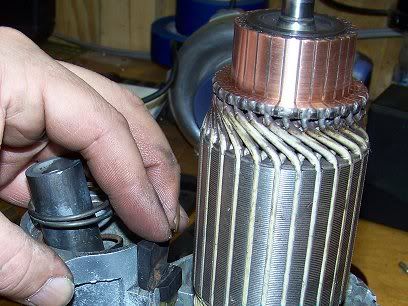
Now we will reassemble the arm and starter drive.
start by liberally lubing the arm where the drive will be.
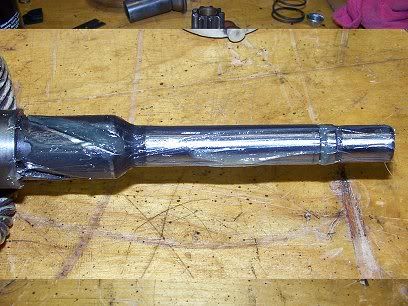
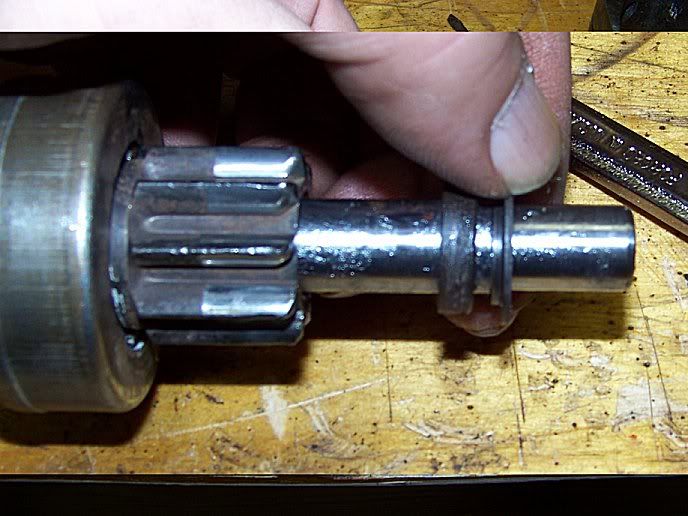
Then take your clean reuseable drive and slide it onto the shaft.
Notice there are two grooves, many starters use a drive stop but some do not.
This one does. Slide the stop over the shaft next. with the smaller DIA. hole going first.
After the stop is on you'll see that this starters stop is also a keeper..
Next squeeze on the "C" clip.
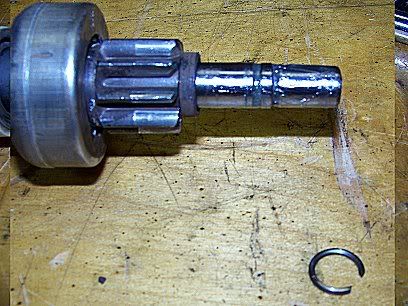
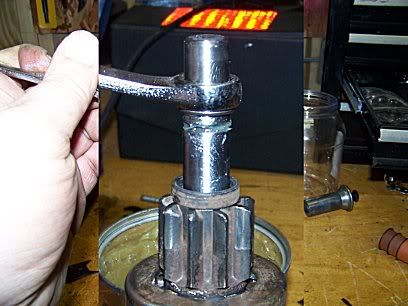
Slide the keeper up to the "C" clip..
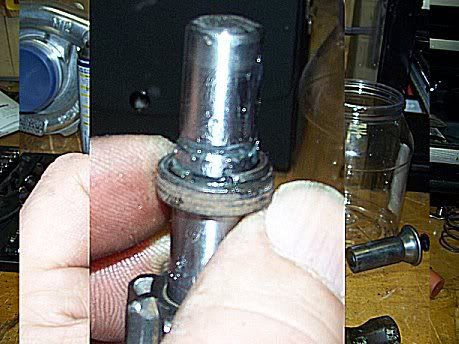
With a small screw driver and a wrench to hold with start the open ends of the C clip into the groove on the stop. Now take your wrench and from behind tap with a hammer, LIGHTLY..
The clip will slip inside the stop where it will then stay on it's own.
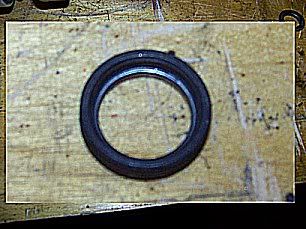
Now slide on the bearing shield ring on top.
You are now ready for the next step..Last edited by Smittro; 06-25-2011 at 11:40 PM.
-
06-25-2011, 05:37 PM #4ʢ ൧ ൨ ൩ ൪ ൫ ൬ ൭ ൮Ր Ց Ւ Փ
- Join Date
- Feb 2009
- Location
- Pittsburgh
- Posts
- 9,963
White- 2008 Hummer H3
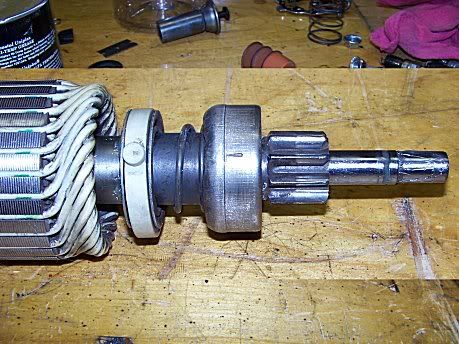
Next with all your parts clean and layed out.
Begin with the nose of the starter and grease the needle bearing cup with some soft but high temp grease. (some starters use brass/bronze bushings instead of needle bearings.
Then snap on the drive engagement arm and install into the nose houseing.
After,, install the solenoid plunger and return spring.
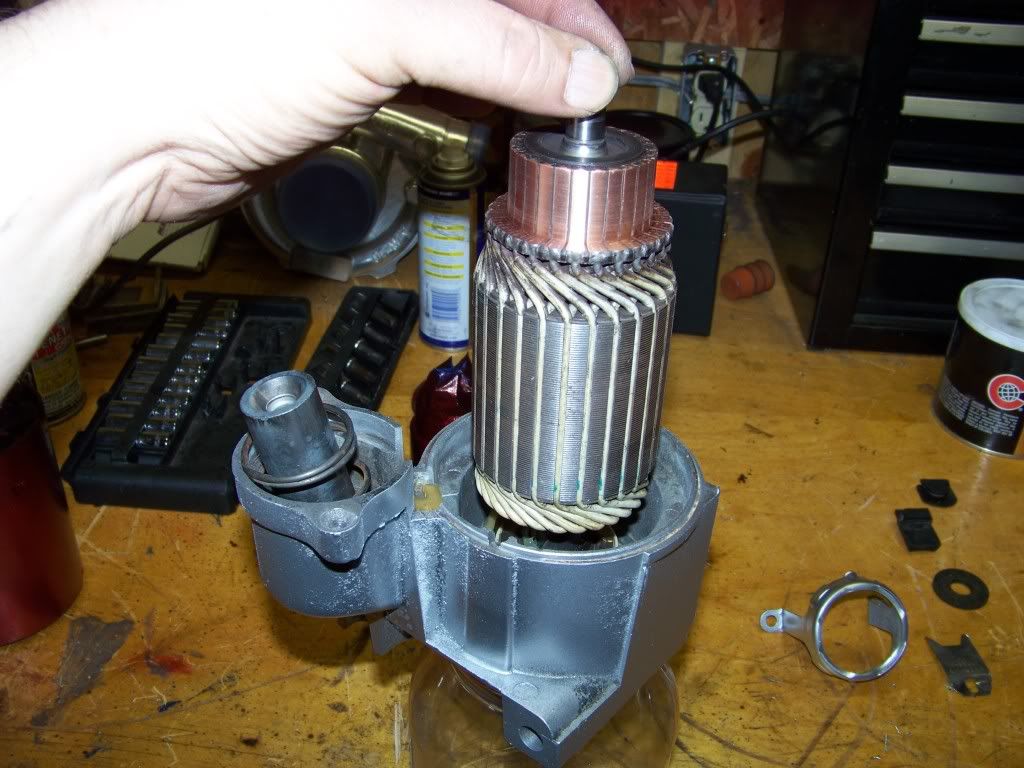
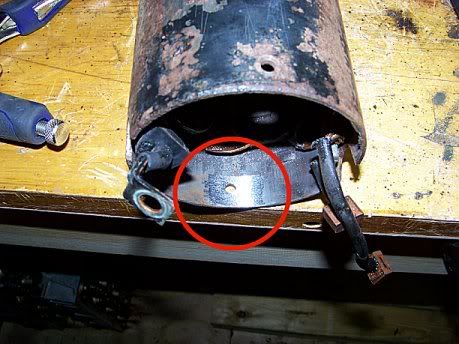
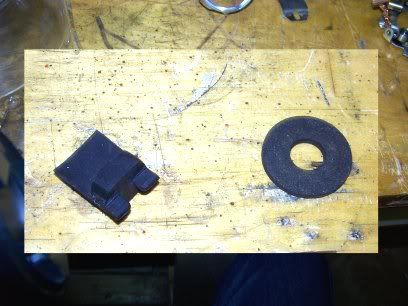
This starter uses a notched rubber stopper which is inserted and locks into the top of the engagement arm pivot point. (on the left)
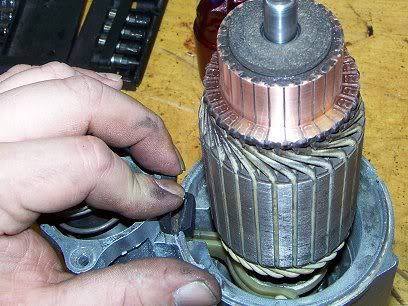
Next,, Install the field case over the armature with any notches lined up. This field case has only one @ the base and it inter locks with the rubber stopper you've just installed.
Tap down LIGHTLY with your hammer on the top edges to ensure the case is bottomed out. then pull your leads free from your way.
Then install the leather washer on top of the comm. (on the right)
Last edited by Smittro; 06-26-2011 at 09:44 AM.
-
06-25-2011, 06:09 PM #5ʢ ൧ ൨ ൩ ൪ ൫ ൬ ൭ ൮Ր Ց Ւ Փ
- Join Date
- Feb 2009
- Location
- Pittsburgh
- Posts
- 9,963
White- 2008 Hummer H3
Now move on to the brush holder.
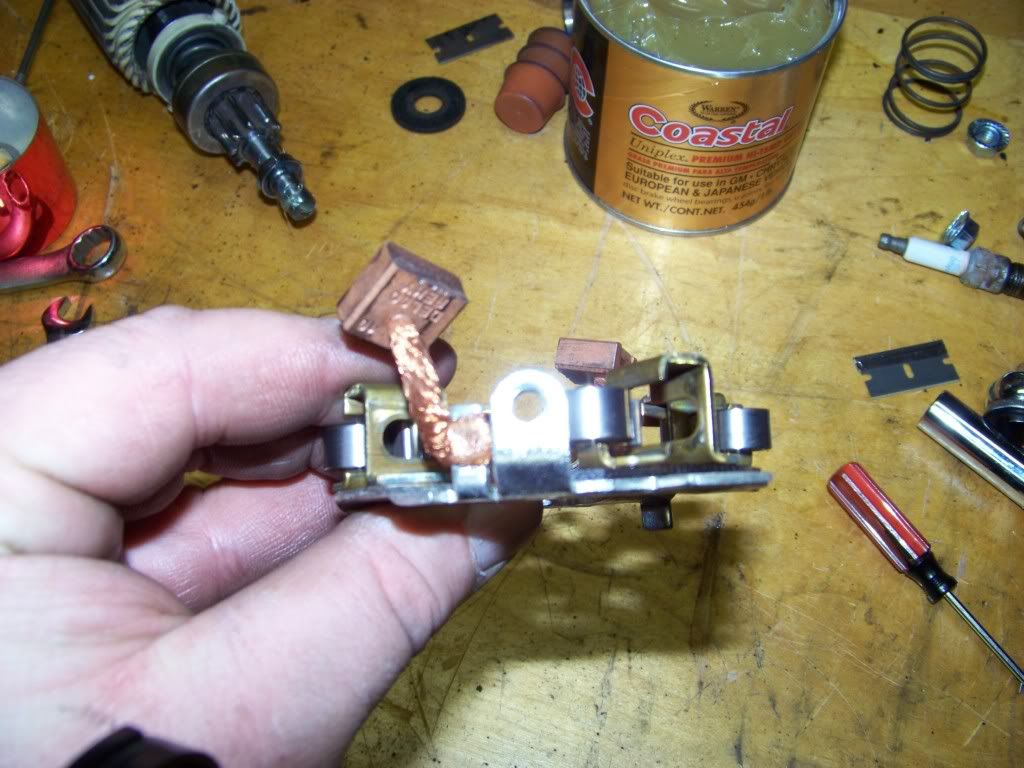
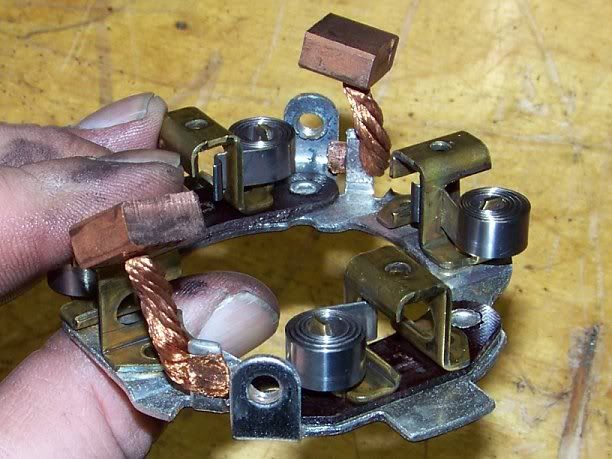
Pry away the brush tensioner springs.
Now you'll have to get the brushes started into their guides @ the same time you slide the holder into place. Then with needle-nose pliers set the srpings under ONE TURN so to get proper bush tension against the comm.
The fields of most starter motors are HOT so once the brush holder is in place you'll need to go around and be sure the pigtails for the brushes are NOT in contact with the case nor the holder body. Because,, two of the brush mounts are isolated as they are 2 positive and 2 NEGATIVE..
Now place the brush HOT stud isolator. This helps prevent a short, but the tab can be moved or bent some so to give more room between HOT and GROUND. The HOT lead to the solenoid has an isolator installed on it so go ahead and set that while you're @ it.
While doing that also, install your solenoid LOOSE with the small stud facing out most, and slide the HOT lead over one of the large studs as seen in the next photo.

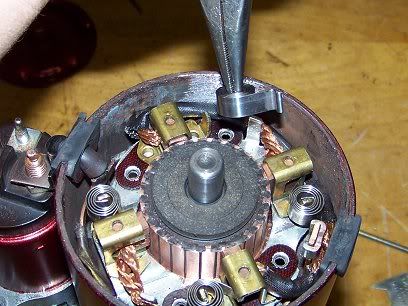
Then place a dab of your grease on the end of the arm shaft, not too much though. just enough to help lube the comm cap needle bearings.
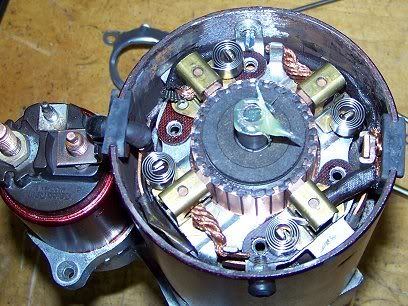
Place the comm cap and align it so the studs go through the brush holder and field case and are not binding. Then add the solenoid hold down and the motor HOT nut tightened.
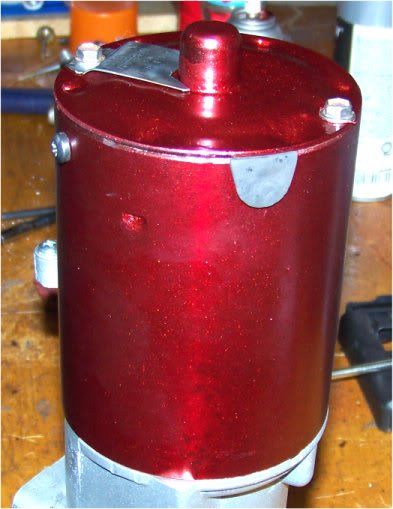
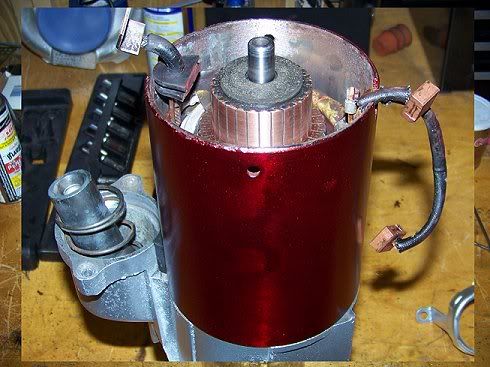
You're DONE!
Now head over to your local auto parts, or jump the small stud with the large bare stud to a automotive 12v source and ground the nose or field case. Lock the starter in your vise and then touch the other end of your leads (jumpers) to your 12v source for no loner than in 10 second intervals to test it's functioning properly. DO NOT hold it there spinning forever. The solenoid and quite possibly the motor will fry. A starter is only designed for intermittent use.. Don't cook it..
The finished product..

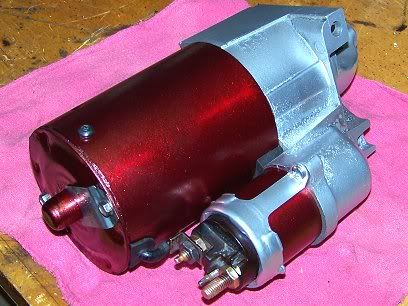
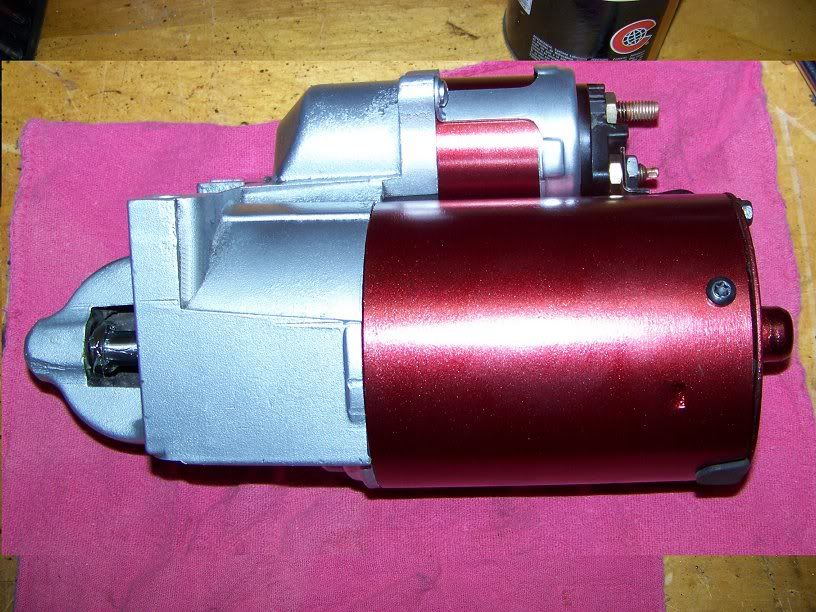
Last edited by Smittro; 06-26-2011 at 09:31 PM.
-
06-25-2011, 06:12 PM #6ʢ ൧ ൨ ൩ ൪ ൫ ൬ ൭ ൮Ր Ց Ւ Փ
- Join Date
- Feb 2009
- Location
- Pittsburgh
- Posts
- 9,963
White- 2008 Hummer H3
 Thanks!
 Originally Posted by transamtom

haha,, Sigh you would've posted right in the middle..
Last edited by Smittro; 06-25-2011 at 08:18 PM.
-
06-26-2011, 03:25 AM #7Waiting on the Tree

- Join Date
- Jul 2005
- Location
- Niagara Falls Ont.Canada
- Posts
- 927
NBM- 1999 TA A4
Sorry I posted before you had the first pics in you must have done it just as I was posting. Originally Posted by Smittro
I open about 20 threads and read them and post as I go....sorry
Maybe a mod can delete my post...please.
-
06-26-2011, 03:57 AM #8ʢ ൧ ൨ ൩ ൪ ൫ ൬ ൭ ൮Ր Ց Ւ Փ
- Join Date
- Feb 2009
- Location
- Pittsburgh
- Posts
- 9,963
White- 2008 Hummer H3
 It's all good. I was just hurrasing you.. Originally Posted by transamtom
 No harm done..
-
06-26-2011, 07:05 AM #9Senior Member

- Join Date
- Jun 2009
- Location
- Ohio
- Posts
- 1,017
Sunset Orange Metallic- 2002 Z28 Hardtop
Nice writeup Smittro.
Its nice to see I'm not the only gearhead that rebuilds accessories anymore.
-
06-26-2011, 08:31 AM #10ʢ ൧ ൨ ൩ ൪ ൫ ൬ ൭ ൮Ր Ց Ւ Փ
- Join Date
- Feb 2009
- Location
- Pittsburgh
- Posts
- 9,963
White- 2008 Hummer H3
Thanks! Originally Posted by Z28_Driver
I used to do alot of rebuilds on older and newer starters for various applications when I worked for an automotive electric co.
Lots of times we would get in starters and so forth for hot rods or folks doing a restore using remanned original parts and accessories.
Some folks were very picky about using chinese parts in thier equiptment. Sometimes it would take as many as
a dozen old starters and such to build one good componet with all original parts.
Luckly, I started with a perfectly good working starter. But it has taken in motor oil from a leaky main bearing seal and needed a going over.
Though this is a v6 starter, many starters use the same principle parts, in various sizes and shapes. But in general they're nearly all the same even when the starter looks different in size and shape. Also, many times unless the armature has blown apart inside or been cranked to death, the brushes and so forth will show signs of very little wear. Though the brushes in the above starter are 20 years old they are still not much different in size as a new set would look. Also the arm as you can see had almost no visible dimention changes from proper intermittent use..
Anywho, glad you enjoyed the process..
-
06-26-2011, 10:05 AM #11ʢ ൧ ൨ ൩ ൪ ൫ ൬ ൭ ൮Ր Ց Ւ Փ
- Join Date
- Feb 2009
- Location
- Pittsburgh
- Posts
- 9,963
White- 2008 Hummer H3
I know some of you folks may be thinking, "why bother?" or, "just get a new remanded one".. Well if you think about it you'd be getting the same thing really. Sept likely stuffed full of HoeCheeMin parts. Any reputable rebuild shop will reuse as much as they can. Firstly because many times the older parts are better than the new chinese parts, and secondly, (most important business wise) it's cheaper to reproduce if you're only fixing what's wrong then reselling..
A shop can't make money on old units stuffed with new parts. Because even new chinese parts cost money, so if you're selling say starters @ 100 bucks a go, but it's full of 200 bucks worth of parts you'd loose money quick. Many times more often than not we turn in exchange for cores, "broken" units that only actually may need things like, brushes, or new fields, even something as simple to change as a solenoid.
Starter motors are unique in that they are only used a few seconds @ a time.
SO, even if your car/truck, what have you, as 150k on the clock the starter motor may look like the day it was made inside as they are usually sealed units. SO like said above it's easy to see how folks may be getting rid of a perfectly good starter for something as simple as needing a new drive or solenoid..
It takes more time to piss around tearing an old unit off, having it tested, then waiting on a possible back order and delivery reinstalling it and blablabla.
What I've done here can sometimes be done by the average wrench turner in less time and hastles than "simply" replacing it..
-
06-26-2011, 03:02 PM #12Waiting on the Tree
- Join Date
- Jul 2005
- Location
- Niagara Falls Ont.Canada
- Posts
- 927
NBM- 1999 TA A4
I didn't realise I could delete my own posts so I went back and did it. Originally Posted by Smittro
All cleaned up and together now
-
06-26-2011, 09:18 PM #13ʢ ൧ ൨ ൩ ൪ ൫ ൬ ൭ ൮Ր Ց Ւ Փ
- Join Date
- Feb 2009
- Location
- Pittsburgh
- Posts
- 9,963
White- 2008 Hummer H3
You did'nt have to do that bro. Originally Posted by transamtom
It was all good, I was just bustin' your balls a lil' bit.. No harm done.
-
06-26-2011, 09:31 PM #14ʢ ൧ ൨ ൩ ൪ ൫ ൬ ൭ ൮Ր Ց Ւ Փ
- Join Date
- Feb 2009
- Location
- Pittsburgh
- Posts
- 9,963
White- 2008 Hummer H3
-
06-28-2011, 05:47 PM #15Senior Member


- Join Date
- Dec 2007
- Location
- Orlando, FL
- Posts
- 3,352
Mean Black- 1998 Trans Am
Very interesting. Nice work Smittro. I never seen a write up about starters.
Is it me or you REALLY like metallic red?
Anyone has a write up on how your can upgrade an existing alternator to more high power one? I know is easier to get the AD244 model. Im just curious to know how hard will it be to change the internals of our stocker unit.
-
06-28-2011, 05:54 PM #16Veteran

- Join Date
- Feb 2009
- Location
- Mansfield, PA
- Posts
- 22,146
Black & Blue- '02 WS.6 / '07 Suburban
Nicely done and good detail in the photos. What grease did you use during re-assembly?
-
06-28-2011, 06:58 PM #17ʢ ൧ ൨ ൩ ൪ ൫ ൬ ൭ ൮Ր Ց Ւ Փ
- Join Date
- Feb 2009
- Location
- Pittsburgh
- Posts
- 9,963
White- 2008 Hummer H3
Originally Posted by pajeff02
Thank you Sir!
High temp bearing grease called (Coastal), it can be used on CV joints it"s sticky not heavy..
It see's some heat but not extreme.. It's listed as for Gm/import use and it worked great on the Camaro's calipar pins..lolLast edited by Smittro; 06-28-2011 at 07:02 PM.
-
06-28-2011, 06:59 PM #18ʢ ൧ ൨ ൩ ൪ ൫ ൬ ൭ ൮Ր Ց Ւ Փ
- Join Date
- Feb 2009
- Location
- Pittsburgh
- Posts
- 9,963
White- 2008 Hummer H3
Thanks! Originally Posted by JayTA98
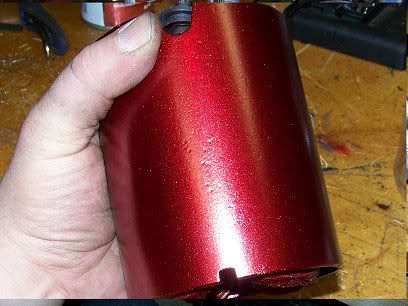
Matches the engine it will be bolted to..
-
06-28-2011, 08:22 PM #19Exalted Cyclops

- Join Date
- Feb 2007
- Location
- San Diego, CA
- Posts
- 5,823
2002 Z28 A4 NBM- Sadly now demodded :(
Great write up Steven.
Back in the day (when I had my shop) I used to go to the self service wrecking yards and buy starters and alternators, even the occasional generator to rebuild for stock. I looked mostly for Hi Torque starters for GM as those were used on big block cars but they all work pretty much the same (barring the solenoid). Parts to rebuild were cheap and doing it was easy.
I'd sell them to customers that needed a replacement or when I did an engine overhaul.
-
06-29-2011, 10:06 AM #20ʢ ൧ ൨ ൩ ൪ ൫ ൬ ൭ ൮Ր Ց Ւ Փ
- Join Date
- Feb 2009
- Location
- Pittsburgh
- Posts
- 9,963
White- 2008 Hummer H3
Thanks! Originally Posted by 67CamaroRSSS
I enjoy doing this kinda thing. Had a small amount of free time for my project motor so I figured why not do one of the smaller projects that goes with it..
Wanted to do it anyways, figured it was more interesting than watching me just paint/install a new one..

 Reply With Quote
Thread Information
Users Browsing this Thread
There are currently 1 users browsing this thread. (0 members and 1 guests)
Similar Threads
-
Help: rebuilding a 3.8
By austin1999 in forum Internal EngineReplies: 2Last Post: 07-06-2016, 02:41 PM -
rebuilding
By 98transamfirebird in forum General HelpReplies: 2Last Post: 10-22-2013, 07:59 AM -
Help: rebuilding the tranny
By blk_ss02 in forum Automatic TransmissionReplies: 0Last Post: 11-24-2008, 08:34 AM -
Question: maybe rebuilding this LS1
By LS-T in forum Internal EngineReplies: 3Last Post: 06-21-2008, 01:36 PM -
Anyone Up To Rebuilding A Ls1
By jbigdawg79 in forum General HelpReplies: 0Last Post: 05-17-2006, 07:38 PM

Bookmarks