
Results 1 to 20 of 23
Thread: Valve cover question
-
01-29-2013, 09:08 PM #1Senior Member


- Join Date
- Apr 2010
- Location
- Alabama
- Posts
- 3,625
Black/ Silver- 98 TA WS6/ 01 C5 Corvette
Valve cover question
I was installing my passenger valve cover on my 243 heads that use the 99 valve covers and I see this:
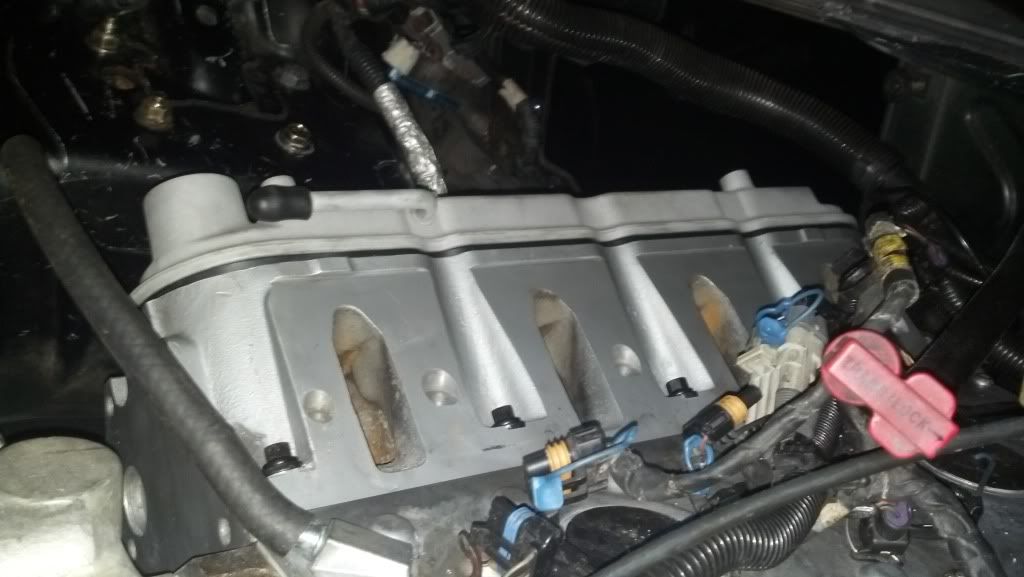
Should I see the gasket like that? My bolts don't have the grommets on them if that matters. It makes me feel like they are not tight enough or I installed the gasket wrong some how.1998 Trans Am WS6 - Phantom
421 CI LQ9, Tick Performance Custom Cam, TFS 255cc LS3 heads, Kooks 2" LT headers, Kooks 3" True Duals w/ high flow cats, FTP 104 lid, Speed Density Tune, 4" silicon tube, LS6 VCT, FAST 102 Intake, NW 102 TB, Oil Catch Can, SLP Bilstein Shocks w/ Vogtland Springs, CTS-V 4-piston Calipers w/C6 Z06 rotors, Stainless Steel Brake Lines, R1 concepts premium rotors, Hawk HP+ brake pads, VFN WSQ Hood, C5-R timing chain, SLP oil pump, E85 tune, Walbro 450 fuel pump, Deatschwerkz 95# injectors, Breathless performance headlights, Frost Tune, !HVAC.
(Coming Soon) BMR DSL, UMI TQ Arm
421 LQ9 14.8:1 on E85 Build/

-
01-30-2013, 03:29 AM #2Veteran

- Join Date
- Feb 2009
- Location
- Mansfield, PA
- Posts
- 22,146
Black & Blue- '02 WS.6 / '07 Suburban
The O-ring gasket sets into a groove machined into the rocker arm cover. Honestly, I haven't paid attention to what they look like when installed. You should pick up a set of grommets for the bolts. As I recall, the recommended torque spec on them isn't all that much.
-
01-30-2013, 05:42 AM #3Senior Member
- Join Date
- Apr 2010
- Location
- Alabama
- Posts
- 3,625
Black/ Silver- 98 TA WS6/ 01 C5 Corvette
Okay well I did put the gasket into the groove. The valve cover wiggles even though the bolts are tight, I will get some grommets and see if that helps any. Originally Posted by pajeff02

-
01-30-2013, 07:27 AM #4Spaz is My Mentor


- Join Date
- Feb 2009
- Location
- Florida Man Status Acheivement
- Posts
- 11,759
Navy Blue Metallic- 98 T/A w/ mods, 00 FBVert
Hey Will,
After I sent last nights pm I got to thinking and I realize what Jeff had said about the grommets.
Side note - ordered the 7.325 push rods, hope to have them by Friday.
-
01-30-2013, 08:50 AM #5Senior Member
- Join Date
- Apr 2010
- Location
- Alabama
- Posts
- 3,625
Black/ Silver- 98 TA WS6/ 01 C5 Corvette
I thought about that too, I just didn't think it would make that much of a difference. I taped off everything on my drivers side and passenger head to attempt to remove the broken lifter tray bolt. Let me know how those pushrods turn out. Originally Posted by SMWS6TA
Last edited by 98TransAmWs-6; 01-30-2013 at 09:44 AM.
-
01-30-2013, 11:17 AM #6Spaz is My Mentor
- Join Date
- Feb 2009
- Location
- Florida Man Status Acheivement
- Posts
- 11,759
Navy Blue Metallic- 98 T/A w/ mods, 00 FBVert
I thought you already got the bolt out already. Be careful.
-
01-30-2013, 11:48 AM #7Senior Member
- Join Date
- Apr 2010
- Location
- Alabama
- Posts
- 3,625
Black/ Silver- 98 TA WS6/ 01 C5 Corvette
No I've been lazy....college, work, kids, and family seem to take all my free time Originally Posted by SMWS6TA

I covered the whole area minus the one spot I need access to with painters tape.
-
01-30-2013, 12:48 PM #8Veteran

- Join Date
- Oct 2008
- Location
- Wherever life takes me
- Posts
- 12,526
Red- 02 35th LE Camaro SS
Interesting. I've never really paid attention to what it looks like either. Now I'm curious.
-
01-30-2013, 01:01 PM #9Spaz is My Mentor
- Join Date
- Feb 2009
- Location
- Florida Man Status Acheivement
- Posts
- 11,759
Navy Blue Metallic- 98 T/A w/ mods, 00 FBVert
I hear yeah!!!
-
01-30-2013, 01:03 PM #10Senior Member
- Join Date
- Apr 2010
- Location
- Alabama
- Posts
- 3,625
Black/ Silver- 98 TA WS6/ 01 C5 Corvette
Do you think I blocked enough off

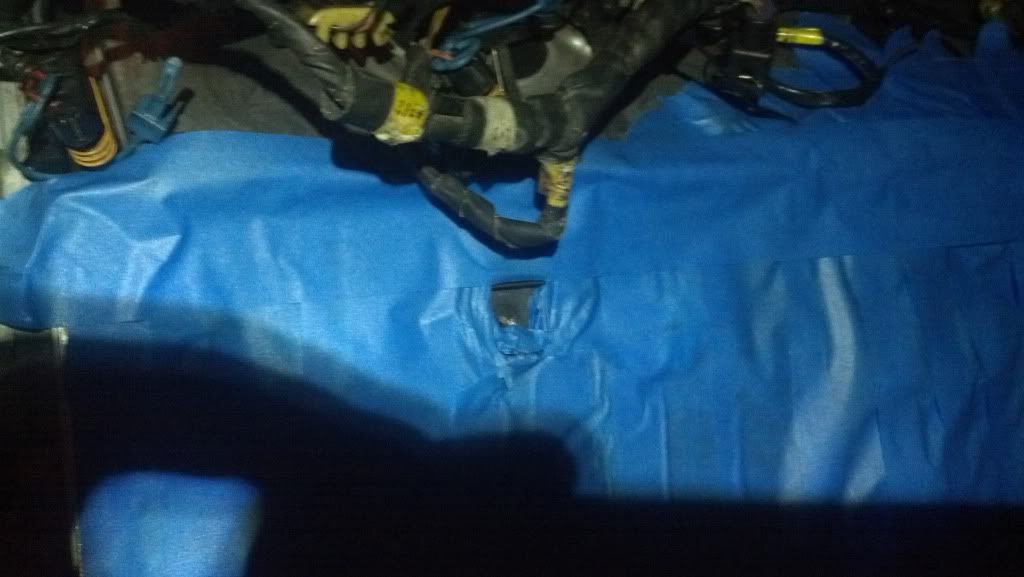
That is where I need to drill. I ordered grommets and they should be here tomorrow morning. Btw I hate advance auto parts employees. They know nothing about cars and what shit is called.
-
01-30-2013, 01:52 PM #11Spaz is My Mentor
- Join Date
- Feb 2009
- Location
- Florida Man Status Acheivement
- Posts
- 11,759
Navy Blue Metallic- 98 T/A w/ mods, 00 FBVert
ignore my pm about how far down the broken bolt is,
is there any edge at all to use a flat tip to turn the bolt?
Use any penetrating oil to help loose it?
I wounder if some carefully applied heat might help it? Maybe warm the surrounding block carefully?
-
01-30-2013, 01:56 PM #12Senior Member
- Join Date
- Apr 2010
- Location
- Alabama
- Posts
- 3,625
Black/ Silver- 98 TA WS6/ 01 C5 Corvette
It is completely flat. I wish it didn't matter if it came out or not lol. I will try penetrating oil and my torch but I feel those won't help much since the left hand drill bit is just drilling and not even turning the bolt a tiny bit. Originally Posted by SMWS6TA
-
01-30-2013, 01:58 PM #13Veteran
- Join Date
- Oct 2008
- Location
- Wherever life takes me
- Posts
- 12,526
Red- 02 35th LE Camaro SS
Just drill it out. Pretty straight-forward process.
-
01-30-2013, 01:59 PM #14Spaz is My Mentor
- Join Date
- Feb 2009
- Location
- Florida Man Status Acheivement
- Posts
- 11,759
Navy Blue Metallic- 98 T/A w/ mods, 00 FBVert
sad thing is that bolt isn't even that deep....
was looking over my wife's Jeep last night and remember I need to do this for a oil pan bolt that broke like this too. I'm luckier in that I'll be pulling the block out
-
01-30-2013, 02:05 PM #15Senior Member
- Join Date
- Apr 2010
- Location
- Alabama
- Posts
- 3,625
Black/ Silver- 98 TA WS6/ 01 C5 Corvette
What size bit and tap though? Originally Posted by 35th-ANV-SS
-
01-30-2013, 02:35 PM #16Veteran
- Join Date
- Oct 2008
- Location
- Wherever life takes me
- Posts
- 12,526
Red- 02 35th LE Camaro SS
Start small and work your way up is what I've done and seen done. I don't know if there's a rule of thumb or not. 1/2? the diameter?
Are you using a left-hand bit?
-
01-30-2013, 03:05 PM #17Senior Member
- Join Date
- Apr 2010
- Location
- Alabama
- Posts
- 3,625
Black/ Silver- 98 TA WS6/ 01 C5 Corvette
Yes I am and none of them worked they just made things worse, they jumped twice off center on different sides. I think I am going to have to drill the hole out with a bigger bit and use a different size bolt, or use JB Weld to fill the hole and redrill it the proper size. This seems like a lot of trouble for something that isn't that critical, what I mean is the head gasket with the heads are what really hold the tray down, in addition to the bolt. Originally Posted by 35th-ANV-SS
Last edited by 98TransAmWs-6; 01-30-2013 at 09:18 PM.
-
01-31-2013, 08:47 AM #18Senior Member
- Join Date
- Apr 2010
- Location
- Alabama
- Posts
- 3,625
Black/ Silver- 98 TA WS6/ 01 C5 Corvette
Well my grommets came in today and I will be installing them tonight, hopefully those allow me to fully tighten down the valve cover.
-
02-01-2013, 03:47 PM #19Senior Member
- Join Date
- Apr 2010
- Location
- Alabama
- Posts
- 3,625
Black/ Silver- 98 TA WS6/ 01 C5 Corvette
It seems the grommets made it no longer loose I will take a picture of how much gasket shows later.
-
02-01-2013, 03:50 PM #20Veteran
- Join Date
- Oct 2008
- Location
- Wherever life takes me
- Posts
- 12,526
Red- 02 35th LE Camaro SS
Did you also use a punch? Originally Posted by 98TransAmWs-6

 Reply With Quote
Thread Information
Users Browsing this Thread
There are currently 1 users browsing this thread. (0 members and 1 guests)
Similar Threads
-
Question: LS9/LSA valve cover question
By biggs in forum LS2/LS3/LS4/LSxReplies: 0Last Post: 11-13-2016, 04:32 PM -
Valve Cover Question
By johngoodman in forum Internal EngineReplies: 11Last Post: 07-19-2016, 05:17 PM -
Center bolt valve cover question
By sjd73ss in forum General HelpReplies: 3Last Post: 07-02-2009, 09:21 PM -
valve cover question
By Eric_The_Jew in forum External EngineReplies: 6Last Post: 09-25-2007, 08:29 AM -
valve cover question *help*
By cm2papa in forum External EngineReplies: 2Last Post: 04-18-2007, 04:57 AM

Bookmarks