

Results 1 to 20 of 66
Thread: Rear seat speaker panel removal.
-
03-19-2015, 12:23 AM #1Member


- Join Date
- Sep 2009
- Location
- U.K.
- Posts
- 532
Pewter- 2002 WS6 TA
Rear seat speaker panel removal.
As the title suggests....
I need to remove both panels this coming weekend and I thought I would
pre-empt the removal and ask here if it's a simple procedure or if there are
any funny little hidden clips or fixings which will have me scratching my head?
Do the seats have to come out or, hopefully, they can stay put?!
Any thoughts welcome.
Trev
-
03-19-2015, 04:26 AM #2Member

- Join Date
- Jan 2009
- Location
- MARYLAND
- Age
- 50
- Posts
- 807
BLACK- 1998 PONTIAC TA
Are you talking about the speakers in the hatch area, or the one's next to the rear seat arm rest? Both are very simple to remove. The one's next to the rear seat arm rest are just flimsy grilles that kinda bend in by just pushing the outer edges towards the center. Use a little pressure cause it may be stuck from sitting in 1 spot for so many years. The rear hatch speakers come out by turning 3 little plastic clips that turn 1/4 of a turn. Then a little tug upwards and forwards (the front of the car) gets them out. (on the drivers side) Again, they probably have been in there for XXX years, so deliberate, but gentle. Good luck.
-
03-19-2015, 05:09 AM #3Member
- Join Date
- Sep 2009
- Location
- U.K.
- Posts
- 532
Pewter- 2002 WS6 TA
Hey Ron,
Thanks for the input.
Have to say though... the whole rear seat armrest panel needs to come out, both sides
not just the speaker grille! In re-reading it was my fault for not being clear enough.
In a few days time you will see why I want them out but it is nothing to do with the
speakers!!
-
03-19-2015, 05:36 AM #4Member
- Join Date
- Nov 2014
- Location
- near Fort Hood, TX
- Posts
- 412
blue- 2002 Trans Am
This may help with pulling it out, even though it is for rear shocks, but shows the removing of the panel on the rear seats.
ASh
-
03-19-2015, 05:45 AM #5Member
- Join Date
- Sep 2009
- Location
- U.K.
- Posts
- 532
Pewter- 2002 WS6 TA
Spot on Ash!!
very helpful lil vid!!
-
03-19-2015, 06:18 AM #6Member
- Join Date
- Nov 2014
- Location
- near Fort Hood, TX
- Posts
- 412
blue- 2002 Trans Am
glad that is what you were looking for, good video that shows how to get that side panel out. Originally Posted by speedyWS6

good luck with your coming up project
ASh
-
03-19-2015, 02:17 PM #7024mula

- Join Date
- Dec 2010
- Location
- Ohio
- Age
- 63
- Posts
- 734
silver- '02 Firebird Formula
I agree it was a very helpful video, but I wish the guy doing the video would of turned the radio off in the background.
-
03-20-2015, 03:50 AM #8Member
- Join Date
- Jan 2009
- Location
- MARYLAND
- Age
- 50
- Posts
- 807
BLACK- 1998 PONTIAC TA
Opps, I thought you just wanted to pull the speaker out. LOL Originally Posted by speedyWS6
-
03-21-2015, 09:14 AM #9Member
- Join Date
- Sep 2009
- Location
- U.K.
- Posts
- 532
Pewter- 2002 WS6 TA
I got busy and removed the rear seat side panels today.
Not a huge deal really. The clothes hanger clip thing
that the vid guy says, "just pull this thing out really
vigorously". Well.... don't do what he says!!
If you look there is a little slot at the bottom which you
use a little flat blade screwdriver to ease the inner securing
barbed thing out from the middle and the hook falls out!
Maybe this is why he broke the T-top clip further on in the vid
if he is too gung ho!?
Also, there are a couple of tabs behind the panel which have
velcro attached. These kinda suffer in the removal if you are
not aware they are there but will be easy to rectify with some
double sided tape.
Now i have the panels off i will post later this coming week as
to what i need them off for But nothing to do with the
speakers and there is not a problem of any kind i am trying to put right!
-
03-21-2015, 02:22 PM #10Member
- Join Date
- Jan 2009
- Location
- MARYLAND
- Age
- 50
- Posts
- 807
BLACK- 1998 PONTIAC TA
Nice work. I also thought there was a better way of pulling those clothes hanger tabs off, besides just giving them a strong yank! Lol
-
03-21-2015, 03:28 PM #11Veteran

- Join Date
- Feb 2009
- Location
- Mansfield, PA
- Posts
- 22,146
Black & Blue- '02 WS.6 / '07 Suburban
Is nitrous even legal on you side of the pond in a street car?

-
03-22-2015, 06:55 AM #12024mula
- Join Date
- Dec 2010
- Location
- Ohio
- Age
- 63
- Posts
- 734
silver- '02 Firebird Formula
What are you up to?
I guess we will have to wait to find out.
-
03-22-2015, 07:32 AM #13Veteran
- Join Date
- Feb 2009
- Location
- Mansfield, PA
- Posts
- 22,146
Black & Blue- '02 WS.6 / '07 Suburban
Yep, he's up to something.
-
03-25-2015, 09:23 AM #14Member
- Join Date
- Jan 2009
- Location
- MARYLAND
- Age
- 50
- Posts
- 807
BLACK- 1998 PONTIAC TA
It can't be NOS. That's illegal. None of us do illegal stuff with our street cars. LOL

-
03-25-2015, 12:47 PM #15Member
- Join Date
- Sep 2009
- Location
- U.K.
- Posts
- 532
Pewter- 2002 WS6 TA
update....................
Nope,
It is not Nitrous!
I am lucky enough to have virtually a month off of work right now so i am getting
on with all the jobs i have been saving up.
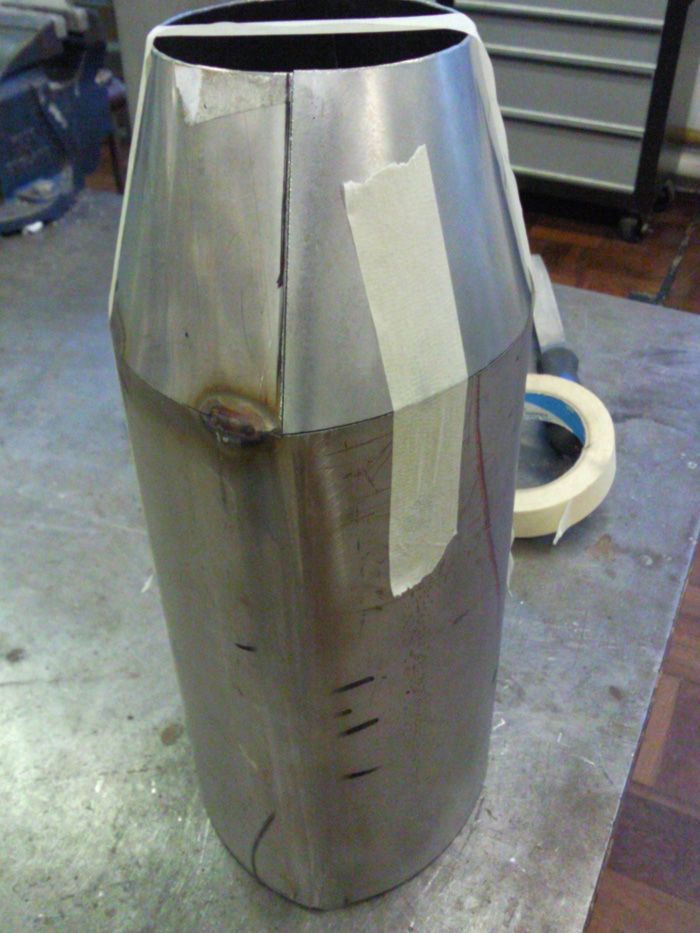
I took the panels out to do this with them.....
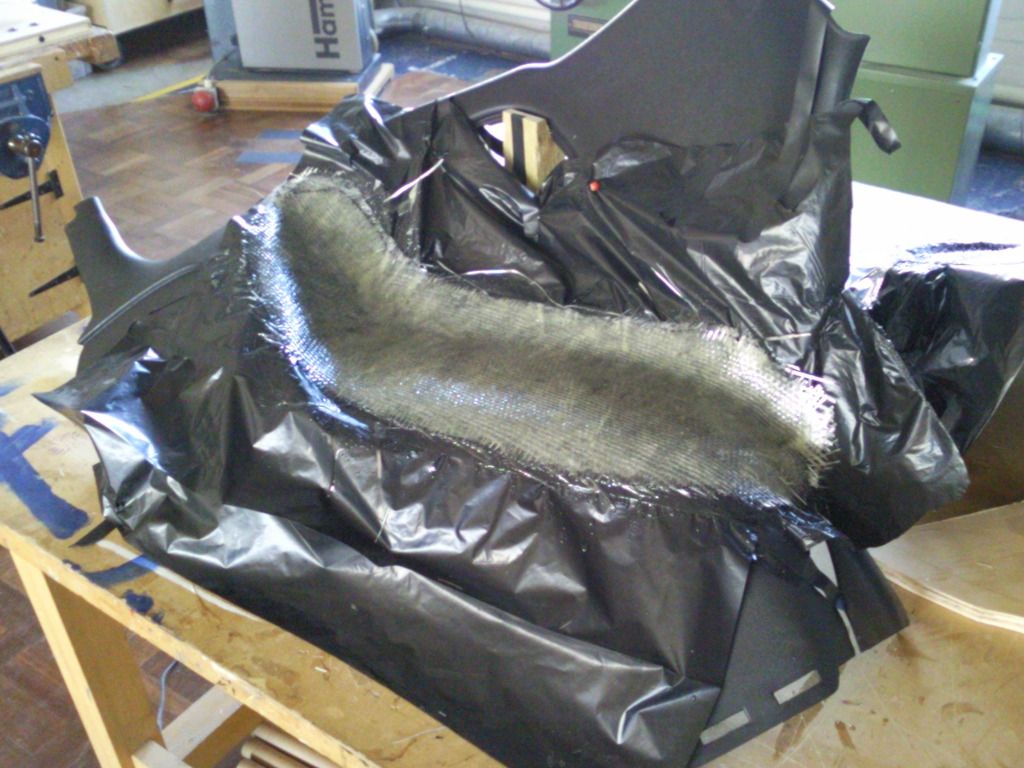
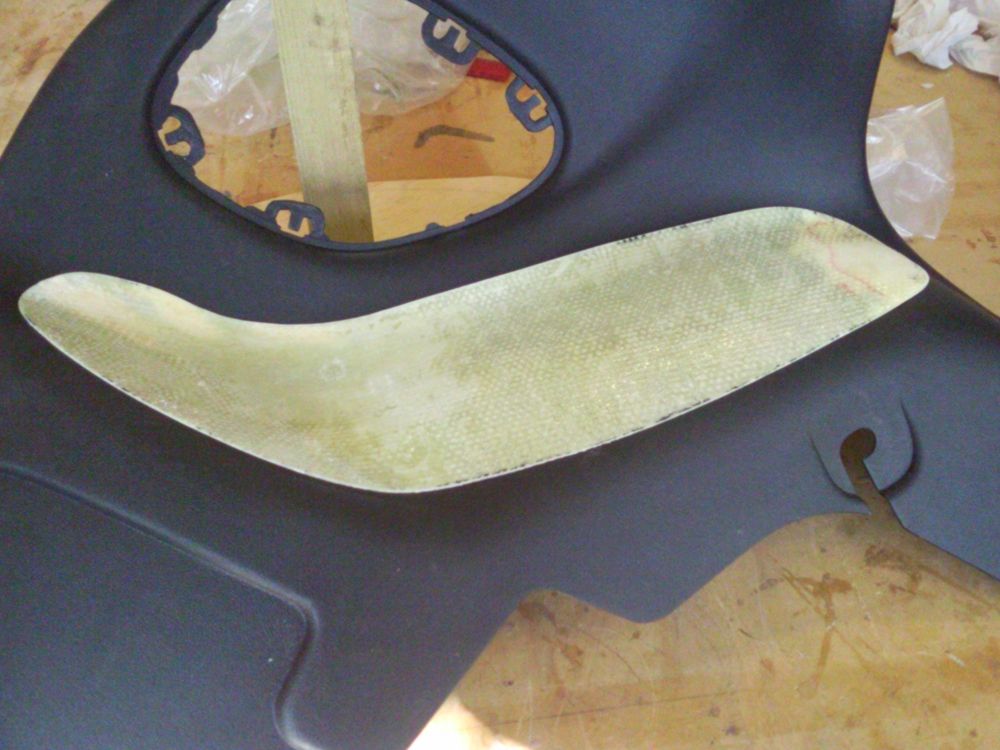
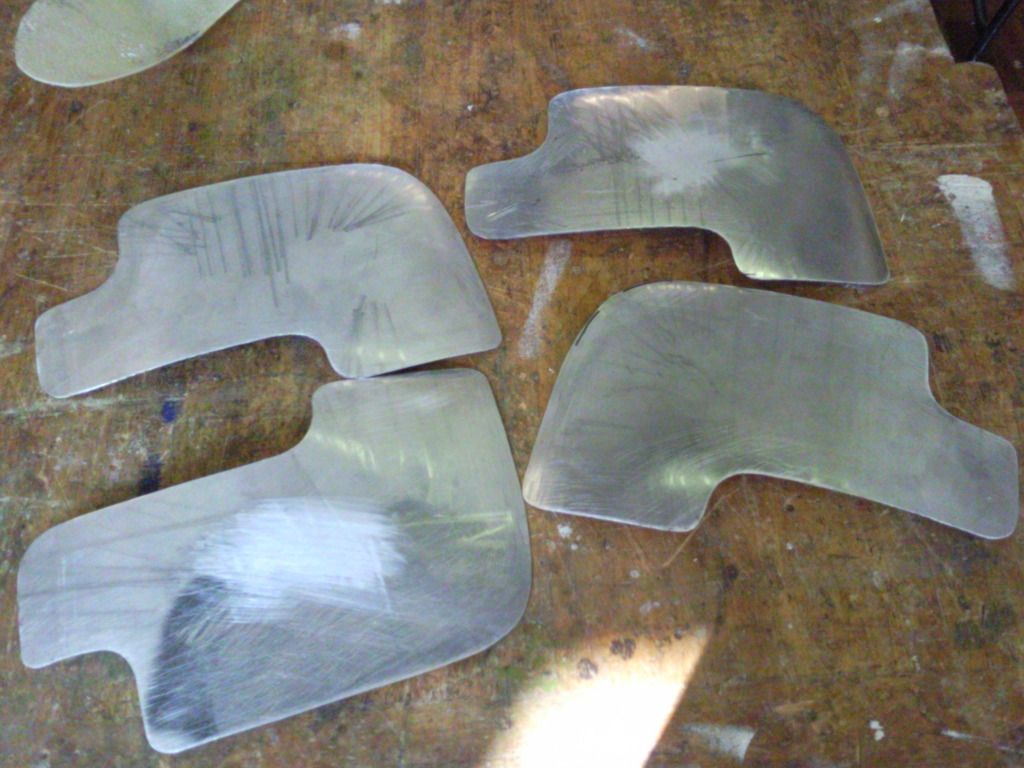
The four aluminum panels are to go in the squarish area down lower and will be trimmed
out also. They are compound curves and so i had to invoke the wheeling machine for them.
I will show you the finished job later this week. Fairly obviously it is to put some
trim in the armrest area. This is to tie the front panels new trim and these together.
I have made quite an interesting color choice... hope you like it when you see it?!
Also on the list is a Badlanz electric cut out, paint the calipers a nice dark orange
color, which is to accent what is going on with the panels. The front door panels
will get the same treatment in the padded area, A new polished stainless fuse panel
cover with some nice detail which should go down well.
A custom molded battery drip tray with special mat is being done with vacuum forming.
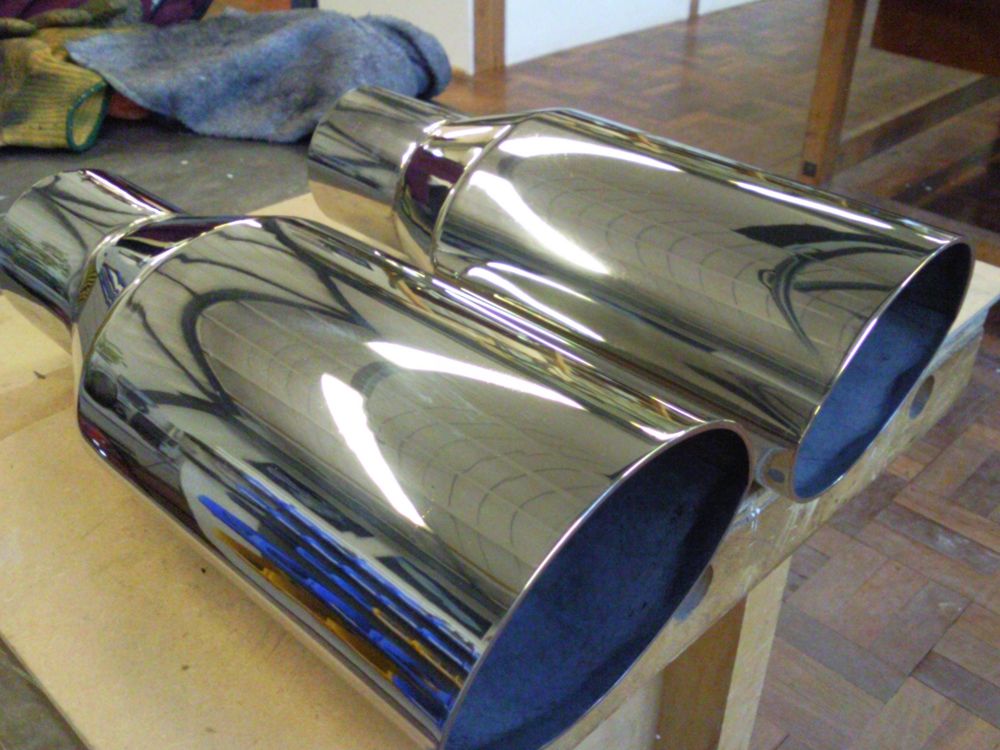
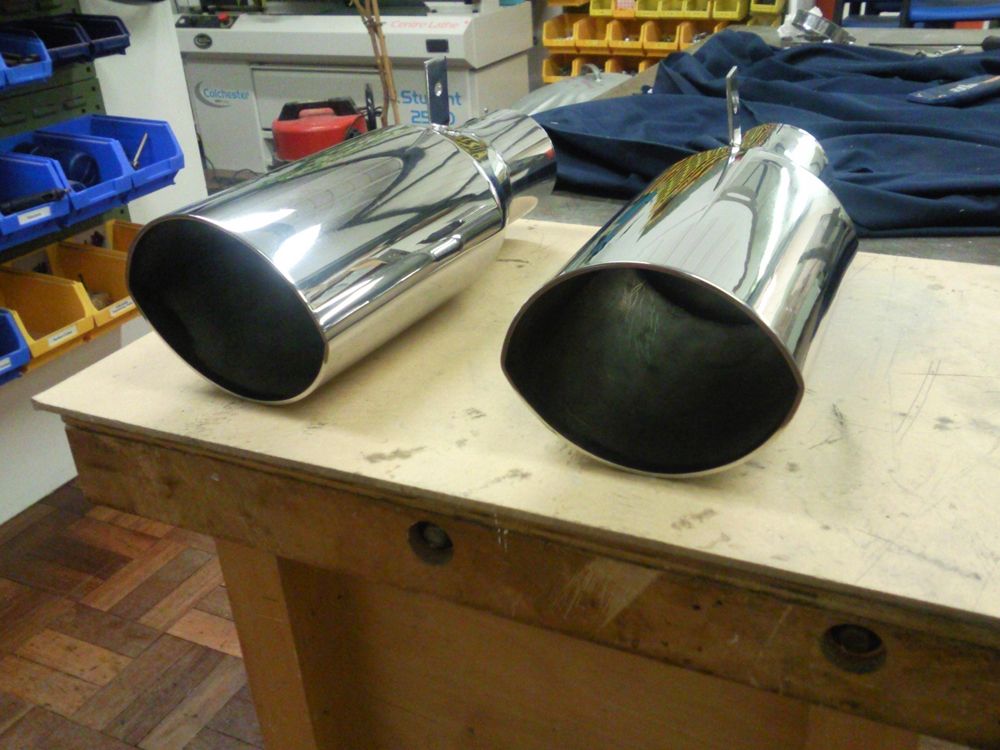
I have just finished some nice stainless polished exhaust tips..... made these between
Xmas and a couple of weeks ago..... Fair bit of work in these but they are certainly un-missable!

Loads more to follow in the next couple of weeks!!
Trev
-
03-26-2015, 03:09 AM #16Veteran
- Join Date
- Feb 2009
- Location
- Mansfield, PA
- Posts
- 22,146
Black & Blue- '02 WS.6 / '07 Suburban
Looking forward to the final results.

-
03-26-2015, 03:11 AM #17Member
- Join Date
- Jan 2009
- Location
- MARYLAND
- Age
- 50
- Posts
- 807
BLACK- 1998 PONTIAC TA
Damn Trev!! You do some really nice custom work. What diameter are those exhaust tips? Love them.
-
03-26-2015, 11:19 AM #18Member
- Join Date
- Sep 2009
- Location
- U.K.
- Posts
- 532
Pewter- 2002 WS6 TA
Finished 'em!
As usual, a job always takes waaaay longer than you plan for!
Trimming is never going to be my real forte. All those damn cuts and
tucks. Like a nimrod i forgot to take a pic of them laid in the car panel... Duh.
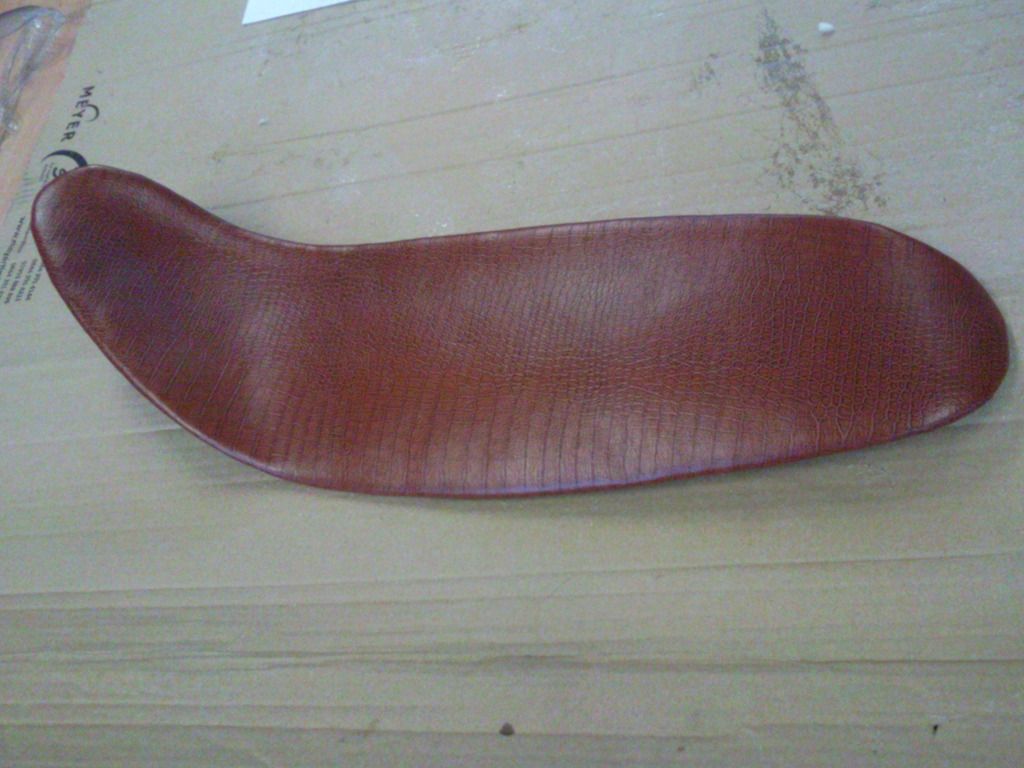
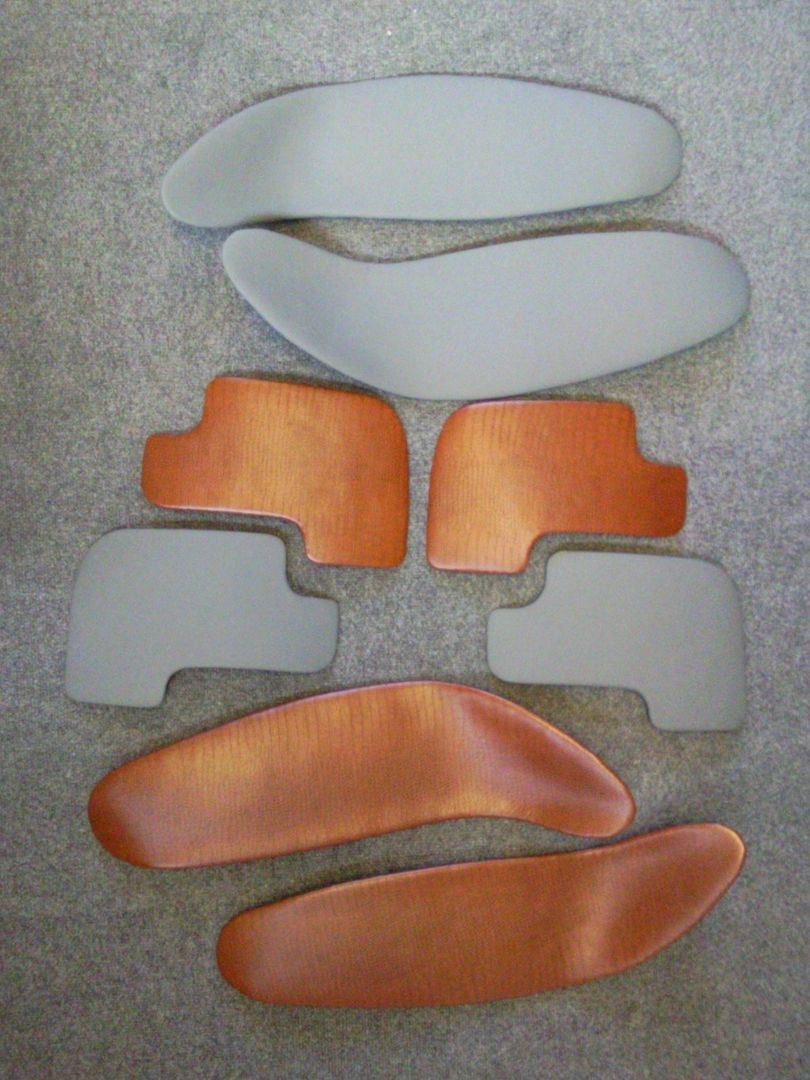

You get the idea though and i will try to do that when i get the panels back in
the car. Really quite pleased with the end result. You can see i have done two
sets.... one in Matt grey leather and one in... wait for it.... Burnt orange Alligator
skin. The orange is mine and the other set is for Stu, the owner of my last Trans
Am. Have become good friends with him and it is a good dose of irony or something
as it is the car i should never have sold! Maybe you read the story there!!?
Not quite sure why i went with the skin but i know it will look ok when i do the door
panel elements also.
The stainless is the beginnings of the re-placement fuse panel cover. It will have an
element of the Alligator incorporated in it. Looking forward to getting that done!
+Ron.... the tips are oval shape and are 6 1/2" x 4 1/2" across the opening then
swaged down to be a tight slip fit over the trimmed down Magnaflow tubes. They
are pretty heavy and so i had to weld a mounting tab on them to hang from the
brackets above.
I will get back onto the jobs early next week. I AM on holiday after all...
Trev
Last edited by speedyWS6; 03-26-2015 at 11:25 AM.
-
03-26-2015, 12:36 PM #19She Moderator

- Join Date
- Jul 2008
- Location
- So Cal
- Age
- 60
- Posts
- 15,660
Arctic White- 2000 Camaro Z28
Can't wait to see how it looks when you're done
-
03-26-2015, 01:05 PM #20Spaz is My Mentor


- Join Date
- Feb 2009
- Location
- Florida Man Status Acheivement
- Posts
- 11,764
Navy Blue Metallic- 98 T/A w/ mods, 00 FBVert
It's been so long I can't remember what my interior look like.....


 Reply With Quote


Thread Information
Users Browsing this Thread
There are currently 1 users browsing this thread. (0 members and 1 guests)
Similar Threads
-
rear seat speaker panel help
By Ramairgod84 in forum General HelpReplies: 7Last Post: 12-16-2009, 01:32 PM -
Back seat panel speaker needed, antenna too.
By BdAsBrd01 in forum Stereo and ElectronicsReplies: 3Last Post: 08-30-2008, 04:12 AM -
rear speaker panel
By txman4362 in forum Stereo and ElectronicsReplies: 1Last Post: 06-05-2008, 08:26 AM -
Rear Panel Removal?
By 99_LS1 in forum General HelpReplies: 1Last Post: 04-29-2007, 05:23 PM -
Anyone ever make a speaker baffle panel in place of the rear cargo panel?
By daveb91 in forum Stereo and ElectronicsReplies: 7Last Post: 04-02-2006, 09:10 PM

Bookmarks