
Results 1 to 20 of 36
Thread: Firehawk Fun!
-
11-08-2010, 03:13 PM #1Junior Member


- Join Date
- Jun 2007
- Location
- New York City, NY
- Posts
- 60
Red- 2002 Firehawk #0689
Firehawk Fun!
For the past few weekends, i have been tending to some issues on my '02 Hawk.
I had the dreaded door panel crack, and I was sick of not seeing too well at night with the stock lighting. I also was tired of my window motors burning out.
First the door panel.
I thoroughly read over the article in High Performance Pontiac on tackling the repair. The article may be found here:
http://www.highperformancepontiac.co...air/index.html
The directions in here are priceless, and the repair went very smoothly... until I used too much heat on a vinyl repair kit, and melted my plastic!
The Panel comes off the door pretty simply, the only issue I had was removing the plug controlling the Rear View Mirrors. It was stubborn, but patience allowed me to get it disconnected.
Once the Panels were off, I went about removing the staples that hold the window felt to the panel. I used a small Screwdriver and Dykes to get the staples out. On the cracked driver's side panel, I scored the rear of the crack with a sanding drum on my Dremel and carefully cleaned up around the crack with a razor so that the damage was minimalized visually and used Superglue to close the crack. I then let the glue cure overnight. Once it was cured, I then used 5-minute Epoxy to reinforce the rear of the crack to keep it from separating and further spreading. I wish I had a picture of how good it looked...
While I let the Driver's side set and cure, I moved on to the passenger side. It was not cracked, but I knew it eventually would, so I went about replacing the now removed staples with 1/2" 4-40 machine screws and corresponding nuts (these were found at Home Depot in the Hardware section, they come in bags of 8 screws and bolts - I used 11 per panel). I tried as much as possible to straighten out the staple and pull it using pliers. These straightened staples would come in handy in the next step.
I test fitted the window felt onto the panel and secured it with a couple of now straightened staples to ensure proper alignment. This is very important so that the screws will in no way interfere with the window - if they touch, they will score the window. Once the felt was aligned, I used a 1/8" high speed drill bit to 1 of the staple holes to accept the machine screw.

As I drilled each hole, I inserted the machine screws to ensure proper alignment. Use pliers to get the screws in and save your fingers!

I then flipped the panel over and put on the nuts.

I then used Blue Locktight on screws to keep the nuts from falling off due to vibration.

I then used a cutting wheel to remove the exposed shafts of the screws, and voila, your panels are ready to go back on the car.
As I said, I screwed up the panel when I tried to use a vinyl repair kit over the crack. In hindsight, it was barely noticeable, and I should have just left it. Let it be said, that when it comes time to "iron" the vinyl pattern onto the repair compound, don't use MAP gas to heat up the iron!!!!!!
If you do use the vinyl repair and have a Black interior, use a very small amount of white to the black (like 1:30 white to black) and you will have an excellent match. The straight black is a bit too much, and was very noticeable.
Anyway, i repaired the damage as much as I could. Its behind my shoulder when driving, and only noticeable when the door is open, so hopefully I won't let it drive me nuts. If anyone has a better idea of how to repair it - short of replacing it for a new panel, I am all ears!
Next up, a passenger express down mod from Auto-Trix. I will post pics and description tomorrow.
-
11-08-2010, 04:26 PM #2now greybat66
- Join Date
- Apr 2007
- Location
- bloomfield nj
- Posts
- 513
Red- 1998 trans am
nice job i tried but i ended up scratching the door panel and gave up.
-
11-08-2010, 04:30 PM #3now greybat66
- Join Date
- Apr 2007
- Location
- bloomfield nj
- Posts
- 513
Red- 1998 trans am
beautiful car by the way.
-
11-08-2010, 04:32 PM #4autoconnectionllc.com

- Join Date
- Nov 2008
- Location
- Montgomery,Ala
- Posts
- 2,435
2007 Corvette- Ebony
Nice work.when using a heat gun on plastic,if you get a area too hot and it get glossy a rubber eraser (like on a pencil) will take the gloss off.
Posted via Mobile Device
-
11-08-2010, 08:10 PM #5Senior Member

- Join Date
- Aug 2009
- Location
- NC
- Posts
- 1,501
midnight blue- 2000 trans am
What kind of headlights did you use? I just had my driver side go out, and my passenger has been replaced in july cause it went out. And I hate not being able to hardly see crap with the replacements!!
-
11-09-2010, 05:58 AM #6autoconnectionllc.com
- Join Date
- Nov 2008
- Location
- Montgomery,Ala
- Posts
- 2,435
2007 Corvette- Ebony
Sylvania has a stock replacement out now that is better than standard halogen,but not as good as silverstars which they do not offer for a firebird.
Posted via Mobile Device
-
11-09-2010, 08:19 AM #7Junior Member
- Join Date
- Jun 2007
- Location
- New York City, NY
- Posts
- 60
Red- 2002 Firehawk #0689
Thanks for the comments guys!
Purplebat66 - Thanks! I love this thing, I have a huge grin everytime I look at it/Drive it.
02transamce - I wish it were that simple. I will posts pics of the damage, but suffice it to say I actually burned and distorted the surface.
Bluehawk - I will post links to all the parts I used in the next write up. I should have it ready in a bit.
-
11-09-2010, 08:47 AM #8Senior Member
- Join Date
- Aug 2009
- Location
- NC
- Posts
- 1,501
midnight blue- 2000 trans am
Alright thanks, Yea I think its just about that mark for shit to start going wrong with mine, its almost at that 100k mark, I need to replace my o2 sensor, I have a turning signal out, my window motor shit on me, my drivers side head light, and I have to buy a replacement fog light housing cause somehow the bulb broke loose and melted the shit out of the housing!!!
-
11-09-2010, 10:47 AM #9Junior Member
- Join Date
- Jun 2007
- Location
- New York City, NY
- Posts
- 60
Red- 2002 Firehawk #0689
Auto Trix Passenger Express Down Install
So on to the Passenger Express down kit from Auto Trix. On first glance, the kit looks like good quality, and uses your stock switches. I looked at the online install instructions here:
http://www.autotrix.net/install/
This kit also addresses the power problem that the factory wiring has. Not enough “clean” power is supplied to the window motors, causing them to burn out fairly early in their lives. I had both motors fail on me in the time I own my car. It is an expensive and PITA repair. This repair is so easy to do, there is no excuse not to do it. It took me about 2 hours to do, and another hour or so to button up the wiring in a very anal way!
Anyway, I followed the install steps from the above link. They are great. I will just add a few of my own steps that I found a bit easier.
Getting the door panels off were easy enough. Getting into the passenger well was a little bit tricky. When pulling off the Kickpanel, the 3rd screw from the front is a bitch to get to because the seat will not move enough to clear the way for a screwdriver. Fortunately, I have a great set of really small drivers.

**When you put the Kickpanel back in, start this screw first, using your hand. It’s a bitch, but be patient.
Pull the kick panel towards the rear of the car, it comes away pretty easily. Now you have to remove the lower passenger console cover. There are 3 attachment points. 2 “pins” that look like this:

In order to remove them, you kind of have to wiggle them as you pull in order for the little “tabs” to release. Took me a while to figure that one out. The third retainer sits here:

Mine was missing, but no matter there is a tab on the firewall that fits in there and keeps it in place.
Here is a picture of the cover out.

Next up was the removal of the PCM. I don’t know how anyone can get it out without removing the retainer and loosening the black cowling under the windshield. Even so, what a PITA!
Anyway, once the PCM was out, I could then see how the TCS Relocation Modification works, and you know I had to do it! So here’s a little sidebar…

End Result (After the PCM was reinstalled)


I obviously used Zip Ties, and made sure not to crimp any of the cables.
Upon my test ride, the TCS and cruise performed flawlessly. If you are doing the window wiring, and have the PCM out anyway, there is no reason not to do this and unclutter the engine bay a bit. I reused the 13mm screws that held the TCM to the car to close up the resulting holes.
That said, back to the Window upgrade…
Once again the Auto Trix Install instructions are great for starting the new wiring through the firewall using the grommet now revealed by the removal of the PCM. You feed the supplied red and black wires into the cabin from the engine bay. I used a regular BIC pen to pierce the grommet, and then used electrical tape to secure the 2 wires to the blunt end of the pen still exposed in the engine bay – make sure the wires are tightly taped so that the wires will stay attached to the pen as you pull it into the cabin.
Here are the power and ground wires entering the cabin through the firewall using the grommet revealed underneath the now removed PCM.

Find the ball point end of the pen that is now through the firewall and able to be grabbed underneath the passenger footwell. Once the wires are accessible in the cabin (make sure you leave a good length in the engine bay) it’s time to move onto the door.

Carefully pull back the protective plastic from the front of the door towards the rear just enough to expose access to the rubber sleeve that allows all the power controls wires to enter the door from the cabin. (The adhesive is very malleable and should seal the plastic up when you are done.) It is here that you are going to run the brown, orange, violet and blue wires from the Kits relay unit. The Red and black wires will stay in the cabin for now. I staggered the attachment points of the wires in order to fish the wires through the sleeve mentioned above.

Auto Trix recommends using a 14mm box wrench to fish the wires through. On my car, I could not get enough access to the box end to get the wires attached. So instead I used a long 1/4” Socket Extension to pull the wires. It is thin enough to get through easy and long enough to have a good grip when pulling the wires through. If you don’t have one, an unbent wire hanger will work just as well.
Here is the extension going through the door into the cabin. Make sure you are careful around the window if it is down!!!

Here is where the extension was able to be accessed, and where the wires will feel through:

Here is where I mounted the relay assembly. This is a protector for the wire clip visible at the top. I don’t know if Auto Trix meant for this, but it is a nice place to secure the assembly. If you forget to do it before everything is wired up, just remove the 2 relays, and slide the assembly through, and replace the relays.
Attach the Red (Power) and Black (Ground) inside the cabin to the corresponding wires on the relay unit, and take up the slack by pulling the wires back into the engine bay.
I ran my Black (Ground) wire to the factory ground from the battery strap on the fender in the engine bay.

There is a factory ground right by where the wires entered the sleeve to go to the door. You could probably use that point, but I chose to follow the Auto Trix instructions, just in case.
You can see it here in the upper right hand side:
Last edited by pajeff02; 11-10-2010 at 01:11 PM. Reason: Link deleted.
-
11-09-2010, 10:47 AM #10Junior Member
- Join Date
- Jun 2007
- Location
- New York City, NY
- Posts
- 60
Red- 2002 Firehawk #0689
For the Red (Power) wire, I removed my battery and ran the wire through the fat factory loom for as long as I could, and routed in front of the radiator, following the factory loom as close as I could. Any exposed wire was then covered with a plastic loom.
In front of the radiator:

A clearer shot:

Anal… I know…
I then used the power bolt by the fuse boxes to attach my fused link, and then attached the Red wire. I will get a thicker loom to cover this up, but I wanted some slack in case I need to adjust later on.

Now, my Passenger window fully rolls down on a single press of the button from both the passenger and driver side. Very sweet, but even better, the speed of ascent and decent of that window is much more rapid. Hopefully that will take care of burning out motors!
In a bit, HID and LMC upgrades to the headlights…
-
11-09-2010, 10:56 AM #11Junior Member
- Join Date
- Jun 2007
- Location
- New York City, NY
- Posts
- 60
Red- 2002 Firehawk #0689
Oh, I forgot, more arts and crafts on my Lid

Firehawk vinyl, build number and Pontiac Emblem. The White SLP has been there for a while.
-
11-10-2010, 08:03 AM #12Chief of his tribe!

- Join Date
- Mar 2008
- Location
- NYC
- Posts
- 1,460
Navy Blue Metallic- 2000 T/A Firehawk M6
oh hello there... i see you are an NYC hawk. very few of us indeed. i deem a meeting to be in order.

pardon the terrible condition of my car.... it had a rough summer....
rock chips from the drive to TN (damn rock carrying big rig). A broken seat belt guide from a pretty girl trying to get out of the car(she's worth at least that much ). door crack... (yeah...) that's about it.... I hope
2000 Firehawk #0036 one of only 10 NBM M6's with the ol lumpy spoilerMagnaflow cat back, adj KYB's, 3 point SFC's, STB, LCA reloc, adj LCA's, SLP lid, Fernco bellows, Strano Springs, Drag Bags, Tick adj Master cylinder, Monster stage3 clutch, speed bleeder, Billet flywheel, MGW shifter, !CAGS
-
11-10-2010, 08:36 AM #13Junior Member
- Join Date
- Jun 2007
- Location
- New York City, NY
- Posts
- 60
Red- 2002 Firehawk #0689
LSCyaL8R,
Good to see a fellow NYC'er. Do you keep your car in City? I hope not on the Street!
I keep my car up in Columbia County, even before it was lowered, it did not like NYC potholes! Now, forgetaboutit!
The door panel crack is really easy to fix, and I am sure you could repair the seatbelt guide as well.
Is that your plate #? Awesome if it is!
Michael G
-
11-10-2010, 09:06 AM #14Chief of his tribe!
- Join Date
- Mar 2008
- Location
- NYC
- Posts
- 1,460
Navy Blue Metallic- 2000 T/A Firehawk M6
actually the username comes from the car i drove when i signed up here. I had a 1997 Lincoln Mark VIII LSC. the "Gentleman's GT" an iron fist in a velvet glove. mine was pushing around 320hp which is only a modest bump over the stock 290. It was a heck of a car to drive though. 3765lbs and 320hp.... do the math
So it would have been a great license plate to have on that car as that'd be the last thing many people would have seen heh heh. Although I can see it working on an F-body as well thanks to our LS engines lol.
Oh side notes... yes i keep it in the city. i rent a garage and only put it away while salt is on the road. I have chewed up my SFC's pretty nice on the bumps and such in the city but they seem to do a good job at protecting all the important bits. If they wear out i'd gladly buy another set to replace them.... UMI bolt in three point's btw. excellent stuff!Last edited by LSCyaL8R; 11-10-2010 at 09:18 AM.
-
11-10-2010, 10:47 AM #15Junior Member
- Join Date
- Jun 2007
- Location
- New York City, NY
- Posts
- 60
Red- 2002 Firehawk #0689
DDM Tuning 35W HID Kit Install on Lowbeams
So on to the final piece of this Trilogy. I was tired of horrible lighting at night, so I wanted to upgrade my lighting system. After much research on LS1.com and LS1tech.com, I decided on a system that looked pretty straightforward.
First step is to replace the stock sealed beams with these following units that I got from LMCtruck.com.
http://www.lmctruck.com/features/cc/CCEL5.htm
Order:
2x 36-0303 Inner Headlight Housing (High Beam) – comes with white H1 bulb and connector
2x 37-0303 Inner Blue H1 bulb (Optional, but I like them)
2x 36-0302 Outer Headlight Housing (Low Beam) – comes with white H1 Bulb and connector
• You do not need any other harness, these parts are “Plug and Play”. The connectors included have a power and a ground wire, which correspond to the factory harness on the car. On the Lw Beam, this connector will be attached to the ballast of the HID System.
Here is the Housing with the supplied connector:

These units are very nice, and in looks alone are huge improvements over the stock sealed beams. If you just want to stop here, I think you get a nice improvement with the H1’s. However, I like the look of the HID’s so I went ahead and installed them in the Low Beams. I will also be installing them in the Fogs as well.
Let’s note here, that HID’s do not like to be switched, so they are best suited for the Low Beams, and not the Highs. So when I install them into the Fogs, I will also have to make sure that the Fogs will not blink when setting the security system.
Here is where I ordered my HID Kit From:
http://www.ddmtuning.com/Products/DD...ast-35W-or-55W
I chose the DDM HID Kit, 35W, 9006, 8000K (Kit / Package) - The exact description is below:
Bulb Type: 9006
Wattage: 35 Watt
Bulb Color: 8000K
You do not need anything else. I ordered one kit for my Low Beams and one kit for my Fog Lights.
The kit you get consists of a pair of ballasts and a pair of wire adaptors.
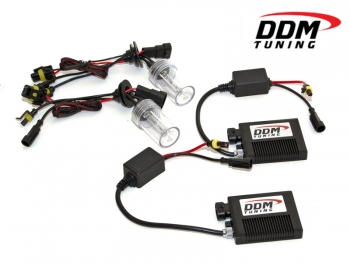
Once again, this is almost plug and play for our cars. DDM has a very good installation guide you can download. Use that in conjunction, I will try and clear up some of the fuzzy issues.
First off, here is what the High Beam looks like installed:

And compared to the stock Sealed Beam:

A close up of the Low Beam unit:

Remove the 3 screws from the plastic cowling around the headlights. Carefully remove the cowling from the headlight fixture and put aside.
To replace the Headlamp Housings, you will need a 15 Torx driver. There are 4 “silver” Torx screws. Do not confuse them with the 2 black “adjustment” screws. It will be readily apparent which is which.
A quick tip: When you are replacing the Headlamp Housings, leave the two lower securing screws loose, but backed out as far as possible. This will give you a good “platform” to rest the new housing on while you fiddle with starting the 2 upper Torx securing screws. See below:

Here is the wiring harness you are going to use:

As you can see you are going to cut off the Blue and black wire combination, and remove it from the grommet.

Once you have all the connectors and ballasts laying out next to each other, you will easily see how everything is going to go together, and how it will attach to the car’s connector. Remember the connector supplied with the Headlight Housings? This will be connected to the DDM Tuning Ballast and wired into the connector on the car, Black wires are the ground wires. Now take the existing 2 connectors on the ballast and connect them to the corresponding connectors for the HID Bulb. Make sure you do not touch the bulb with your hand. If yo do make sure to thoroughly
I have no idea where these 2 supplied O-rings go, I think they are superfluous.

Also note that the grommet on the harness will not seal up the rear of the headlamp unit (as far as I can tell – I could be wrong, let me know if I am!), but will not interfere with mounting.
Once everything is mounted up, test your lights:

Here you can see the Driver’s side Low beam with the HID System, the Driver’s Side High Beam with the Blue H1 Bulb, and on the passenger side, the High Beam has the supplied white H1 Bulb and the Low Beam is the stock Sealed Beam. A run of the gambit!
Once everything is running, you have to mount the ballasts. They are super thin, but you have to take in to consideration that they need to clear the lights' movement. That said on the Driver’s side, I mounted the ballast here:

I made sure to clean it well with adhesive cleaner so that the Double sided tape will bod well and keep the Ballast in place.
Here is the Ballast installed:

As you can see, it sits underneath an overhang, and is safe from being hit by the lights. I left the wires with the small “box” on them loose. I think they will be OK, but I can always secure them if need be.
On the passenger side, I ran into the fact that in the corresponding location, is the horn. I was not comfortable enough that I could get enough contact for a strong bond. There is a bit of frame work where the ballast tucks in nicely. Had I had not already mounted the Driver’s side, I would have also mounted it here on that side as well, but I am leaving well enough alone. I thought I had a picture, but I don’t, but you will see the spot easily when you are in there.
Once that was done, I reassembled the black plastic cowling on the lights and checked the results.

I did lower the aim of the low beams a bit too radically, but even with them too low, the results were fantastic. This weekend, I will be installing the other set of HID’s into the Fogs.
This was a very easy mod to do, and once everything is laid out, it basically falls together. All said and done, it took about ½ hour per side.Last edited by dagersh; 11-16-2010 at 09:15 AM. Reason: Added picture
-
11-10-2010, 09:13 PM #16Senior Member
- Join Date
- Aug 2009
- Location
- NC
- Posts
- 1,501
midnight blue- 2000 trans am
Wow is that your personal garage, cause if so its pretty awsome, it comes with the housing and everything correct, how much did you spend overall for the set up?
-
11-11-2010, 06:50 AM #17Junior Member
- Join Date
- Jun 2007
- Location
- New York City, NY
- Posts
- 60
Red- 2002 Firehawk #0689
Blue Hawk,
Yeah, its the toybox. I restore vintage motorcycles as well as messing around with cars. I have a pretty decent shop set-up in there.
All said and done:
$156 + Shipping to LMC for the lights
$130 + Shipping to Auto Trix for the Passenger Express down
$ 70 + Shipping to DDM Tuning for the HID Kits
Using the parts list I sent you, you have a plug and play set-up, everything you need.
Gersh
-
11-11-2010, 08:27 AM #18Spaz is My Mentor


- Join Date
- Feb 2009
- Location
- Florida Man Status Acheivement
- Posts
- 11,759
Navy Blue Metallic- 98 T/A w/ mods, 00 FBVert
Thanks for posting this. Originally Posted by dagersh

I've been looking into doing this and this post has answer most of my questions.
I may PM you on some other things. Again Thanks. If you were to break this out and make another thread just on this, I'm sure it will make it as a sticky.
-
11-11-2010, 09:10 AM #19Junior Member
- Join Date
- Jun 2007
- Location
- New York City, NY
- Posts
- 60
Red- 2002 Firehawk #0689
I could do that if you guys want. Anything that should be added?
-
11-11-2010, 10:02 AM #20Member

- Join Date
- Jun 2007
- Location
- 39466 USA
- Age
- 62
- Posts
- 904
Bright Red- 99 Firehawk #157 Roadster
I have the LMC lights too, I dont really use my car at night (garage queen) so I didnt upgrade to the HID's yet but still a big imporvment.
Regards,
Todd
#cajunhotrodder on instagram

 Reply With Quote


Thread Information
Users Browsing this Thread
There are currently 1 users browsing this thread. (0 members and 1 guests)
Similar Threads
-
Spoiler, 1993-02 Firehawk "Iroc-Style" (Trans Am only) Iroc style Firehawk spoiler??
By Devylyst in forum Appearance SectionReplies: 18Last Post: 01-25-2014, 03:54 PM -
Wanted: Boot cover, Firehawk slp floor mats, Firehawk slp car cover
By 1fastcamarosss11 in forum Parts Wanted / TradeReplies: 3Last Post: 02-21-2013, 04:37 PM -
WTB: 98-02 WS6 or Firehawk M6
By the_tom in forum Vehicles For Sale / TradeReplies: 12Last Post: 04-16-2010, 12:16 PM -
firehawk a4 vs firehawk m6? suggestions on buying
By jermoe in forum Firebird / WS6Replies: 4Last Post: 04-24-2007, 02:45 PM -
Ebony Firehawk Floormats & Firehawk Car Cover/Bag
By John02Hawk in forum Parts For Sale / TradeReplies: 6Last Post: 05-21-2006, 11:32 AM

Bookmarks