
Results 1 to 5 of 5
Thread: Ext. Paint suggestions
-
07-30-2009, 06:56 PM #1Member


- Join Date
- Apr 2009
- Location
- Nashville
- Posts
- 105
Green- 1994 Trans Am GTA
Ext. Paint suggestions
Been thinking about painting the Phoenix on my hood....any suggestions on some excellent ext. stray paint I could do this with and not have it flake or peel in a few months? also would love to see some pics of others that did this.....any fresh ideas?
-
07-30-2009, 07:57 PM #2Custom Painter/Tech

- Join Date
- May 2009
- Location
- Plainwell, Mi
- Age
- 38
- Posts
- 230
Flame Red / Orange Custom- 1998 Trans Am
All I can tell you is make sure to clean the surface properly with wax and greese remover then scuff it with a burgundy scuff pad so the paint will stick . If you dont reclear your hood you could have problems with it sun fadeing after a little bit and chiping off. You can use spray paint and make it come out really good you just have to go though the proper steps, Originally Posted by MotorDogStar

1) Clean the surface before doing anything with Wax and greese remover.
2) Scuff the whole hood with scuff pad (Burgundy=to 400-600 grit sand paper)
3) Clean again with wax and greese remover wipe in one direction only (it will help pick up dirt and other contaminations and make sure you flip the paper towelafter every wipe)
4) Apply the outline of the bird and mask off the rest of the hood, windsheild, fenders, front bumber cover, side view mirrors, and any thing elice you think might get over spray on it.
5) Then check over the outline you put on and make sure it is all holding down to the surface, no cracks, tears, gaps if everything looks good then you can clean it again (if you want I do cause when I airbrush stuff I dont want any dirt in it) then your ready to spray.
6) Spray on the paint with a good over laping 2-3 coats make sure to give appropriate flash time (check on the can or online) in between coats.
7) After you have the last coat of paint on start to remove the masking from the hood leaveing the rest alone and remove the bird outline (now you can get an idea of what it will look like) make sure there is no dirt on the hood.
8) get the clear ready. Spray the clear in a 50% overlap pattern go from one side to the other do not start in the middle and dont try to make it look super gloss right away, it will only lead to runs with a spray can, apply at least 3 coats alowing proper flash time in between coats. Then let it dry and remove other masking after it is fully dry so as not to kick up any dust onto the clear.
After that it should look pretty good and if you got any dirt nibs in the clear or runs use some 1500 grit wet sand paper to sand it down flater(BUT ONLY AFTER 2-3 DAYS WHEN THE CLEAR HAS HARDNED ALL THE WAY), then use 2000 grit wet sand paper to get the 1500 sanding marks smoother then buff the hood with a buffer set on low with rubbing compound (med compound first on white pad then fine compound seconed on a black pad both pads are 3M) after that you should Wax it and keep it waxed it will make it last a lot longer. Then you should have a nicely painted bird hood.
But remember useing the spray paint is not the best choice it will work and look nice if you take car of it properly but its not as strong and will not hold up as well as the real thing. I painted my friends rims black useing this method and they went through 2 full years through winter too and only had a few minor chips. I used Diplicolor (Paint and Clear) on his rims and it worked good for me, I perfer the real thing tho.
If you have any questions about any thing paint related let me know I can most likely help.Last edited by Customta98; 07-30-2009 at 08:12 PM.
98 Trans Am Custom Paint, Ghost Skuls On Racing Stripe + Custom Front Lip, :MODs Tubular K-member, Tubular Upper and lower A-arms, Tubular Control Arms, 4:10's, Cam L-.567/.575 D@.05-.212/.218,1.85 Roller Rockers, P&P Heads, ARH Headers & HF Cats & Y-Pipe, SLP loudmouth catback, +'s

-
07-31-2009, 04:12 AM #3Electrical Engineer


- Join Date
- Jul 2009
- Location
- North of the Motorcity
- Posts
- 2,612
Custom Swirly Black- 2001 WS6 M6
 What kind of metal were the rims? (if that matters) Originally Posted by Customta98
-
07-31-2009, 08:05 AM #4Member
- Join Date
- Apr 2009
- Location
- Nashville
- Posts
- 105
Green- 1994 Trans Am GTA
kool.....thanx!
"I'll gut you like a fish!"
-
07-31-2009, 10:50 AM #5Custom Painter/Tech
- Join Date
- May 2009
- Location
- Plainwell, Mi
- Age
- 38
- Posts
- 230
Flame Red / Orange Custom- 1998 Trans Am
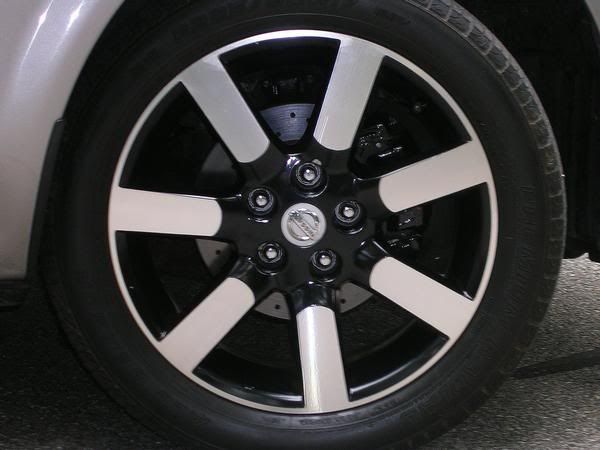
They were aluminum but I don't think it matters if it was steel or any other type. here is a pic >>> Originally Posted by KMdef9

 Reply With Quote
Thread Information
Users Browsing this Thread
There are currently 1 users browsing this thread. (0 members and 1 guests)
Similar Threads
-
paint correction/detail black paint
By 98maro in forum Showcar and DetailingReplies: 27Last Post: 08-24-2013, 03:02 PM -
Paint NowPaint and Body Basics - Paint Now
By Ed Blown Vert in forum Camaro / SSReplies: 0Last Post: 06-29-2010, 01:50 AM -
Body Work & Auto Paint Tips - Get Your Paint On
By Ed Blown Vert in forum Camaro / SSReplies: 0Last Post: 04-09-2009, 10:50 PM -
a paint container flew out of a truck and paint is all over my car
By Speedy_Gonzales in forum Showcar and DetailingReplies: 53Last Post: 12-21-2007, 09:45 PM -
A 1962 Ford Falcon Recieve A Budget Paint Job - The $98 Paint Job
By Ed Blown Vert in forum Almost Anything GoesReplies: 5Last Post: 10-05-2007, 03:17 AM

Bookmarks